Introduction
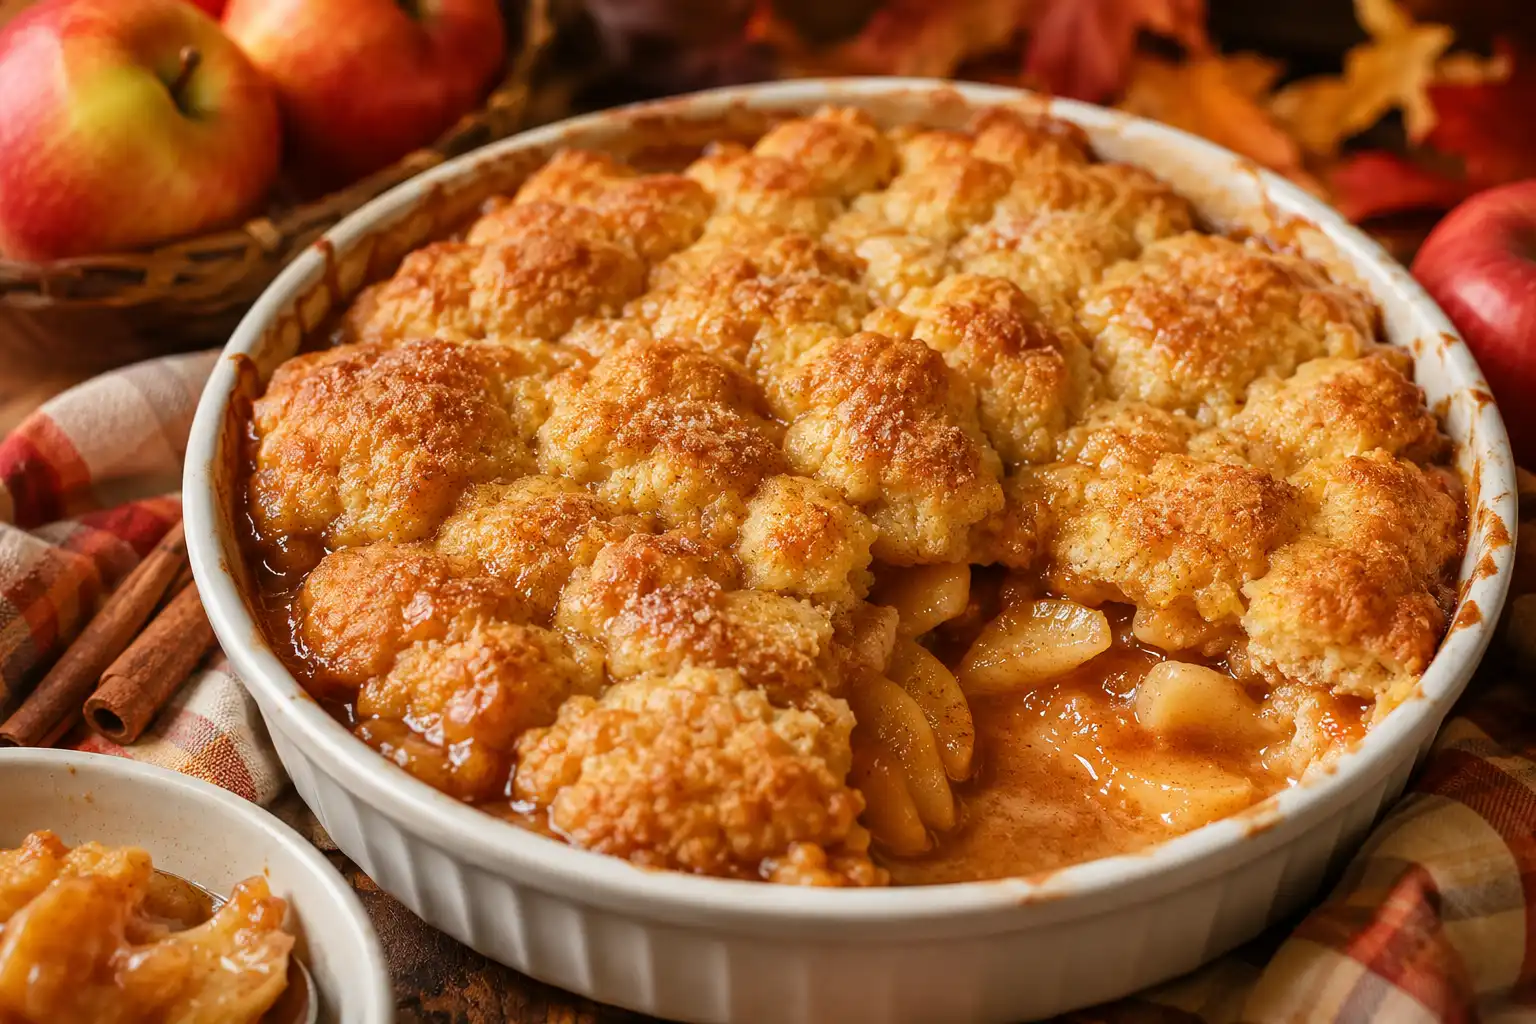
There is perhaps no dessert more evocative of the autumn season than a warm, bubbling apple cobbler. As the air turns crisp and the leaves begin to paint the landscape in shades of amber and gold, the kitchen becomes the heart of the home, filled with the intoxicating aroma of simmering cinnamon, nutmeg, and caramelized fruit. The “Irresistible Buttery Apple Cobbler” is not merely a dessert; it is a culinary embrace, a spoonful of comfort that transports you back to childhood memories of family gatherings and harvest festivals. Unlike a pie, which requires a laborious crimping of edges and a perfectly rolled crust, a cobbler is rustic, forgiving, and deeply satisfying. The “biscuit” topping, baked until golden brown and soaked in the sweet juices of the fruit below, creates a textural contrast that is nothing short of magic. This recipe focuses on achieving that perfect balance: a filling that is tart yet sweet, thickened just enough to coat the spoon, and a topping that is crisp on the outside and tender on the inside, enriched with high-quality butter for an undeniable richness.
The History
To truly appreciate this dish, one must look back at its humble origins. The cobbler is a distinctly American creation, believed to have emerged during the colonial era in the British American colonies. Early settlers, lacking the specialized equipment and ingredients necessary to make traditional British suet puddings or pies, had to improvise. They did not have deep pie tins or the time to roll out pastry dough. Instead, they “cobbled” together a dessert by dropping spoonfuls of biscuit dough directly onto a pot of stewed fruit. The name “cobbler” is thought to derive from the appearance of the baked topping, which, when finished, resembled a cobblestone street due to its uneven, lumpy surface. Over the centuries, the cobbler evolved from a survivalist dessert into a staple of American comfort food. While the British have their “crumbles” and “crisps” (which use oat-based toppings), the American cobbler is defined by its biscuit or cake-like batter. It represents the spirit of resourcefulness and the celebration of the harvest, turning simple orchard apples into a feast fit for royalty.
Ingredients Breakdown
Creating the ultimate cobbler requires understanding the role each component plays in the final texture and flavor profile. This is not a dish where you can simply throw things together; the chemistry matters.
The Apples
The star of the show is, undeniably, the apple. However, not all apples are created equal when it comes to baking. You need a variety that holds its shape under heat. Red Delicious apples will turn to mush, resulting in a sauce rather than a cobbler. The ideal choice is a blend. Granny Smith apples provide the necessary tartness and structural integrity, while Honeycrisp or Braeburn apples add natural sweetness and a complex flavor profile. Using a mix ensures you don’t end up with a one-note sugary filling.
The Butter
The recipe title promises “buttery,” and we intend to deliver. We use unsalted butter for two reasons: control and flavor. Unsalted butter allows you to control the sodium levels in the dough precisely. Furthermore, high-fat European-style butters contain less water and more fat, which translates to a flakier, richer biscuit topping that melts in your mouth.
The Thickener
Apples release a significant amount of liquid when baked. Without a thickener, you would have apple soup. We utilize a combination of cornstarch and flour. Cornstarch provides a glossy, clear finish to the juices, while flour adds a bit of opacity and helps bind the spices to the fruit.
The Spices
Cinnamon is the classic choice, but to elevate this cobbler to “irresistible” status, we add a pinch of ground nutmeg and allspice. These warm spices deepen the flavor profile, adding earthy and peppery notes that complement the sweetness of the apples without overpowering them.
Step-by-Step Recipe
Follow this narrative guide to ensure your cobbler comes out of the oven looking and tasting like a masterpiece.
Step 1: Preparation is Key
Begin by preheating your oven to 375°F (190°C). This ensures the oven is at the exact temperature needed to activate the leavening agents in your biscuit topping immediately upon entry. Grease a 9×13 inch baking dish with a little butter or non-stick spray.
Step 2: The Fruit Base
Peel, core, and slice your apples. Aim for slices that are about 1/4 inch thick. Uniformity is important here so they cook evenly. Place the slices in a large bowl. In a separate small bowl, whisk together your sugars, flour, cornstarch, cinnamon, nutmeg, and salt. Pour this dry mixture over the apples and toss gently but thoroughly until every slice is coated. This coating prevents the apples from oxidizing (turning brown) and ensures the sauce thickens evenly.
Step 3: Creating the Topping
In a medium bowl, whisk together the flour, sugar, baking powder, and salt for the topping. The secret to a tender biscuit is cold butter. Cut your butter into small cubes and add it to the flour mixture. Using a pastry cutter or your fingers, work the butter into the flour until the mixture resembles coarse crumbs with some pea-sized pieces of butter remaining. These pockets of butter will steam during baking, creating lift and flakiness. Stir in the milk just until the dough comes together. Do not overmix, or the topping will be tough.
Step 4: Assembly
Pour the apple mixture into your prepared baking dish, spreading it out evenly. Drop spoonfuls of the biscuit dough over the top of the apples. It does not need to be perfect; the rustic gaps allow the steam to escape and the edges to crisp up.
Step 5: The Bake
Place the dish in the center rack of the oven. Bake for 45 to 55 minutes. You are looking for two signs of doneness: the fruit filling should be bubbling vigorously around the edges, and the biscuit topping should be a deep golden brown. If the top browns too quickly, tent it loosely with aluminum foil.
Step 6: The Cool Down
This is the hardest part. You must let the cobbler rest for at least 20 minutes before serving. This allows the fruit juices to thicken and set. If you dig in too early, the filling will be runny.
Tips
- Keep it Cold: Ensure your butter and milk are very cold before making the topping. Warm butter melts into the flour before baking, resulting in a dense, greasy topping rather than a fluffy one.
- Prevent Sogginess: To ensure the bottom of the biscuit doesn’t get soggy, you can par-bake the apple filling for 15 minutes before adding the dough, though this recipe is designed to work in one go if your oven is fully preheated.
- The Sugar Balance: Taste your apple slices before adding the sugar. If you are using very sweet Fuji apples, reduce the granulated sugar in the filling by 1/4 cup.
- Serving Suggestion: This cobbler is best served warm. A scoop of vanilla bean ice cream creates a hot-and-cold contrast that is legendary, but a dollop of freshly whipped cream with a hint of bourbon is equally divine.
Variations and Customizations
While the classic buttery apple cobbler is a timeless favorite, the recipe is versatile enough to accommodate various dietary needs and flavor preferences.
Gluten-Free Option: Substitute the all-purpose flour in both the filling and the topping with a high-quality 1-to-1 gluten-free baking blend. Ensure your oats (if adding) are certified gluten-free.
Vegan Adaptation: Replace the dairy butter with high-quality vegan butter sticks (not margarine from a tub) and use almond or oat milk instead of cow’s milk. The texture remains surprisingly similar.
Spiced Chai Cobbler: Infuse the milk for the topping with a chai tea bag before mixing the dough for a sophisticated, aromatic twist.
Mixed Berry Apple: Add a cup of fresh cranberries or blackberries to the apple mixture for a tart, colorful variation that adds a burst of antioxidants.
Health Considerations and Nutritional Value
It is important to acknowledge that this is a dessert meant for indulgence. A standard serving contains a significant amount of carbohydrates and sugars due to the fruit and the sweetened dough. However, apples are a nutritious fruit, high in dietary fiber and Vitamin C. The fiber in the apples helps slow the absorption of sugar into the bloodstream. To make this slightly healthier, you can reduce the sugar in the topping by 25% without sacrificing texture, or use a natural sweetener like coconut sugar which has a lower glycemic index. Portion control is key; a smaller serving accompanied by a protein-rich side, like Greek yogurt instead of ice cream, can balance the meal.
Ingredients
- For the Filling:
- 8 cups apples (peeled, cored, and sliced thinly)
- 3/4 cup granulated sugar
- 1/4 cup light brown sugar, packed
- 1/4 cup all-purpose flour
- 1 tablespoon cornstarch
- 1 teaspoon ground cinnamon
- 1/4 teaspoon ground nutmeg
- 1/4 teaspoon salt
- 1 tablespoon lemon juice
- 2 tablespoons unsalted butter, cut into small pieces (to dot the top of the filling)
- For the Buttery Topping:
- 1 1/2 cups all-purpose flour
- 1/2 cup granulated sugar
- 1 1/2 teaspoons baking powder
- 1/4 teaspoon salt
- 1/2 cup (1 stick) unsalted butter, very cold and cubed
- 1/2 cup whole milk (cold)
- 1 teaspoon vanilla extract
Directions
- Preheat your oven to 375°F (190°C). Lightly grease a 9×13 inch baking dish with butter or cooking spray.
- In a large bowl, combine the sliced apples, granulated sugar, brown sugar, flour, cornstarch, cinnamon, nutmeg, salt, and lemon juice. Toss until the apples are evenly coated.
- Pour the apple mixture into the prepared baking dish. Dot the top of the apples with the 2 tablespoons of cubed butter.
- In a separate medium bowl, whisk together the flour, sugar, baking powder, and salt for the topping.
- Cut the cold, cubed butter into the flour mixture using a pastry blender or your fingers until the mixture resembles coarse crumbs.
- Stir in the cold milk and vanilla extract just until the dough comes together. Do not overmix.
- Drop large spoonfuls of the dough over the apple filling, covering most of the surface but leaving some gaps for the fruit to bubble through.
- Bake for 45 to 55 minutes, or until the topping is golden brown and the fruit filling is bubbling thickly around the edges.
- Remove from the oven and let cool on a wire rack for at least 20 minutes before serving to allow the juices to set.
FAQ
Can I make this cobbler ahead of time?
Yes, you can assemble the cobbler up to 24 hours in advance and keep it covered in the refrigerator. You may need to add 5-10 minutes to the baking time since it will be going into the oven cold.
Can I use frozen apples?
Yes, but do not thaw them completely before using, or they will become mushy. Bake for an additional 10-15 minutes if using frozen fruit.
Why is my topping doughy?
This usually happens if the oven wasn’t hot enough or if the dough was overmixed. Ensure your baking powder is fresh and your oven is fully preheated.
How do I store leftovers?
Store leftovers in an airtight container in the refrigerator for up to 4 days. Reheat individual portions in the microwave or the oven to restore crispness.
Summary
This Irresistible Buttery Apple Cobbler combines tart Granny Smith apples with a rich, biscuit-like topping for the ultimate fall comfort dessert. Simple to prepare and bursting with warm spices, it is best served warm with a scoop of vanilla ice cream.