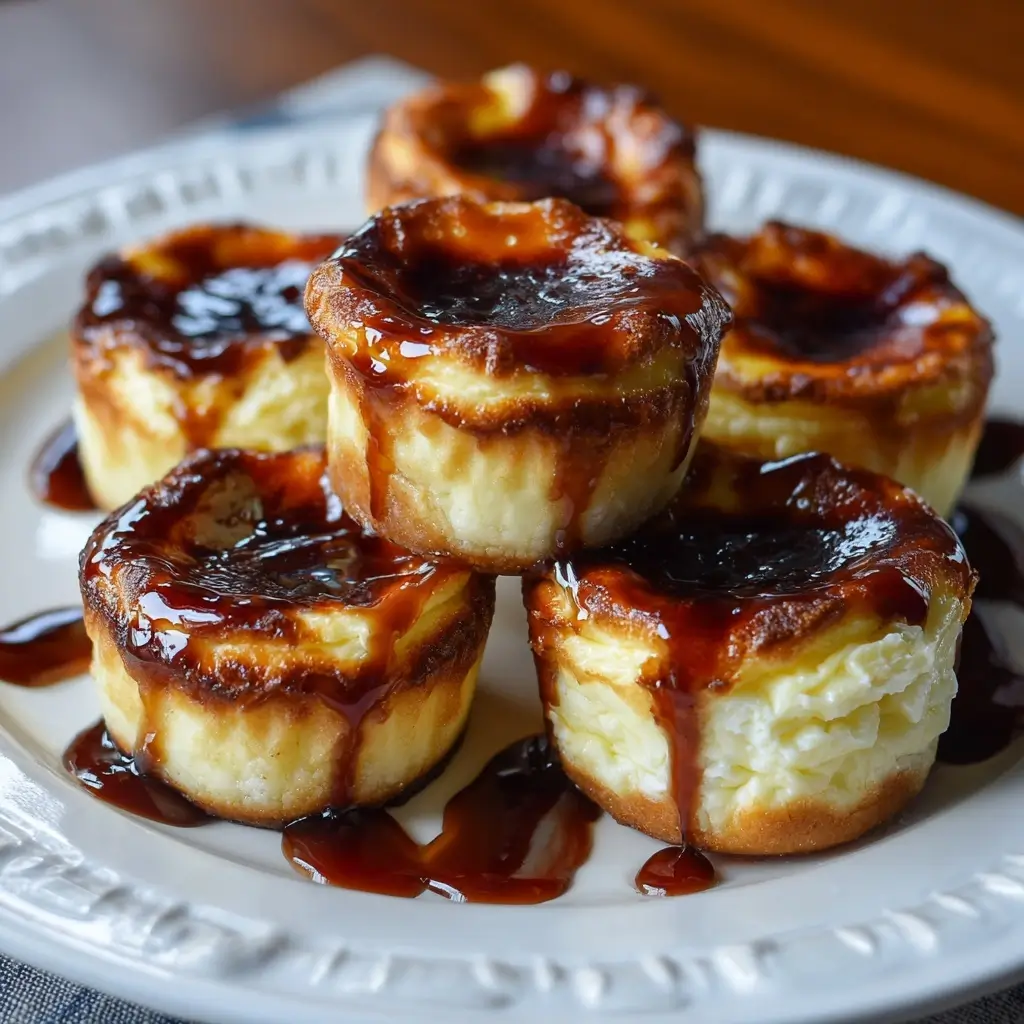
Mini Basque Burnt Cheesecakes: A Decadent Delight with a Smoky Crust
The Mini Basque Burnt Cheesecake has taken the culinary world by storm, captivating dessert lovers with its audacious imperfection and rich, velvety texture. Unlike traditional cheesecakes that aim for a pristine, creamy finish, this Spanish-inspired treat proudly wears a dark, caramelized crust—burnt to perfection—as a badge of honor. Originating from the Basque Country in northern Spain, particularly from the renowned La Viña restaurant in San Sebastián, the burnt cheesecake defies conventional baking norms. Its rise to global fame began in the late 20th century but surged during the pandemic-driven home baking boom, where its simple ingredients and forgiving technique made it accessible to even novice bakers.
The History Behind the Burnt Beauty
The story of the Basque burnt cheesecake begins in the 1990s at La Viña, a seaside bar and grill in San Sebastián, Spain. Chef Santiago Rivera sought to create a unique dessert using minimal ingredients and bold flavors. What emerged was an accidental masterpiece: a custard-like cheesecake baked at high heat until the exterior charred dramatically, while the center remained lusciously soft. Initially seen as a mistake, this “overbaked” look soon became its defining feature. The contrast between the smoky, almost bitter top and the sweet, creamy interior created a complex flavor profile that intrigued food critics and home cooks alike.
Over time, the dessert gained cult status across Europe and eventually spread worldwide through social media, food blogs, and viral videos showcasing its dramatic appearance and melt-in-the-mouth texture. The miniaturized version—individual-sized burnt cheesecakes—emerged as a popular adaptation, offering portion control, elegant presentation, and faster baking times. These bite-sized wonders are now staples at dinner parties, brunch spreads, and gourmet dessert menus, beloved not only for their taste but also for the theatrical experience of serving them.
Ingredients Breakdown: Simple Yet Luxurious
One of the most appealing aspects of Mini Basque Burnt Cheesecakes is the simplicity of the ingredient list. Despite their sophisticated taste, they require only a handful of pantry staples and premium dairy products. Each component plays a crucial role in achieving the signature texture and flavor:
- Cream Cheese (Full-Fat): The foundation of any great cheesecake, full-fat cream cheese ensures a rich, dense, and creamy texture. It should be at room temperature to blend smoothly without lumps.
- Heavy Cream or Double Cream: Adds moisture and silkiness. It also contributes to the custardy center and helps develop the slight runniness that defines authentic Basque cheesecake.
- Granulated Sugar: Provides sweetness and aids in browning. While some recipes use less sugar to let the cheese shine, a moderate amount enhances flavor balance and promotes caramelization.
- Eggs (Large, Room Temperature): Act as a binder and contribute to the structure. They help create the characteristic jiggle and custard-like consistency when baked properly.
- All-Purpose Flour or Cake Flour (Optional): Used in small quantities to provide slight stability without compromising the soft texture. Some purists omit flour entirely for an ultra-smooth result.
- Vanilla Extract: Enhances aroma and adds warmth. Pure vanilla extract is recommended over imitation for superior depth of flavor.
- Lemon Zest or Juice (Optional): A small amount brightens the richness and cuts through the heaviness, balancing the overall profile.
- Salt (Pinch): Elevates all other flavors and prevents the dessert from tasting flat.
No water bath, no springform pan, no fear of cracks—this recipe embraces chaos and turns it into art.
Step-by-Step Recipe: Crafting Your Mini Masterpieces
Making Mini Basque Burnt Cheesecakes is surprisingly straightforward, requiring basic kitchen tools and about an hour from start to finish. Here’s how to achieve professional results at home:
Ingredients (Makes 12 Mini Cheesecakes)
- 24 oz (680g) full-fat cream cheese, room temperature
- ¾ cup (150g) granulated sugar
- 3 large eggs, room temperature
- 1 ½ cups (360ml) heavy cream
- 1 tsp pure vanilla extract
- 1 tbsp all-purpose flour (optional)
- Pinch of salt
- Zest of ½ lemon (optional)
- Butter or non-stick spray (for greasing molds)
- Parchment paper liners or cupcake liners (optional, for easy removal)
Equipment Needed
- 12-cup standard muffin tin
- Electric hand mixer or stand mixer
- Mixing bowls (medium and large)
- Whisk
- Spatula
- Fine mesh sieve (for straining batter, optional)
Directions
- Preheat Oven & Prepare Pan: Preheat your oven to 400°F (200°C). Generously grease each cavity of the muffin tin with softened butter or non-stick spray. For easier removal, line each cup with parchment paper liners or foil cupcake liners.
- Cream Cheese Softening Check: Ensure cream cheese is fully softened—no cold spots. This prevents lumps and ensures smooth blending.
- Mix Cream Cheese and Sugar: In a large bowl, beat the cream cheese with an electric mixer on medium speed until smooth and fluffy (about 2 minutes). Gradually add sugar and continue beating until well incorporated and slightly lightened in color.
- Add Eggs One at a Time: Add one egg at a time, mixing just until blended after each addition. Overmixing can incorporate too much air, leading to cracking or uneven texture.
- Incorporate Cream and Flavorings: Slowly pour in the heavy cream while mixing on low. Then mix in vanilla extract, lemon zest (if using), salt, and flour (if using). Mix only until combined—do not overbeat.
- Strain the Batter (Optional but Recommended): To ensure ultimate smoothness and eliminate any unincorporated bits, strain the batter through a fine-mesh sieve into another bowl. This step elevates texture significantly.
- Fill Muffin Cups: Carefully divide the batter evenly among the 12 prepared cavities. Fill each about ¾ full to allow for slight rise without spilling.
- Bake Until Deeply Golden: Place the muffin tin in the center of the preheated oven. Bake for 22–28 minutes, or until the tops are deeply browned—almost burnt-looking—with a pronounced dark mahogany or espresso hue. The centers should still have a noticeable jiggle, like softly set gelatin.
- Cool Gradually: Remove from oven and let cool in the pan for 10 minutes. Then transfer individual cheesecakes to a wire rack to cool completely at room temperature. As they cool, they will continue to set.
- Chill Before Serving: Once cooled, cover and refrigerate for at least 3 hours, preferably overnight. Chilling enhances flavor complexity, firms up the texture, and allows the burnt notes to mellow into a nuanced smokiness.
Tips for Perfect Mini Basque Burnt Cheesecakes
- Room Temperature Ingredients Are Non-Negotiable: Cold cream cheese or eggs lead to lumpy batter. Take them out 1–2 hours before baking.
- Don’t Fear the Burn: Embrace the dark top! It’s not overcooked—it’s essential to the identity of the dessert. If the top is golden but not dark, it’s underbaked.
- Avoid Overmixing: Once you add the eggs and cream, mix gently. Overbeating introduces excess air, which can cause puffing and cracking.
- Use a Convection Oven with Caution: If using convection, reduce temperature by 25°F (15°C) and monitor closely, as airflow increases browning.
- Rotate the Pan Midway: Ovens often have hot spots. Rotate the muffin tin halfway through baking for even coloring.
- Test Doneness Visually: There’s no toothpick test here—the center should wobble like a waterbed. Trust the look: deep brown = success.
- Line for Easy Removal: Parchment or foil liners make unmolding effortless. Greasing alone may still cause sticking due to caramelized sugars.
- Let Them Rest: Cooling and chilling aren’t optional. The texture transforms dramatically during this time—from loose to luxuriously thick.
Variations and Customizations: Make It Your Own
While classic Mini Basque Burnt Cheesecakes are divine on their own, there are countless ways to personalize them for different occasions, palates, or dietary preferences:
- Flavor Infusions: Add 1 tsp of almond extract, orange zest, or matcha powder to the batter for a twist. Espresso powder (½ tsp) creates a mocha version that pairs beautifully with the burnt crust.
- Fruit Swirls: Gently swirl in raspberry coulis, blueberry compote, or salted caramel sauce before baking for a marbled effect.
- Crust Options: Though traditionally crustless, you can press a thin layer of graham cracker or cookie crumbs into the bottom of each liner for added crunch.
- Mini Chocolate Basque: Replace 2 tbsp of flour with unsweetened cocoa powder and add ¼ cup melted dark chocolate to the batter.
- Savory-Honey Drizzle: Top with flaky sea salt and a generous drizzle of warm honey or maple syrup before serving.
- Boozy Upgrade: Add 1–2 tbsp of bourbon, Grand Marnier, or Amaretto to the batter for an adult-friendly version.
- Seasonal Themes: Add pumpkin puree and spices in fall, peppermint extract in winter, or lavender in spring.
- Dairy-Free Version: Use plant-based cream cheese (like Kite Hill) and coconut cream. Results vary, but many find success with careful experimentation.
- Gluten-Free Option: Omit flour or substitute with cornstarch or gluten-free all-purpose flour blend.
- Mini Vegan Basque: Combine soaked cashews, coconut milk, agar-agar, and sugar, then bake similarly. Not traditional, but satisfying for plant-based diets.
Health Considerations and Nutritional Value
Mini Basque Burnt Cheesecakes are undeniably indulgent. While delicious, they are high in fat, sugar, and calories, so moderation is key—especially for those managing conditions like diabetes, heart disease, or weight concerns.
Nutritional Breakdown (Per Mini Cheesecake, Approximate)
- Calories: ~220–250
- Total Fat: 18–20g (mostly saturated from cream and cream cheese)
- Carbohydrates: 12–15g (primarily from sugar)
- Sugars: 10–12g
- Protein: 4–5g
- Cholesterol: ~60mg
- Sodium: ~150mg
They contain calcium and some B vitamins from dairy, but lack fiber, vitamins, and significant micronutrients. For a healthier approach:
- Reduce Sugar: Try cutting sugar by 25% (use ⅔ cup instead of ¾ cup). The burnt top provides natural bitterness that balances sweetness.
- Portion Control: Their mini size naturally limits intake—one or two satisfy most cravings.
- Top Smart: Serve with fresh berries instead of whipped cream or caramel to add antioxidants and fiber.
- Infuse with Protein: Pair with Greek yogurt or a protein-rich beverage to balance the meal.
- Occasional Treat: Best enjoyed as an occasional dessert rather than a daily habit.
Frequently Asked Questions (FAQ)
Q: Why is my Basque cheesecake not burnt enough?
A: If the top is only golden, it’s underbaked. The dark crust is intentional and develops flavor. Bake longer until deeply browned, even if it looks “too dark.”
Q: Can I make these ahead of time?
A: Absolutely! They keep well in the fridge for up to 5 days. In fact, flavor improves after 24 hours of chilling.
Q: Can I freeze Mini Basque Cheesecakes?
A: Yes! Wrap individually in plastic and store in an airtight container. Freeze for up to 2 months. Thaw in the refrigerator overnight before serving.
Q: Why did my cheesecakes crack or sink?
A: Minor sinking is normal due to the high heat and lack of structural support. Excessive cracking usually comes from overmixing or rapid cooling. Avoid opening the oven door during baking.
Q: Can I double the recipe?
A: Yes, just ensure your oven has space for multiple tins. Rotate pans midway for even baking.
Q: Do I need to use a water bath?
A: No! That’s the beauty of this recipe. The high-heat, dry-bake method is what creates the signature burnt top and creamy center.
Q: How do I know they’re done?
A: Look for a deeply caramelized, almost blackened surface and a pronounced wobble in the center. The internal temperature should be around 175–185°F (80–85°C).
Q: Can I use low-fat cream cheese or milk?
A: Not recommended. Low-fat versions result in a thinner, less creamy texture and may not set properly. Full-fat dairy is essential.
Summary
Mini Basque Burnt Cheesecakes combine rustic charm with luxurious flavor, featuring a dramatically charred exterior and a silky, custard-like center—all in adorable individual portions. With simple ingredients, minimal prep, and no need for precision, they’re perfect for both beginners and seasoned bakers.