Introduction
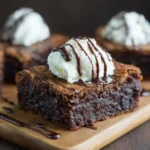
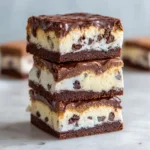
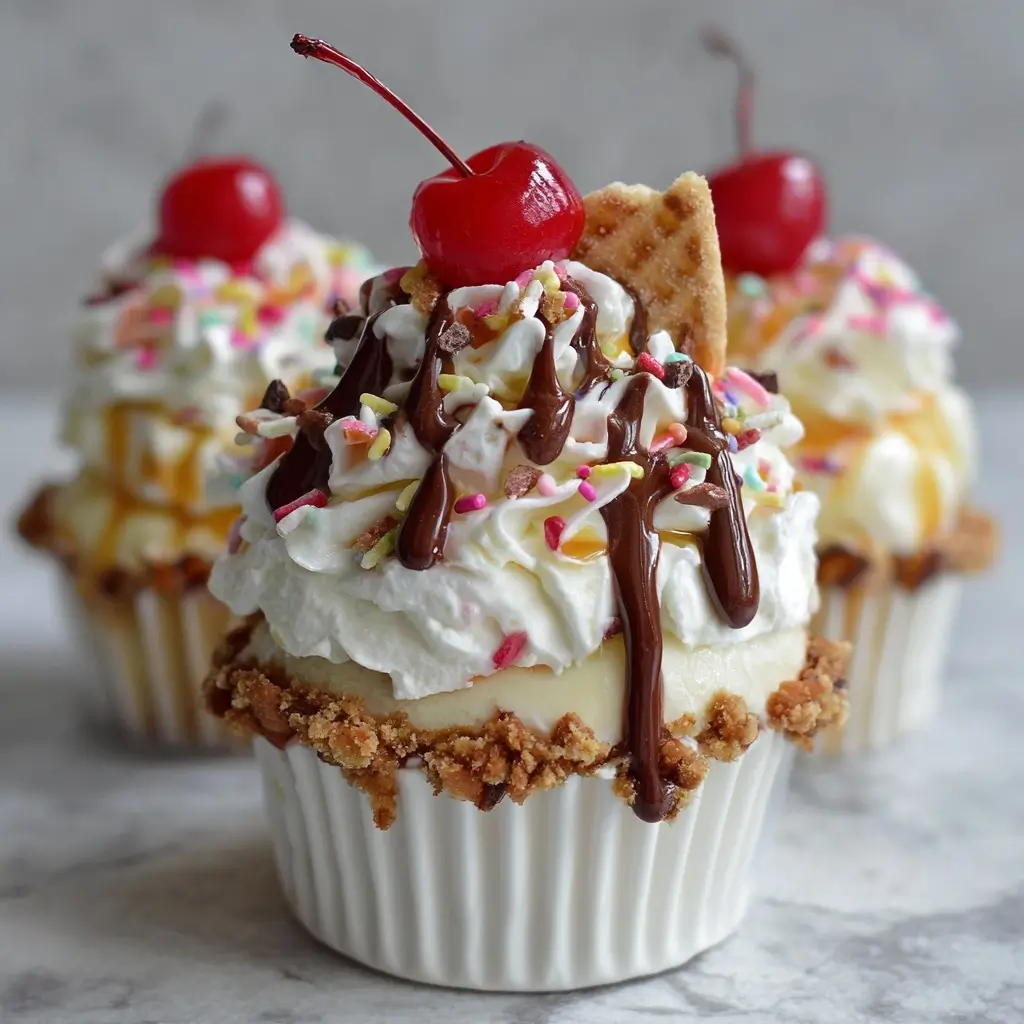
Ice Cream Sundae Cupcakes are the ultimate fusion dessert—melding the nostalgic joy of a classic ice cream sundae with the portable, portion-perfect charm of a cupcake. Imagine a moist, rich chocolate (or vanilla, or funfetti!) cupcake base crowned not with traditional frosting, but with a luscious, scoopable “ice cream” filling—crafted from stabilized whipped cream, cream cheese, or even a no-churn ice cream base—then lavishly adorned with all the beloved sundae toppings: glossy hot fudge, tangy caramel, rainbow sprinkles, maraschino cherries, crushed nuts, whipped cream rosettes, and even edible glitter or candy pearls. These aren’t just cupcakes—they’re edible celebrations in miniature form, perfect for birthdays, summer parties, bake sales, holiday gatherings, or any occasion where whimsy and indulgence are non-negotiable. Designed to delight both children and adults alike, Ice Cream Sundae Cupcakes offer visual drama, textural contrast (soft cake, creamy “ice cream,” crunchy toppings), and layered flavor complexity—all while maintaining structural integrity so they hold up beautifully on the plate or platter.
The History
The evolution of the Ice Cream Sundae Cupcake is a delicious testament to culinary cross-pollination and modern dessert innovation. While the ice cream sundae traces its roots to late 19th-century America—legend credits Ithaca, New York (1892) and Two Rivers, Wisconsin (1881) as rival birthplaces—the cupcake’s origins date back even further, appearing in American cookbooks as early as the 1796 edition of American Cookery by Amelia Simmons, where “a cake to be baked in small cups” was first documented. However, the deliberate marriage of these two icons didn’t occur until the early 2000s, gaining momentum alongside the cupcake renaissance ignited by bakeries like Magnolia Bakery (New York, 1996) and the Food Network’s Cupcake Wars (2010). Pioneering pastry chefs and home bakers began experimenting with frozen fillings, inspired by trends like “ice cream cakes” and “frosting-free” cupcakes that prioritized texture play. Social media platforms—especially Pinterest and Instagram—catapulted the concept into viral fame between 2013–2016, with hashtags like #SundaeCupcake and #IceCreamCupcake amassing millions of posts. Notably, Disney Parks introduced limited-edition versions in their Epcot and Hollywood Studios bakeries around 2015, featuring Mickey-shaped sprinkles and signature “Magic Shell” drizzles—further cementing the dessert’s cultural resonance. Today, it stands as a hallmark of contemporary American baking: playful, photogenic, customizable, and deeply rooted in tradition—even as it boldly reinvents it.
Ingredients Breakdown
Every exceptional Ice Cream Sundae Cupcake relies on thoughtfully balanced components—each playing a distinct role in structure, flavor, temperature contrast, and visual appeal:
- Cupcake Base: Typically a rich, tender chocolate or golden vanilla cake—often made with buttermilk for moisture and tenderness, or enhanced with espresso powder (for depth in chocolate versions) or almond extract (for nuanced vanilla). Gluten-free, vegan, or keto-friendly adaptations use carefully selected flours (almond, oat, coconut), egg replacers (flax, aquafaba), and low-carb sweeteners (erythritol, monk fruit).
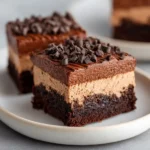
- “Ice Cream” Filling: This is the heart of the sundae illusion—and the most technically nuanced element. It must be stable enough to pipe and hold shape at room temperature for 1–2 hours, yet retain a cool, creamy mouthfeel. Common approaches include:
- Stabilized Whipped Cream Base: Heavy cream whipped with powdered sugar and a stabilizer (gelatin bloom, instant clearjel, or cornstarch slurry) + full-fat cream cheese or mascarpone for body and tang.
- No-Churn Ice Cream Core: A churned or hand-mixed blend of sweetened condensed milk, cold heavy cream, and flavorings—frozen solid for 4+ hours, then softened just enough to scoop and pipe.
- Buttercream-Ice Cream Hybrid: Swiss or Italian meringue buttercream infused with freeze-dried fruit powders or melted-and-cooled chocolate, chilled until firm but spreadable.
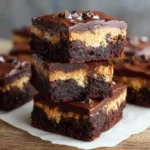
- Sundae Toppings: Layered intentionally for maximum impact:
- Sauces: Warm or room-temp—hot fudge (dark, milk, or white chocolate-based), salted caramel (with fleur de sel), strawberry coulis, blueberry compote, or dairy-free “magic shell” (coconut oil + cocoa powder).
- Crunch Elements: Toasted pecans, walnuts, or almonds; crushed pretzels (for sweet-salty balance); crumbled waffle cones or chocolate sandwich cookies; freeze-dried raspberries or mango for tart pop.
- Fresh & Fun Accents: Maraschino cherries (classic or Luxardo-style), fresh berries (raspberries, sliced strawberries), edible flowers (violets, pansies), mini marshmallows, popping candy, or gold leaf for luxury events.
- Finishing Touches: Generous swirls of real whipped cream (not aerosol), rainbow jimmies, nonpareils, sanding sugar, or custom-printed edible cupcake toppers.
- Structural Enhancements: Often overlooked—but critical! A small “well” carved into the cooled cupcake top (using a melon baller or paring knife) helps anchor the filling. Some bakers insert a thin wafer cookie or mini graham cracker square beneath the filling for added stability and textural surprise.
Step-by-Step Recipe
- Prepare the Cupcakes: Preheat oven to 350°F (175°C). Line standard muffin tins with high-quality paper liners (preferably greaseproof or foil-lined for structural support). Prepare your chosen cupcake batter (e.g., classic chocolate: sift together 1¾ cups all-purpose flour, 2 cups granulated sugar, ¾ cup unsweetened cocoa powder, 2 tsp baking powder, 1 tsp baking soda, and 1 tsp salt. In another bowl, whisk 2 large eggs, 1 cup buttermilk, ½ cup vegetable oil, 2 tsp pure vanilla extract, and 1 cup hot brewed coffee [enhances chocolate flavor—optional but recommended]. Gently fold wet into dry until *just* combined—do not overmix. Fill liners ⅔ full. Bake 18–22 minutes, or until a toothpick inserted comes out clean. Cool completely in pan for 10 minutes, then transfer to wire racks to cool fully (minimum 2 hours, preferably overnight—cold cake prevents melting).
- Create the “Ice Cream” Filling: For stabilized whipped cream version: Bloom 1 tsp unflavored gelatin in 1 tbsp cold water for 5 minutes. Heat gently in microwave (5–10 sec) until liquid—do not boil. In a large chilled bowl, whip 2 cups very cold heavy cream (36% fat) with ¼ cup powdered sugar and 1 tsp vanilla until soft peaks form. Gradually stream in gelatin mixture while whipping. Add 4 oz full-fat cream cheese (room temp, softened) and 2 tbsp powdered sugar; whip to medium-stiff peaks. Transfer to piping bag fitted with a large star tip (Wilton 1M). Chill for 30 minutes before piping.
- Carve & Fill: Using a small serrated knife or cupcake corer, carefully remove a 1-inch wide, ¾-inch deep cylinder from the center of each cooled cupcake—creating a “well.” Reserve cake cores (they make excellent cake pops or crumbs for toppings!). Pipe the chilled filling generously into each well, building a tall, swirled dome slightly above the liner rim. Smooth tops lightly with an offset spatula if desired—or leave rustic and textured.
- Chill Firmly: Place filled cupcakes on a parchment-lined tray and freeze uncovered for 45–60 minutes—this sets the filling and prevents sauce bleeding. Do not skip this step.
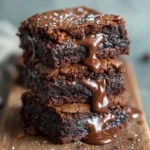
- Drizzle & Decorate: Remove cupcakes from freezer. Working quickly, drizzle each with 1–2 tsp warm hot fudge (microwave fudge sauce in 10-sec bursts until fluid but not hot—excess heat melts the filling). Immediately follow with a zigzag of salted caramel, then a generous spoonful of rainbow sprinkles, 2–3 toasted pecan halves, and a single maraschino cherry with stem. Finish with a final cloud of freshly whipped cream piped in a loose rosette. Optional: dust with flaky sea salt or edible gold dust.
- Serve & Enjoy: Serve immediately—or hold in refrigerator (not freezer) for up to 90 minutes before serving. Never serve straight from freezer (too hard) or sit at room temp >2 hours (filling softens excessively).
Tips
- Temperature Control Is King: All components should be at precise temperatures: cupcakes *completely cold*, filling *chilled but pliable*, sauces *warm—not hot*, toppings *room temp*. Use a digital thermometer to verify filling is between 38–42°F (3–6°C) before piping.
- Line Smart: Double-line liners (paper inside foil) or use commercial-grade “cupcake collars” for extra height and stability—especially important when stacking tall fillings and toppings.
- Prevent Sauce Bleeding: Always chill filled cupcakes before saucing. Alternatively, brush cupcake tops with a thin layer of tempered white chocolate before filling—it creates a moisture barrier.
- Piping Perfection: Use a piping bag with a wide open tip (or snip a ½-inch opening) for smooth, air-pocket-free filling application. Hold bag vertically and pipe in a tight spiral from center outward.
- Make-Ahead Mastery: Bake cupcakes up to 3 days ahead—store airtight at room temp. Fill and decorate *no more than 2 hours* before serving. Sauces can be prepped 5 days ahead and refrigerated; reheat gently.
- Photography Pro-Tip: For social media shots, garnish *just* before photographing—and keep a mini spray bottle of chilled water nearby to mist cherries and berries for dewy freshness.
- Transport Trick: When delivering, place cupcakes upright in a rigid, insulated cooler with frozen gel packs wrapped in towels (never direct contact). Keep upright and minimize movement.
- Taste-Balance Reminder: Counter sweetness with acidity—add a pinch of citric acid to caramel, a splash of balsamic to strawberry sauce, or a drop of lemon juice to whipped cream.
Variations and Customizations
The beauty of Ice Cream Sundae Cupcakes lies in their infinite adaptability—here’s how to tailor them for every palate, season, and occasion:
- Flavor Themes:
- Root Beer Float: Vanilla cupcake + cola-infused whipped cream filling + root beer reduction drizzle + crushed vanilla wafers + vanilla bean whipped cream + candied orange peel.
- Tropical Paradise: Coconut cupcake + mango-coconut “ice cream” (coconut cream + puréed frozen mango + lime zest) + passionfruit curd + toasted coconut flakes + pineapple chunks + edible orchid.
- Peppermint Patty: Dark chocolate cupcake + peppermint-chocolate ganache filling + dark chocolate fudge + crushed candy canes + white chocolate curls + crushed peppermint sticks.
- Maple-Bacon: Brown sugar cupcake + maple-cream cheese filling + bourbon-maple syrup + candied bacon bits + chopped roasted pecans + flaky sea salt.
- Dietary Adaptations:
- Vegan: Flax egg cupcakes (1 tbsp ground flax + 2.5 tbsp water per egg), coconut milk “ice cream” filling (blended frozen coconut milk + agave + vanilla), date caramel, and vegan sprinkles.
- Gluten-Free: Cupcakes made with 1:1 GF flour blend (like Bob’s Red Mill) + xanthan gum; ensure all toppings (sprinkles, sauces) are certified GF.
- Keto/Low-Carb: Almond flour cupcakes sweetened with erythritol; filling of heavy cream + cream cheese + stevia + MCT oil; sugar-free chocolate shell and keto-approved sprinkles.
- Protein-Powered: Add unflavored whey or collagen peptides to batter and filling; top with Greek yogurt “whipped cream” and pumpkin seed clusters.
- Occasion-Specific Twists:
- Wedding Tier: Miniature versions on a tiered stand with edible lace accents, rosewater-infused filling, and gold-dusted raspberries.
- Holiday Edition: Red velvet cupcakes + peppermint “ice cream” + white chocolate ganache + crushed candy canes + holly-shaped sprinkles.
- Kids’ Party: Funfetti cupcakes + confetti “ice cream” (vanilla filling studded with rainbow jimmies) + rainbow sauce swirl + giant gummy bears + cupcake toppers shaped like ice cream cones.
- Adults-Only: Espresso cupcake + Bailey’s Irish Cream filling + dark chocolate ganache + espresso bean crunch + orange zest + edible gold flakes.
- Texture Innovations: Embed a hidden layer—freeze-dried raspberry “lava” core, a salted caramel chewy center, or a mini Oreo “cookie dough” surprise beneath the filling.
Health Considerations and Nutritional Value
While undeniably indulgent, thoughtful ingredient choices and portion awareness allow Ice Cream Sundae Cupcakes to fit meaningfully—even occasionally—into a balanced lifestyle. A standard 3-inch cupcake (including 2 tbsp filling, 1 tsp fudge, 1 tsp caramel, 1 tbsp sprinkles, 1 cherry, and 1 tbsp whipped cream) contains approximately 380–460 calories, with 22–28g total sugar (of which 16–22g are added), 18–24g fat (10–14g saturated), and 4–6g protein. Key considerations include:
- Sugar Intelligence: Opt for natural sweeteners like dates, bananas, or applesauce in the cake base; reduce granulated sugar by 25% and compensate with brown sugar or molasses for moisture and depth. Use unsweetened cocoa, pure extracts, and fruit-based sauces instead of corn syrup-laden alternatives.
- Fat Quality Matters: Choose grass-fed butter, organic coconut oil, or avocado oil in baking. Use full-fat dairy in fillings for satiety and nutrient absorption (fat-soluble vitamins A, D, E, K)—avoid low-fat substitutes that often contain added sugars and gums.
- Boosted Nutrition: Enrich batter with ground flaxseed (omega-3s), oat bran (fiber), or blackstrap molasses (iron, calcium). Top with antioxidant-rich berries, walnuts (omega-3s), or dark chocolate (>70% cacao). Replace some sprinkles with freeze-dried fruit powder.
- Allergen Awareness: Clearly label cupcakes containing common allergens (milk, eggs, tree nuts, soy, wheat, sesame). Offer dedicated nut-free, dairy-free, and gluten-free stations at events.
- Mindful Indulgence Framework: Position these as “special occasion desserts”—not daily treats. Pair with hydrating beverages (sparkling water with citrus), serve alongside fresh fruit platters, and encourage savoring slowly to enhance satisfaction with smaller portions.
- For Diabetics: Consult a registered dietitian before consuming. Keto or low-glycemic versions with erythritol and fiber-rich flours may be appropriate—but individual carb tolerance varies significantly.
Remember: Nutrition is not just about macro-counting—it’s about pleasure, culture, celebration, and mindful presence. An Ice Cream Sundae Cupcake enjoyed with joy, shared with loved ones, and crafted with care contributes meaningfully to emotional and social well-being—a vital dimension of holistic health.
Ingredients
For the Chocolate Cupcakes (Makes 12):
- 1¾ cups (220g) all-purpose flour
- 2 cups (400g) granulated sugar
- ¾ cup (75g) unsweetened natural cocoa powder (not Dutch-process for this recipe)
- 2 tsp baking powder
- 1 tsp baking soda
- 1 tsp fine sea salt
- 2 large eggs, room temperature
- 1 cup (240ml) whole buttermilk, room temperature
- ½ cup (120ml) neutral oil (avocado or grapeseed)
- 2 tsp pure vanilla extract
- 1 cup (240ml) hot strong brewed coffee (or hot water)
For the Stabilized “Ice Cream” Filling:
- 1 tsp unflavored gelatin
- 1 tbsp cold water
- 2 cups (480ml) heavy whipping cream (36% fat), very cold
- ¼ cup (30g) powdered sugar
- 1 tsp pure vanilla extract
- 4 oz (113g) full-fat brick cream cheese, softened
- 2 tbsp (15g) additional powdered sugar
For the Sundae Assembly:
- ½ cup (120ml) premium hot fudge sauce, warmed
- ½ cup (120ml) salted caramel sauce, warmed
- ⅓ cup (50g) rainbow jimmies (nonpareils)
- ⅓ cup (45g) toasted pecan halves
- 12 maraschino cherries with stems
- 1 cup (240ml) freshly whipped heavy cream (unsweetened, for topping)
- Flaky sea salt, for finishing (optional)
Directions
- Preheat & Prep: Preheat oven to 350°F (175°C). Line a standard 12-cup muffin tin with high-quality double-walled cupcake liners. Set aside.
- Mix Dry Ingredients: In a large bowl, sift together flour, sugar, cocoa powder, baking powder, baking soda, and salt. Whisk thoroughly to combine and aerate.
- Combine Wet Ingredients: In a separate medium bowl, whisk eggs, buttermilk, oil, and vanilla until fully emulsified and smooth.
- Combine Batter: Pour wet ingredients into dry ingredients. Gently fold with a silicone spatula until *just* incorporated—small lumps are okay. Do not overmix. Carefully pour in hot coffee (or water) in a slow, steady stream while folding gently. Batter will be thin—this is correct.
- Bake: Divide batter evenly among lined cups (about ⅔ full). Bake 18–22 minutes, rotating pan halfway through, until a toothpick inserted into the center comes out clean with moist crumbs (not wet batter). Cool in pan for 10 minutes, then transfer to wire racks. Cool completely—minimum 2 hours, ideally overnight.
- Prepare Filling: In a small bowl, sprinkle gelatin over cold water. Let sit 5 minutes to bloom. Microwave on low power for 8–10 seconds until fully liquefied (do not boil). In a large chilled metal or glass bowl, whip cold heavy cream, powdered sugar, and vanilla on medium-high until soft peaks form (~2 min). Reduce speed to low; slowly drizzle in gelatin. Increase speed to medium-high and whip 30 seconds. Add softened cream cheese and 2 tbsp powdered sugar; whip on medium until stiff, glossy peaks form (~1–1.5 min). Transfer to piping bag with large open star tip. Refrigerate 30 minutes.
- Core & Fill: Using a 1-inch cookie scoop or melon baller, gently remove center of each cupcake to create a ¾-inch-deep well. Pipe filling into wells, building tall, elegant domes. Smooth lightly if desired. Freeze uncovered on a parchment-lined tray for 60 minutes.
- Assemble: Remove cupcakes from freezer. Warm fudge and caramel separately in microwave (10-sec bursts) until fluid but cool to touch (~90°F / 32°C). Drizzle fudge in circular motion over each cupcake. Immediately drizzle caramel in zigzag pattern. Generously sprinkle with jimmies, then arrange pecans and cherries. Pipe a final rosette of freshly whipped cream on each. Finish with a tiny pinch of flaky salt.
- Serve: Enjoy within 90 minutes of assembly. Store undecorated cupcakes airtight at room temperature up to 3 days; unfilled “ice cream” mixture keeps refrigerated 3 days or frozen 1 month.
FAQ
- Can I make these ahead of time?
- Yes—with strategy. Cupcakes bake and freeze beautifully (up to 3 months, wrapped tightly). Fillings can be made 2 days ahead and refrigerated. Assemble *only* 1–2 hours before serving for optimal texture and visual appeal.
- Why does my filling melt or weep?
- Common causes: over-whipping cream (breaks down fat structure), insufficient stabilizer (gelatin ratio off), warm cupcakes (heat transfers upward), or ambient temperature >72°F (22°C). Solution: always chill components, use exact gelatin measurements, and freeze filled cupcakes before saucing.
- Can I use store-bought ice cream?
- Technically yes—but not recommended. Most commercial ice creams contain high water content, emulsifiers, and air (overrun), causing rapid melting and iciness. Homemade no-churn or stabilized whipped cream offers superior control, texture, and stability.
- My fudge is cracking or separating—what went wrong?
- Fudge sauce requires gentle, even heating. Overheating or introducing cold ingredients causes fat separation. Always warm in short bursts, stir constantly, and never boil. If separated, whisk in 1 tsp hot cream or corn syrup to re-emulsify.
- How do I prevent sprinkles from bleeding color?
- Use high-quality, bakery-grade sprinkles labeled “non-bleeding” or “decorator’s grade.” Avoid adding them to warm surfaces or overly moist fillings. Apply *after* sauces have set slightly (30–60 seconds) and while filling is still cold.
- Can I make mini versions?
- Absolutely! Use mini muffin tins. Reduce bake time to 10–12 minutes. Scale filling to 1–1.5 tsp per cupcake. Perfect for wedding favors or party appetizers—yield increases to ~24–30.
- Are there allergy-friendly topping alternatives?
- Yes: sunflower seed butter chips instead of nuts, dairy-free chocolate shell (coconut oil + cocoa), naturally colored sprinkles (spirulina, beet, turmeric), and maraschino cherries packed in fruit juice (not corn syrup).
- What’s the best way to photograph these?
- Shoot in natural, diffused light (near north-facing window). Use a clean, textured backdrop (marble, slate, linen). Style with vintage spoons, striped straws, or a scattering of loose sprinkles. Capture detail shots of cherry stems, sauce drips, and whipped cream peaks. Edit with subtle brightness/contrast—avoid oversaturation.
Summary
Ice Cream Sundae Cupcakes are a masterclass in joyful dessert engineering—where nostalgic sundae exuberance meets the refined structure of artisanal cupcakes, offering limitless customization, stunning visual impact, and deeply satisfying multi-sensory indulgence.
With meticulous attention to temperature, texture balance, and ingredient integrity, they transform any gathering into a celebration—proving that whimsy, craftsmanship, and heartfelt hospitality can be beautifully, deliciously, and memorably served—one cupcake at a time.