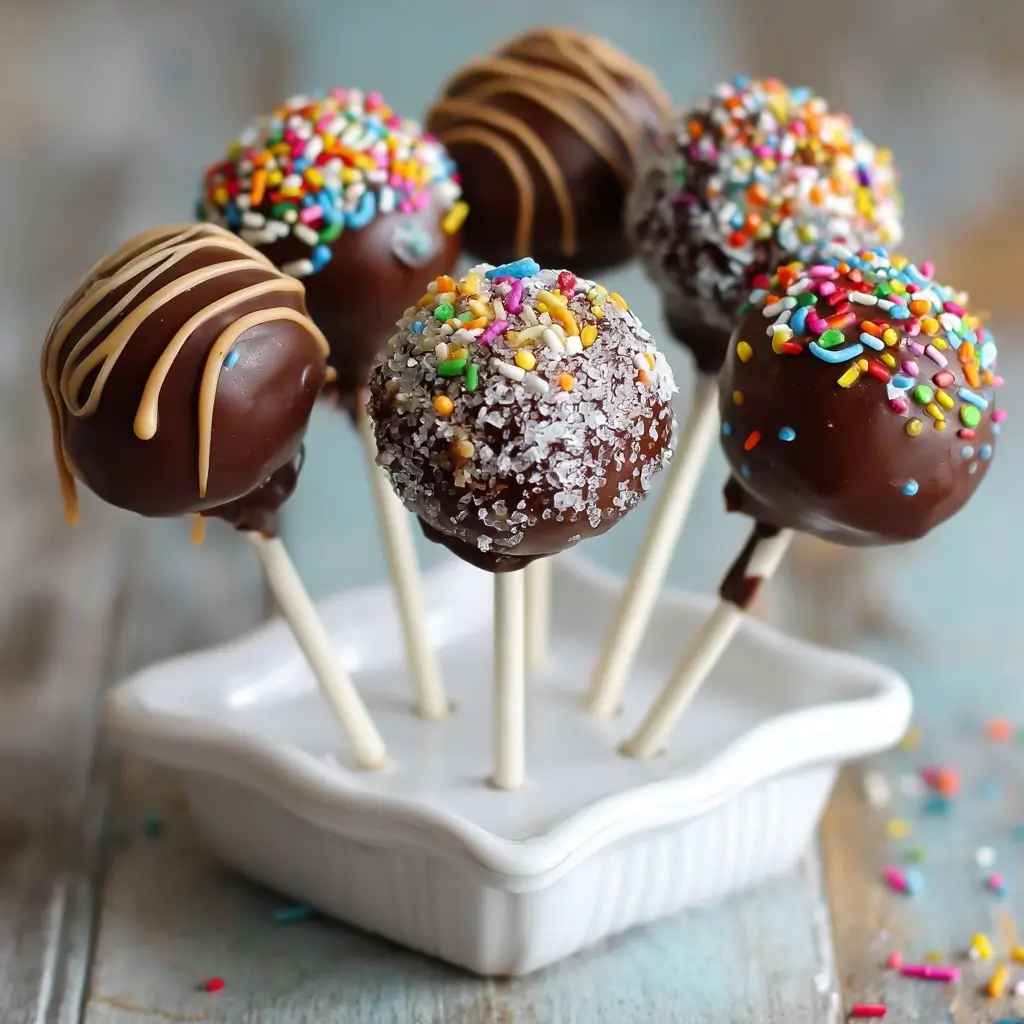
Chocolate Fudge Cake Pops
Introduction
Chocolate Fudge Cake Pops are the ultimate indulgence for chocolate lovers and dessert enthusiasts alike. These bite-sized treats combine the rich, moist texture of a decadent chocolate cake with the creamy sweetness of fudge-like frosting, all rolled into perfectly round balls and coated in smooth, shiny chocolate. Whether you’re preparing them for a birthday party, holiday celebration, or simply as a delightful homemade treat, cake pops offer both visual appeal and an explosion of flavor in every bite. Their portability, elegant presentation on sticks, and endless customization options make them a favorite among bakers of all skill levels. In this comprehensive guide, we’ll dive deep into everything you need to know about making perfect Chocolate Fudge Cake Pops—from their fascinating history to expert tips, nutritional insights, and creative variations.
The History
The concept of cake pops traces its roots back to ancient civilizations, where sweetened doughs were shaped into small portions and consumed as early forms of confections. However, the modern version of cake pops as we know them today gained popularity in the early 21st century, largely credited to baker Angie Dudley, the creative mind behind the blog Bakerella. In 2008, she introduced decorated cake pops inspired by Star Wars characters, which quickly went viral across social media platforms. This innovative idea transformed leftover cake crumbs into adorable, stick-mounted treats that combined baking with artistic expression. The trend exploded, appearing in bakeries, food blogs, and even mainstream media such as cooking shows and lifestyle magazines. While chocolate-based versions have always been a favorite, the chocolate fudge variation emerged as a top contender due to its intense cocoa flavor and velvety consistency. Today, cake pops are not only a staple at parties and weddings but also a symbol of creative home baking—where taste meets craftsmanship.
Ingredients Breakdown
Creating flawless Chocolate Fudge Cake Pops begins with understanding each ingredient’s role in achieving the ideal texture, flavor, and structure. Here’s a detailed breakdown:
- Chocolate Cake (homemade or boxed): Provides the base structure. A dense, moist chocolate cake works best because it holds together well when crumbled. Using a high-quality cocoa powder or dark chocolate in the cake enhances richness.
- Cream Cheese or Chocolate Frosting: Acts as the binder that holds the cake crumbs together. Cream cheese adds tanginess and creaminess, while chocolate frosting intensifies the chocolate flavor and contributes to a fudgier texture.
- Vanilla Extract: Enhances overall flavor depth and balances sweetness.
- Semi-Sweet Chocolate Melting Wafers or Chopping Chocolate: Used for coating; these provide a glossy finish and snap when bitten into. Wafers are easier to melt smoothly, while high-quality chopped chocolate offers superior taste.
- Candy Melts (optional): Available in various colors and flavors, they’re ideal for decorative coatings and ensure consistent melting without tempering.
- Vegetable Shortening or Coconut Oil (small amount): Added to melted chocolate to thin it slightly, improving dip-ability and creating a smoother coating.
- Lollipop Sticks: Inserted into the cake balls for handling. Food-safe paper or plastic sticks are available in different lengths and designs.
- Sprinkles, Crushed Nuts, or Edible Glitter (optional): For decoration and added texture.
- Heavy Cream or Milk (if needed): Can be used to adjust moisture if the cake mixture is too dry.
Each component plays a crucial role in ensuring your cake pops are flavorful, firm enough to hold shape, yet soft and melt-in-your-mouth delicious.
Step-by-Step Recipe
- Bake the Chocolate Cake: Prepare a 9×13 inch chocolate cake using your preferred recipe or a high-quality boxed mix. Bake according to instructions until a toothpick inserted comes out clean. Allow the cake to cool completely in the pan before removing.
- Crumble the Cake: Once cooled, use your hands or a food processor to break the cake into fine, even crumbs. Transfer the crumbs to a large mixing bowl. Avoid large chunks for a smoother texture.
- Add Frosting: Gradually add ¾ to 1 cup of chocolate frosting or cream cheese frosting to the cake crumbs. Start with less and mix thoroughly. The goal is a play-dough-like consistency—moist enough to roll into balls without crumbling, but not so wet that it feels sticky.
- Mix Thoroughly: Use a spatula or clean hands to blend the mixture until uniform. Taste and adjust sweetness if desired by adding more frosting one tablespoon at a time.
- Roll into Balls: Scoop out about 1 tablespoon of the mixture and roll between palms into smooth, round balls approximately 1¼ inches in diameter. Place on a parchment-lined baking sheet. Chill in the refrigerator for 30–60 minutes to firm up.
- Melt the Coating: While chilling, melt 12 oz of semi-sweet chocolate wafers or chopped chocolate in a microwave-safe bowl in 30-second intervals, stirring between each, until smooth. Add ½ teaspoon of vegetable shortening or coconut oil to improve fluidity.
- Prepare Workstation: Line another baking sheet with parchment paper. Have lollipop sticks, sprinkles, and decorations ready near your workspace.
- Insert Sticks: Remove chilled cake balls from the fridge. Dip the tip of a lollipop stick into melted chocolate, then insert it halfway into a cake ball. This “glue” helps secure the stick. Return to tray and chill again for 15 minutes.
- Dip in Chocolate: Holding the stick, submerge the cake pop into the melted chocolate, gently swirling to coat evenly. Lift slowly, allowing excess chocolate to drip off.
- Decorate: Immediately add sprinkles or other toppings before the chocolate sets. Rotate the stick slightly to achieve even coverage.
- Set and Dry: Place the finished cake pop upright into a styrofoam block, cake pop stand, or egg carton to dry. Let sit at room temperature for 15–20 minutes until the coating hardens.
- Store: Keep in an airtight container in the refrigerator for up to 1 week or freeze for longer storage.
Tips
- Use Moist Cake: Overbaked or dry cake will result in crumbly pops. Consider brushing the cooled cake with simple syrup (equal parts sugar and water, boiled and cooled) to add moisture.
- Chill Before Rolling: If the mixture feels too soft, refrigerate the crumbs and frosting blend for 20 minutes before rolling.
- Uniform Size: Use a cookie scoop for consistent sizing, which ensures even chilling and dipping.
- Avoid Water in Chocolate: Even a drop of water can cause chocolate to seize. Ensure all utensils are completely dry.
- Tempering Chocolate (Optional): For a professional shine and snap, temper the chocolate instead of simply melting it. This involves precise heating and cooling cycles.
- Dipping Technique: Tap the stick lightly against the bowl’s edge to remove excess chocolate and prevent thick buildup at the base.
- Fix Cracks: If cracks appear after chilling, warm the cake ball slightly in your hands or re-roll gently before dipping.
- Work in Batches: Melt chocolate in smaller quantities to prevent it from hardening too quickly during the process.
- Room Temperature: Warm environments can soften cake pops quickly. Work in a cool kitchen and consider air conditioning if necessary.
- Label Flavors: When making multiple varieties, use colored sticks or tags to distinguish them easily.
Variations and Customizations
While classic Chocolate Fudge Cake Pops are irresistible, the real fun lies in personalizing them to suit any occasion or preference:
- Flavor Twists: Infuse the cake batter with espresso powder, orange zest, peppermint extract, or chili for gourmet flair.
- Filling Surprise: Hide a mini marshmallow, chocolate chip, peanut butter cup, or caramel center inside each cake ball before chilling.
- Gluten-Free Version: Use a gluten-free chocolate cake mix and certified gluten-free ingredients throughout.
- Vegan Option: Substitute with vegan cake, dairy-free frosting, and plant-based chocolate for a cruelty-free treat.
- Seasonal Themes: Decorate with red and green sprinkles for Christmas, pastel colors for Easter, or orange and black for Halloween.
- Holiday Shapes: Mold into hearts for Valentine’s Day, pumpkins for fall, or bunnies for springtime events.
- Oreo-Inspired: Mix crushed Oreos into the cake crumbs or use Oreo-flavored frosting for a cookies-and-cream twist.
- Alcohol-Infused: Add a splash of Baileys, Kahlua, or Grand Marnier to the frosting for adult-only versions.
- Nutty Crunch: Roll the dipped pops in crushed peanuts, almonds, or pretzels for added texture.
- Drizzle Design: After the base coat dries, drizzle white, dark, or colored candy melts over the top using a ziplock bag with a tiny corner snipped off.
- Pastel Dreams: Use pastel-colored candy melts for baby showers or bridal showers.
- Marbled Effect: Swirl two melted chocolate colors together just before setting for a marbled look.
Health Considerations and Nutritional Value
Chocolate Fudge Cake Pops are undeniably rich and should be enjoyed in moderation as part of a balanced diet. On average, one standard cake pop (approximately 45g) contains:
- Calories: 180–250 kcal
- Total Fat: 10–15g (including 6–8g saturated fat)
- Carbohydrates: 20–30g (with 15–20g sugars)
- Protein: 2–3g
- Sodium: 80–120mg
- Dietary Fiber: 1–2g
Key considerations include:
- Sugar Content: High due to frosting and chocolate coating. Opt for reduced-sugar frostings or dark chocolate (70%+ cocoa) to lower glycemic impact.
- Allergens: Common allergens include dairy, eggs, wheat, soy, and nuts (depending on additives). Always label accordingly for guests.
- Portion Control: Their small size may encourage overconsumption. Serve on platters with fruit or cheese to balance the spread.
- Kid-Friendly but Caffeine-Aware: Chocolate contains caffeine; limit intake for young children or those sensitive to stimulants.
- Storage Safety: Refrigeration is recommended, especially if cream cheese is used. Consume within 7 days to avoid spoilage.
- Healthy Swaps: Use Greek yogurt instead of frosting, whole grain cake, natural sweeteners like honey or maple syrup, and dark chocolate to boost nutrition slightly.
Ingredients
- 1 prepared chocolate cake (9×13 inch), cooled and crumbled
- ¾ to 1 cup chocolate frosting or cream cheese frosting
- 1 teaspoon vanilla extract
- 12 oz semi-sweet chocolate melting wafers or high-quality dark chocolate, finely chopped
- ½ teaspoon vegetable shortening or coconut oil
- 20–30 lollipop sticks
- Parchment paper
- Sprinkles or decorations (optional)
- Styrofoam block or cake pop stand (for drying)
Directions
- Prepare and bake a chocolate cake. Let cool completely, then crumble into fine crumbs in a large bowl.
- Mix in frosting gradually until the mixture holds together when pressed. Add vanilla extract.
- Roll into 1¼-inch balls and place on a parchment-lined tray. Chill for 30–60 minutes.
- Melt chocolate wafers with shortening in 30-second microwave intervals, stirring until smooth.
- Partially insert lollipop sticks into cake balls after dipping the tip in melted chocolate. Chill again for 15 minutes.
- Dip each cake pop into melted chocolate, tap off excess, decorate immediately, and place in a drying stand.
- Allow to set at room temperature for 15–20 minutes before serving.
- Store in an airtight container in the refrigerator for up to 1 week.
FAQ
- Why are my cake pops cracking?
- This usually happens when the cake ball is cold and the coating is hot. Let cake balls come closer to room temperature before dipping, or warm the coating slightly less.
- Can I make cake pops ahead of time?
- Yes! You can prepare cake balls up to 2 days in advance and store them covered in the fridge. Fully assembled pops can be stored for up to 1 week refrigerated.
- How do I transport cake pops safely?
- Use individual cardboard boxes, cupcake liners in a snug container, or insert into a foam block inside a sturdy box to prevent breakage.
- Can I freeze cake pops?
- Yes. Freeze undipped cake balls for up to 6 weeks. Thaw in the fridge before proceeding. Dipped pops can be frozen but may develop condensation; wrap tightly in plastic.
- What can I use instead of frosting?
- You can use ganache, pudding, mashed banana (for moisture), or even condensed milk as binders, though texture and flavor will vary.
- Why did my chocolate coating become thick or lumpy?
- Overheating or introducing moisture can cause seizing. Stir in a bit more shortening or start over gently.
- Can I use a different cake flavor?
- Absolutely! Red velvet, vanilla, carrot, or even pumpkin cake can be turned into cake pops with appropriate frosting pairings.
- Are cake pops safe for kids?
- Yes, but supervise young children due to the lollipop stick. Consider using flat-ended sticks or making cake truffles (without sticks) for toddlers.
Summary
Chocolate Fudge Cake Pops are a luxurious fusion of moist chocolate cake and creamy frosting, enrobed in silky melted chocolate for an unforgettable treat. Easy to customize and perfect for any occasion, they bring joy in every bite-sized form.