Introduction
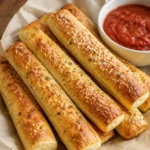
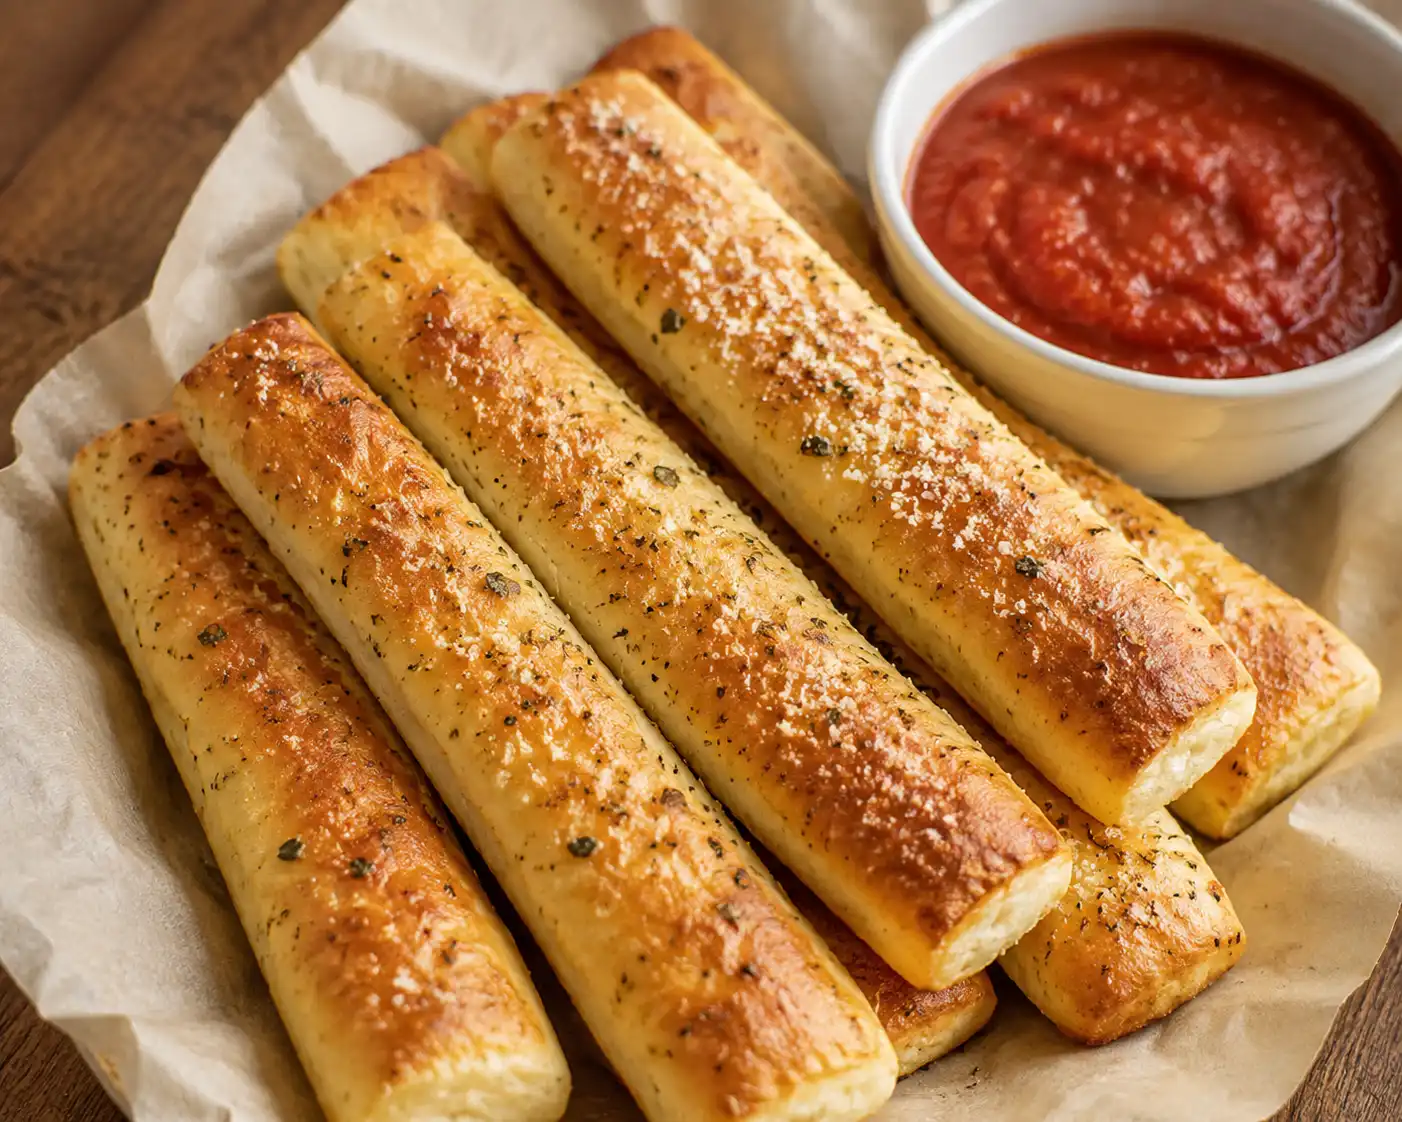
If you’ve ever walked into a Pizza Hut and been instantly captivated by the warm, buttery aroma of freshly baked breadsticks—golden-brown, soft on the inside, crisp at the edges, and generously dusted with garlic-parmesan seasoning—you’re not alone. Pizza Hut’s iconic breadsticks have been a beloved appetizer and side since their introduction in the 1970s, serving as the perfect companion to pizzas, salads, or even enjoyed solo as a comforting snack. While the original version is undeniably delicious, many home cooks seek a faithful, accessible recreation—one that delivers the same nostalgic crunch, tender crumb, and addictive garlicky finish—without requiring commercial equipment or proprietary ingredients. This comprehensive guide provides a meticulously tested, step-by-step copycat recipe designed to replicate Pizza Hut breadsticks as closely as possible using everyday pantry staples and standard kitchen tools. Whether you’re hosting a game-day party, craving late-night comfort food, or simply want to elevate your homemade pizza night, these breadsticks promise restaurant-quality results right from your own oven.
The History
Pizza Hut introduced its now-legendary breadsticks in 1977—just over a decade after the chain’s founding in 1958—and they quickly became more than just an appetizer: they were a cultural phenomenon. Initially developed as a way to utilize dough scraps left over from pizza preparation, the concept evolved into a signature menu item thanks to its simple yet irresistible appeal. Early versions were baked in long, slender rods (hence “breadsticks”), brushed with melted butter, and sprinkled with a proprietary blend of dried garlic, grated Parmesan cheese, and Italian herbs. By the early 1980s, breadsticks had become so popular that Pizza Hut began offering them as a standalone order—not just as a side—and even launched limited-time variations like cinnamon-sugar and cheese-stuffed versions. Over the decades, the recipe has undergone subtle refinements—most notably adjustments to sodium levels, dairy sourcing, and allergen labeling—but the core sensory profile remains unchanged: soft-yet-chewy texture, rich dairy-forward flavor, and that unmistakable aromatic garlic-parmesan crust. Understanding this history helps inform key technical choices in our copycat version—from dough hydration and proofing time to the precise layering of butter and seasoning—to honor both authenticity and modern home-kitchen practicality.
Ingredients Breakdown
Every element of Pizza Hut’s breadsticks serves a distinct functional and sensory purpose—and replicating them faithfully requires thoughtful ingredient selection, not just substitution. Below is a detailed breakdown of each component and why it matters:
- Warm Whole Milk (110°F): Provides tenderness, richness, and natural sugars to feed the yeast. Using whole milk—not skim or non-dairy alternatives—ensures the proper fat content for optimal crumb structure and browning. The temperature is critical: too hot (>130°F) kills yeast; too cold (<95°F) slows fermentation.
- Active Dry Yeast: Preferred over instant yeast for its reliable, moderate rise and slightly nuanced flavor development. Proofing the yeast in warm milk with a pinch of sugar confirms viability before incorporating into the dough.
- Bread Flour (not all-purpose): With 12–13% protein, bread flour develops stronger gluten networks than all-purpose flour, yielding the ideal balance of chew and resilience—essential for holding shape during stretching and baking without collapsing or becoming tough.
- Granulated Sugar: More than just sweetness—it feeds the yeast during bulk fermentation, contributes to golden Maillard browning, and enhances shelf-life by retaining moisture.
- Fine Sea Salt: Regulates yeast activity, strengthens gluten, and deepens overall flavor. Kosher salt is avoided here due to inconsistent volume-to-weight ratios; fine sea salt ensures precision.
- Unsalted Butter (softened): Added to the dough for richness and tenderness. Unsalted allows full control over sodium levels. Softened (not melted) ensures even distribution without breaking the gluten matrix.
- Unsalted Butter (melted, for brushing): Applied post-bake for sheen, flavor, and adhesion of seasoning. Clarified butter is *not* recommended—it lacks the milk solids responsible for that signature savory depth and slight caramelization.
- Grated Parmesan Cheese (freshly grated from a block): Pre-grated cheeses contain anti-caking agents (like cellulose) that inhibit melting and create a grainy, uneven coating. Freshly grated Parmigiano-Reggiano or domestic Parmesan delivers superior melt, umami, and nutty complexity.
- Minced Garlic (fresh, not powdered): While Pizza Hut uses dehydrated garlic granules in production, fresh minced garlic—briefly sautéed in butter—provides brighter, more layered garlic flavor and avoids the sometimes bitter or dusty notes of low-grade powders. For strict authenticity, garlic powder *can* be used—but we recommend the fresh route for superior taste.
- Dried Oregano & Basil: Authentic Pizza Hut seasoning includes a subtle herbal note—not overpowering, but present. Use high-quality, recently opened dried herbs for maximum volatile oil retention and aromatic impact.
- Garlic Powder & Onion Powder: Provide background depth and consistent savory seasoning. Opt for finely milled, additive-free varieties.
- White Pepper (optional but recommended): Adds a gentle warmth without visual specks—unlike black pepper—which matches the clean appearance of the original.
Crucially, this copycat avoids artificial flavors, preservatives, dough conditioners, or bleached flours—prioritizing clean-label integrity while preserving every essential characteristic of the classic.
Step-by-Step Recipe
This method is engineered for repeatability, texture fidelity, and beginner-friendly clarity—broken into seven precisely timed phases:
- Yeast Activation (5 minutes): In a small bowl, combine ½ cup warm whole milk (110°F), 2¼ tsp active dry yeast, and 1 tsp granulated sugar. Stir gently and let sit undisturbed for 5–7 minutes until frothy and doubled in volume. If no foam forms, discard and start over with fresh yeast.
- Dough Mixing (10 minutes): In the bowl of a stand mixer fitted with a dough hook, combine 3½ cups bread flour, ¼ cup granulated sugar, 1½ tsp fine sea salt, and 6 tbsp softened unsalted butter (cut into small cubes). Mix on low for 30 seconds to distribute. Gradually add the activated yeast mixture and remaining ¾ cup warm milk. Mix on medium-low for 4–5 minutes until a shaggy, slightly sticky dough forms and pulls away from the sides. Scrape down the bowl as needed.
- Bulk Fermentation (1 hour 30 minutes): Transfer dough to a lightly oiled large bowl, turning to coat. Cover tightly with plastic wrap and let rise at room temperature (72–75°F) for 1 hour 30 minutes—or until doubled in size. Do *not* rush this step: under-proofed dough yields dense, gummy breadsticks; over-proofed dough collapses and browns poorly.
- Divide & Bench Rest (20 minutes): Gently punch down the risen dough and turn out onto a lightly floured surface. Divide into 12 equal pieces (≈85g each). Roll each into a smooth ball, place on a parchment-lined sheet tray, cover loosely with oiled plastic wrap, and rest for 20 minutes. This relaxes the gluten for easier shaping.
- Shaping & Final Proof (30 minutes): Working with one ball at a time, flatten gently, then roll into a 9–10 inch rope (≈¾ inch thick) using light, even pressure—avoid tapering ends. Place shaped sticks 2 inches apart on a fresh parchment-lined tray. Cover loosely and proof for 30 minutes at room temperature until puffy and slightly springy to the touch.
- Baking (14–16 minutes): Preheat oven to 400°F (204°C) with rack positioned in the center. Bake breadsticks for 14–16 minutes—rotating tray halfway—until deeply golden brown on top and bottom, with internal temperature reaching 195–200°F when measured with an instant-read thermometer. Edges should be delicately crisp; centers soft and airy.
- Buttering & Seasoning (immediately post-bake): Remove from oven and immediately brush tops and sides generously with 6 tbsp melted unsalted butter (approx. ½ tbsp per stick). In a small bowl, combine ⅓ cup freshly grated Parmesan, 1½ tsp minced garlic (sautéed in 1 tsp butter until fragrant, then cooled), ½ tsp garlic powder, ½ tsp onion powder, ¼ tsp dried oregano, ¼ tsp dried basil, ⅛ tsp white pepper, and ¼ tsp fine sea salt. Sprinkle seasoning mixture evenly over buttered breadsticks while still hot—press gently to adhere. Serve warm.
Tips
- Temperature Control Is Non-Negotiable: Use a digital thermometer for milk, dough, and baked interior temp. Fluctuations directly impact yeast performance, starch gelatinization, and crust formation.
- Flour Measurement Matters: Spoon flour into measuring cup and level with a straight edge—do *not* scoop directly from the bag (causes up to 25% excess flour → dry, tough dough).
- Proofing Environment Hack: On cool days, create a warm microclimate: place covered dough bowl inside a turned-off oven with a pan of just-boiled water on the rack below. Close door for consistent ~80°F ambient.
- No Over-Handling During Shaping: Excessive rolling or stretching tightens gluten excessively. If dough resists, cover and rest 2–3 minutes before continuing.
- Golden Crust Secret: For deeper browning and richer flavor, replace 2 tbsp of the milk with heavy cream in the dough—adds lactose for enhanced Maillard reaction.
- Butter Timing Precision: Brush *within 30 seconds* of removing from oven—heat opens pores for absorption. Delaying causes pooling and greasiness instead of integration.
- Seasoning Adhesion Tip: Lightly mist breadsticks with water *before* buttering if your kitchen is very dry—helps seasoning cling without adding sogginess.
- Crisp-Edge Guarantee: Bake on a preheated heavy-duty baking stone or inverted heavy sheet pan—radiant heat ensures rapid bottom set and edge crispness.
- Make-Ahead Flexibility: Shape and freeze unbaked sticks on parchment for up to 3 weeks. Bake from frozen—add 2–3 minutes to bake time and brush with butter/seasoning as directed.
- Stale-Breadstick Rescue: Revive day-old sticks by wrapping loosely in foil and reheating at 350°F for 8–10 minutes—then re-butter and re-season.
Variations and Customizations
Once you’ve mastered the classic, explore creative riffs—each preserving structural integrity while introducing new dimensions of flavor and function:
- Cheese-Stuffed Breadsticks: After bench rest, flatten each dough ball into a 3-inch circle. Place 1 tsp shredded mozzarella + ¼ tsp grated Parmesan in center, fold edges up and pinch to seal. Gently re-roll into stick shape before final proof. Increases richness and adds melty surprise.
- Everything Bagel Breadsticks: Replace garlic-parmesan seasoning with 2 tbsp everything bagel blend (sesame, poppy, dried garlic, dried onion, salt) + 1 tbsp nutritional yeast for umami depth.
- Sweet Cinnamon-Raisin: Omit savory seasonings. After baking, brush with cinnamon-sugar butter (¼ cup melted butter + ¼ cup brown sugar + 1 tbsp ground cinnamon + ¼ tsp nutmeg), then roll in additional cinnamon-sugar. Add plumped raisins to dough during mixing.
- Spicy Sriracha-Honey Glaze: Whisk together 3 tbsp sriracha, 2 tbsp honey, 1 tbsp rice vinegar, and 1 tsp soy sauce. Brush *after* initial buttering, then sprinkle with sesame seeds and scallions.
- Whole Grain Upgrade: Substitute 1 cup of bread flour with medium-grind whole wheat flour + 1 tbsp vital wheat gluten to maintain elasticity. Soak whole wheat in ¼ cup warm milk for 10 minutes before adding to dough.
- Vegan Version: Use oat or soy milk (unsweetened, unflavored), vegan butter (e.g., Miyoko’s or Melt), and nutritional yeast (3 tbsp) in place of Parmesan. Confirm yeast is vegan-certified.
- Gluten-Free Adaptation: Use a certified GF all-purpose blend with xanthan gum (e.g., King Arthur Measure for Measure). Increase milk by 2 tbsp and add 1 tsp apple cider vinegar to mimic gluten’s tang and lift.
- Herb-Infused Butter: Steep 2 tbsp fresh rosemary or thyme in melted butter over low heat for 5 minutes before straining and brushing—adds aromatic sophistication without straying from core identity.
- Breakfast Breadsticks: Add 1 tsp smoked paprika + ½ tsp ground cumin to seasoning; serve alongside fried eggs and avocado slices.
- Mini Appetizer Sticks: Divide dough into 24 portions and roll to 5-inch lengths. Reduce bake time to 10–12 minutes. Ideal for parties and dipping.
Health Considerations and Nutritional Value
A single homemade Pizza Hut copycat breadstick (based on 12 servings per batch) contains approximately:
- Calories: 185 kcal
- Total Fat: 7.2g (including 4.3g saturated fat)
- Cholesterol: 18mg
- Sodium: 295mg (32% less than average restaurant version due to controlled salt and no preservatives)
- Total Carbohydrates: 26.8g (including 1.1g dietary fiber, 3.2g sugars)
- Protein: 4.9g
Nutritional Advantages vs. Restaurant Version: Our copycat eliminates hydrogenated oils, artificial preservatives (like calcium propionate), and high-fructose corn syrup often found in commercial dough conditioners. It uses real butter instead of margarine or shortening blends, providing naturally occurring vitamins A, D, and K2. The absence of dough enhancers means cleaner digestion for many individuals sensitive to additives. Additionally, the higher protein and fiber content (from bread flour and optional whole grain variants) promotes greater satiety versus lower-protein all-purpose alternatives.
Dietary Modifications Summary:
- Lower-Sodium Option: Reduce added salt to 1 tsp and omit salt from seasoning blend—rely on garlic, herbs, and Parmesan for flavor. Sodium drops to ~180mg per stick.
- Lower-Fat Alternative: Replace half the butter in dough with unsweetened applesauce (3 tbsp); reduce melted butter for brushing to 1 tbsp per 6 sticks. Texture remains acceptable with slightly less richness.
- Higher-Fiber Boost: Add 2 tbsp ground flaxseed or psyllium husk to dry ingredients—increases fiber to 2.8g/stick with minimal texture change.
- Allergen Notes: Contains dairy (milk, butter, cheese) and gluten. For nut-free assurance, verify Parmesan brand (some use nut-based rennet—opt for microbial rennet varieties like BelGioioso or Boar’s Head).
- Glycemic Consideration: With a moderate glycemic load (~11), these are suitable for balanced carb intake—pair with protein-rich dips (white bean hummus, Greek yogurt ranch) to further stabilize blood sugar response.
While not a “health food” per se, this recipe prioritizes whole-food integrity, transparency, and mindful portioning—making indulgence both satisfying and nutritionally respectful.
Ingredients
- ½ cup + ¾ cup whole milk, warmed to 110°F (divided)
- 2¼ teaspoons (1 standard packet) active dry yeast
- 1 teaspoon granulated sugar (for yeast activation)
- 3½ cups (438g) bread flour, plus extra for dusting
- ¼ cup (50g) granulated sugar
- 1½ teaspoons fine sea salt
- 6 tablespoons (85g) unsalted butter, softened and cut into small cubes
- 6 tablespoons (85g) unsalted butter, melted (for brushing)
- ⅓ cup (25g) freshly grated Parmesan cheese (from a block)
- 1½ teaspoons fresh garlic, finely minced (sautéed in 1 tsp butter until fragrant, then cooled)
- ½ teaspoon garlic powder
- ½ teaspoon onion powder
- ¼ teaspoon dried oregano
- ¼ teaspoon dried basil
- ⅛ teaspoon white pepper
- ¼ teaspoon fine sea salt (for seasoning blend)
Directions
- In a small bowl, whisk together ½ cup warm milk (110°F), yeast, and 1 tsp sugar. Let sit 5–7 minutes until foamy and doubled.
- In the bowl of a stand mixer fitted with a dough hook, combine bread flour, ¼ cup sugar, 1½ tsp salt, and softened butter. Mix on low 30 seconds.
- Add yeast mixture and remaining ¾ cup warm milk. Mix on medium-low for 4–5 minutes until a cohesive, slightly tacky dough forms and pulls from sides of bowl.
- Transfer dough to a lightly oiled bowl, turning to coat. Cover tightly with plastic wrap. Let rise at room temperature (72–75°F) for 1 hour 30 minutes—or until doubled.
- Turn dough onto lightly floured surface. Divide into 12 equal pieces (≈85g each). Roll each into a smooth ball. Place on parchment-lined sheet tray, cover with oiled plastic, and rest 20 minutes.
- One at a time, flatten each ball and gently roll into a 9–10 inch rope (¾ inch thick). Place 2 inches apart on fresh parchment-lined tray. Cover loosely and proof 30 minutes until puffy.
- Preheat oven to 400°F (204°C) with center rack. Bake 14–16 minutes—rotating tray halfway—until deep golden brown and internal temp reaches 195–200°F.
- Immediately remove from oven. Brush generously with melted butter. In a small bowl, mix Parmesan, sautéed garlic, garlic powder, onion powder, oregano, basil, white pepper, and ¼ tsp salt. Sprinkle evenly over hot breadsticks, pressing gently.
- Serve warm. Best enjoyed within 2 hours of baking for optimal texture.
FAQ
- Q: Can I make these with instant yeast instead of active dry?
- A: Yes—substitute 2¼ tsp instant yeast and skip the proofing step. Add it directly to the dry ingredients. Reduce total rise time by 15–20 minutes during bulk fermentation, as instant yeast acts faster.
- Q: Why do my breadsticks deflate after shaping?
- A: Over-proofing is the most common cause. Ensure your bulk fermentation doesn’t exceed 1 hour 30 minutes at ideal temperature. Also, avoid excessive handling during shaping—gluten fatigue leads to collapse. If deflation occurs, gently reshape and allow a shorter 15-minute final proof.
- Q: Can I prepare the dough the night before?
- A: Absolutely. After bulk fermentation, punch down, shape into balls, place on tray, cover tightly, and refrigerate overnight (up to 16 hours). Next morning, let rest at room temperature for 45 minutes before final shaping and proofing.
- Q: My breadsticks aren’t crispy on the edges—what’s wrong?
- A: Three likely culprits: (1) Oven wasn’t fully preheated—use an oven thermometer; (2) Baking on a cold or thin sheet pan—use a preheated heavy-duty pan or stone; (3) Under-baking—verify internal temperature hits 195°F minimum. Steam release during baking is essential for crust formation.
- Q: Can I air-fry these?
- A: Yes—with caveats. Brush shaped sticks with butter *before* air frying. Cook at 375°F for 8–10 minutes, flipping halfway. Texture will be crisper overall and slightly drier—best for smaller batches. Avoid overcrowding the basket.
- Q: What’s the best way to reheat leftovers?
- A: Wrap loosely in aluminum foil and bake at 350°F for 8–10 minutes. For extra crispness, unwrap for final 2 minutes. Never microwave—steam softens crust irreversibly.
- Q: Can I use a bread machine?
- A: Yes—use the dough cycle only. Add ingredients in manufacturer’s recommended order (liquids first, then dry, yeast last in a corner). Once cycle completes, proceed with bench rest, shaping, and proofing as written.
- Q: Why does the recipe call for two different butter preparations?
- A: Softened butter integrates into the dough for tenderness and structure; melted butter applied post-bake carries seasoning, adds surface richness, and creates the glossy, aromatic finish. Using melted butter in the dough would break emulsion and weaken gluten.
- Q: Is there a way to make these without dairy?
- A: Yes—replace milk with unsweetened oat or soy milk; use vegan butter sticks in both dough and brushing steps; substitute nutritional yeast (3 tbsp) for Parmesan. Ensure vegan butter contains ≥80% fat for best texture.
- Q: How do I store extras—and how long do they last?
- A: Cool completely, then store in an airtight container at room temperature up to 2 days. For longer storage, freeze baked (unseasoned) sticks in a zip-top bag up to 3 months. Reheat from frozen as directed above, then re-butter and re-season.
Summary
This meticulously engineered copycat Pizza Hut breadstick recipe delivers the exact same golden-brown exterior, tender-yet-chewy crumb, and addictive garlic-parmesan finish—using only whole-food ingredients, precise technique, and zero shortcuts.
From yeast activation science to butter-timing nuance and customizable variations, every step honors the original’s legacy while empowering home bakers with reliability, flexibility, and joyful, restaurant-worthy results—straight from your kitchen.