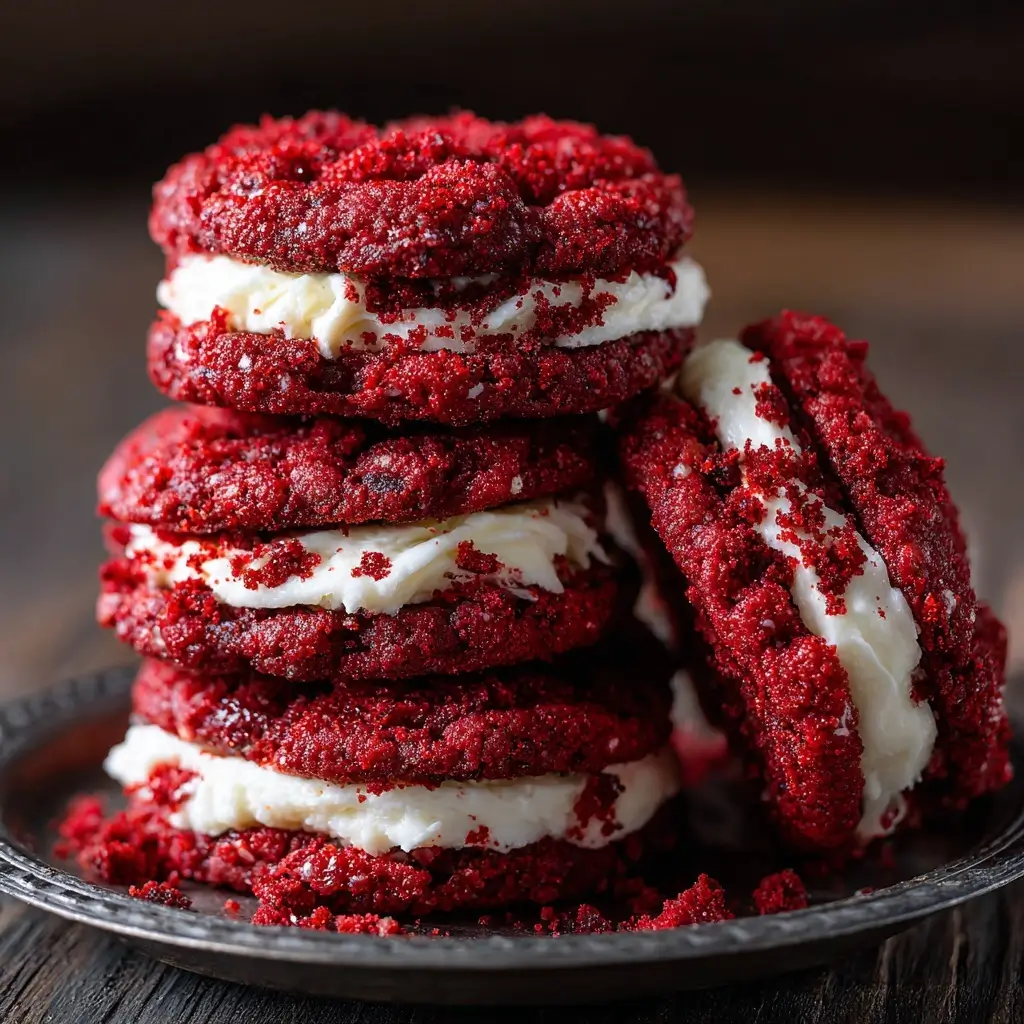
Red Velvet Cheesecake Cookies
Indulge in the luxurious fusion of red velvet cake and creamy cheesecake with these decadent Red Velvet Cheesecake Cookies. These soft, chewy cookies boast a vibrant red velvet base swirled with a rich, tangy cheesecake filling, delivering an irresistible blend of flavors and textures in every bite. Perfect for holiday gatherings, afternoon treats, or just because you deserve something sweet, these cookies are sure to impress both visually and taste-wise.
The History
The story of Red Velvet Cheesecake Cookies begins with the legacy of two beloved American desserts: red velvet cake and cheesecake. Red velvet cake traces its origins back to the early 20th century, with roots believed to be in the Southern United States. The cake’s signature deep red hue was originally the result of a chemical reaction between natural cocoa powder (which contains anthocyanin, a pH-sensitive pigment) and acidic ingredients like buttermilk and vinegar. Over time, food coloring became more common, intensifying the red color we now associate with the cake.
Meanwhile, cheesecake has ancient roots—dating back to Greece—but the modern American version, made with cream cheese, graham cracker crusts, and fruit toppings, gained popularity in the early 1900s, especially after the invention of Philadelphia Cream Cheese. It wasn’t long before bakers began experimenting by combining elements of both desserts.
Enter the cookie form: the Red Velvet Cheesecake Cookie is a relatively recent innovation, emerging in the late 2000s and early 2010s as part of the gourmet cookie trend. Bakers sought to miniaturize and personalize dessert experiences, leading to stuffed, swirled, and layered cookies that mimic their full-sized counterparts. This particular recipe captures the essence of both desserts in a handheld treat that’s both elegant and easy to make.
Ingredients Breakdown
To achieve the perfect balance of flavor, texture, and visual appeal, each ingredient in this recipe plays a crucial role:
- All-Purpose Flour: Provides the structural foundation. A moderate amount ensures softness without spreading too much.
- Cocoa Powder (Unsweetened, Natural): Adds depth and the classic red velvet chocolate flavor. Natural cocoa is preferred here due to its acidity, which reacts with baking soda.
- Baking Soda: Reacts with acidic components (like buttermilk and vinegar) to help the cookies rise slightly while remaining tender.
- Salt: Enhances all other flavors and balances sweetness.
- Butter (Unsalted, Room Temperature): Adds richness and helps create a tender crumb. Using room temperature butter ensures even mixing and proper aeration.
- Granulated Sugar & Brown Sugar: Granulated sugar adds sweetness and promotes slight crispness on the edges, while brown sugar contributes moisture and chewiness thanks to its molasses content.
- Egg: Binds the ingredients together and adds structure and moisture.
- Vanilla Extract: Complements the chocolate and cheesecake layers with warm, aromatic notes.
- Red Food Coloring (Gel Preferred): Gives the iconic red velvet look. Gel coloring is concentrated and won’t alter the dough’s consistency like liquid might.
- Buttermilk: Adds tenderness and slight tang while activating the baking soda for lift.
- White Vinegar: Works with buttermilk and cocoa to enhance color and texture through mild acid reactions.
For the cheesecake filling:
- Cream Cheese (Full-Fat, Softened): The star of the filling—creamy, tangy, and smooth. Must be at room temperature for lump-free mixing.
- Powdered Sugar: Sweetens the filling without adding excess moisture.
- Vanilla Extract: Reinforces the vanilla profile and complements the tanginess of cream cheese.
- Egg Yolk: Helps bind the filling so it doesn’t leak during baking.
Step-by-Step Recipe
- Prepare the Cheesecake Filling: In a medium bowl, beat together 8 oz (225g) softened cream cheese, 1/4 cup (30g) powdered sugar, 1/2 tsp vanilla extract, and 1 egg yolk until completely smooth and creamy. Set aside in the refrigerator while you prepare the cookie dough. This chilling step prevents the filling from melting too quickly in the oven.
- Preheat Oven & Prepare Baking Sheets: Preheat your oven to 350°F (175°C). Line two large baking sheets with parchment paper or silicone baking mats. This prevents sticking and ensures even baking.
- Mix Dry Ingredients: In a medium bowl, whisk together 1 3/4 cups (220g) all-purpose flour, 2 tbsp (10g) unsweetened natural cocoa powder, 1/2 tsp baking soda, and 1/4 tsp salt. Set aside.
- Cream Butter and Sugars: In a large mixing bowl, use an electric mixer to beat 1/2 cup (115g) softened unsalted butter with 1/2 cup (100g) granulated sugar and 1/4 cup (55g) packed brown sugar until light and fluffy (about 2–3 minutes).
- Add Wet Ingredients: Beat in 1 large egg, 1 1/2 tsp vanilla extract, 1 tbsp red gel food coloring, 1 tbsp buttermilk, and 1/2 tsp white vinegar until fully combined and smooth.
- Incorporate Dry Ingredients: Gradually add the dry mixture to the wet ingredients, mixing on low speed until just combined. Do not overmix. The dough should be soft but not sticky—chill briefly if too soft.
- Portion the Dough: Scoop out about 1 1/2 tablespoons of cookie dough and roll into a ball. Flatten slightly into a disc using your palm or the bottom of a glass.
- Add Cheesecake Filling: Place about 1 teaspoon of chilled cheesecake filling in the center of each dough disc. Carefully fold the dough around the filling, sealing completely to prevent leakage during baking. Reshape into a smooth ball.
- Arrange on Baking Sheet: Place filled cookie balls 2 inches apart on prepared baking sheets. If desired, gently press down just slightly to encourage even spreading.
- Bake: Bake for 10–12 minutes, rotating the pans halfway through. Cookies are done when the edges are set but the centers still appear soft. They will continue to firm up as they cool.
- Cool Completely: Let cookies cool on the baking sheet for 5 minutes before transferring to a wire rack to cool completely. This helps them set properly and prevents breakage.
Tips for Success
- Use Gel Food Coloring: Liquid food coloring adds extra moisture and may affect texture. Gel coloring gives vibrant results without altering the dough.
- Don’t Overbake: These cookies should remain soft and slightly underdone in the center for that bakery-style chew. Overbaking leads to dryness.
- Seal the Filling Well: Make sure no cheesecake filling is exposed, or it may leak and brown excessively during baking.
- Chill the Filling: Cold filling holds its shape better and swirls beautifully inside the warm cookie.
- Uniform Sizing: Use a cookie scoop for consistent size and even baking. Aim for 1.5-tbsp dough balls and 1-tsp filling portions.
- Room Temperature Ingredients: Especially important for butter and cream cheese—this ensures smooth mixing and prevents lumps.
- Rotate Pans: Ovens often have hot spots. Rotating the baking sheets halfway ensures even browning.
Variations and Customizations
Make these Red Velvet Cheesecake Cookies your own with creative twists:
- Mini Version: Use a teaspoon for smaller bite-sized cookies—perfect for parties. Reduce baking time to 8–9 minutes.
- Chocolate Drizzle: After cooling, drizzle melted white or dark chocolate over the tops for elegance and extra flavor.
- Crushed Oreos: Mix crushed Oreo cookies into the red velvet dough for a cookies-and-cream twist.
- Peppermint Swirl: Add 1/4 tsp peppermint extract to the cheesecake filling and sprinkle crushed candy canes on top post-bake for a festive holiday version.
- Gluten-Free Option: Substitute the all-purpose flour with a 1:1 gluten-free baking blend. Ensure cocoa powder and other ingredients are certified GF.
- Dairy-Free Version: Use plant-based butter and dairy-free cream cheese (like Kite Hill or Miyoko’s). Replace buttermilk with almond milk + 1/2 tsp lemon juice.
- Spiced Red Velvet: Add 1/2 tsp cinnamon and a pinch of nutmeg to the dry ingredients for a warm, autumnal flair.
- Stuffed Center Variations: Instead of plain cheesecake, mix in mini chocolate chips, raspberry jam, or Nutella into the filling for surprise bursts of flavor.
Health Considerations and Nutritional Value
While undeniably delicious, Red Velvet Cheesecake Cookies are a treat best enjoyed in moderation. Here’s a general nutritional breakdown per cookie (based on 24 cookies per batch):
| Nutrient | Amount Per Cookie |
|---|---|
| Calories | Approx. 180 kcal |
| Total Fat | 10g (Saturated: 6g) |
| Cholesterol | 35mg |
| Sodium | 90mg |
| Total Carbohydrates | 21g (Dietary Fiber: 1g, Sugars: 14g) |
| Protein | 2g |
Considerations:
- Sugar Content: High in added sugars from both the cookie and filling. Those monitoring blood sugar should consume sparingly.
- Saturated Fat: Comes primarily from butter and cream cheese. Opt for reduced-fat versions if desired, though texture may be affected.
- Allergens: Contains dairy, eggs, and wheat. Not suitable for those with these allergies unless modified.
- Portion Control: One cookie satisfies the craving. Serve alongside tea or coffee to stretch the experience.
Ingredients
For the Red Velvet Cookie Dough:
- 1 3/4 cups (220g) all-purpose flour
- 2 tablespoons (10g) unsweetened natural cocoa powder
- 1/2 teaspoon baking soda
- 1/4 teaspoon salt
- 1/2 cup (115g) unsalted butter, softened
- 1/2 cup (100g) granulated sugar
- 1/4 cup (55g) packed light brown sugar
- 1 large egg, room temperature
- 1 1/2 teaspoons vanilla extract
- 1 tablespoon red gel food coloring (not liquid)
- 1 tablespoon buttermilk
- 1/2 teaspoon white vinegar
For the Cheesecake Filling:
- 8 oz (225g) cream cheese, softened
- 1/4 cup (30g) powdered sugar
- 1/2 teaspoon vanilla extract
- 1 large egg yolk
Directions
- In a medium bowl, beat cream cheese, powdered sugar, vanilla, and egg yolk until smooth. Chill for 20 minutes.
- Preheat oven to 350°F (175°C). Line baking sheets with parchment paper.
- Whisk flour, cocoa, baking soda, and salt in a bowl; set aside.
- Using a stand or hand mixer, cream butter and sugars until fluffy (2–3 mins).
- Beat in egg, vanilla, food coloring, buttermilk, and vinegar until combined.
- Gradually mix in dry ingredients until just incorporated. Do not overmix.
- Scoop 1.5-tbsp portions of dough, flatten into discs.
- Place 1 tsp chilled filling in center; wrap dough around it, seal well, and roll into balls.
- Place 2 inches apart on baking sheets. Flatten slightly if needed.
- Bake 10–12 minutes until edges are set but centers soft.
- Cool on pan for 5 minutes, then transfer to wire rack to cool completely.
FAQ
Can I make these cookies ahead of time?
Yes! You can prepare the dough and filling separately, store covered in the fridge for up to 2 days, and bake when ready. You can also freeze unbaked cookie balls for up to 3 months—bake straight from frozen, adding 1–2 minutes to baking time.
Why did my cheesecake filling leak?
This usually happens if the filling wasn’t cold enough or if the dough wasn’t sealed completely. Always chill the filling and ensure no cracks in the dough envelope.
Can I use liquid food coloring?
You can, but it may alter the dough’s texture. Use highly concentrated red liquid or reduce another wet ingredient slightly. Gel is strongly recommended.
How should I store these cookies?
Keep in an airtight container at room temperature for up to 3 days. For longer storage, refrigerate for up to 1 week. Bring to room temperature before serving for best texture.
Can I freeze baked cookies?
Yes. Freeze cooled cookies in a single layer, then transfer to a freezer-safe bag. Thaw at room temperature. Texture remains excellent for up to 2 months.
What if I don’t have buttermilk?
Make a substitute: Add 1 teaspoon lemon juice or vinegar to 1 tablespoon milk. Let sit 5 minutes before using.
Can I double the recipe?
Absolutely. Just make sure your mixer bowl isn’t overloaded. Mix in batches if necessary.
Summary
Delight in the perfect harmony of moist red velvet cookies swirled with creamy, tangy cheesecake filling—each bite is a celebration of flavor, texture, and indulgence.
Easy to make, endlessly customizable, and irresistibly delicious, these Red Velvet Cheesecake Cookies are destined to become a favorite for any occasion.