Introduction
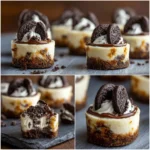
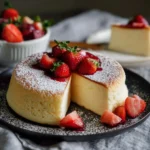
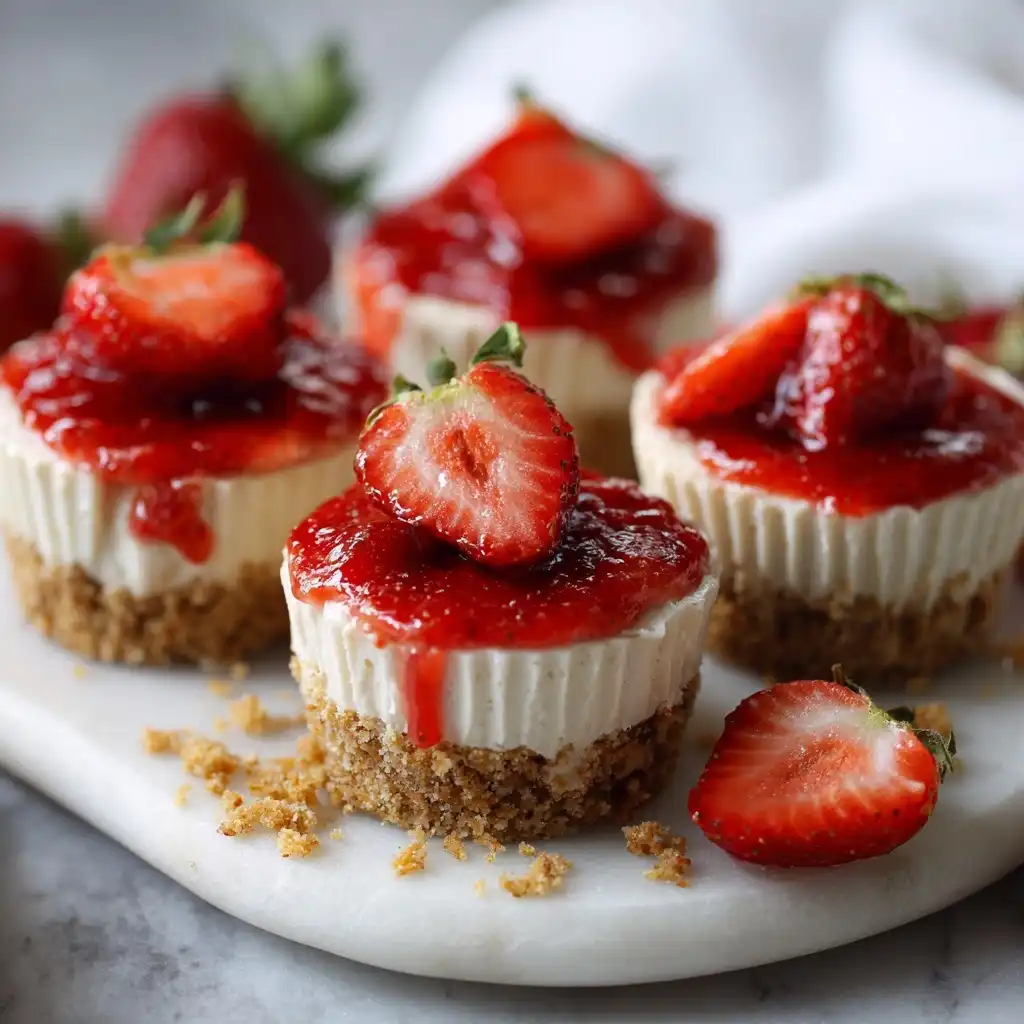
Welcome to the ultimate guide for No-Bake Strawberry Cheesecake Cups — a luscious, refreshing, and effortlessly elegant dessert that brings the creamy richness of classic cheesecake together with the bright, juicy sweetness of ripe strawberries — all served in individual, portable, no-fuss cups! Perfect for summer picnics, holiday buffets, potlucks, kids’ parties, or even a quiet self-care treat after a long day, these chilled delights require zero oven time, minimal cleanup, and deliver maximum flavor in every spoonful. Unlike traditional baked cheesecakes that demand precise water baths, cooling schedules, and hours of patience, this version is assembled in under 30 minutes, then chilled to perfection — making it ideal for beginners, busy parents, meal-prep enthusiasts, and anyone who values both taste and convenience. Whether you’re hosting a garden party or simply craving something cool, creamy, and vibrantly fruity, these strawberry cheesecake cups promise indulgence without the effort — and satisfaction without the stress.
The History
The evolution of the no-bake cheesecake traces back to mid-20th-century American home cooking, when convenience foods like cream cheese (popularized by Philadelphia Cream Cheese starting in 1872), graham crackers, and gelatin began reshaping dessert traditions. Early versions appeared in women’s magazines and community cookbooks as “refrigerator cheesecakes” — simple combinations of softened cream cheese, sweetened condensed milk, lemon juice, and crushed cookies, set with gelatin or simply chilled until firm. The concept gained widespread appeal during the 1950s and ’60s, aligning with postwar shifts toward time-saving techniques and accessible ingredients. Meanwhile, strawberries — cultivated in North America since the 18th century and commercially grown across California by the early 1900s — became synonymous with freshness, celebration, and seasonal luxury. Their natural acidity and floral-sweet profile made them an ideal pairing for rich, tangy cream cheese. As individual-serving desserts surged in popularity with the rise of portion control awareness and Instagram-worthy food presentation in the 2010s, the “cup” format emerged: elegant, mess-free, and highly customizable. Today’s No-Bake Strawberry Cheesecake Cups represent a delicious convergence of culinary heritage, modern lifestyle needs, and social-media-driven creativity — honoring tradition while embracing innovation, one perfectly layered cup at a time.
Ingredients Breakdown
Every exceptional no-bake cheesecake cup begins with thoughtfully chosen, high-quality components — each playing a distinct role in texture, structure, flavor balance, and visual appeal. Below is a comprehensive breakdown of each ingredient, including its functional purpose, substitution notes, and pro tips:
- Graham Cracker Crumbs (1 ½ cups): Forms the sturdy, buttery base layer. The subtle honeyed sweetness and gentle crunch provide structural contrast to the creamy filling. For gluten-free versions, use certified GF graham-style crumbs or digestive biscuits. Toasting the crumbs lightly before mixing with melted butter enhances nuttiness and improves cohesion.
- Unsalted Butter (6 tbsp, melted): Acts as the binding agent for the crust — cooling and solidifying in the fridge to lock crumbs in place. Clarified butter can be used for richer flavor and higher smoke point (though unnecessary here), while coconut oil (refined for neutral taste) works well for dairy-free adaptations.
- Cream Cheese (16 oz / 2 standard blocks, full-fat, room temperature): The foundational element of the filling — responsible for body, tang, and luxurious mouthfeel. Must be fully softened (not melted) to ensure smooth, lump-free blending. Low-fat or Neufchâtel cheese may be substituted but will yield a softer, less stable filling; extra chilling time is recommended.
- Powdered Sugar (⅔ cup, sifted): Sweetens without graininess and contributes to smooth texture and light stability. Sifting prevents clumping and ensures seamless integration. For refined sugar–free versions, use ultra-fine erythritol or monk fruit blend formulated for baking (adjust quantity to taste, as sweetness profiles vary).
- Fresh Lemon Juice (2 tbsp + zest of 1 lemon): Provides essential acidity to cut through richness, enhance strawberry brightness, and stabilize the cream cheese emulsion. Bottled juice lacks aromatic complexity and may introduce off-flavors; always use freshly squeezed. Lemon zest adds fragrant oils that elevate the entire profile.
- Heavy Whipping Cream (1 cup, cold): Whipped to soft peaks and folded in to aerate the filling — lending volume, silkiness, and a delicate cloud-like texture. Ultra-cold cream whips faster and holds longer. Avoid substitutes like half-and-half or milk — they lack sufficient fat (minimum 36% required) and will not hold shape.
- Vanilla Extract (1 tsp, pure): Adds warmth and depth, rounding out sharpness and complementing both strawberry and graham notes. Mexican or Tahitian vanilla offers floral nuance; avoid artificial versions which impart a medicinal aftertaste.
- Fresh Strawberries (1 lb / ~3 cups hulled & sliced): Used in two ways: puréed for the vibrant pink filling layer, and reserved whole or sliced for garnish. Peak-season berries (May–July in most regions) offer optimal sweetness, fragrance, and color. Underripe berries lack sugar and require more added sweetener; overripe ones may introduce excess water — pat dry before puréeing.
- Granulated Sugar (¼ cup, optional, for strawberry purée): Enhances natural fruit sweetness and balances tartness — especially helpful with less-ripe berries. Adjust to taste and skip entirely if berries are exceptionally sweet. Agave or maple syrup may be used, though they add subtle flavor and slight moisture.
- Unflavored Gelatin (1 tsp + 1 tbsp cold water, bloomed): Optional but highly recommended for improved sliceability and heat resistance. Blooming (hydrating in cold water for 5–10 minutes) ensures smooth dissolution without lumps. Dissolve gently over low heat or in microwave (5–10 sec bursts) — never boil, or strength is lost. Not needed if serving immediately and keeping chilled below 65°F.
- Pinch of Salt (¼ tsp): A crucial “flavor amplifier” that heightens sweetness, tempers acidity, and deepens overall complexity. Use fine sea salt or kosher salt — avoid iodized table salt for best results.
Optional finishing touches include fresh mint leaves, edible flowers (e.g., pansies or violets), crumbled freeze-dried strawberries for intense crunch and color pop, or a drizzle of balsamic glaze for sophisticated contrast.
Step-by-Step Recipe
This meticulously tested method ensures foolproof results — from crisp crust to velvety filling to jewel-toned strawberry layer — every single time. Follow each stage precisely for optimal texture, stability, and visual impact.
- Prepare the Graham Cracker Crust: In a medium bowl, combine 1 ½ cups graham cracker crumbs and 6 tablespoons melted unsalted butter. Stir thoroughly with a fork until all crumbs are evenly moistened and resemble wet sand. Press 1 generous tablespoon firmly into the bottom of each cavity of a standard 12-cup muffin tin lined with parchment paper liners (or use reusable silicone cups for eco-friendly service). Use the back of a measuring spoon or a small flat-bottomed glass to compact the crust into an even, tight layer (~¼ inch thick). Chill uncovered for at least 15 minutes to set.
- Make the Strawberry Purée: Hull and roughly chop 2 cups of fresh strawberries. Place in a blender or food processor with optional ¼ cup granulated sugar and 1 tsp lemon juice. Blend on high until completely smooth (30–45 seconds). Strain through a fine-mesh sieve into a small bowl, pressing with a spatula to extract maximum liquid and discard seeds/pulp. You should yield ~¾ cup vibrant purée. Refrigerate until ready to use (up to 2 hours ahead).
- Bloom the Gelatin (if using): Sprinkle 1 teaspoon unflavored gelatin over 1 tablespoon cold water in a small heatproof dish. Let sit undisturbed for 5 minutes until puffed and spongy. Gently melt using either: (a) microwave in 5-second bursts, stirring between, until fully liquefied but not boiling; or (b) place dish over barely simmering water for ~30 seconds, stirring constantly. Set aside to cool slightly — it must remain liquid but not hot when added.
- Prepare the Cream Cheese Filling: In a large bowl, beat 16 oz full-fat cream cheese (room temperature) with an electric mixer on medium speed for 1–2 minutes until completely smooth and creamy — scraping down sides frequently. Gradually add sifted powdered sugar (⅔ cup), beating on low until incorporated, then increase to medium for 30 seconds until fluffy. Add lemon juice (2 tbsp), lemon zest, vanilla extract (1 tsp), and salt (¼ tsp); mix just until combined. Do not overbeat — this can incorporate too much air and cause separation later.
- Whip the Cream: In a separate chilled metal or glass bowl, pour 1 cup very cold heavy whipping cream. Using chilled beaters, whip on medium-high speed until soft peaks form — about 1 minute 15 seconds. Watch closely: over-whipping leads to butter. Transfer whipped cream to a large spatula-friendly bowl.
- Combine Filling & Fold Gently: Pour the slightly cooled gelatin mixture (if using) into the cream cheese mixture and stir with a silicone spatula until fully dissolved and uniform. Then, add about ⅓ of the whipped cream and fold vigorously with a large spatula using broad, sweeping motions — this lightens the dense base. Next, gently fold in remaining whipped cream in two additions, rotating the bowl and using a “cut-and-fold” motion — lifting from bottom and turning over — until no white streaks remain. Overmixing deflates air and compromises fluffiness; aim for homogeneity with preserved volume.
- Layer the Cups: Remove chilled crusts from refrigerator. Spoon or pipe ~2 tablespoons of the cream cheese filling into each cup, spreading gently to cover the crust and create a smooth, level surface. Tap tin lightly on counter to release air bubbles. Return to fridge for 10 minutes to partially set.
- Add the Strawberry Layer: Stir the chilled strawberry purée to reincorporate any settled liquid. Spoon or drizzle ~1 tablespoon over each cream cheese layer. Tilt cup slightly and swirl gently with a toothpick or skewer for marbled effect (optional), or leave pristine for bold color contrast. Avoid pressing or stirring deeply — you want clean separation between layers.
- Chill to Perfection: Cover muffin tin loosely with plastic wrap or transfer cups to an airtight container. Refrigerate for a minimum of 4 hours — preferably overnight (8–12 hours). This extended rest allows full setting, flavor melding, and optimal slice-and-serve integrity. Do not freeze unless absolutely necessary (texture becomes icy; thaw slowly in fridge for 4+ hours).
- Garnish & Serve: Just before serving, top each cup with a fresh strawberry half, a mint leaf, and/or a sprinkle of crumbled freeze-dried strawberries. For elegant presentation, serve in clear disposable or reusable dessert cups with wide openings. Cups hold beautifully for up to 3 days refrigerated — though peak freshness is within 48 hours.
Tips
- Room Temperature Is Non-Negotiable: Cream cheese *must* be truly softened — cool to the touch but not warm or oily. Microwaving for more than 10 seconds risks partial melting and graininess. Let sit on counter 1–2 hours ahead or cut into cubes for faster, even softening.
- Chill All Equipment: Whip cream in a chilled bowl with chilled beaters — even 10–15 minutes in the freezer helps dramatically. Cold tools = faster, stiffer, longer-lasting peaks.
- Sift Your Sugar: Powdered sugar clumps easily due to cornstarch. Sifting prevents gritty texture and ensures seamless incorporation into the cream cheese base.
- Strawberry Prep Matters: Wash berries *just* before hulling and slicing — excess moisture dilutes purée and weakens structure. Pat thoroughly with paper towels or a clean linen cloth.
- Strain, Don’t Skip: Even “seedless” varieties contain tiny seeds that affect mouthfeel. Straining yields silky, professional-grade purée — worth the extra 60 seconds.
- Use a Piping Bag for Clean Layers: Fit a large zip-top bag with a wide round tip (or snip corner) to neatly portion filling and purée. Prevents spills, ensures consistent volume, and gives bakery-level precision.
- Tap Out Air Bubbles: After adding each layer, tap the tin firmly on the counter 3–4 times. This eliminates tiny air pockets that can cause cracks, gaps, or instability during serving.
- Don’t Rush the Chill: While 4 hours is functional, 8+ hours delivers transformative texture — firmer set, smoother mouthfeel, and enhanced flavor harmony. Overnight chilling is strongly encouraged.
- Warm Your Knife (If Cutting): Though served in cups, if presenting on a platter or slicing a larger batch, dip knife in hot water and wipe dry between cuts for clean edges.
- Prevent Condensation: To avoid “sweating” on chilled cups, remove from fridge 5–8 minutes before serving — just enough to take the deep chill off surface without softening layers.
- Label & Date: If prepping ahead, label containers with date and contents. These are best consumed within 72 hours for optimal freshness, texture, and food safety.
Variations and Customizations
One of the greatest joys of No-Bake Strawberry Cheesecake Cups lies in their extraordinary versatility — a blank canvas awaiting your personal twist. Below are inspired, chef-tested variations spanning dietary needs, global flavors, seasonal shifts, and playful creativity — all maintaining structural integrity and balanced taste:
- Gluten-Free: Swap graham crackers for gluten-free honey graham crumbs, GF shortbread cookies, or toasted almond flour + coconut flour blend (¾ cup almond flour + ¼ cup coconut flour + 2 tbsp maple syrup + 3 tbsp melted butter). Verify all labels for cross-contamination.
- Dairy-Free/Vegan: Use vegan cream cheese (Kite Hill or Miyoko’s), full-fat coconut cream (chilled overnight, scoop solid cream only), and refined coconut oil instead of butter. Sweeten with maple syrup or agave. Replace gelatin with agar-agar (1 tsp agar powder boiled in ¼ cup water, cooled slightly) — note agar sets firmer and faster.
- Protein-Packed: Add 1–2 scoops unflavored or vanilla plant-based protein powder to cream cheese mixture (start with 1 scoop, adjust liquid as needed). Or swirl in Greek yogurt (¼ cup strained) for tang and thickness — reduce cream slightly to compensate.
- Chocolate-Dipped: Dip rim of each cup in melted dark chocolate (tempered or with 1 tsp coconut oil), then roll in crushed freeze-dried strawberries or cocoa nibs. Let set on parchment before filling.
- White Chocolate–Strawberry: Melt 4 oz high-quality white chocolate, cool to room temp, and fold into cream cheese mixture before adding whipped cream. Enhances sweetness and adds creamy depth that complements strawberry beautifully.
- Balsamic-Infused: Simmer ½ cup strawberry purée with 1 tbsp aged balsamic vinegar and 1 tsp brown sugar until reduced by ⅓ and syrupy (5–7 min). Cool completely before layering — adds complex, savory-sweet sophistication.
- Tropical Twist: Replace ¼ cup strawberry purée with mango or passionfruit purée. Top with toasted coconut flakes and lime zest instead of mint.
- Herbal Elegance: Infuse cream with 2–3 sprigs of fresh basil or lemon verbena (heat gently, steep 20 min, strain and chill) before whipping. Pair with black pepper–infused graham crust for surprising nuance.
- Boozy Upgrade: Add 1 tbsp Chambord (black raspberry liqueur), Grand Marnier, or elderflower cordial to strawberry purée. Reduce added sugar accordingly. Garnish with candied violets.
- Mini “Cheesecake Shots”: Serve in 2-oz martini glasses or mini mason jars for cocktail parties. Layer crust → filling → purée → whipped cream → fresh berry. Serve with edible spoons!
- Seasonal Swaps: In fall: substitute roasted apple purée + cinnamon graham crust. Winter: blood orange curd layer + ginger snap crust. Spring: rhubarb-strawberry compote + lavender-infused cream.
- Kid-Friendly Fun: Add natural red food coloring (beet powder or strawberry powder) for vivid hue. Use animal cracker or Oreos for crust. Top with rainbow sprinkles and mini marshmallows.
Health Considerations and Nutritional Value
While undeniably indulgent, No-Bake Strawberry Cheesecake Cups can be adapted mindfully to support wellness goals — without sacrificing joy or flavor. Understanding their nutritional composition empowers informed choices:
Standard Serving (1 cup, approx. 180g):
- Calories: ~290–320 kcal
- Total Fat: 18–21g (11–14g saturated)
- Carbohydrates: 26–30g (18–22g sugars, primarily from fruit, dairy, and added sweeteners)
- Protein: 4–5g (from cream cheese and trace dairy)
- Fiber: ~0.5g (low unless GF crust uses high-fiber crumbs or chia seeds)
- Vitamin C: ~35–45mg (≈50–75% DV from fresh strawberries)
- Calcium: ~50–65mg (≈5–7% DV from dairy components)
- Antioxidants: Rich in anthocyanins (from strawberries), lycopene (trace), and polyphenols (from lemon, graham spices)
Key Health Notes:
- Natural Sugars vs. Added Sugars: Strawberries contribute intrinsic fructose and glucose — metabolized more gradually than refined sugar. Limiting added sugars (powdered sugar, optional granulated) supports blood sugar balance and dental health.
- Full-Fat Dairy Benefits: Contrary to outdated myths, full-fat dairy in moderation is associated with satiety, nutrient absorption (fat-soluble vitamins A/D/E/K), and lower risk of metabolic syndrome. Cream cheese provides conjugated linoleic acid (CLA) and vitamin A.
- Strawberry Superpowers: One cup of strawberries contains more vitamin C than an orange — plus folate, potassium, manganese, and ellagic acid (a potent anti-inflammatory and anticancer compound).
- Gut-Friendly Potential: When made with live-culture cream cheese or paired with probiotic-rich toppings (e.g., kefir-soaked granola crumble), these cups gain subtle microbiome-supportive properties.
- Portion Awareness: Individual cups inherently encourage mindful eating — no second helpings or lingering bowls. Their satisfying fat-protein-carb ratio promotes sustained energy and reduces cravings.
- Allergen Transparency: Contains dairy, wheat (unless GF), and potential egg (if using certain commercial whipped toppings). Always disclose ingredients for guests with sensitivities.
- Lower-Sugar Options: Reduce powdered sugar to ½ cup and rely on ripe strawberries for sweetness. Add 1–2 drops stevia or monk fruit for lift without calories. Note: excessive sugar reduction may compromise texture and shelf life.
- Sodium Consideration: Naturally low in sodium (~120mg per cup), making it suitable for heart-healthy diets — just verify butter and cream cheese brands for added salt content.
Remember: Nutrition is deeply personal. These cups shine brightest as part of a balanced, joyful relationship with food — not restriction, but celebration with intention.
Ingredients
- 1 ½ cups graham cracker crumbs (about 10–12 full sheets)
- 6 tablespoons unsalted butter, melted and slightly cooled
- 16 oz full-fat cream cheese, at true room temperature (not warm)
- ⅔ cup powdered sugar, sifted
- 2 tablespoons fresh lemon juice (plus zest of 1 lemon)
- 1 teaspoon pure vanilla extract
- ¼ teaspoon fine sea salt
- 1 cup heavy whipping cream, very cold
- 1 pound fresh strawberries, washed, hulled, and roughly chopped (reserve 6–8 perfect berries for garnish)
- ¼ cup granulated sugar (optional, for strawberry purée — adjust to taste)
- 1 teaspoon unflavored gelatin + 1 tablespoon cold water (optional, for enhanced stability)
- Extra garnishes: fresh mint leaves, crumbled freeze-dried strawberries, edible flowers, balsamic glaze
Directions
- Line a 12-cup standard muffin tin with parchment paper liners or use reusable silicone dessert cups. Set aside.
- In a medium bowl, combine graham cracker crumbs and melted butter. Mix with a fork until evenly moistened. Press 1 generous tablespoon firmly into the bottom of each liner. Chill for 15 minutes.
- While crust chills, prepare strawberry purée: In a blender, combine 2 cups chopped strawberries, optional ¼ cup granulated sugar, and 1 tsp lemon juice. Blend until smooth. Strain through a fine-mesh sieve into a bowl, pressing pulp with a spatula. Refrigerate purée until cold — at least 20 minutes.
- If using gelatin, sprinkle over 1 tbsp cold water in a small dish. Let bloom 5 minutes. Gently melt in microwave (5-sec bursts) or over simmering water. Set aside to cool slightly — must remain liquid.
- In a large bowl, beat cream cheese with electric mixer on medium until creamy and lump-free (1–2 min). Add sifted powdered sugar gradually; beat on low, then medium 30 sec. Add lemon juice, zest, vanilla, and salt; mix just until combined.
- In a separate chilled bowl, whip cold heavy cream to soft peaks (~1 min 15 sec). Do not over-whip.
- Stir bloomed gelatin into cream cheese mixture until fully dissolved. Fold in ⅓ of whipped cream to lighten. Gently fold in remaining whipped cream in two batches until uniform and airy — no streaks.
- Remove chilled crusts. Spoon ~2 tbsp cream cheese filling into each cup. Tap tin firmly to settle. Chill 10 minutes.
- Spoon ~1 tbsp chilled strawberry purée over each filling layer. Optional: swirl gently with toothpick.
- Cover loosely and refrigerate for minimum 4 hours — ideally 8–12 hours or overnight.
- Just before serving, garnish each cup with a fresh strawberry half, mint leaf, and/or freeze-dried strawberry crumbles.
FAQ
- Can I make these ahead of time?
- Absolutely — and we recommend it! They keep beautifully refrigerated for up to 3 days. For best texture and flavor, prepare the day before serving. Crusts can be pressed and chilled up to 2 days ahead; fillings assembled up to 24 hours prior to layering.
- Why did my filling get lumpy or grainy?
- Most commonly due to cold cream cheese or insufficient beating. Ensure cream cheese is truly room temp (cool to touch, not oily) and beat thoroughly before adding other ingredients. Also, avoid adding cold lemon juice or gelatin directly — warm gelatin slightly and bring lemon juice to room temp first.
- Can I freeze them?
- Technically yes, but not ideal. Freezing causes ice crystals that break down texture — filling may weep or become watery upon thawing. If freezing is necessary, wrap individual cups tightly in plastic + foil, freeze up to 1 month, and thaw overnight in fridge (not at room temp). Expect minor textural changes.
- My strawberry layer bled into the filling — why?
- Excess moisture is the culprit. Always pat berries dry before puréeing, strain thoroughly, and chill purée well. Also, ensure cream cheese layer is adequately chilled (10+ min) before adding purée. Using gelatin helps create a barrier.
- What can I use instead of graham crackers?
- Endless options! Try ginger snaps (spicy contrast), chocolate wafers (decadent twist), shortbread (buttery elegance), gingersnaps, Biscoff cookies (caramelized depth), or even crushed pretzels for sweet-salty intrigue. Adjust butter quantity slightly based on crumb absorbency.
- Can I use frozen strawberries?
- Fresh is strongly preferred for flavor, color, and texture. If using frozen, thaw completely, drain *extremely* well in a fine sieve (press gently), and reduce added sugar — frozen berries are often sweeter and more watery. Expect paler color and softer set.
- How do I prevent soggy crusts?
- Ensure butter is fully absorbed before chilling, press crusts firmly and evenly, and always chill crusts *before* adding filling. Avoid over-wetting crumbs —