Honey Garlic Chicken Thighs: A Sweet and Savory Delight
The History
The origins of honey garlic chicken can be traced back to the fusion of Asian and Western culinary traditions, particularly within North American Chinese cuisine. While traditional Chinese cooking features a variety of sauces made from fermented black beans, soy, and ginger, the concept of combining sweet honey with pungent garlic gained popularity in the 20th century as Chinese immigrants adapted their recipes to local tastes. Canada, especially cities like Toronto and Vancouver with large Chinese communities, is often credited with popularizing the honey garlic flavor profile—initially showcased in dishes like honey garlic spare ribs and later applied to chicken.
Chicken thighs became a favored cut for this recipe due to their rich flavor, juiciness, and ability to withstand longer cooking times without drying out. Unlike leaner cuts such as chicken breast, thighs absorb flavors more deeply and caramelize beautifully under heat. Over time, honey garlic chicken thighs evolved into a staple comfort dish found in home kitchens, diners, and takeout menus across North America. Today, it’s celebrated not only for its bold taste but also for its simplicity and versatility, making it a go-to choice for weeknight dinners and family gatherings alike.
Ingredients Breakdown
Creating the perfect honey garlic chicken thighs hinges on using high-quality ingredients that balance sweetness, saltiness, acidity, and umami. Here’s a detailed look at each component:
- Chicken Thighs (bone-in, skin-on): These are preferred for their succulence and fat content, which keeps the meat moist and enhances browning. The skin crisps up beautifully when seared, adding texture to the dish.
- Olive Oil or Vegetable Oil: Used for searing the chicken, oil helps develop a golden crust and prevents sticking. High smoke point oils work best.
- Garlic (freshly minced): Fresh garlic delivers a sharp, aromatic punch that mellows slightly during cooking, blending seamlessly into the sauce.
- Soy Sauce (low sodium preferred): Provides saltiness and depth, contributing to the savory umami backbone of the sauce. Tamari can be used as a gluten-free alternative.
- Honey (pure, raw if possible): Acts as both a sweetener and glazing agent. Its natural sugars help create a glossy finish and promote caramelization.
- Rice Vinegar or Apple Cider Vinegar: Adds brightness and cuts through the richness of the honey and fat, balancing the overall flavor profile.
- Fresh Ginger (grated): Introduces a warm, slightly spicy note that complements both garlic and honey.
- Water or Chicken Broth: Helps thin the sauce slightly and ensures even distribution while simmering.
- Cornstarch (optional): Used as a thickening agent to give the sauce a silky, restaurant-style consistency.
- Sesame Oil (toasted, for finishing): A few drops add an earthy aroma and elevate the final presentation.
- Garnishes – Green Onions, Sesame Seeds: Provide freshness, color contrast, and subtle nuttiness.
Step-by-Step Recipe
- Prep the Chicken: Start by patting 6 bone-in, skin-on chicken thighs dry with paper towels. This step is crucial for achieving crispy skin. Season generously with salt and pepper on both sides.
- Preheat the Pan: Place a large oven-safe skillet (like cast iron) over medium-high heat. Add 2 tablespoons of olive oil and allow it to shimmer—this ensures proper searing.
- Sear the Chicken: Carefully place the chicken thighs skin-side down in the hot pan. Cook undisturbed for 6–7 minutes until the skin is deep golden brown and crisp. Flip and cook the other side for 3–4 minutes. Remove the chicken and set aside on a plate.
- Build the Sauce Base: In the same skillet (now full of flavorful rendered fat), reduce the heat to medium. Add 6 cloves of minced garlic and 1 tablespoon of grated fresh ginger. Sauté for about 30 seconds until fragrant—be careful not to burn.
- Create the Liquid Mixture: Stir in ½ cup low-sodium soy sauce, ⅓ cup pure honey, 2 tablespoons rice vinegar, and ¼ cup chicken broth. Whisk together and bring to a gentle simmer.
- Optional Thickening: In a small bowl, mix 1 tablespoon cornstarch with 2 tablespoons cold water to make a slurry. Slowly pour into the sauce while stirring. Let it thicken for 1–2 minutes until glossy and coating the back of a spoon.
- Return Chicken to Skillet: Place the seared chicken thighs back into the pan, skin-side up. Spoon some sauce over them, but avoid submerging completely to preserve crispness.
- Bake Until Cooked Through: Transfer the skillet to a preheated oven at 375°F (190°C). Bake uncovered for 25–30 minutes, or until the internal temperature reaches 165°F (74°C).
- Glaze and Finish: Remove from oven and brush the tops with extra sauce. For a deeper glaze, broil for 2–3 minutes, watching closely to prevent burning.
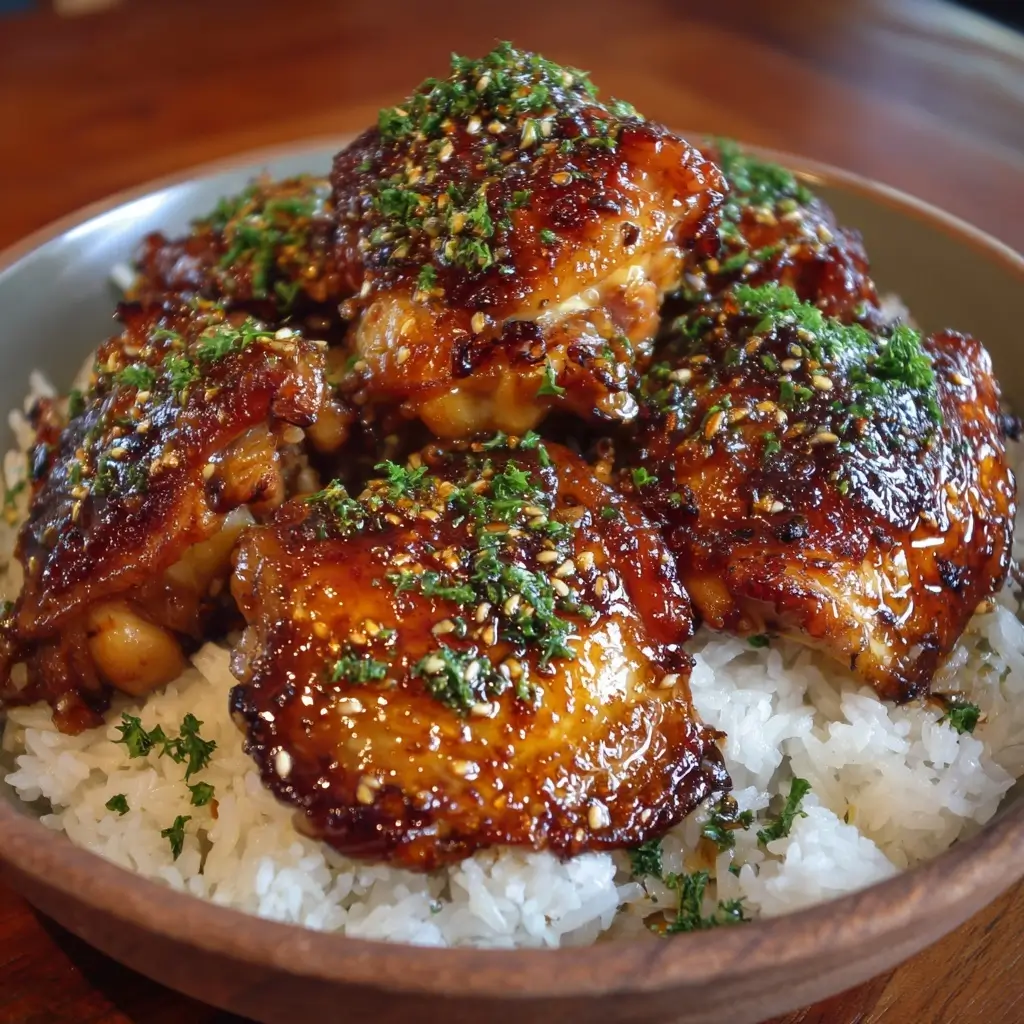
- Rest and Garnish: Let the chicken rest for 5 minutes. Drizzle with a touch of toasted sesame oil, then sprinkle chopped green onions and sesame seeds before serving.
Tips
- Dry the Skin Well: Moisture is the enemy of crisp skin. Always pat chicken thoroughly before seasoning.
- Don’t Crowd the Pan: Cook in batches if necessary to ensure even browning and proper air circulation.
- Use a Meat Thermometer: Ensures accuracy and prevents overcooking. Insert into the thickest part without touching bone.
- Reserve Some Sauce: Set aside a portion of the raw sauce before adding it to the pan with cooked chicken to use as a fresh drizzle.
- Basting Boosts Flavor: During baking, baste the chicken halfway through with the pan sauce for deeper infusion.
- Let It Rest: Allows juices to redistribute, resulting in more tender, flavorful meat.
- Crispy Skin Secret: After baking, turn on the broiler briefly to re-crisp the skin if needed.
Variations and Customizations
Honey garlic chicken thighs are incredibly adaptable. Whether you’re catering to dietary needs, global flavors, or seasonal ingredients, here are several creative twists:
- Spicy Honey Garlic: Add 1–2 teaspoons sriracha, red pepper flakes, or a sliced fresh chili to the sauce for a fiery kick.
- Keto-Friendly Version: Replace honey with sugar-free maple syrup or monk fruit-based honey substitute. Use coconut aminos instead of soy sauce for lower sodium and carbs.
- Grilled Option: Marinate chicken thighs in honey garlic sauce (without cornstarch), then grill over indirect heat for a smoky twist.
- Slow Cooker Method: Sear chicken first, then transfer to a slow cooker with sauce. Cook on low for 5–6 hours. Finish under broiler to crisp skin.
- Instant Pot Adaptation: Use sauté function to sear, then pressure cook with sauce for 8 minutes. Quick release, then broil for glaze.
- Pineapple Twist: Add ½ cup crushed pineapple (with juice) to the sauce for a tropical flair—pairs wonderfully with ham or bell peppers.
- Herb-Infused: Stir in rosemary, thyme, or cilantro at the end for aromatic complexity.
- Vegan Alternative: Use portobello mushrooms or tofu cubes marinated and glazed similarly for plant-based eaters.
- Sticky Ribs Variation: Apply the same sauce to pork ribs for a crowd-pleasing appetizer or main course.
- Mediterranean Fusion: Swap soy sauce for fish sauce, add lemon zest, and serve over couscous with olives and feta.
Health Considerations and Nutritional Value
While honey garlic chicken thighs are undeniably delicious, understanding their nutritional composition can help you enjoy them mindfully.
Nutrition Facts (per serving, assuming 1 thigh with sauce):
- Calories: ~380–420 kcal
- Protein: ~28–32g (excellent source)
- Fat: ~20–25g (mostly unsaturated and monounsaturated fats from skin and oil)
- Saturated Fat: ~5–7g
- Carbohydrates: ~20–25g (primarily from honey)
- Sugar: ~18–22g (natural sugars from honey)
- Sodium: ~800–1000mg (can vary based on soy sauce type)
- Vitamins & Minerals: Rich in B-vitamins (especially B6 and niacin), selenium, phosphorus, and iron.
Health Notes:
- Honey: Though natural, it’s still high in sugar. Moderation is key, especially for diabetics or those managing blood glucose levels.
- Sodium Awareness: Soy sauce contributes significant sodium. Opt for low-sodium versions or dilute with water/broth to reduce intake.
- Healthy Fats: Chicken thighs contain heart-healthy fats and contribute to satiety, helping regulate appetite.
- Balanced Meal Pairing: Serve with steamed vegetables, quinoa, or brown rice to increase fiber and nutrient density.
- Allergens: Contains soy; may contain wheat (in regular soy sauce). Always check labels if allergies are a concern.
Ingredients
- 6 bone-in, skin-on chicken thighs (about 2.5 lbs total)
- Salt and freshly ground black pepper (to taste)
- 2 tablespoons olive oil (or avocado oil)
- 6 cloves garlic, finely minced
- 1 tablespoon fresh ginger, grated
- ½ cup low-sodium soy sauce (or tamari for gluten-free)
- ⅓ cup pure honey (preferably raw)
- 2 tablespoons rice vinegar (or apple cider vinegar)
- ¼ cup chicken broth (or water)
- 1 tablespoon cornstarch + 2 tablespoons water (for slurry, optional)
- 1 teaspoon toasted sesame oil (for finishing)
- 3 green onions, thinly sliced
- 1 tablespoon sesame seeds (white or black)
Directions
- Preheat your oven to 375°F (190°C). Pat the chicken thighs dry with paper towels and season both sides liberally with salt and pepper.
- In a large oven-safe skillet (cast iron recommended), heat olive oil over medium-high heat until shimmering.
- Place chicken thighs skin-side down in the skillet. Cook for 6–7 minutes without moving, until skin is golden brown and releases easily. Flip and cook the other side for 3–4 minutes. Transfer to a plate.
- Reduce heat to medium. Add minced garlic and grated ginger to the skillet. Sauté for 30 seconds until fragrant.
- Pour in soy sauce, honey, rice vinegar, and chicken broth. Whisk well and bring to a simmer.
- If thickening the sauce, stir cornstarch slurry into the mixture and cook for 1–2 minutes until glossy and slightly thickened.
- Return chicken thighs to the skillet, skin-side up. Spoon sauce around but not over the top to maintain crispiness.
- Transfer the skillet to the preheated oven. Bake for 25–30 minutes, or until internal temperature reaches 165°F (74°C).
- Remove from oven. Brush chicken with additional sauce. Broil for 2–3 minutes for a deeper glaze, if desired.
- Let rest for 5 minutes. Drizzle with sesame oil, then garnish with green onions and sesame seeds.
- Serve immediately with your favorite sides such as roasted vegetables, rice, or noodles.
FAQ
Can I use boneless, skinless chicken thighs?
Yes, but they will cook faster and may dry out more easily. Reduce oven time to 18–20 minutes and monitor closely.
Can I make this ahead of time?
Absolutely. Prepare and refrigerate for up to 3 days. Reheat in a 350°F oven until warmed through. You can also freeze for up to 3 months—thaw overnight before reheating.
Why did my sauce turn out too thin/thick?
If too thin, simmer longer or add another slurry. If too thick, whisk in a splash of broth or water to loosen.
Is honey garlic chicken healthy?
It contains quality protein and beneficial nutrients, but moderation is advised due to sugar and sodium content. Balance with plenty of veggies and whole grains.
Can I double the recipe?
Yes, just use two skillets or work in batches to avoid overcrowding. Double all ingredients accordingly.
What sides pair well with this dish?
Excellent options include jasmine rice, garlic broccoli, stir-fried bok choy, steamed edamame, cucumber salad, or kimchi fried rice.
Can I use honey substitutes?
For vegan diets, try agave nectar or date syrup. For keto, opt for monk fruit syrup or erythritol-based blends. Note: taste and texture may vary.
How do I store leftovers?
Store in an airtight container in the refrigerator for up to 4 days. Reheat gently in the oven or skillet to preserve texture.
Summary
Honey garlic chicken thighs offer a perfect harmony of sweet, savory, and umami flavors, featuring juicy meat coated in a glossy, aromatic glaze. Easy to prepare yet impressive enough for guests, this dish bridges comfort food and gourmet appeal.
With endless customization options—from spicy kicks to healthier swaps—it remains a timeless favorite for home cooks seeking bold taste and satisfying results in every bite.