Delightful Mini Berry Pies Recipe
The History
Pies have been a beloved staple in culinary traditions across the world for centuries, with their origins tracing back to ancient civilizations. The Greeks are credited with creating early versions of pie-like dishes as far back as 500 BC, using a mixture of honey and leftover meats enclosed in a crust made from flour and water. As trade routes expanded and ingredients diversified, sweet fruit pies began to emerge in medieval Europe, particularly in England during the 14th century. These early recipes often included apples, cherries, and berries baked inside thick pastry shells.
Berry pies specifically gained popularity during the 18th and 19th centuries when wild berries became more accessible and sugar became less of a luxury. In North America, pioneers adapted European pie-making techniques using locally available fruits such as blueberries, raspberries, blackberries, and strawberries. The tradition evolved into a symbol of home-baked comfort and seasonal celebration.
The concept of mini pies—individual-sized desserts—emerged as a charming way to serve guests at gatherings, offering convenience and elegance. Perfect for picnics, brunches, or holiday tables, these bite-sized treats became especially popular in the 20th century as entertaining styles shifted toward portion control and visual appeal. Today, delightful mini berry pies represent not only a delicious dessert but also a nod to generations of bakers who cherished the art of homemade goodness.
Ingredients Breakdown
To create truly delightful mini berry pies, it’s essential to understand each ingredient’s role in achieving the perfect balance of flavor, texture, and structure:
- All-Purpose Flour: The foundation of the pie crust, providing gluten development that gives the dough its structure and slight elasticity. It also contributes to the flakiness when combined properly with fat.
- Cold Unsalted Butter: Essential for creating a rich, flaky crust. Keeping the butter cold ensures that it creates steam pockets during baking, which leads to layers and lift in the pastry.
- Sugar (Granulated): Adds sweetness to both the filling and crust. In the crust, it helps with browning and tenderness; in the filling, it balances the tartness of the berries.
- Salt: Enhances overall flavor and counteracts excessive sweetness. Even a small amount makes a significant difference in depth of taste.
- Ice Water: Used sparingly to bind the dough without overdeveloping gluten. Cold water keeps the butter from melting prematurely, preserving the flakiness.
- Fresh Mixed Berries: A combination of blueberries, raspberries, blackberries, and sliced strawberries offers a vibrant array of flavors and colors. Fresh berries provide natural juiciness and brightness.
- Lemon Juice: Brightens the berry mixture, cutting through sweetness and enhancing fruit flavor. It also helps activate pectin for better gel formation.
- Cornstarch: Acts as a thickening agent to absorb excess juice released by the berries during baking, preventing soggy bottoms and ensuring a luscious, spoonable consistency.
- Vanilla Extract: Adds warmth and complexity to the filling, rounding out the sharp acidity of the berries.
- Cinnamon (Optional): A pinch adds subtle spice and nostalgia, complementing the sweetness without overpowering the fruit.
- Egg Wash (Egg + Milk): Brushed on top before baking, this creates a golden, glossy finish on the crusts.
- Coarse Sugar (for topping): Sprinkled on just before baking, it adds a delicate crunch and sparkling appearance.
Step-by-Step Recipe
- Prepare the Pie Crust Dough: In a large mixing bowl, combine 2½ cups all-purpose flour and 1 teaspoon salt. Cut in 1 cup (2 sticks) of very cold unsalted butter using a pastry cutter or two forks until the mixture resembles coarse crumbs with pea-sized pieces of butter remaining.
- Gradually add 6–8 tablespoons of ice-cold water, one tablespoon at a time, mixing gently with a fork until the dough begins to clump together. Be careful not to overmix—this prevents toughness.
- Divide the dough into two equal portions, shape each into a flat disc, wrap in plastic wrap, and refrigerate for at least 1 hour (or up to 2 days). This chilling step is crucial for relaxing the gluten and firming up the butter.
- Make the Berry Filling: While the dough chills, prepare the filling. In a medium saucepan, combine 4 cups mixed fresh berries, ½ cup granulated sugar, 2 tablespoons cornstarch, 1 tablespoon lemon juice, ½ teaspoon vanilla extract, and a pinch of cinnamon (if using).
- Cook over medium heat, stirring frequently, until the mixture comes to a gentle boil and thickens—about 8–10 minutes. Remove from heat and let cool completely. You can speed this process by placing the pan in an ice bath, stirring occasionally.
- Preheat Oven & Prepare Muffin Tin: Preheat your oven to 375°F (190°C). Lightly grease a 12-cup standard muffin tin with nonstick spray or brush with melted butter.
- Roll Out the Bottom Crusts: On a lightly floured surface, roll out one chilled dough disc to about ⅛-inch thickness. Using a round cookie cutter or glass (approximately 3.5 inches in diameter), cut out 12 circles. Carefully press each into the bottom and sides of the muffin cups. If the dough cracks, gently patch with scraps.
- Add the Filling: Once the berry mixture has cooled, give it a stir and evenly distribute it among the prepared crusts, filling each about three-quarters full to allow room for expansion.
- Cut and Place Top Crusts: Roll out the second dough disc and cut 12 smaller circles (about 2.5–3 inches) or use decorative cutters for flair. Place one top crust over each filled pie. Alternatively, you can leave them open-faced for a rustic look.
- Seal and Vent: Moisten the edges of the bottom crust with a bit of water, then press the top crust gently around the rim to seal. Use a fork to crimp the edges decoratively. If using full top crusts, cut 2–3 small slits in the center to allow steam to escape.
- Egg Wash and Sugar: In a small bowl, whisk together 1 egg and 1 tablespoon milk. Lightly brush this mixture over the top crusts and sprinkle with coarse sugar for shine and crunch.
- Bake: Place the muffin tin in the preheated oven and bake for 25–30 minutes, or until the crusts are golden brown and the filling is bubbling slightly through the vents.
- Cool Completely: Allow the mini pies to cool in the tin for 10 minutes, then carefully remove them using a small offset spatula or butter knife. Transfer to a wire rack to cool completely, which allows the filling to set properly.
- Serve: Serve plain or with a dollop of whipped cream, vanilla ice cream, or a dusting of powdered sugar.
Tips
- Keep Everything Cold: The key to a flaky crust is maintaining cold ingredients throughout preparation. Chill your bowl, rolling pin, and even flour if your kitchen is warm.
- Don’t Skip Cooling the Filling: Adding hot filling to raw dough can melt the butter in the crust, leading to greasy, tough results. Always ensure the berry mixture is fully cooled.
- Use Fresh, Ripe Berries: While frozen berries can work in a pinch, they release more moisture and may require additional thickener. Fresh berries offer superior texture and flavor.
- Prevent Soggy Bottoms: For extra crispness, blind-bake the bottom crusts for 5–7 minutes before adding filling. Simply line the dough with parchment and fill with pie weights or dried beans.
- Uniform Thickness: When rolling dough, aim for consistent thickness so all pies bake evenly. Too thin and they might burn; too thick and they won’t cook through.
- Work Quickly: Handle the dough as little as possible to avoid warming it with your hands. Warm dough becomes sticky and difficult to manage.
- Storage Tip: These mini pies can be stored in an airtight container at room temperature for up to 2 days or refrigerated for up to 5 days. Reheat gently in the oven for best texture.
Variations and Customizations
The beauty of mini berry pies lies in their versatility. Here are some creative twists to suit different tastes and occasions:
- Fruit Swaps: Try peach, cherry, apple, or rhubarb-strawberry combinations. Adjust sugar and thickener based on the fruit’s natural juiciness.
- Gluten-Free Option: Substitute the all-purpose flour with a high-quality gluten-free flour blend designed for baking. Add ½ teaspoon xanthan gum if not already included.
- Dairy-Free Crust: Replace butter with cold coconut oil or vegan butter sticks. Ensure the product is solid when cold for proper flakiness.
- Herbal Infusion: Add a few torn basil or thyme leaves to the berry mix while cooking for a surprising aromatic twist that pairs beautifully with strawberries and raspberries.
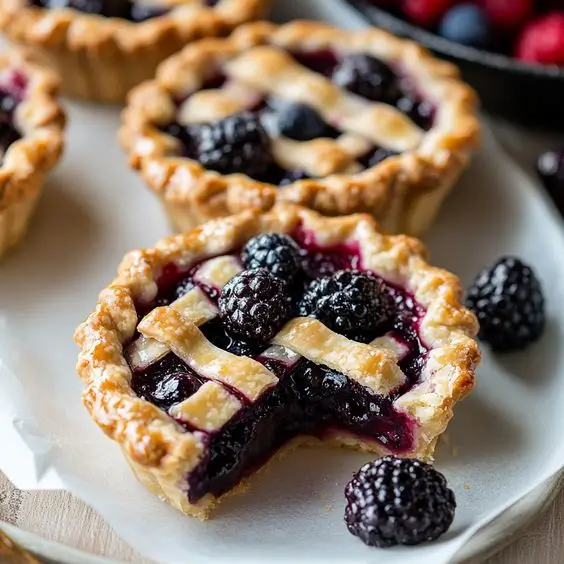
- Lattice Tops: Instead of full or round tops, weave thin strips of dough into lattice patterns for a classic, elegant touch.
- Mini Jam Pies: Use high-quality store-bought jam (like apricot, blackberry, or mixed berry) instead of homemade filling for a quick version. Just warm slightly for easier spreading.
- Chocolate Drizzle: After cooling, drizzle melted dark or white chocolate over the tops for added decadence.
- Spiced Variants: Add nutmeg, cardamom, or ginger to the filling for a warm, autumnal profile—even with summer berries!
- Mini Galette Style: Skip the muffin tin and place filling on dough rounds on a baking sheet, folding the edges loosely over the filling for free-form mini galettes.
Health Considerations and Nutritional Value
While mini berry pies are undeniably indulgent, there are ways to make them more nutritious without sacrificing flavor:
- Berries Are Superfoods: Rich in antioxidants, vitamins C and K, fiber, and phytonutrients, berries support heart health, brain function, and inflammation reduction.
- Natural Sweeteners: Reduce refined sugar by using maple syrup, honey, or monk fruit sweetener in the filling. Note: liquid sweeteners may affect thickness, so adjust cornstarch accordingly.
- Whole Wheat Crust: Replace half or all of the all-purpose flour with whole wheat pastry flour for added fiber and nutrients. Be aware that the crust will be denser and nuttier.
- Lower-Fat Options: Though challenging for flakiness, some bakers experiment with olive oil or avocado oil in place of part of the butter. Results vary, so proceed with caution.
- Portion Control: One of the benefits of mini pies is built-in portion management—each serving is naturally small, helping prevent overindulgence.
- Caloric Estimate (per mini pie): Approximately 220–260 calories, depending on size and ingredients. About 30g carbohydrates, 3–4g protein, 10–12g fat, and 2–3g fiber.
- Dietary Modifications: For keto diets, consider almond flour crusts and low-carb sweeteners like erythritol, though traditional texture cannot be fully replicated.
Ingredients
For the Crust:
- 2½ cups (315g) all-purpose flour
- 1 teaspoon salt
- 1 cup (2 sticks / 226g) unsalted butter, very cold and cubed
- 6–8 tablespoons ice water
For the Berry Filling:
- 4 cups (about 600g) mixed fresh berries (blueberries, raspberries, blackberries, strawberries)
- ½ cup (100g) granulated sugar
- 2 tablespoons cornstarch
- 1 tablespoon lemon juice
- ½ teaspoon vanilla extract
- Pinch of ground cinnamon (optional)
For Assembly and Finish:
- 1 large egg
- 1 tablespoon milk (dairy or plant-based)
- 2–3 tablespoons coarse sugar (for sprinkling)
Directions
- In a large bowl, whisk together flour and salt. Cut in cold butter using a pastry blender or two forks until the mixture resembles coarse meal with visible butter chunks.
- Add ice water one tablespoon at a time, mixing just until the dough starts to come together. Form into two discs, wrap in plastic, and chill for at least 1 hour.
- Combine all filling ingredients in a saucepan. Cook over medium heat, stirring constantly, until thickened and bubbly—about 8–10 minutes. Cool completely.
- Preheat oven to 375°F (190°C). Grease a 12-cup muffin tin.
- Roll out one dough disc and cut 12 rounds (3.5 inches). Press into muffin cups.
- Spoon cooled berry filling into each crust, filling about ¾ full.
- Roll out second dough disc and cut 12 smaller rounds (2.5–3 inches). Place on top of filling.
- Seal edges with a fork and cut small slits in the top for venting.
- Whisk egg and milk; brush over tops and sprinkle with coarse sugar.
- Bake for 25–30 minutes until golden brown and filling bubbles.
- Cool in pan for 10 minutes, then transfer to wire rack to cool completely.
- Serve with whipped cream or enjoy as-is!
FAQ
- Can I make these mini berry pies ahead of time?
- Yes! You can prepare the dough and filling up to 2 days in advance and store them separately in the refrigerator. Assemble and bake just before serving for best texture. Baked pies can be stored at room temperature for 1–2 days.
- Can I freeze mini berry pies?
- Absolutely. Freeze baked and cooled pies on a tray, then transfer to an airtight container or freezer bag. Reheat in a 350°F oven for 10–15 minutes straight from frozen.
- Why did my pie filling bubble over?
- This usually happens if the filling wasn’t cooled before baking or if too much was added. Fill only ¾ full and always cool the mixture first.
- Can I use frozen berries?
- You can, but increase cornstarch by ½–1 teaspoon and thaw the berries first, draining excess liquid. Otherwise, the filling may become too watery.
- How do I prevent a soggy bottom crust?
- Ensure the filling is cool, pre-bake the bottom crust briefly (blind bake), and don’t overfill. Using cornstarch effectively also helps absorb juices.
- Can I make these without eggs?
- Yes—the egg wash can be replaced with milk, cream, or even a light brushing of maple syrup for shine. The pies will still brown nicely.
- Are these suitable for kids to help make?
- Definitely! Kids can help measure ingredients, press dough into tins, sprinkle sugar, and use cookie cutters for fun shapes. Supervise near stovetop and oven.
Summary
These Delightful Mini Berry Pies bring together flaky, buttery crusts and a vibrant, homemade berry filling in adorable individual servings perfect for any occasion.
Easy to customize, freezer-friendly, and bursting with fresh flavor, they’re a timeless treat that bridges tradition and modern convenience with every bite.