Chocolate Lava Mug Cake: The Ultimate Single-Serving Dessert
Introduction
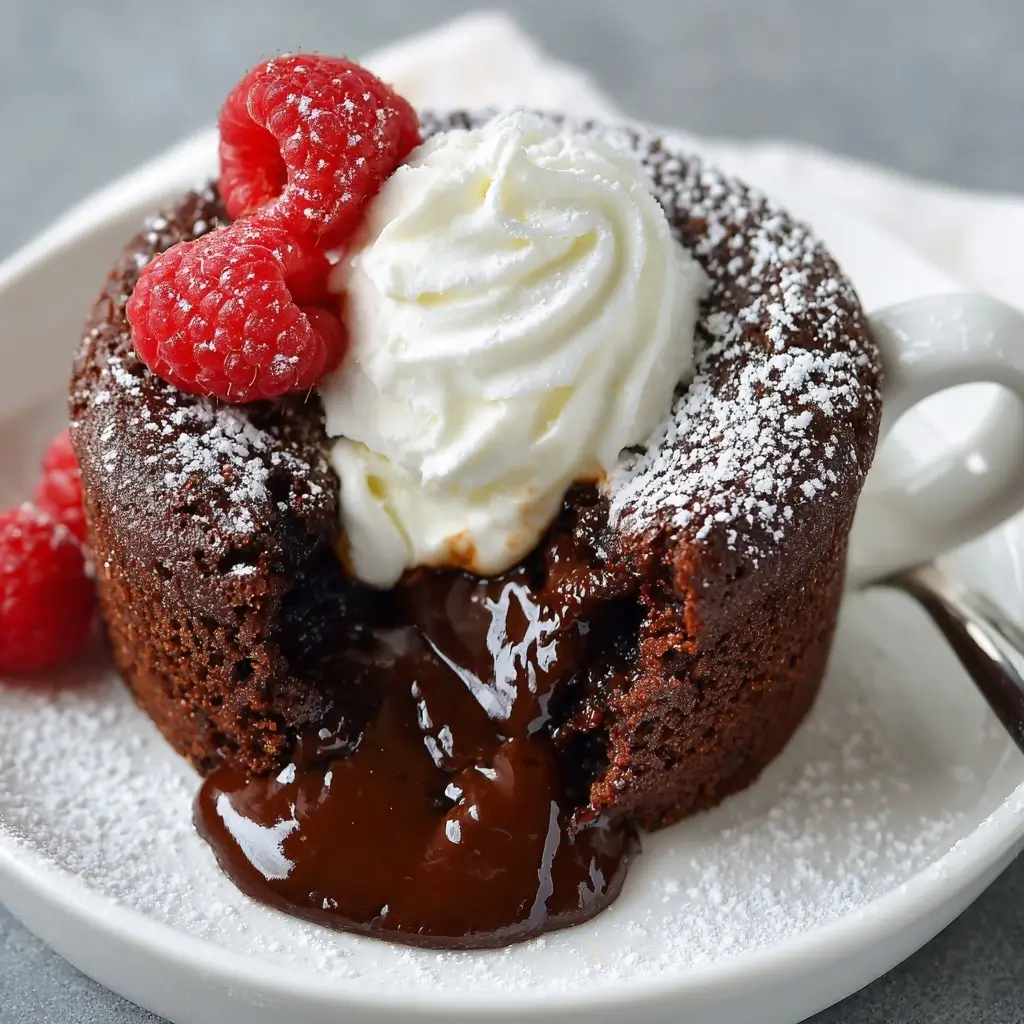
Imagine biting into a warm, rich, and decadent chocolate cake with a molten center that oozes out at the first touch of your spoon. Now imagine having it ready in under 10 minutes—all in a single mug. That’s the magic of the Chocolate Lava Mug Cake. This modern dessert phenomenon combines convenience, indulgence, and gourmet appeal into one compact treat perfect for satisfying sudden chocolate cravings without the hassle of baking an entire cake. Whether you’re living alone, craving something sweet after dinner, or simply want to avoid leftover desserts, this quick-fix recipe is your go-to solution.
The History
The origins of the lava cake trace back to the late 1980s when French chef Jean-Georges Vongerichten accidentally underbaked a chocolate sponge cake. What was initially considered a mistake turned into a culinary sensation—the result was a firm outer shell with a soft, gooey, liquid chocolate center. The dessert quickly gained fame in upscale restaurants across New York and Europe.
Fast forward to the 2000s, as home cooking trends evolved and microwave technology became more prevalent, food bloggers and amateur chefs began experimenting with simplified versions of restaurant-style desserts. The “mug cake” trend exploded during the early 2010s, particularly on platforms like YouTube and Pinterest. The Chocolate Lava Mug Cake emerged as a star—offering all the richness of its oven-baked counterpart but made entirely in a coffee mug using common pantry ingredients. Its popularity soared due to its speed, minimal cleanup, and adaptability for dietary preferences such as gluten-free or vegan options.
Ingredients Breakdown
The beauty of this recipe lies in its simplicity. Most ingredients are staples found in any kitchen, making it easy to whip up even when you’re not fully stocked. Here’s a detailed look at what goes into creating the perfect Chocolate Lava Mug Cake:
- All-Purpose Flour: Provides structure. You can substitute with almond flour, oat flour, or gluten-free flour blend if needed.
- Granulated Sugar: Adds sweetness and helps create a tender crumb. Brown sugar can be used for a deeper, caramel-like flavor.
- Cocoa Powder: The heart of the chocolate flavor. Use high-quality unsweetened cocoa powder (preferably Dutch-processed) for a richer, smoother taste.
- Baking Powder: A leavening agent that helps the cake rise slightly while maintaining a dense texture around the molten center.
- Salt: Enhances all the flavors and balances the sweetness.
- Milk: Adds moisture. Any kind works—whole, skim, almond, soy, oat, or coconut milk.
- Vegetable Oil or Melted Butter: Contributes to the moist texture. Butter adds richness; oil keeps it softer.
- Vanilla Extract: Deepens the flavor profile and rounds out the chocolate notes.
- Dark Chocolate Chunk or Chocolate Truffle: The secret to the lava center! A solid piece placed in the middle melts during cooking to create the signature gooey core.
- Optional Add-ins: Mini chocolate chips, espresso powder (enhances chocolate flavor), chili flakes (for a Mexican chocolate twist), or liqueur like Grand Marnier or Baileys.
Step-by-Step Recipe
- Gather Your Tools: You’ll need a large microwave-safe mug (at least 12 oz capacity), a small mixing bowl or the mug itself, a fork or whisk, and measuring spoons.
- Preheat (in a way): While there’s no traditional preheating, ensure your microwave is clean and functioning properly. Set it to high power (usually 100%).
- Mix Dry Ingredients: In the mug or bowl, combine 4 tablespoons all-purpose flour, 3 tablespoons granulated sugar, 2 tablespoons cocoa powder, ¼ teaspoon baking powder, and a pinch of salt. Whisk thoroughly to remove lumps.
- Add Wet Ingredients: Pour in 3 tablespoons milk, 1½ tablespoons vegetable oil (or melted butter), and ¼ teaspoon vanilla extract. Stir until smooth and no streaks remain. Be careful not to overmix.
- Create the Lava Center: Push the batter to the sides of the mug, forming a well in the center. Place a generous square (about 1 inch) of dark chocolate (70% cacao or higher) right in the middle. Do not stir it in—it must stay whole to melt properly.
- Top It Off (Optional): For extra decadence, sprinkle a few mini chocolate chips on top or add a dollop of peanut butter before cooking.
- Microwave: Place the mug in the center of the microwave. Cook on high for 60 to 90 seconds. Start checking at 60 seconds—look for the edges to be set but the center still slightly soft. Overcooking will eliminate the lava effect!
- Cool Slightly: Let the mug sit for 1–2 minutes. It will continue to cook from residual heat, and this prevents burning your mouth on the molten center.
- Serve Immediately: Grab a spoon and dig in. Optionally dust with powdered sugar, drizzle with chocolate sauce, or top with whipped cream, ice cream, or fresh berries.
Tips
- Mug Size Matters: Use a large mug (12–16 oz). Smaller mugs may overflow during cooking.
- Don’t Overmix: Stir just until combined. Overworking the batter can make the cake tough.
- Watch Closely: Microwaves vary widely. If your cake rises too fast or starts spilling, stop immediately.
- Use Real Dark Chocolate: Cheap chocolate bars or chips may not melt smoothly. Opt for quality chocolate for the best lava flow.
- Rotate Midway (if applicable): If your microwave has hot spots, gently rotate the mug halfway through for even cooking.
- Let It Rest: Never skip the 1–2 minute resting time. It stabilizes the structure and enhances safety and texture.
- Double Up Carefully: This recipe is designed for one. Doubling it in a larger container won’t yield the same results—stick to individual servings.
- Customize Timing: Prefer a runnier center? Cook closer to 60 seconds. Want it firmer? Go up to 90 seconds, depending on your microwave wattage (typically 700–1200W).
Variations and Customizations
The Chocolate Lava Mug Cake is incredibly versatile. Once you master the base recipe, feel free to experiment:
- Gluten-Free: Replace all-purpose flour with a 1:1 gluten-free flour blend. Ensure cocoa powder and chocolate are certified gluten-free.
- Vegan Version: Use plant-based milk, coconut oil instead of butter, and a flax egg (1 tbsp ground flaxseed + 3 tbsp water, let sit 5 mins) for binding. Choose dairy-free dark chocolate.
- Protein Boost: Add 1 scoop of chocolate protein powder and reduce flour by 1 tablespoon to balance texture.
- Peanut Butter Swirl: After placing the chocolate chunk, add a spoonful of peanut butter beside it. When cooked, it creates a marbled peanut-chocolate lava effect.
- White Chocolate Raspberry: Swap dark chocolate for white chocolate and add a few frozen raspberries to the center.
- Peppermint Twist: Add a drop of peppermint extract and place a candy cane chocolate piece in the center. Top with crushed candy canes after cooking.
- Salted Caramel Core: Use a soft caramel square coated in chocolate (like a truffle) and finish with sea salt flakes.
- Spiced Mocha: Add ½ tsp instant espresso powder and a pinch of cinnamon or cayenne for warmth and depth.
- Nutella Lava: Replace the dark chocolate with a heaped teaspoon of Nutella for a hazelnut-chocolate explosion.
- Alcoholic Infusion: Mix ½–1 tsp of rum, Kahlúa, or Amaretto into the batter for an adult version.
Health Considerations and Nutritional Value
While undeniably indulgent, understanding the nutritional content helps you enjoy this treat mindfully:
| Nutrient | Amount (Approximate per serving) |
|---|---|
| Calories | 320–380 kcal |
| Total Fat | 15–20g |
| Saturated Fat | 8–10g |
| Cholesterol | 20–30mg |
| Sodium | 180–250mg |
| Total Carbohydrates | 45–55g |
| Dietary Fiber | 3–5g |
| Sugars | 30–35g |
| Protein | 4–6g |
Health Notes:
- This dessert is high in sugar and fat, so moderation is key—especially for those managing diabetes, heart conditions, or weight.
- Using dark chocolate (70%+ cacao) provides antioxidants like flavonoids, which may support heart health in moderation.
- Opt for natural sweeteners like coconut sugar or monk fruit to reduce glycemic impact (though texture may vary).
- To lower calories, reduce sugar by 1 tsp, use skim milk, and skip added toppings.
- For fiber boost, replace half the flour with black bean flour or add chia seeds (use sparingly to maintain texture).
- Not suitable for low-carb or ketogenic diets unless significantly modified (e.g., almond flour, erythritol, stevia, heavy cream).
Ingredients
- 4 tablespoons all-purpose flour
- 3 tablespoons granulated sugar
- 2 tablespoons unsweetened cocoa powder (Dutch-processed preferred)
- ¼ teaspoon baking powder
- Pinch of salt
- 3 tablespoons milk (dairy or non-dairy)
- 1½ tablespoons vegetable oil or melted butter
- ¼ teaspoon vanilla extract
- 1 ounce high-quality dark chocolate (70% cacao or higher), chopped into a square
- Optional: powdered sugar, whipped cream, vanilla ice cream, berries, chocolate shavings
Directions
- In a large microwave-safe mug, combine flour, sugar, cocoa powder, baking powder, and salt. Mix well with a fork until no lumps remain.
- Add milk, oil (or melted butter), and vanilla extract. Stir until the batter is smooth and uniformly blended.
- Push the batter toward the edges of the mug using the back of a spoon to form a small well in the center.
- Place the dark chocolate square in the middle of the well. Do not stir it into the batter.
- Microwave on high power for 60 to 90 seconds. Begin checking at 60 seconds—edges should be set, but the center should still look soft and slightly underdone.
- Remove carefully (the mug will be hot!) and let rest for 1–2 minutes.
- Optionally dust with powdered sugar or top with a scoop of vanilla ice cream.
- Serve immediately with a spoon and enjoy the warm, gooey chocolate lava center.
FAQ
Q: Can I make this without a microwave?
A: Yes! Preheat your oven to 350°F (175°C). Use an oven-safe ramekin or small baking dish. Bake for 12–15 minutes until edges are set but center is soft. Results may vary slightly.
Q: Why didn’t my cake have a lava center?
A: Likely causes include overcooking, using too small a chocolate piece, stirring the chocolate into the batter, or using low-quality chocolate that doesn’t melt well.
Q: Can I prepare this ahead of time?
A: Not recommended. The batter may settle or react prematurely. However, you can pre-measure dry ingredients into a jar and store them—just add wet ingredients and chocolate when ready.
Q: Is it safe to eat undercooked cake?
A: Yes, because this recipe contains no raw eggs. The slight softness in the center comes from melted chocolate and unreacted starch, not uncooked batter in a dangerous sense.
Q: Can I double the recipe?
A: No—this recipe relies on rapid, even heating in a confined space. Doubling it leads to uneven cooking. Make multiple single servings instead.
Q: Why did my mug cake overflow?
A: Possible reasons: too much batter, using a small mug, over-leavening (too much baking powder), or excessive microwave time. Always leave at least 1 inch of space at the top.
Q: Can I freeze leftovers?
A: Not really. This cake is meant to be eaten fresh. Reheating ruins the lava effect and alters texture dramatically.
Q: Can I use cake mix instead?
A: You can, but it won’t yield the same dense, fudgy texture. Homemade gives you control over ingredients and consistency.
Summary
The Chocolate Lava Mug Cake is a quick, luxurious dessert that delivers a gourmet chocolate experience in under 10 minutes using simple ingredients and a single mug.
Perfect for solo indulgence, last-minute guests, or midnight cravings, this easy treat proves that rich, restaurant-quality desserts can be made anytime—right in your microwave.