Introduction
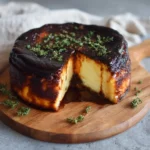
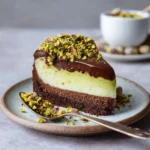
Burnt Basque Cheesecake—also known as Tarta de Queso Quemada or “Basque Burnt Cheesecake”—is a stunning paradox of textures and flavors: an intentionally dark, caramelized, almost charred exterior giving way to an impossibly creamy, velvety, molten-center interior. Originating from the San Sebastián region of Spain’s Basque Country, this dessert defies traditional cheesecake expectations—not only in appearance but also in technique, philosophy, and spirit. Unlike New York–style cheesecakes that demand water baths, precise temperature control, and hours of chilling, the Burnt Basque Cheesecake is gloriously unfussy: mixed by hand or with a whisk, poured into an unlined, parchment-free springform pan, and baked at high heat until the surface cracks, blisters, and deepens into a rich mahogany brown. Its allure lies not in perfection—but in its beautiful imperfection: rustic, audacious, deeply comforting, and profoundly elegant all at once. More than just a dessert, it’s a cultural statement—a celebration of boldness, simplicity, and the transformative magic of fire and time.
The History
The Burnt Basque Cheesecake traces its origins to 1990 in San Sebastián, Spain, at the now-iconic restaurant La Viña, founded by brothers Santiago and Ramón Santos. Legend has it that the dessert was born not from meticulous planning, but from serendipitous oversight: a cheesecake left in the oven too long at too high a temperature—yet rather than being ruined, it emerged with an unexpectedly luscious, custard-like center and a dramatically scorched, caramelized crust. Embracing this happy accident, the Santos brothers refined the recipe over months, dialing in ratios, temperatures, and baking times to consistently reproduce that magical contrast. They named it Tarta de Queso de San Sebastián, and for decades, it remained a fiercely guarded regional treasure—served only at La Viña, where lines stretched around the block and patrons often waited over an hour for a slice.
It wasn’t until the mid-2010s—fueled by food bloggers, Instagram aesthetics, and global fascination with “ugly delicious” trends—that the Burnt Basque Cheesecake exploded internationally. Japanese patisseries adopted it with reverence (calling it “black cheesecake”), Korean bakeries reimagined it with matcha and yuzu, and American home bakers fell in love with its no-fuss ethos. In 2017, food writer Jenny Rosenstrach published a widely shared adaptation in Food52, catapulting it into mainstream consciousness. Today, it stands as one of the most beloved modern desserts worldwide—not because it’s easy, but because its ease is revolutionary: no water bath, no springform lining, no chilling required before baking, and no fear of cracks (in fact, cracks are encouraged). Its history is a testament to culinary humility, regional pride, and the universal joy of turning “mistake” into masterpiece.
Ingredients Breakdown
What makes the Burnt Basque Cheesecake so extraordinary isn’t complexity—it’s the alchemy of just six core ingredients, each playing a non-negotiable role:
- Cream Cheese (full-fat, room temperature): The foundation. Must be high-quality, European-style if possible (e.g., Kiri, President, or locally sourced artisanal brands), with minimal stabilizers. Cold cream cheese leads to lumps; overly softened cheese can cause curdling. Ideal temp: 68–72°F (20–22°C).
- Granulated Sugar: Not just for sweetness—it aids in browning (Maillard reaction and caramelization), stabilizes the protein matrix, and contributes to the signature crackled crust. Some bakers add a small portion of brown sugar or demerara for deeper molasses notes and enhanced crust formation.
- Eggs (large, room temperature): Act as both binder and leavening agent. Their proteins coagulate slowly under heat, creating structure without stiffness—critical for that jiggle. Overmixing after adding eggs introduces air, leading to puffing and collapse. Egg whites provide lift; yolks enrich mouthfeel and emulsify fat.
- Heavy Cream (36–40% milkfat): The secret to silkiness. Higher fat content prevents graininess and ensures fluidity during baking, allowing the center to remain molten while the edges set. Ultra-pasteurized cream works—but avoid light cream, half-and-half, or plant-based alternatives unless specially formulated (see Variations).
- Sour Cream or Crème Fraîche: Adds acidity, brightness, and subtle tang that balances the richness. It also lowers pH, which helps prevent curdling and promotes even coagulation. Crème fraîche (10–15% fat, naturally cultured) yields a more nuanced, buttery finish than standard sour cream.
- Unsalted Butter (melted and cooled): Enhances aroma, adds gloss, and improves moisture retention. Clarified butter may be used for higher smoke point and purer flavor—though whole butter contributes desirable milk solids that deepen browning.
Optional—but highly recommended—additions:
- Vanilla Extract (pure, Madagascar Bourbon): A teaspoon amplifies depth without overpowering. Avoid imitation vanilla—it can taste medicinal at high heat.
- Sea Salt (flaky or fine): ¼ tsp enhances all other flavors and counters sweetness. Critical for balance.
- Lemon Zest (microplaned, organic): Bright citrus oils cut through fat and elevate aromatic complexity—especially effective when paired with crème fraîche.
- Almond Extract (1/8 tsp): A whisper adds marzipan-like warmth that complements the burnt notes beautifully.
Step-by-Step Recipe
- Preheat & Prepare: Position oven rack in the lower third. Preheat oven to 400°F (200°C)—not a degree lower. Use a conventional (not convection) oven for consistent radiant heat. Grease a 9-inch (23 cm) springform pan thoroughly with unsalted butter—no parchment, no flour, no lining. This intentional “naked” contact with the pan is essential for crust development and heat transfer.
- Softening & Whisking: In a large heatproof bowl, combine 24 oz (680 g) full-fat cream cheese and 1 cup (200 g) granulated sugar. Using a silicone spatula or wooden spoon (not a mixer—yet), stir vigorously for 2–3 minutes until smooth, glossy, and completely free of lumps. Scrape down sides frequently.
- Incorporating Dairy: Add 1 cup (240 ml) heavy cream, ½ cup (120 g) sour cream or crème fraîche, and ¼ cup (60 g) melted, cooled unsalted butter. Stir until homogenous—about 1 minute. Mixture should be fluid but not thin; avoid overworking.
- Eggs—One at a Time: Add 3 large room-temperature eggs, one at a time, stirring gently but thoroughly after each addition until fully incorporated and no streaks remain. Do not whip or aerate—this is crucial. After the third egg, stir in 1 tsp pure vanilla extract, ¼ tsp fine sea salt, and optional zest of 1 lemon.
- Straining (Non-Negotiable Step): Pour batter through a fine-mesh sieve into a clean, large measuring cup or bowl. Press batter through with a spatula. This removes any undissolved sugar granules, tiny cream cheese bits, or egg membrane—ensuring absolute smoothness and preventing graininess or uneven baking.
- Pour & Smooth: Carefully pour strained batter into the prepared springform pan. Gently tap pan on counter 3–4 times to release air bubbles. Smooth top with offset spatula—but do not worry about perfection. Imperfections become part of the charm.
- Bake with Intention: Place pan directly on oven’s lowest rack. Bake 55–65 minutes, rotating pan 180° halfway through. Watch closely after 50 minutes: the cake is done when the top is deeply bronzed to near-black at the edges, deeply cracked across the center, puffed slightly (1–1.5 inches above rim), and the center jiggles like firm Jell-O—not liquid, not solid. A toothpick inserted 1 inch from edge should come out with moist crumbs; center should remain wet.
- Cool Gradually—No Rush: Turn off oven. Crack oven door open 2 inches with a folded kitchen towel. Let cake cool inside for 30 minutes. Then carefully remove from oven and place on a wire rack. Cool at room temperature for 2–3 hours—until just barely warm. Resist refrigeration at this stage; rapid chilling causes condensation and textural shock.
- Chill Overnight (Essential): Cover loosely with foil (not plastic wrap—traps moisture) and refrigerate for at least 12 hours, ideally 16–24 hours. This slow, cold setting allows proteins to fully relax, fats to re-solidify evenly, and flavors to harmonize. The center transforms from warm custard to dense, cool silk.
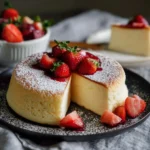
- Unmold & Serve: Run thin knife around inner edge. Release springform clasp. Lift cake gently using two wide spatulas. For clean slices, dip knife in hot water and wipe dry between cuts. Serve chilled—but let sit at room temperature for 10–15 minutes for optimal creaminess.
Tips
- Oven Calibration Is Everything: Use an independent oven thermometer. Many ovens run hot or cold—especially at high temps. Even ±15°F can mean the difference between “burnt” and “burnt *just right*.”
- Room Temperature Is Non-Negotiable: Eggs and cream cheese must be truly room temp—not “left out for 30 minutes.” Plan ahead: take them from fridge 2–3 hours before baking. Cold ingredients cause splitting and uneven emulsification.
- No Mixer Zone: Electric mixers (stand or hand) incorporate too much air, risking puffing, cracking, and collapse. A silicone spatula + elbow grease = perfect texture.
- Straining Is Your Secret Weapon: Skipping this invites grittiness and visual flaws. Don’t rush it—press firmly and patiently.
- Embrace the Burn: That dark, blistered, almost blackened crust? That’s not overdone—it’s flavor. It contains roasted milk solids, caramelized sugars, and toasted butterfat—the soul of the cake. Don’t reduce heat to “save” it.
- Don’t Peek Before 50 Minutes: Opening the oven too early causes temperature drop and uneven rise. Set a timer—and walk away.
- Cooling Can’t Be Accelerated: No ice baths, no fan cooling, no fridge before full room-temp cool-down. Thermal stress = weeping, cracking, or rubbery texture.
- Springform Integrity Matters: Use a heavy-duty, leak-resistant pan. If yours leaks, double-wrap the outside in heavy-duty foil—but know that some seepage is normal and harmless.
- Altitude Adjustments: Above 3,000 ft? Reduce sugar by 1 tbsp, increase cream by 1 tbsp, and bake at 410°F for 50–55 min. Monitor closely—thin air accelerates browning.
- Batch Baking Tip: Make two cakes at once—same oven, same conditions. One for now, one frozen (see Variations). They freeze beautifully for up to 3 months.
Variations and Customizations
The Burnt Basque Cheesecake is remarkably adaptable—while preserving its structural integrity and signature texture. Here are thoughtfully tested, chef-approved variations:
Flavor Infusions
- Espresso-Burnt: Dissolve 2 tsp instant espresso powder in warm cream before adding. Garnish with edible gold dust and dark chocolate curls.
- Yuzu-Koji: Replace 2 tbsp sour cream with yuzu juice + 1 tsp rice koji paste for umami brightness and delicate citrus funk.
- Black Sesame: Toast 3 tbsp white sesame seeds until golden, grind finely, and fold in after straining. Adds nutty depth and striking gray-marbled visuals.
- Rosemary-Orange: Steep 2 sprigs fresh rosemary + zest of 1 orange in warm cream for 20 min, then strain before mixing. Earthy, floral, and vibrant.
Dietary Adaptations
- Gluten-Free & Naturally So: This recipe is inherently gluten-free—no flour, no thickeners, no starches. Verify all labels (e.g., vanilla, cream cheese cultures) for hidden gluten.
- Lower-Sugar Version: Reduce sugar to ¾ cup (150 g) and add 2 tbsp erythritol + 1 tsp stevia glycerite. Texture remains intact; browning is slightly less pronounced but still robust.
- Lactose-Reduced: Substitute lactose-free cream cheese (e.g., Green Valley Creamery), lactose-free sour cream, and ultra-filtered lactose-free heavy cream. Results are nearly identical—ideal for sensitive palates.
- Vegan Adaptation (Advanced): Use 24 oz high-fat cashew cream (soaked, blended, strained), ½ cup coconut cream, ⅓ cup refined coconut oil, ⅔ cup coconut sugar, 3 tbsp apple cider vinegar + ½ tsp baking soda (for tang/leaven), and 2 tbsp aquafaba (whisked to soft peaks, folded in last). Requires precise timing and chilling—best attempted after mastering the classic.
Textural & Structural Twists
- Crumb-Crusted Basque: Press 1 cup finely ground graham cracker or digestive biscuit + 3 tbsp melted butter into pan bottom before pouring batter. Bake as usual—creates a contrasting base layer without compromising center silk.
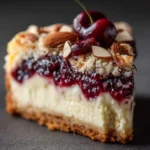
- Marbled Basque: Swirl in 3 tbsp dulce de leche, blackberry coulis, or matcha paste *after* pouring—use chopstick in figure-eights. Creates stunning cross-sections when sliced.
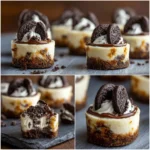
- Mini-Muffin Basque: Portion into lined muffin tin. Bake at 400°F for 18–22 min. Yields 12–14 individual cakes—perfect for parties. Chill 8+ hours before serving.
- Frozen Basque “Cheesecake Pops”: Pour into silicone popsicle molds. Freeze 6 hours, then dip in tempered dark chocolate. Store frozen up to 2 months. A revelation in portable luxury.
Global Interpretations
- Japanese Black Sesame–Miso: Add 1 tbsp white miso paste + 2 tbsp toasted black sesame paste. Deeply savory-sweet, with complex fermentation notes.
- Mexican Canela-Cocoa: Infuse cream with 1 cinnamon stick + 2 tbsp unsweetened cocoa powder. Strain, then proceed. Warm spice meets bitter chocolate in perfect harmony.
- Scandinavian Lingonberry Swirl: Fold in ⅓ cup house-made lingonberry jam (low-sugar) in ribbons. Tart, forest-floor brightness cuts richness exquisitely.
Health Considerations and Nutritional Value
A single 1/12th slice (approx. 120 g) of classic Burnt Basque Cheesecake contains approximately:
- Calories: 380–420 kcal
- Total Fat: 32–36 g (20–22 g saturated)
- Carbohydrates: 18–20 g (17–19 g sugars)
- Protein: 7–9 g
- Sodium: 220–260 mg
- Calcium: ~12% DV (from dairy)
- Vitamin A: ~15% DV (from cream, butter, egg yolks)
- Vitamin B12 & D: Moderate amounts (naturally occurring in animal fats)
Nutritional Notes & Mindful Enjoyment:
- No Added Stabilizers or Gums: Unlike many commercial cheesecakes, this version relies solely on natural dairy proteins and fat for structure—making it more digestible for many, though still rich.
- Low Glycemic Impact (Relative to Other Desserts): Despite sugar content, the high fat and protein content significantly slow glucose absorption—leading to gentler blood sugar curves than cakes with refined flour or corn syrup.
- Concentrated Nutrient Density: Contains bioavailable calcium, phosphorus, selenium, and fat-soluble vitamins—all critical for bone health, immunity, and neurological function.
- Considerations for Specific Diets:
- Lactose Sensitivity: Contains moderate lactose (≈3–4 g/slice); lactose-reduced versions are viable (see Variations).
- Heart Health: High saturated fat warrants moderation for those managing cholesterol—though recent research suggests context matters (e.g., whole-food matrix, absence of refined carbs).
- Keto-Friendly?: At ~18g net carbs/slice, it falls outside strict keto (<20g/day)—but a 1/16th portion fits easily into a targeted keto plan.
- Mindful Indulgence Framework: Rather than labeling it “unhealthy,” consider it a nutrient-rich, calorie-dense celebration food. Pair with black coffee or herbal tea; savor slowly; share generously. Its lack of refined flour, artificial ingredients, and preservatives makes it a far cleaner choice than most bakery desserts.
Ingredients
Makes one 9-inch cake (12–14 servings)
- 24 oz (680 g) full-fat cream cheese, room temperature (2–3 hours out of fridge)
- 1 cup (200 g) granulated sugar
- 1 cup (240 ml) heavy cream (36–40% milkfat)
- ½ cup (120 g) sour cream or crème fraîche
- ¼ cup (60 g) unsalted butter, melted and cooled to room temperature
- 3 large eggs, room temperature
- 1 tsp pure vanilla extract (Madagascar Bourbon preferred)
- ¼ tsp fine sea salt
- Optional: Zest of 1 organic lemon or ⅛ tsp almond extract
Directions
- Position oven rack in the lower third. Preheat oven to 400°F (200°C). Generously butter a 9-inch springform pan—no parchment, no flour, no lining.
- In a large heatproof bowl, combine cream cheese and sugar. Stir vigorously with a silicone spatula for 2–3 minutes until completely smooth, glossy, and lump-free.
- Add heavy cream, sour cream (or crème fraîche), and melted butter. Stir until fully combined and uniform in texture—about 1 minute.
- Add eggs one at a time, stirring gently but thoroughly after each until no streaks remain. Do not whip or aerate.
- Stir in vanilla extract, sea salt, and optional lemon zest or almond extract.
- Strain batter through a fine-mesh sieve into a large measuring cup or bowl, pressing with a spatula to extract every bit. Discard any residue.
- Pour batter into prepared pan. Tap pan firmly on counter 3–4 times to release air bubbles. Smooth top lightly.
- Place pan directly on lowest oven rack. Bake 55–65 minutes, rotating halfway through, until top is deeply bronzed to near-black at edges, deeply cracked, puffed 1–1.5 inches, and center jiggles like firm Jell-O.
- Turn off oven. Crack door open 2 inches with a folded towel. Let cake cool inside oven for 30 minutes.
- Remove cake and place on wire rack. Cool at room temperature 2–3 hours—until just barely warm.
- Cover loosely with aluminum foil and refrigerate minimum 12 hours, ideally 16–24 hours.
- To serve: Run thin knife around edge, release springform, lift cake gently, and slice with hot, wiped knife. Serve chilled, optionally with unsweetened whipped cream, seasonal berries, or a drizzle of aged balsamic.
FAQ
- Q: Why does my cake crack excessively—or not enough?
- A: Cracking is natural and desirable! Too many cracks often mean overmixing or too-rapid cooling. No cracks may indicate underbaking or insufficient surface drying. Aim for 3–5 dramatic fissures radiating from center—signs of ideal thermal contraction.
- Q: Can I use low-fat cream cheese or Neufchâtel?
- A: Strongly discouraged. Reduced-fat versions contain added gums, starches, and water that destabilize emulsion, causing weeping, graininess, and poor browning. Full-fat is essential for texture and Maillard development.
- Q: My cake sank in the center after cooling. Did I underbake?
- A: Not necessarily. Slight settling is normal—but dramatic sinking indicates either underbaking (center was still liquid, not viscous custard) or too-rapid chilling. Always cool gradually and chill overnight.
- Q: Can I freeze Burnt Basque Cheesecake?
- A: Absolutely—and it freezes exceptionally well. Once fully chilled, wrap tightly in plastic wrap, then foil. Freeze up to 3 months. Thaw overnight in fridge, then rest at room temp 15 minutes before slicing.
- Q: Why no water bath? Isn’t that standard for cheesecakes?
- A: The water bath creates gentle, even heat—ideal for delicate, pale cheesecakes. The Burnt Basque *requires* intense, dry, radiant heat to caramelize the surface and develop its signature crust. A water bath would steam the top, yielding a pale, soggy, flavorless result.
- Q: Can I make it in a different size pan?
- A: Yes—with adjustments: An 8-inch pan needs 10–15 extra minutes; a 10-inch requires 5–8 fewer minutes. Always rely on visual cues (color, jiggle, puff) over time alone.
- Q: What if I don’t have a springform pan?
- A: You can use a regular 9-inch cake pan lined with *heavy-duty* parchment (bottom + tall collar), but unmolding will be less pristine—and crust development may be less even due to altered heat flow. Springform is strongly recommended.
- Q: Is the “burnt” part actually burnt—or is it safe to eat?
- A: It is caramelized and roasted—not carbonized or acrid. The surface reaches ~320–350°F, triggering Maillard reactions and controlled sugar pyrolysis. It tastes deeply nutty, toasty, and complex—not bitter or smoky. If it smells sharp, acrid, or smells like charcoal, your oven ran too hot—reduce by 10°F next time.
- Q: Can I add fruit or chocolate chips to the batter?
- A: Not recommended in the base batter—they sink, create pockets of steam, and disrupt the seamless texture. Instead, swirl in compotes, coulis, or ganache *after* pouring (see Marbled variation) or serve alongside as garnish.
- Q: How do I prevent sticking to the pan bottom?
- A: Generous, even buttering is key. Use room-temp butter and a pastry brush for full coverage. If sticking occurs, run a thin metal spatula around the very bottom edge before releasing the springform—never force it.
Summary
Burnt Basque Cheesecake is a masterclass in minimalist luxury: six humble ingredients transformed by fearless heat into a dessert of profound contrast—crisp, smoky, caramelized exterior yielding to a cool, dense, cloud-like center that melts on the tongue with cultured richness and quiet elegance.
It honors its San Sebastián roots through uncompromising technique, rewards patience with transcendent texture, and invites endless reinvention—proving that the most unforgettable desserts aren’t perfected in precision, but born from passion, fire, and the beautiful, intentional embrace of imperfection.