Chocolate Peanut Butter Icebox Cake: A No-Bake Delight
The Chocolate Peanut Butter Icebox Cake is a dream come true for anyone who loves rich, creamy desserts without the hassle of baking. This indulgent treat combines the deep, velvety flavor of chocolate with the smooth, nutty richness of peanut butter in a no-bake layered dessert that’s as easy to make as it is delicious. Perfect for summer gatherings, potlucks, or cozy nights in, this icebox cake requires minimal effort but delivers maximum satisfaction. Whether you’re a seasoned baker or a kitchen novice, this recipe will become a staple in your dessert repertoire.
The History of the Icebox Cake
The concept of the icebox cake dates back to the early 20th century when households began adopting electric refrigerators—then called “iceboxes.” Before reliable ovens and air conditioning, baking was often impractical during hot weather, so clever cooks turned to chilled desserts that relied on refrigeration rather than heat. The original icebox cakes were typically made by layering sweetened whipped cream with graham crackers or thin cookies, allowing the moisture to soften the layers into a cake-like texture over time.
Over the decades, variations emerged using chocolate wafers, vanilla wafers, and even ladyfingers. As ingredients evolved, so did creativity—enter the marriage of chocolate and peanut butter, two American favorites. Inspired by classic candy bars and beloved sandwich combinations, the Chocolate Peanut Butter Icebox Cake emerged as a modern twist on the vintage dessert. Its popularity surged in the late 20th and early 21st centuries, especially with the rise of no-bake recipes on food blogs and social media platforms. Today, it stands as a testament to simple ingredients creating extraordinary flavors through patience and chilling.
Ingredients Breakdown: What Makes This Cake Irresistible?
The magic of the Chocolate Peanut Butter Icebox Cake lies in its balance of textures and flavors. Each ingredient plays a crucial role in building the final product’s creamy, crunchy, rich, and refreshing profile.
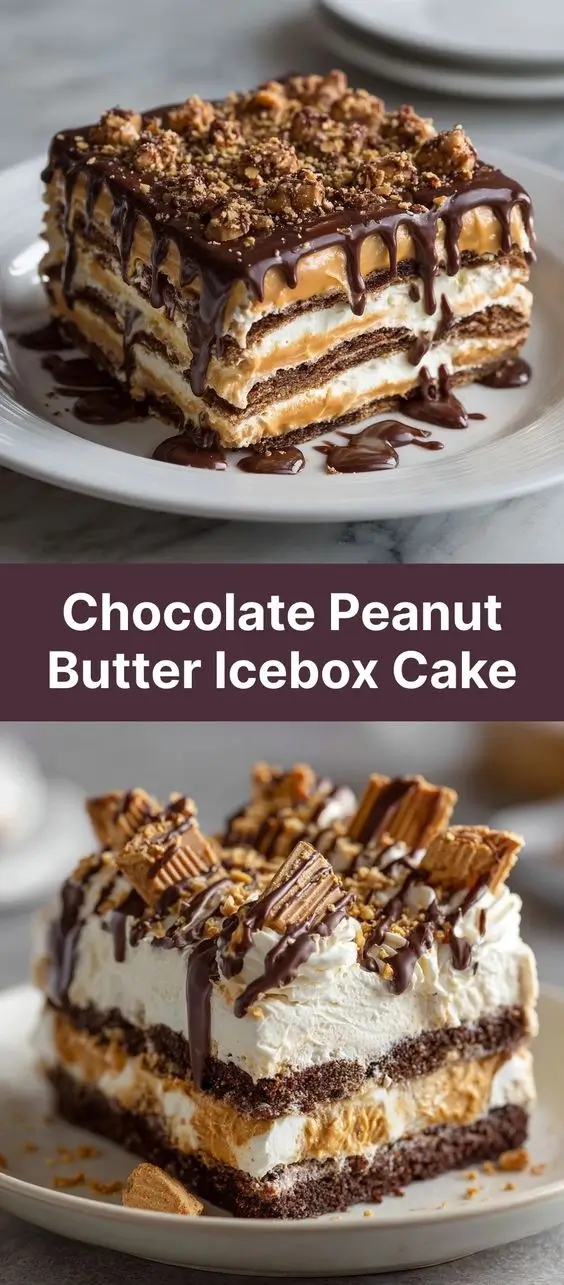
- Chocolate Wafer Cookies: These provide a crisp, cocoa-rich base that softens slightly in the fridge, mimicking the texture of actual cake layers. They’re more intense than graham crackers and pair perfectly with peanut butter.
- Peanut Butter: Use creamy, unsweetened natural peanut butter for the best flavor control. It adds protein-rich depth and a savory-sweet contrast to the sweetness of other components.
- Cream Cheese: Adds body, tang, and creaminess to the filling. It stabilizes the mixture and prevents it from being overly sweet.
- Heavy Whipping Cream: When whipped to stiff peaks, it gives the filling a light, airy texture while helping the layers set firmly in the refrigerator.
- Powdered Sugar: Sweetens and thickens the filling. Sifting ensures a smooth, lump-free consistency.
- Vanilla Extract: Enhances overall flavor complexity with warm, aromatic notes.
- Salted Butter (optional): Sometimes used in a crust variation or to boost richness.
- Mini Chocolate Chips or Chopped Peanuts (optional): For added texture and visual appeal in the layers.
All these elements work together to create a dessert that’s cool, creamy, decadent, and satisfyingly crunchy—all without turning on the oven.
Step-by-Step Recipe: How to Make Chocolate Peanut Butter Icebox Cake
Ingredients
- 2 sleeves (about 40) chocolate wafer cookies
- 1 cup (250g) creamy peanut butter (preferably unsweetened)
- 8 oz (226g) cream cheese, softened to room temperature
- 1 cup (240ml) heavy whipping cream, cold
- ½ cup (60g) powdered sugar, sifted
- 1 tsp pure vanilla extract
- Pinch of salt (if using unsalted peanut butter)
- Optional: ⅓ cup mini chocolate chips or chopped roasted peanuts
Directions
- Prepare the Pan: Line a 9-inch springform pan or an 8×8-inch square baking dish with parchment paper, leaving overhang on the sides for easy removal. Alternatively, use a loaf pan for a taller, narrower cake. Set aside.
- Make the Filling Base: In a large mixing bowl, beat the softened cream cheese and peanut butter together using a hand mixer or stand mixer until completely smooth and fully combined, about 2 minutes. Scrape down the sides as needed.
- Add Sweetness and Flavor: Add the sifted powdered sugar, vanilla extract, and a pinch of salt. Beat again on medium speed until fluffy and well incorporated, another 1–2 minutes.
- Whip the Cream: In a separate clean bowl, whip the cold heavy cream until stiff peaks form. Be careful not to over-whip, or it may turn grainy.
- Fold Together: Gently fold the whipped cream into the peanut butter mixture in three additions, using a spatula. Mix just until uniform and silky. Avoid overmixing to preserve the airy texture.
- Add Optional Mix-ins: If desired, gently fold in mini chocolate chips or chopped peanuts for extra crunch and flavor contrast.
- Layer the Cake: Begin assembling by placing a single layer of chocolate wafers on the bottom of the prepared pan. Arrange them tightly to cover the base completely. Spread one-third of the peanut butter filling evenly over the wafers. Repeat the process—add another layer of cookies, then another third of filling—until all ingredients are used, finishing with a generous layer of filling on top.
- Smooth the Top: Use an offset spatula or the back of a spoon to smooth the final layer, creating a polished finish.
- Chill Thoroughly: Cover the pan tightly with plastic wrap and refrigerate for at least 8 hours, preferably overnight. This allows the cookies to absorb moisture from the filling and soften into a cake-like consistency.
- Serve: To serve, remove from the fridge. If using a springform pan, release the sides carefully. Lift the cake using the parchment overhang. Slice with a sharp knife dipped in hot water for clean cuts.
- Garnish (Optional): Top with additional crushed chocolate wafers, drizzled melted peanut butter, shaved chocolate, or fresh banana slices before serving.
Tips for the Perfect Chocolate Peanut Butter Icebox Cake
- Use Cold Cream: Ensure your heavy cream is very cold before whipping—it whips faster and holds better structure.
- Room Temperature Cream Cheese: Let the cream cheese sit out for 30–60 minutes before mixing. Cold cream cheese can lead to lumps.
- Sift the Powdered Sugar: This prevents clumping and gives the filling a smoother texture.
- Don’t Skip the Chill Time: At least 8 hours is essential. Rushing this step results in a loose, crumbly dessert instead of a firm, sliceable cake.
- Even Layers: Use a measuring cup or kitchen scale to divide the filling equally for consistent layers.
- Customize Thickness: For a thicker cake, use fewer cookie layers and more filling between them. For a denser texture, add more cookie layers.
- Clean Slicing: Wipe the knife between cuts for neat slices, especially important when serving at parties.
- Storage Tip: Keep covered in the fridge for up to 5 days. It does not freeze well due to the high dairy content, though some have had success freezing individual slices wrapped tightly.
Variations and Customizations
The beauty of the Chocolate Peanut Butter Icebox Cake is its versatility. With a few tweaks, you can tailor it to different tastes, dietary needs, or seasonal themes.
- Nut-Free Version: Substitute peanut butter with sunflower seed butter or soy nut butter for those with allergies.
- Gluten-Free Option: Use gluten-free chocolate wafers (available in most health food stores or online).
- Dairy-Free Adaptation: Replace cream cheese with vegan cream cheese and use coconut cream instead of heavy whipping cream. Whip the chilled solid part of full-fat coconut milk for best results.
- Low-Sugar or Keto-Friendly: Use sugar-free chocolate wafers and replace powdered sugar with powdered erythritol or monk fruit blend. Choose low-carb peanut butter with no added sugars.
- Flavor Twists:
- Chocolate Hazelnut: Swap peanut butter for Nutella (reduce sugar accordingly).
- Banana Split Style: Add thin banana slices between layers.
- S’mores Version: Use graham crackers instead of chocolate wafers and add marshmallow fluff layers.
- Reese’s-Inspired: Add chopped Reese’s cups between layers or sprinkle mini cups on top.
- Crust-Based Version: Crush 1 sleeve of chocolate wafers and mix with melted butter to form a base layer. Press into the pan, chill, then build the icebox cake on top for a hybrid pie-cake texture.
- Mini Jars or Cups: Layer ingredients in mason jars or dessert cups for portable, individual servings—perfect for parties or gifts.
- Seasonal Themes: Add peppermint extract and crushed candy canes for winter, or red and blue sprinkles for July 4th.
Health Considerations and Nutritional Value
While undeniably indulgent, understanding the nutritional makeup of this dessert helps in making mindful choices.
Nutritional Breakdown (Per Serving, Approx. 1/12 of Cake):
- Calories: ~350–400 kcal
- Total Fat: 28–32g (mostly healthy fats from peanut butter and cream)
- Saturated Fat: 10–12g
- Cholesterol: 40–50mg
- Sodium: 200–250mg (can vary based on peanut butter choice)
- Total Carbohydrates: 25–30g
- Dietary Fiber: 2–3g
- Sugars: 18–22g (mostly from powdered sugar and cookies)
- Protein: 7–9g (thanks to peanut butter and dairy)
Health Notes:
- Healthy Fats: Peanut butter contains monounsaturated and polyunsaturated fats, which support heart health when consumed in moderation.
- Protein Content: The inclusion of peanut butter and cream cheese boosts protein compared to traditional whipped cream-only icebox cakes.
- Sugar Awareness: This dessert is moderately high in sugar. Consider reducing powdered sugar or using alternatives for lower glycemic impact.
- Lactose Sensitivity: Contains both cream cheese and heavy cream, so not suitable for those with lactose intolerance unless substituted with dairy-free versions.
- Allergen Alert: Contains peanuts and dairy. Always label clearly if serving at gatherings.
- Portion Control: Serve smaller slices—this cake is rich, and a little goes a long way.
Frequently Asked Questions (FAQ)
Can I make this cake ahead of time?
Absolutely! This cake actually improves with time. Making it 1–2 days in advance allows the flavors to meld and the texture to set perfectly. Just keep it covered in the fridge.
Why is my filling runny?
This usually happens if the heavy cream wasn’t whipped to stiff peaks or if the cream cheese was too soft. Always ensure cold cream and properly softened (not melted) cream cheese. Folding gently also preserves volume.
Can I use chunky peanut butter?
Yes, but be aware that it may create a less smooth filling and could affect layering. For a balanced texture, consider blending it first or mixing half chunky with half creamy.
What can I use instead of chocolate wafers?
Oreo cookies (filling removed), chocolate graham crackers, or even chocolate digestives work well. Just avoid overly sweet cookies if your peanut butter is already sweetened.
Can I freeze this icebox cake?
It’s not recommended. Freezing can cause separation in the dairy-based filling and alter the texture of the softened cookies. However, some people freeze individual slices for up to 1 month—thaw in the fridge before serving.
How long does it last in the fridge?
Up to 5 days when stored in an airtight container or covered tightly with plastic wrap.
Is this safe for pregnant women?
Yes, as long as pasteurized dairy products are used. Avoid raw eggs (none in this recipe) and ensure cleanliness during preparation.
Can I make this without powdered sugar?
You can try using maple syrup or honey, but they add liquid and may prevent proper setting. Powdered sugar is preferred for its drying and thickening properties.
Summary
The Chocolate Peanut Butter Icebox Cake is a luxurious, no-bake dessert that brings together the bold taste of chocolate wafers and the creamy richness of peanut butter in a refreshingly chilled, sliceable masterpiece.
Easy to customize, perfect for any season, and loved by kids and adults alike, this cake proves that sometimes the simplest recipes deliver the most unforgettable flavors.