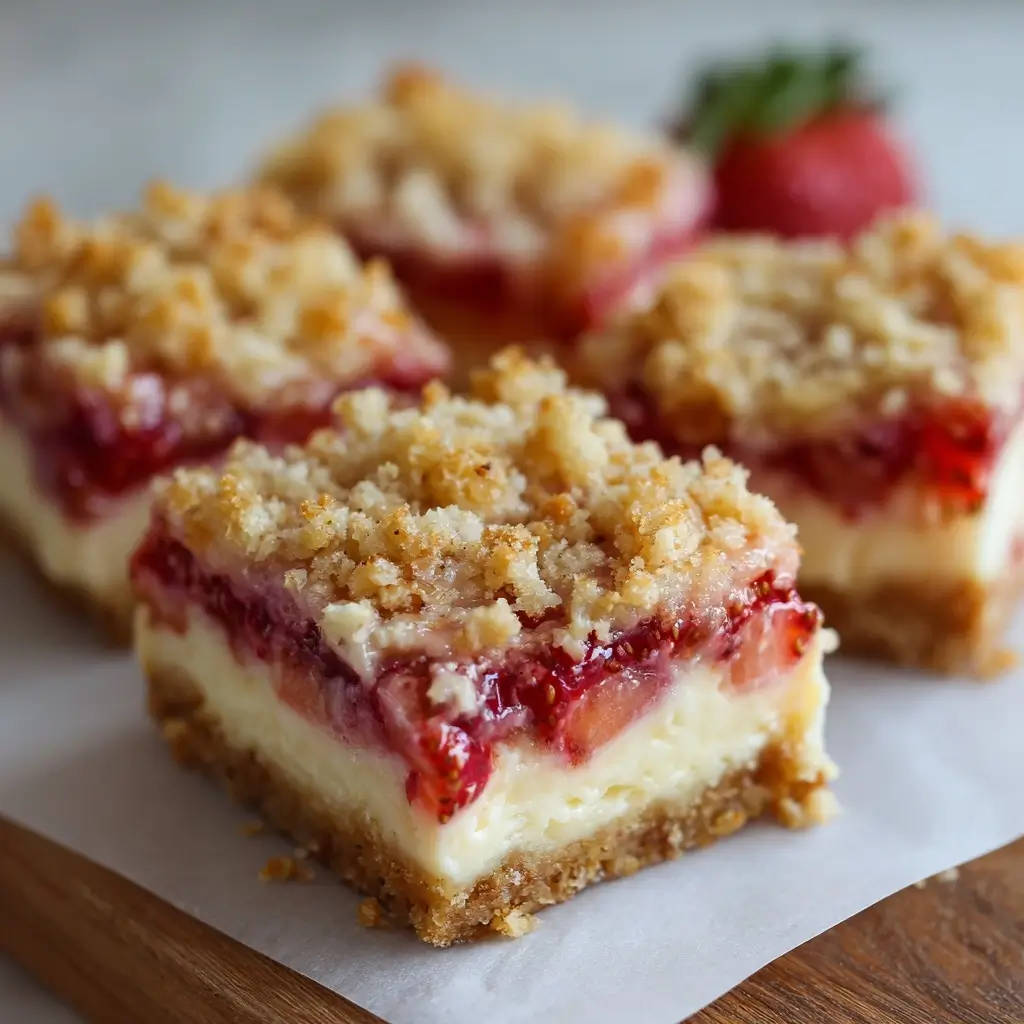
Strawberry Crunch Cheesecake Bars
Introduction
Welcome to a delightful journey into the world of decadent desserts with our Strawberry Crunch Cheesecake Bars—a perfect fusion of creamy cheesecake, buttery shortbread crust, and vibrant strawberry topping. These bars are ideal for parties, picnics, holiday gatherings, or simply as a sweet treat to brighten your day. With their eye-catching layers, rich texture, and refreshing flavor, they strike the perfect balance between indulgence and elegance. Whether you’re a seasoned baker or a beginner in the kitchen, this recipe is designed to be approachable, delicious, and sure to impress.
The History
Cheesecake has ancient roots, dating back to the Greeks who served it to athletes during the first Olympic Games in 776 BC. Over centuries, it evolved across cultures—adopting new ingredients and techniques—until it became the beloved dessert we know today. The modern American version gained popularity in the early 20th century, particularly after the invention of cream cheese by William Lawrence in 1872. The concept of cheesecake bars emerged as a convenient, sliceable alternative to traditional round cheesecakes, offering easier serving and greater versatility. Adding a fruit topping like strawberries brings a fresh twist that reflects post-war American baking trends, where convenience foods and canned fruits became household staples. Our Strawberry Crunch Cheesecake Bars pay homage to this legacy while introducing a crunchy, buttery base and a glossy, fruity finish that elevates the experience.
Ingredients Breakdown
To create these luscious bars, we use a carefully curated list of high-quality ingredients that work together to deliver a harmonious blend of textures and flavors:
- All-Purpose Flour: Forms the structural base of the shortbread crust, providing a tender crumb.
- Granulated Sugar: Adds sweetness and helps achieve a golden-brown crust.
- Butter (Unsalted, Cold): Gives richness and flakiness to the crust; cold butter ensures a crisp texture.
- Cream Cheese (Full-Fat): The star of the filling, delivering a smooth, tangy, and creamy consistency.
- Sugar (for Filling): Balances the tanginess of the cream cheese and enhances overall sweetness.
- Eggs: Bind the filling together and provide structure while contributing to a velvety texture.
- Vanilla Extract: Enhances flavor depth and adds a warm, aromatic note.
- Sour Cream or Heavy Cream: Adds moisture and richness, preventing the cheesecake layer from becoming too dense.
- Fresh or Frozen Strawberries: Provide natural sweetness, vibrant color, and a juicy contrast.
- Strawberry Jam or Glaze: Creates a shiny, flavorful topping that seals in freshness and prevents drying.
- Lemon Juice: Brightens the flavor, cuts through richness, and enhances the fruitiness.
- Cornstarch (optional): Helps thicken the strawberry topping for a more stable glaze.
- Pinch of Salt: Elevates all other flavors and balances sweetness.
Each ingredient plays a crucial role in building complexity and ensuring a professional-quality result.
Step-by-Step Recipe
- Preheat Oven & Prepare Pan: Preheat your oven to 350°F (175°C). Line a 9×13-inch baking pan with parchment paper, leaving overhang on two sides for easy removal. Lightly grease any exposed areas.
- Make the Crust: In a large bowl, combine 2 cups all-purpose flour, 1/2 cup granulated sugar, and a pinch of salt. Cut in 1 cup (2 sticks) of cold unsalted butter using a pastry cutter or fork until the mixture resembles coarse crumbs. Press firmly and evenly into the bottom of the prepared pan. Bake for 20–22 minutes, or until lightly golden. Remove and let cool slightly while preparing the filling.
- Prepare the Cheesecake Filling: In a stand mixer fitted with a paddle attachment (or using a hand mixer), beat 3 (8 oz) packages of cream cheese on medium speed until smooth and fluffy, about 2 minutes. Gradually add 3/4 cup sugar and continue beating until well combined. Scrape down the sides of the bowl, then mix in 1 teaspoon vanilla extract and 1/4 cup sour cream (or heavy cream). Add 3 large eggs one at a time, mixing just until incorporated after each addition. Avoid overmixing to prevent air bubbles and cracking.
- Pour Filling Over Crust: Carefully pour the cheesecake batter over the warm crust, spreading it evenly with a spatula to cover completely.
- Bake the Bars: Bake in the preheated oven for 30–35 minutes, or until the edges are set but the center still has a slight jiggle. Do not overbake. Turn off the oven, crack the door open slightly, and let the bars cool inside for 1 hour to reduce temperature shock and prevent cracks.
- Cool Completely: Remove from oven and let cool to room temperature on a wire rack. Then refrigerate for at least 4 hours, preferably overnight, to allow the filling to fully set.
- Prepare the Strawberry Topping: While the bars chill, hull and slice 2 cups of fresh strawberries. In a saucepan, combine the sliced strawberries with 1/4 cup sugar and 1 tablespoon lemon juice. Cook over medium heat for 8–10 minutes, stirring occasionally, until the strawberries break down and release juices. Mix 1 teaspoon cornstarch with 1 tablespoon water and stir into the mixture. Simmer for another 2 minutes until thickened. Let cool completely, then spread evenly over the chilled cheesecake layer. Alternatively, use warmed strawberry jam strained for a smoother finish.
- Chill Again: Return the pan to the refrigerator for at least 1 hour to set the topping.
- Cut Into Bars: Using the parchment overhang, lift the entire slab out of the pan. Place on a cutting board and slice into 12–16 even bars using a sharp knife dipped in hot water and wiped dry between cuts for clean edges.
Tips
- Room Temperature Ingredients: Ensure cream cheese and eggs are at room temperature before mixing to avoid lumps and achieve a silky-smooth filling.
- Avoid Cracks: Don’t overmix the batter after adding eggs, and allow gradual cooling in the oven to minimize stress on the surface.
- Use Parchment Paper: This makes lifting the bars out effortless and keeps your pan clean.
- Sharp Knife Technique: Dip your knife in hot water and dry it before every cut to glide through cleanly without dragging the filling.
- Uniform Crust Pressure: Use the bottom of a measuring cup or glass to press the crust evenly, especially into corners.
- Don’t Skip Chilling Time: Proper chilling ensures clean slicing and optimal texture. Overnight chilling is best.
- Strain the Glaze: For a restaurant-quality finish, strain the cooked strawberry mixture to remove seeds if desired.
- Freeze for Storage: These bars freeze beautifully—wrap individually and store up to 3 months. Thaw in the fridge before serving.
Variations and Customizations
One of the joys of Strawberry Crunch Cheesecake Bars is their adaptability. Here are some creative twists to suit different tastes and occasions:
- Fruit Variations: Swap strawberries for raspberries, blueberries, peaches, or cherries. Each brings its own unique tartness and color.
- Crust Options: Try a graham cracker crust, Oreo crust, or almond shortbread for a nutty twist. Gluten-free flour blends also work well for dietary needs.
- Swirls and Layers: Add a swirl of raspberry puree or Nutella into the cheesecake batter before baking for a marbled effect.
- Mini Versions: Make bite-sized bars using a muffin tin for party-friendly portions.
- Chocolate Drizzle: Top with melted white or dark chocolate for an elegant finish.
- Herbal Infusion: Add a few fresh basil or mint leaves to the strawberry compote for a sophisticated herbal note.
- Yogurt Substitute: Replace sour cream with Greek yogurt for a slightly tangier, lighter filling.
- Dairy-Free Version: Use vegan cream cheese, plant-based butter, and egg replacers to make a dairy-free alternative.
- Low-Sugar Option: Use sugar substitutes like erythritol or monk fruit in both crust and filling, and opt for sugar-free jam.
- Holiday Themes: Add red and green sprinkles for Christmas, heart-shaped strawberries for Valentine’s Day, or edible glitter for celebrations.
Health Considerations and Nutritional Value
While Strawberry Crunch Cheesecake Bars are undeniably indulgent, understanding their nutritional profile can help you enjoy them mindfully:
- Calories: One bar (assuming 16 servings) contains approximately 320–380 calories, depending on size and ingredients used.
- Fat Content: High in saturated fat due to butter and cream cheese. Consider using reduced-fat dairy products for a lighter version, though texture may be affected.
- Sugar Levels: Contains significant added sugars from crust, filling, and topping. Diabetics should consume in moderation or explore low-glycemic alternatives.
- Protein: Provides about 5–6 grams per bar from eggs and dairy, making it somewhat satisfying despite being a dessert.
- Calcium: A good source thanks to cream cheese and eggs, supporting bone health.
- Portion Control: Serve small slices alongside fresh fruit or whipped cream to stretch servings and enhance nutrition.
- Gluten and Allergens: Contains gluten, dairy, and eggs—common allergens. Always label accordingly when serving guests.
- Balanced Indulgence: Best enjoyed occasionally as part of a balanced diet. Pair with a walk or light activity to offset the treat.
Ingredients
For the Crust:
- 2 cups all-purpose flour (or gluten-free 1:1 substitute)
- 1/2 cup granulated sugar
- 1 cup (2 sticks) cold unsalted butter, cubed
- Pinch of salt
For the Cheesecake Filling:
- 3 (8 oz) packages full-fat cream cheese, softened
- 3/4 cup granulated sugar
- 1 teaspoon pure vanilla extract
- 1/4 cup sour cream or heavy cream
- 3 large eggs, room temperature
- Pinch of salt
For the Strawberry Topping:
- 2 cups fresh strawberries, hulled and sliced (or frozen, thawed)
- 1/4 cup granulated sugar
- 1 tablespoon lemon juice
- 1 teaspoon cornstarch + 1 tablespoon water (slurry)
- (Optional) 1/2 cup seedless strawberry jam, warmed
Directions
- Preheat oven to 350°F (175°C). Line a 9×13-inch baking dish with parchment paper and lightly grease.
- In a bowl, mix flour, sugar, and salt. Cut in cold butter until crumbly. Press mixture firmly into the bottom of the pan. Bake for 20–22 minutes until golden. Cool slightly.
- Beat cream cheese until smooth. Add sugar and beat until creamy. Mix in vanilla and sour cream. Add eggs one at a time, mixing just until blended. Stir in salt.
- Pour batter over warm crust and spread evenly.
- Bake 30–35 minutes until edges are set and center jiggles slightly. Turn off oven, open door, and let cool inside for 1 hour.
- Cool completely on counter, then refrigerate at least 4 hours or overnight.
- Meanwhile, cook strawberries, sugar, and lemon juice in a saucepan until soft (8–10 min). Stir in cornstarch slurry and simmer 2 more minutes. Cool completely.
- Spread cooled strawberry mixture over cheesecake layer. Chill 1 hour.
- Lift bars out using parchment. Slice with a hot, clean knife into 12–16 pieces.
- Serve chilled. Store leftovers covered in the refrigerator for up to 5 days.
FAQ
Can I make these bars ahead of time?
Yes! These bars actually taste better after chilling overnight. You can prepare them 2–3 days in advance.
Why did my cheesecake crack?
Cracking is usually due to overbaking, overmixing, or rapid cooling. Using a water bath can help, but the gradual oven cooling method works well for bars.
Can I use frozen strawberries?
Absolutely. Thaw and drain excess liquid before cooking to avoid a watery topping.
How do I store leftover bars?
Keep refrigerated in an airtight container for up to 5 days. Layer with parchment to prevent sticking.
Can I freeze Strawberry Crunch Cheesecake Bars?
Yes! Wrap tightly in plastic and foil, or store in a freezer-safe container. Freeze for up to 3 months. Thaw in the fridge overnight.
Is there a way to make these gluten-free?
Yes—use a gluten-free flour blend for the crust and ensure all other ingredients are certified GF.
Can I skip the strawberry topping?
You can, but it adds freshness and visual appeal. Try a dusting of powdered sugar or fresh berries instead.
What size pan should I use?
A 9×13-inch rectangular pan is ideal. Using a different size will alter thickness and baking time.
Can I make mini cheesecake bars?
Yes! Use a muffin tin with liners, fill with crust and batter, and bake for 18–22 minutes.
Are these bars suitable for kids?
Definitely! They’re a hit at school events, birthdays, and family gatherings. Just watch for common allergens.
Summary
Strawberry Crunch Cheesecake Bars combine a buttery shortbread crust, creamy cheesecake layer, and glossy strawberry topping for a show-stopping dessert that’s as delicious as it is beautiful. Easy to make, customizable, and perfect for sharing, these bars are destined to become a favorite in your baking repertoire.