Classic Marble Cake
Classic Marble Cake: A Timeless Treat for Every Occasion
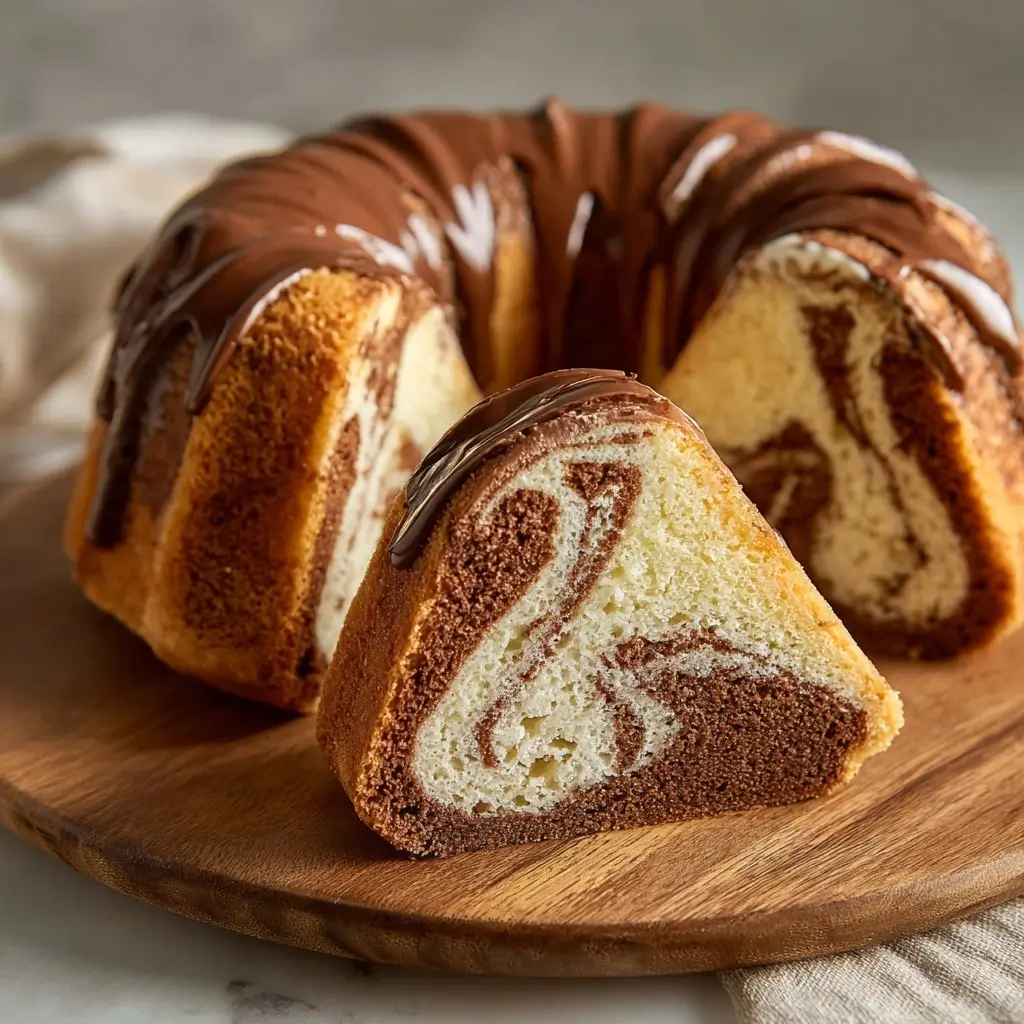
The Classic Marble Cake is a beloved dessert that has graced family tables, birthday parties, and holiday gatherings for generations. With its signature swirl of vanilla and chocolate batters creating a marbled effect, this cake is as visually appealing as it is delicious. Its soft, moist crumb and balanced flavor make it a favorite among children and adults alike. Whether served with a dusting of powdered sugar, a dollop of whipped cream, or a scoop of vanilla ice cream, the marble cake holds a special place in the hearts of home bakers and dessert lovers around the world.
The History of Marble Cake
The origins of the marble cake trace back to 19th-century Germany, where it was known as Marmorkuchen. German bakers were among the first to experiment with combining light and dark batters to create a swirled effect reminiscent of marble stone—hence the name. The technique was both artistic and practical: by blending a portion of a plain batter with cocoa, bakers could easily produce two flavors from one base recipe.
As European immigrants settled in America during the late 1800s and early 1900s, they brought their baking traditions with them, including marble cake. It quickly gained popularity in American households due to its simplicity, affordability, and visual appeal. By the mid-20th century, marble cake had become a staple in community cookbooks, church bake sales, and family kitchens across the United States.
Interestingly, the cake’s rise coincided with the availability of chemical leaveners like baking powder and baking soda, which made cakes fluffier and more consistent. Additionally, the commercial production of cocoa powder made chocolate-flavored desserts more accessible than ever before. Today, the marble cake remains a symbol of nostalgic comfort baking and culinary creativity.
Ingredients Breakdown: What Makes a Marble Cake Special
The beauty of a classic marble cake lies not only in its appearance but also in its balanced ingredients. Each component plays a vital role in achieving the perfect texture, moisture, and flavor contrast between the vanilla and chocolate sections.
- All-Purpose Flour: Provides structure to the cake. It’s the foundation that holds everything together while allowing for a tender crumb.
- Granulated Sugar: Adds sweetness and helps create a soft texture. It also contributes to the golden-brown crust when baked.
- Butter (Unsalted): Gives richness and depth of flavor. Room-temperature butter blends smoothly with sugar to create a creamy base that traps air for a light texture.
- Eggs: Act as a binder and add moisture. They also help with leavening and contribute to the cake’s structure.
- Buttermilk: Adds tanginess and tenderness. The acidity in buttermilk reacts with baking soda to enhance rising and improve texture.
- Vanilla Extract: Enhances the overall flavor profile, especially in the vanilla portion of the batter.
- Baking Powder & Baking Soda: Work together as leavening agents. Baking powder provides lift, while baking soda reacts with buttermilk for additional rise and softness.
- Salt: Balances sweetness and enhances all other flavors.
- Cocoa Powder (Unsweetened): Used to create the chocolate swirl. Natural or Dutch-process cocoa can be used, though each affects color and flavor slightly differently.
- Boiling Water: Often added to the chocolate portion to bloom the cocoa, intensifying its flavor and creating a smooth, thin batter that swirls easily.
These ingredients work in harmony to create a cake that is neither too dense nor too airy—a perfect middle ground that defines a well-made marble cake.
Step-by-Step Recipe: How to Make the Perfect Classic Marble Cake
Follow these detailed instructions to bake a moist, flavorful, and beautifully swirled marble cake right in your own kitchen.
Ingredients
- 2 ½ cups (315g) all-purpose flour
- 2 ½ teaspoons baking powder
- ½ teaspoon baking soda
- ½ teaspoon salt
- 1 cup (2 sticks / 226g) unsalted butter, softened to room temperature
- 2 cups (400g) granulated sugar
- 4 large eggs, at room temperature
- 1 ½ teaspoons pure vanilla extract
- 1 cup (240ml) buttermilk, at room temperature
- ¾ cup (75g) unsweetened cocoa powder (natural or Dutch-process)
- ¾ cup (180ml) boiling water
Directions
- Preheat oven and prepare pan: Preheat your oven to 350°F (175°C). Grease and flour a 12-cup bundt pan or two 9-inch round cake pans. For best results, use non-stick baking spray with flour or line the bottom with parchment paper.
- Mix dry ingredients: In a medium bowl, whisk together the flour, baking powder, baking soda, and salt. Set aside.
- Cream butter and sugar: In a large mixing bowl, beat the softened butter and granulated sugar together on medium-high speed until light and fluffy (about 3–4 minutes). Scrape down the sides of the bowl as needed.
- Add eggs and vanilla: Add the eggs one at a time, beating well after each addition. Mix in the vanilla extract. The mixture should be smooth and pale yellow.
- Incorporate dry and wet ingredients alternately: With the mixer on low speed, add the dry ingredients in three parts, alternating with the buttermilk in two parts, beginning and ending with the dry ingredients. Mix just until combined after each addition. Do not overmix.
- Prepare chocolate batter: In a separate bowl, stir the cocoa powder and boiling water together until smooth. Allow it to cool slightly (about 2–3 minutes).
- Divide and combine: Remove about 2 cups of the plain batter and transfer it to a smaller bowl. Stir the cooled cocoa mixture into this portion to create the chocolate batter.
- Swirl in the pan: Alternate spoonfuls of vanilla and chocolate batters into the prepared pan. Use a knife or skewer to gently swirl the batters together in a figure-eight motion. Be careful not to over-swirl, or you’ll lose the marbled effect.
- Bake: Place the pan in the preheated oven and bake for 45–60 minutes (for bundt) or 30–35 minutes (for layer pans), or until a toothpick inserted into the center comes out clean or with a few moist crumbs.
- Cool and release: Let the cake cool in the pan for 15 minutes, then invert it onto a wire rack to cool completely. If using a bundt pan, ensure it’s fully cooled before removing to prevent breakage.
- Serve: Once cooled, dust with powdered sugar, frost, or serve plain. Slice and enjoy!
Tips for Baking the Best Marble Cake
- Use room-temperature ingredients: Cold eggs or buttermilk can cause the batter to curdle and affect the cake’s texture. Take them out an hour before baking.
- Don’t overmix the batter: Overmixing develops gluten, which can make the cake tough. Mix until just combined, especially after adding flour.
- Swirl gently: Use a butter knife or chopstick to lightly swirl the batters. Too much swirling will blend them entirely, losing the marbled look.
- Bloom the cocoa: Mixing cocoa with boiling water intensifies the chocolate flavor and creates a smoother chocolate batter.
- Avoid opening the oven door: During the first 30 minutes of baking, resist the urge to open the oven door—it can cause the cake to sink.
- Check doneness properly: Insert a toothpick near the center. If it comes out clean or with a few dry crumbs, it’s done. Wet batter means more time is needed.
- Let it cool: Cooling allows the structure to set. Removing the cake too soon can cause it to crack or collapse.
Variations and Customizations
The classic marble cake is wonderfully adaptable. Here are some creative ways to personalize your cake:
- Lemon Marble Cake: Add 1 tablespoon of lemon zest and 2 tablespoons of lemon juice to the vanilla batter for a citrus twist.
- Coffee-Infused Chocolate Swirl: Replace the boiling water with strong brewed coffee to deepen the chocolate flavor.
- Marble Bundt with Glaze: Drizzle with a simple confectioners’ sugar glaze or a chocolate-vanilla dual glaze for extra sweetness.
- Spiced Marble Cake: Add 1 teaspoon of cinnamon or pumpkin spice to the vanilla batter for a warm, autumnal variation.
- Fruit-Filled Layers: Layer the cake with raspberry jam or fresh berries between slices for a fruity surprise.
- Gluten-Free Marble Cake: Substitute the all-purpose flour with a high-quality gluten-free flour blend. Ensure it contains xanthan gum or add ½ teaspoon separately.
- Dairy-Free Version: Use plant-based butter, dairy-free yogurt instead of buttermilk (or make a substitute with almond milk + lemon juice), and a non-dairy milk alternative.
- Mini Marble Cupcakes: Divide the batter into lined muffin tins and bake for 18–22 minutes for adorable individual servings.
- White Chocolate Swirl: Omit cocoa and use melted white chocolate mixed with a bit of batter for a vanilla-dark-white chocolate trio.
- Alcohol-Enhanced: Brush the cooled cake with a simple syrup infused with bourbon, rum, or Kahlúa for an adult twist.
Health Considerations and Nutritional Value
While the classic marble cake is undeniably delicious, it’s important to enjoy it in moderation as part of a balanced diet. Here’s a general nutritional breakdown per slice (based on 12 servings):
- Calories: ~380–420
- Total Fat: 18–22g (mostly from butter)
- Saturated Fat: 10–12g
- Cholesterol: 85–95mg
- Sodium: 200–250mg
- Total Carbohydrates: 50–55g
- Sugars: 30–35g
- Protein: 5–6g
Considerations:
- High in Sugar and Fat: Due to butter, sugar, and eggs, this cake is rich and calorie-dense. Those managing blood sugar levels or heart health should consume it sparingly.
- Low in Fiber: Made with refined flour, it lacks dietary fiber. Consider substituting up to ½ cup of whole wheat flour for added nutrition.
- Allergens: Contains common allergens such as eggs, dairy, wheat, and soy (depending on butter and cocoa brands).
- Portion Control: Serve smaller slices and pair with fresh fruit or Greek yogurt to balance the meal.
- Healthier Substitutions: Try using applesauce or mashed banana to replace up to half the butter, and reduce sugar by ¼ cup without sacrificing taste.
Frequently Asked Questions (FAQ)
Q: Can I make marble cake ahead of time?
A: Yes! Bake it a day in advance and store it covered at room temperature. It often tastes even better the next day as flavors meld.
Q: How do I store leftover marble cake?
A: Keep it in an airtight container at room temperature for up to 3 days, or refrigerate for up to 5 days. Bring to room temperature before serving for best texture.
Q: Can I freeze marble cake?
A: Absolutely. Wrap the cooled, unfrosted cake tightly in plastic wrap and foil, then freeze for up to 3 months. Thaw overnight in the refrigerator and bring to room temperature before serving.
Q: Why did my cake sink in the middle?
A: This can happen due to underbaking, opening the oven too early, using expired leavening agents, or overmixing the batter. Double-check your baking time and ingredient freshness.
Q: Can I use oil instead of butter?
A: Yes. Substitute equal parts neutral oil (like canola or vegetable) for butter. The cake will be slightly more moist but less rich in flavor.
Q: Why isn’t my marbling showing?
A: Over-swirling, overmixing, or letting the batter sit too long can blur the layers. Swirl gently and bake immediately after pouring into the pan.
Q: Can I make this cake in a sheet pan?
A: Yes. Use a 9×13 inch pan and bake for 35–40 minutes. This makes it ideal for parties or slicing into bars.
Q: Is buttermilk necessary?
A: While not mandatory, buttermilk adds tenderness and flavor. If unavailable, make a substitute: add 1 tablespoon lemon juice or vinegar to 1 cup of milk and let sit for 5 minutes.
Summary
The Classic Marble Cake is a timeless dessert that combines the best of vanilla and chocolate in a beautifully swirled, moist, and tender loaf. Easy to make and endlessly customizable, it’s perfect for celebrations or everyday indulgence.