Introduction
Brownie Pie Bars are the ultimate fusion dessert—a luscious, decadent hybrid that marries the rich, fudgy depth of classic brownies with the buttery, flaky elegance of a pie crust. Unlike traditional brownies baked in a single dense slab or pies with delicate custard or fruit fillings, Brownie Pie Bars deliver a textural symphony: a crisp, golden shortbread or pastry base cradles a thick, gooey, crackly-topped brownie layer, often finished with optional garnishes like sea salt, toasted nuts, or a glossy ganache drizzle. This hybrid treat is beloved for its ease of preparation, crowd-pleasing versatility, and nostalgic comfort—ideal for bake sales, holiday platters, potlucks, or cozy weekend indulgence. Whether you’re a novice baker seeking foolproof satisfaction or an experienced confectioner looking to elevate a timeless favorite, Brownie Pie Bars offer endless creative potential without demanding professional technique.
The History
The origins of Brownie Pie Bars lie at the crossroads of two iconic American dessert evolutions: the invention of the brownie in the late 19th century and the enduring popularity of pie-based bar cookies throughout the 20th century. The first known brownie recipe appeared in the 1896 edition of Fannie Farmer’s Boston Cooking-School Cook Book, though early versions were more akin to molasses-spiced “brown biscuits.” By the 1900s, chocolate-laden iterations gained traction—especially after the Palmer House Hotel in Chicago claimed (though contested) to have served a walnut-studded, apricot-glazed version at the 1893 World’s Columbian Exposition. Meanwhile, bar cookies—baked in sheet pans and cut into squares—became household staples during the Great Depression and WWII due to their economical use of ingredients and minimal equipment needs. The “pie bar” concept emerged organically as home bakers began adapting pie crust techniques (like press-in shortbread or graham cracker bases) to support richer, denser fillings. By the 1950s–60s, community cookbooks and Betty Crocker publications featured “brownie pie,” “fudge pie bars,” and “chocolate crumb bars”—early ancestors of today’s Brownie Pie Bars. The modern iteration, with its emphasis on visual contrast (crisp bottom + shiny top), heightened texture, and gourmet customization, surged in popularity with the rise of food blogging, Pinterest culture, and artisanal baking movements in the 2010s—solidifying its status as a contemporary classic.
Ingredients Breakdown
Understanding each ingredient’s functional role ensures consistent, restaurant-quality results—not just flavor, but structure, moisture balance, leavening control, and mouthfeel.
- Unsalted Butter (for crust & filling): Provides richness, tenderness, and flakiness in the base; in the brownie layer, it emulsifies cocoa and sugar, carries fat-soluble flavors, and contributes to a dense yet melt-in-the-mouth crumb. Clarified butter or browned butter can be used for deeper nuttiness.
- Granulated Sugar: Sweetens and aids in aeration when creamed with butter (for crust) or melted with chocolate (for filling). It also promotes surface cracking and crust formation during baking.
- Brown Sugar (optional in crust or filling): Adds moisture, acidity (via molasses), and caramel notes; improves chewiness and helps retain softness over time.
- All-Purpose Flour: Forms gluten networks—minimal in the crust for tenderness, slightly more in the brownie layer for structural integrity without cakeiness. Pastry flour or a blend with cake flour yields extra tenderness; bread flour is avoided (too much gluten).
- Natural or Dutch-Processed Cocoa Powder: Natural cocoa (acidic) reacts with baking soda for subtle lift and bright chocolate flavor; Dutch-processed (alkalized) delivers mellow, earthy depth and dissolves more smoothly. Many recipes use a combination for complexity.
- Dark Chocolate (60–72% cacao): The soul of the brownie layer—provides superior mouth-coating fat, nuanced bitterness, and aromatic volatiles lost in cocoa-only versions. Chopped bars are preferred over chips for even melting and richer texture.
- Eggs (large, room temperature): Act as binders, emulsifiers, and leaveners. The yolks add fat and richness; whites contribute structure. Overmixing after adding eggs causes excessive gluten development and toughness.
- Vanilla Extract (pure, not imitation): Enhances chocolate’s aromatic profile and rounds out sweetness. Mexican or Tahitian vanilla adds floral complexity.
- Salt (fine sea salt or kosher): Not merely for seasoning—salt suppresses bitterness, heightens sweetness perception, and balances fat. A pinch in the crust and a finishing flake on top are non-negotiable for dimension.
- Baking Powder or Soda (small amounts): Used sparingly—if at all—to provide *just enough* lift to prevent leaden density while preserving fudginess. Too much yields a cakelike, dry result.
- Optional Add-Ins: Toasted walnuts, pecans, or hazelnuts (adds crunch and tannic contrast); espresso powder (intensifies chocolate without tasting like coffee); flaky sea salt (for finish); mini marshmallows (for s’mores variation); swirls of peanut butter or caramel.
Step-by-Step Recipe
- Prep & Preheat: Position oven rack in center position. Preheat oven to 350°F (175°C). Line a 9×13-inch metal baking pan with parchment paper, leaving 2-inch overhangs on two opposite sides for easy lifting. Lightly grease exposed pan edges and parchment.
- Make the Crust Base: In a medium bowl, whisk together 1¼ cups (155g) all-purpose flour, ¼ tsp fine sea salt, and ½ tsp baking powder (if using). In a large bowl, beat ½ cup (1 stick / 113g) unsalted butter (cold, cubed) with ⅓ cup (67g) granulated sugar and 2 tbsp (25g) light brown sugar using an electric mixer on medium until sandy and cohesive (~2 minutes). Gradually add dry ingredients, mixing on low until clumps form and dough begins to gather. Press evenly into prepared pan, building a slight rim (¼ inch high) along edges. Chill 15 minutes.
- Bake the Crust: Bake chilled crust 18–22 minutes, until lightly golden and set (no wet sheen). Cool 10 minutes on wire rack—do not skip cooling; prevents soggy interface.
- Prepare Brownie Layer: While crust bakes, melt ¾ cup (170g) unsalted butter and 8 oz (227g) chopped dark chocolate (60–72% cacao) in a heatproof bowl over simmering water (double boiler), stirring until smooth. Remove from heat; cool 5 minutes. Whisk in 1¾ cups (350g) granulated sugar, ½ cup (100g) light brown sugar, and 2 tsp pure vanilla extract until glossy. Add 3 large room-temperature eggs one at a time, whisking vigorously for 30 seconds after each addition until batter thickens and ribbons off whisk. Sift in ⅔ cup (65g) natural or Dutch-processed cocoa powder, ½ cup (63g) all-purpose flour, 1 tsp instant espresso powder (optional), and 1 tsp fine sea salt. Fold gently with spatula until *just* combined—no streaks, but do not overmix. Fold in 1 cup (120g) toasted walnuts or pecans.
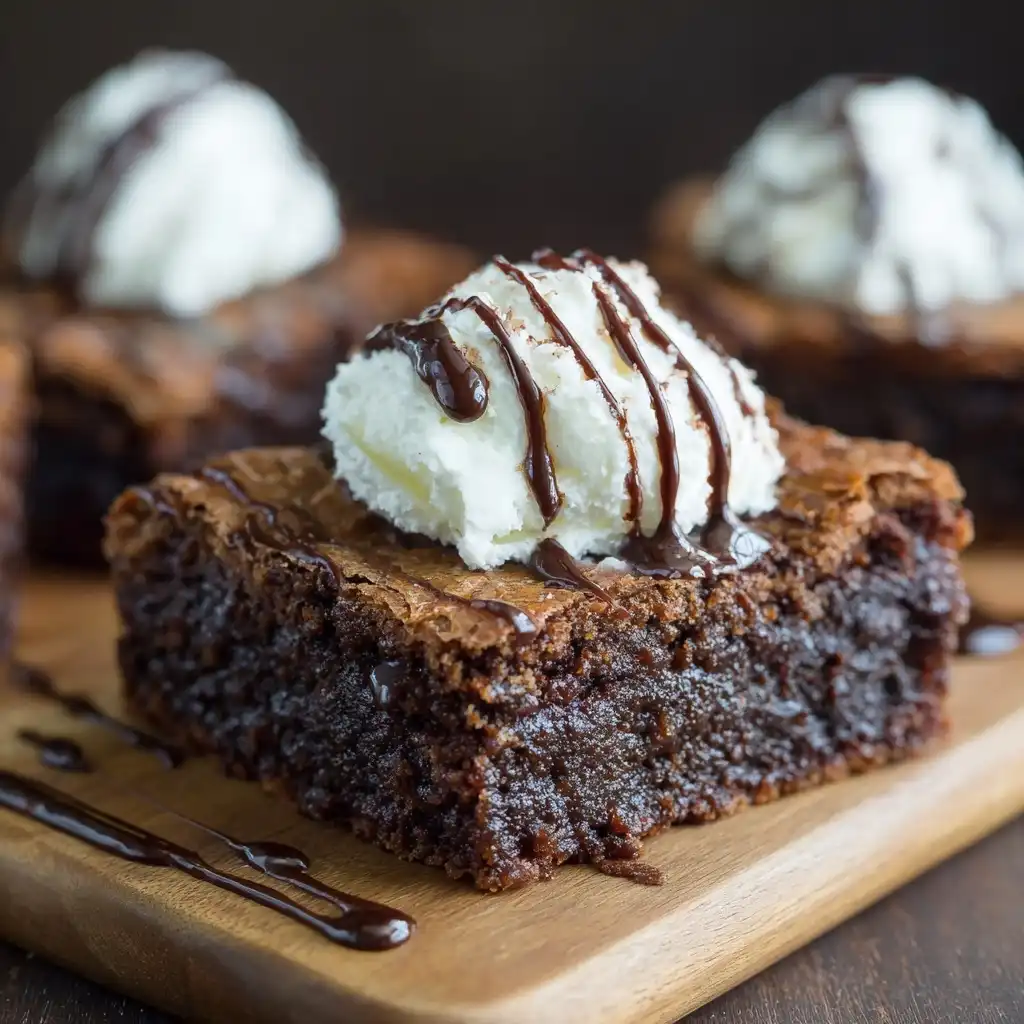
- Assemble & Bake: Pour warm brownie batter evenly over partially cooled crust. Tilt pan gently to level. Tap firmly twice on counter to release air bubbles. Optional: Sprinkle top with flaky sea salt or extra chopped nuts. Bake 32–38 minutes—center should be set with a slight jiggle (like Jell-O), and top deeply cracked and matte—not wet or glossy. A toothpick inserted 1 inch from edge should come out with moist crumbs; center may show a few damp crumbs (this ensures fudginess).
- Cool & Set: Cool completely in pan on wire rack (minimum 2 hours, ideally 4 hours or overnight refrigerated). This step is critical: allows fats to re-solidify, sugars to crystallize, and layers to separate cleanly. Cutting while warm causes crumbling and smearing.
- Cut & Serve: Use parchment overhangs to lift entire slab onto cutting board. With a hot, sharp knife (dipped in hot water and wiped dry between cuts), slice into 12–16 uniform bars. Wipe blade clean after every 2–3 cuts for pristine edges.
Tips
- Room-Temperature Eggs Are Essential: Cold eggs don’t emulsify properly with warm chocolate-butter mixture, risking separation and graininess. Place eggs in warm water for 5 minutes if forgotten.
- Toast Your Nuts: Spread nuts on a parchment-lined baking sheet and toast at 350°F for 8–10 minutes until fragrant and golden. Cool completely before folding in—warm nuts melt chocolate pockets.
- Chill the Crust Before Baking: Prevents shrinkage and ensures even thickness. For ultra-crisp bases, freeze crust 10 minutes before baking.
- Don’t Overbake—Trust the Wiggle Test: Overbaking is the #1 cause of dry, cakey bars. The center should wobble like firm jelly—not slosh, but not be still. Carryover cooking continues as it cools.
- Parchment Is Non-Negotiable: Foil tears; greased pans stick. Parchment guarantees clean release and effortless presentation—even for sticky, ganache-topped versions.
- Use a Metal Pan: Glass or ceramic retains heat longer, increasing risk of overbaked edges and underdone centers. Heavy-gauge aluminum ensures even conduction.
- Measure Flour Correctly: Spoon flour into measuring cup and level with straight edge—don’t scoop! Too much flour = tough, dry bars. For precision, weigh flour (120g per cup).
- Rest Overnight for Best Texture: Refrigeration firms up the fat, deepens chocolate flavor, and makes slicing surgical. Bring to room temperature 15 minutes before serving for optimal mouthfeel.
- Hot Knife Technique: Run knife under hot tap water, wipe thoroughly, then cut. Repeat. Prevents dragging, smearing, and crumbling—especially vital for glossy glazes or cold-set ganache.
- Store Smart: Keep in airtight container at room temperature up to 3 days, refrigerated up to 1 week, or frozen up to 3 months (wrap bars individually in plastic, then place in freezer bag). Thaw overnight in fridge or 20 minutes at room temp.
Variations and Customizations
Brownie Pie Bars are a canvas for creativity—easily adapted for dietary needs, seasonal ingredients, global flavors, or festive occasions.
- Blondie Pie Bars: Omit cocoa and chocolate; use 1 cup (200g) brown sugar + ½ cup (100g) granulated sugar, 1 tsp cinnamon, and 1 cup white chocolate chips or butterscotch morsels. Add ½ cup dried cranberries and 1 tsp orange zest.
- Espresso Crunch: Add 2 tsp instant espresso powder to brownie batter and ½ cup crushed toffee bits (like Heath) folded in at the end. Top with espresso-dusted whipped cream.
- Peanut Butter Swirl: After pouring brownie batter, dollop ½ cup smooth natural peanut butter over top. Drag a knife through in figure-eights to create marbling—don’t overmix.
- S’mores Style: Press 1 cup graham cracker crumbs into crust instead of flour-based. After baking brownie layer, top with mini marshmallows and broil 60 seconds until puffed and golden. Finish with melted milk chocolate drizzle.
- Gluten-Free: Replace all-purpose flour in both crust and brownie with 1:1 GF blend (e.g., Bob’s Red Mill). Add ½ tsp xanthan gum to crust if blend doesn’t include it. Use GF certified oats for oat-based variations.
- Vegan: Crust: Use vegan butter + maple syrup instead of sugar. Brownie layer: Flax eggs (3 tbsp ground flax + 9 tbsp water, rested 10 min), coconut oil or vegan butter, dairy-free chocolate, and aquafaba (3 tbsp whipped to soft peaks) folded in last for lift.
- Mini Mason Jar Version: Press 2 tbsp crust into bottom of 4-oz jars. Add ¼ cup brownie batter. Bake at 350°F for 22–26 minutes. Chill, top with coconut whipped cream and chocolate shavings.
- Orange-Chocolate: Add 2 tbsp fresh orange zest and 1 tbsp Grand Marnier or Cointreau to brownie batter. Garnish with candied orange peel.
- Spiced Chai: Infuse melted butter with 1 tsp chai spice blend (cinnamon, ginger, cardamom, cloves, black pepper) for 10 minutes; strain before using. Add 1 tbsp strong brewed chai tea (cooled) to batter.
- White Chocolate Raspberry: Swap dark chocolate for high-quality white chocolate. Swirl in ⅓ cup seedless raspberry jam before baking. Top with fresh raspberries and white chocolate curls.
Health Considerations and Nutritional Value
While Brownie Pie Bars are inherently indulgent, mindful ingredient swaps and portion awareness allow for greater nutritional harmony without sacrificing pleasure.
Caloric Profile (per standard 2×2-inch bar, approx. 1/16th of recipe):
• Calories: 285–340 kcal
• Total Fat: 16–19g (mostly unsaturated from cocoa butter and nuts)
• Saturated Fat: 8–10g
• Carbohydrates: 32–38g (including 22–26g sugars)
• Fiber: 2–3g (increases with whole wheat flour, oats, or added psyllium)
• Protein: 3–4g
• Sodium: 140–180mg
Nutrient Highlights & Upgrades:
- Antioxidant-Rich Cocoa: Dark chocolate (70%+) contains flavanols linked to improved endothelial function and reduced oxidative stress. Choose minimally processed, low-sugar cocoa for maximum benefit.
- Heart-Healthy Fats: Nuts (walnuts, almonds) contribute monounsaturated fats, vitamin E, magnesium, and plant sterols shown to support cholesterol balance.
- Lower-Sugar Options: Reduce granulated sugar by ¼ cup and replace with 2 tbsp monk fruit or erythritol blend. Use unsweetened cocoa and dark chocolate ≥70% cacao.
- Fiber Boosters: Substitute ¼ cup flour with almond flour or oat fiber. Add 2 tbsp ground flaxseed or chia seeds to brownie batter for omega-3s and viscous fiber.
- Reduced-Guilt Crust: Use 1 cup blended dates + 1 cup toasted walnuts + ¼ tsp salt for a no-bake, fiber-dense base (press and chill instead of bake).
- Allergen Notes: Naturally nut-free if omitted—but always label clearly. For dairy sensitivity, high-fat coconut milk or avocado oil can replace some butter (test in small batches). Gluten-free versions require dedicated GF equipment to avoid cross-contact.
- Mindful Enjoyment: Savor one bar slowly—pair with herbal tea or black coffee to enhance satiety signals. Avoid eating straight from the pan; plate intentionally to honor the experience.
Consult a registered dietitian before making significant modifications for medical conditions (e.g., diabetes, IBS, renal disease). Moderation, not elimination, remains the gold standard for sustainable enjoyment.
Ingredients
For the Crust:
• 1¼ cups (155g) all-purpose flour
• ½ cup (1 stick / 113g) unsalted butter, cold and cubed
• ⅓ cup (67g) granulated sugar
• 2 tablespoons (25g) light brown sugar
• ¼ teaspoon fine sea salt
• ½ teaspoon baking powder (optional, for slight lift)
For the Brownie Layer:
• ¾ cup (170g) unsalted butter
• 8 ounces (227g) high-quality dark chocolate (60–72% cacao), finely chopped
• 1¾ cups (350g) granulated sugar
• ½ cup (100g) light brown sugar
• 2 teaspoons pure vanilla extract
• 3 large eggs, room temperature
• ⅔ cup (65g) unsweetened cocoa powder (natural or Dutch-process)
• ½ cup (63g) all-purpose flour
• 1 teaspoon instant espresso powder (optional, enhances chocolate)
• 1 teaspoon fine sea salt
• 1 cup (120g) toasted walnuts or pecans, roughly chopped
For Finishing (Optional):
• Flaky sea salt (Maldon or fleur de sel)
• Additional chopped nuts or chocolate shavings
• Warm chocolate ganache (½ cup heavy cream + 4 oz chopped chocolate, heated and stirred until smooth)
Directions
- Preheat oven to 350°F (175°C). Line a 9×13-inch metal baking pan with parchment paper, allowing 2-inch overhangs on two opposite sides. Lightly grease exposed pan edges and parchment.
- In a medium bowl, whisk together flour, salt, and baking powder (if using). In a large bowl, beat cold cubed butter, granulated sugar, and brown sugar with an electric mixer on medium speed until mixture resembles coarse, damp sand—about 2 minutes. Gradually add dry ingredients, mixing on low until dough begins to clump and hold together when pinched. Press evenly into prepared pan, building a ¼-inch-high rim along edges. Chill 15 minutes.
- Bake chilled crust for 18–22 minutes, until lightly golden and set (no wet shine). Cool on wire rack for 10 minutes—do not skip this step.
- While crust bakes, prepare brownie layer: In a heatproof bowl set over barely simmering water (double boiler), melt butter and chopped chocolate, stirring constantly until smooth and glossy. Remove from heat and let cool 5 minutes.
- Whisk warm chocolate mixture with granulated sugar, brown sugar, and vanilla until thickened and glossy—about 1 minute. Add eggs one at a time, whisking vigorously for 30 seconds after each addition until batter is thick, smooth, and leaves a ribbon trail.
- Sift cocoa powder, flour, espresso powder (if using), and salt over batter. Using a silicone spatula, fold gently until *just* combined—no dry streaks remain. Fold in toasted nuts.
- Pour brownie batter evenly over warm, partially cooled crust. Tilt pan to level. Tap firmly twice on countertop to release air bubbles. Sprinkle top with flaky sea salt or extra nuts.
- Bake 32–38 minutes—center should be set with a gentle jiggle (like firm Jell-O), top deeply cracked and matte. A toothpick inserted 1 inch from edge should show moist crumbs; center may show a few damp crumbs.
- Cool completely in pan on wire rack—minimum 2 hours, ideally 4 hours or overnight refrigerated. This ensures clean cuts and ideal texture.
- Using parchment overhangs, lift slab onto cutting board. With hot, clean knife, cut into 12–16 bars. Wipe knife between cuts. Serve at room temperature. Store airtight at room temperature up to 3 days, refrigerated up to 1 week, or frozen up to 3 months.
FAQ
- Can I use a glass or ceramic pan?
- Not recommended. Glass and ceramic retain and radiate heat differently than metal, leading to overbaked, hard edges and a potentially undercooked or gummy center. If necessary, reduce oven temperature to 325°F and extend bake time by 5–8 minutes—monitor closely.
- Why did my brownie layer sink or separate from the crust?
- Most commonly caused by pouring hot brownie batter onto a hot crust. Always cool the pre-baked crust for at least 10 minutes before adding batter. Also ensure crust is fully chilled before baking—it prevents butter from melting too fast and causing slippage.
- My bars turned out cakey instead of fudgy—what went wrong?
- Overmixing the batter after adding eggs or flour develops excess gluten. Overbaking—even by 2–3 minutes—dries them out. Also, using too much leavener (baking powder/soda) or substituting cake flour (too low protein) can cause unwanted rise and airiness. Stick to AP flour and precise timing.
- Can I make these ahead for a party?
- Absolutely—and they improve! Bake and cool completely, then wrap tightly in plastic and refrigerate up to 3 days. For best quality, slice day-of and bring to room temperature 20 minutes before serving. You may also freeze unbaked crust and brownie batter separately (crust up to 1 month; batter up to 3 days—thaw overnight in fridge before baking).
- How do I prevent crumbling when cutting?
- Cooling is paramount—never cut warm. Use parchment overhangs for lift-out. A hot, sharp knife (dipped in hot water, wiped dry) slices cleanly. For ultra-clean edges, chill bars 30 minutes before cutting. Avoid serrated knives—they tear.
- Can I substitute oil for butter?
- Butter provides essential flavor, emulsification, and structure. Oil yields greasier, less cohesive bars with diminished crust integrity. If dairy-free is required, use high-quality vegan butter (e.g., Miyoko’s or Melt) — never neutral oil.
- What’s the best way to store leftovers?
- Store in an airtight container at room temperature up to 3 days. For longer storage, refrigerate up to 1 week (wrap individual bars in plastic to prevent drying). Freeze for up to 3 months: wrap each bar tightly in plastic, then place in freezer bag. Thaw overnight in fridge or 20 minutes at room temp.
- Can I add fruit like raspberries or cherries?
- Yes—but pat fresh berries *very* dry and toss with 1 tsp cornstarch to absorb excess moisture and prevent soggy spots. Fold in gently at the end. Frozen fruit must be thawed, drained, and blotted—otherwise steam creates tunnels. Dried fruit (cherries, cranberries) works beautifully without prep.
- Why does my top have a dull, matte crust instead of shiny?
- A shiny, crackly top forms from proper sugar dissolution, egg aeration, and surface drying. Ensure you whisk sugar into warm chocolate-butter mixture *until glossy*, and add eggs with vigorous whisking. Avoid opening oven during first 25 minutes—steam escape disrupts crust formation.
- Are these suitable for mailing or shipping?
- Yes—with precautions. Fully cool, then wrap each bar individually in parchment + plastic wrap. Place in rigid box with bubble wrap or crumpled parchment to prevent shifting. Ship via 2-day express. Avoid summer months unless using ice packs and insulated liners. Note: Ganache-topped versions are less stable for transit.
Summary
Brownie Pie Bars masterfully unite the buttery sophistication of a shortbread crust with the deeply fudgy, crackly-topped decadence of premium brownies—creating a layered, texturally thrilling dessert that’s as impressive as it is approachable. With meticulous attention to ingredient temperature, precise baking windows, and smart customization options—from vegan adaptations to festive swirls—they deliver consistent, crowd-raving results whether you’re baking for Sunday supper or scaling for a wedding dessert table.
More than just a recipe, Brownie Pie Bars represent the joyful alchemy of home baking: where science meets nostalgia, restraint meets indulgence, and every square promises a moment of unapologetic, deeply satisfying delight.