Introduction
Lemon Brownie Bars are the brilliant, zesty lovechild of two beloved dessert worlds: the dense, fudgy richness of classic brownies and the bright, tangy vibrancy of lemon bars. These decadent squares strike an exquisite balance—offering a tender, slightly chewy base infused with deep cocoa notes, crowned with a luxuriously smooth, sun-kissed lemon layer that’s neither cloyingly sweet nor overwhelmingly tart. Unlike traditional lemon bars—which rely on a shortbread crust—Lemon Brownie Bars feature a rich chocolate foundation that creates a stunning visual contrast and a complex flavor interplay: the bitterness of cocoa tempers the citrus acidity, while the lemon cuts through the brownie’s richness, resulting in a harmonious, sophisticated treat perfect for spring gatherings, summer picnics, holiday dessert tables, or even as an elegant afternoon indulgence. Whether you’re a devoted brownie aficionado seeking a refreshing twist or a lemon lover craving something more substantial than a simple bar, Lemon Brownie Bars deliver unforgettable texture, layered flavor, and showstopping appeal—all in one easy-to-bake, slice-and-serve format.
The History
While no single documented “invention” of Lemon Brownie Bars exists, their emergence reflects a broader culinary evolution rooted in American home baking innovation during the mid-to-late 20th century. The iconic chocolate brownie itself traces back to the 1890s—first appearing in the 1896 Boston Cooking-School Cook Book by Fannie Farmer—and rose to national prominence with the introduction of boxed cake mixes and accessible cocoa powder in the 1930s–40s. Lemon bars, conversely, gained widespread popularity in the 1970s and ’80s, notably boosted by the 1984 publication of the “Magic Lemon Bar” recipe in the L.A. Times, which quickly became a cultural phenomenon. As home bakers began experimenting with cross-category hybrids—think red velvet brownies, peanut butter cup brownies, or mint chocolate fudge bars—the natural next step was marrying lemon’s brightness with chocolate’s depth. Early iterations appeared in regional cookbooks and church fundraisers across the Midwest and Pacific Northwest in the late 1990s, often under names like “Lemon Swirl Brownies,” “Citrus Chocolate Squares,” or “Sunshine Brownie Bars.” Food bloggers accelerated their rise in the early 2010s, refining techniques to prevent curdling, ensure clean layer separation, and enhance lemon intensity without artificial flavorings. Today, Lemon Brownie Bars represent a modern classic—a testament to intuitive flavor pairing, the democratization of gourmet baking, and the enduring American love affair with both chocolate and citrus.
Ingredients Breakdown
Every exceptional Lemon Brownie Bar hinges on thoughtfully selected, high-quality ingredients—not just for taste, but for structural integrity, moisture retention, and balanced chemistry. Below is a meticulous analysis of each component’s functional and sensory role:
- Unsalted Butter (1 cup, cubed & chilled for brownie base; ½ cup, melted for lemon layer): Provides essential fat for tenderness, richness, and mouthfeel. Chilled butter in the brownie batter ensures proper creaming with sugar for optimal aeration, while melted butter in the lemon layer promotes smooth emulsification and prevents graininess.
- Granulated Sugar (1¾ cups total: 1¼ cups for brownie, ½ cup for lemon): Not only sweetens but also contributes to browning (Maillard reaction), structure (via sugar’s binding properties), and texture (granular size affects batter viscosity). The higher proportion in the brownie base supports fudginess; the precise amount in the lemon layer balances acidity without masking lemon’s aromatic oils.
- Large Eggs (3 total: 2 for brownie, 1 for lemon): Act as emulsifiers, leavening agents (trapping air when beaten), and structural proteins. Room-temperature eggs incorporate more evenly into both batters—critical for avoiding lumps in the lemon layer and ensuring uniform rise in the brownie.
- Pure Vanilla Extract (1 tsp, preferably Madagascar bourbon): Enhances complexity and rounds out sharp citrus notes. Alcohol-based vanilla helps volatilize lemon esters, making aromas more perceptible.
- All-Purpose Flour (¾ cup, spooned & leveled): Supplies gluten-forming proteins for structure—but too much yields toughness. Precise measuring avoids dryness; sifting ensures lump-free incorporation and even distribution.
- Natural-Process Cocoa Powder (¾ cup, unsweetened, non-alkalized): Delivers intense, fruity chocolate notes and deep color. Non-alkalized cocoa retains more acidity, which synergizes beautifully with lemon’s pH—unlike Dutch-process cocoa, which can mute brightness.
- Pinch of Fine Sea Salt (⅛ tsp in brownie, optional pinch in lemon): A critical flavor amplifier that heightens sweetness perception and suppresses bitterness, allowing both chocolate and lemon to shine with greater clarity.
- Fresh Lemons (4–5 medium, preferably organic): The heart of the lemon layer. You’ll need ~½ cup freshly squeezed juice (strained) and 2 tbsp finely grated zest (only the yellow outer peel—avoid bitter white pith). Freshness is non-negotiable: bottled juice lacks volatile top notes and contains preservatives that interfere with setting; zest provides essential lemon oil compounds responsible for aroma and perceived intensity.
- Cornstarch (2 tbsp, sifted): The gentle thickener for the lemon layer—providing a velvety, custard-like set without the rubberiness of flour or the cloudiness of tapioca. Must be fully dissolved in cold lemon juice before heating to prevent lumps.
- Confectioners’ Sugar (for dusting, optional but recommended): Adds subtle sweetness and elegant visual finish. Sifted confectioners’ sugar melts slightly on warm bars, creating a delicate glaze-like sheen.
Step-by-Step Recipe
- Preheat & Prep (10 minutes): Position oven rack in center position. Preheat oven to 350°F (175°C). Generously grease a 9×13-inch metal baking pan (not glass or ceramic—metal ensures even, rapid heat transfer crucial for clean layer definition) with unsalted butter or non-stick spray, then line bottom and long sides with parchment paper, leaving 2-inch overhangs on two opposite sides for effortless lifting. Lightly grease parchment.
- Make the Brownie Base (15 minutes + cooling): In a medium heatproof bowl, combine cubed chilled butter and chopped dark chocolate (60–70% cacao, optional but highly recommended for depth). Melt gently over simmering water (double boiler), stirring constantly until smooth and glossy. Remove from heat; cool 5 minutes. Whisk in granulated sugar, then add eggs one at a time, whisking vigorously for 30 seconds after each addition until thickened and pale. Stir in vanilla. Sift together flour, cocoa powder, and salt; fold in with a silicone spatula using 10–12 gentle strokes—just until no dry streaks remain (overmixing develops gluten = tough bars). Pour batter into prepared pan, spreading evenly with offset spatula. Tap pan firmly twice on counter to release air bubbles. Bake 20–22 minutes—until top is set with slight crust, edges begin to pull away, and a toothpick inserted 1 inch from edge comes out with moist crumbs (not wet batter). Crucially, do not overbake—this base will firm further as it cools and must remain fudgy to support the lemon layer. Cool completely in pan on wire rack—minimum 60 minutes (refrigerating speeds this up to 30 minutes, but never skip full cooling).
- Prepare Lemon Layer (10 minutes): While brownie cools, finely grate lemon zest (2 tbsp) and squeeze juice (~½ cup); strain to remove pulp/membranes. In small saucepan, whisk together lemon juice, cornstarch, granulated sugar, and egg yolk until completely smooth and no lumps remain. Stir in lemon zest and melted butter.
- Cook Lemon Mixture (8–10 minutes): Place saucepan over medium-low heat. Cook, stirring constantly with heatproof spatula, scraping bottom and corners, until mixture thickens dramatically—beginning to bubble gently around edges and coat the back of the spatula (about 170°F/77°C on instant-read thermometer). Do NOT boil vigorously or let curdle. Remove from heat immediately; stir in vanilla. Cool 5 minutes, stirring occasionally, until just warm to touch (120°F/49°C max)—too hot and it will melt the brownie base; too cool and it won’t pour smoothly.
- Layer & Bake (25–28 minutes): Carefully pour warm lemon mixture over cooled brownie base. Tilt pan gently to spread evenly. Tap pan lightly to settle. Bake at 350°F (175°C) for 25–28 minutes—until lemon layer is set with slight jiggle in center (like firm gelatin), edges are lightly golden, and surface loses its raw sheen. A toothpick inserted in center should come out clean or with minimal sticky residue. Do not overbake—lemon layer will continue to set as it cools.
- Cool Completely & Chill (Minimum 4 hours, ideally overnight): Transfer pan to wire rack. Cool at room temperature for 1 hour, then refrigerate uncovered for minimum 3 hours (preferably overnight). Chilling is non-negotiable: it allows lemon layer to fully set, prevents smearing during cutting, firms the brownie base for clean slices, and melds flavors. For best texture, bring to cool room temperature (15–20 minutes) before slicing.
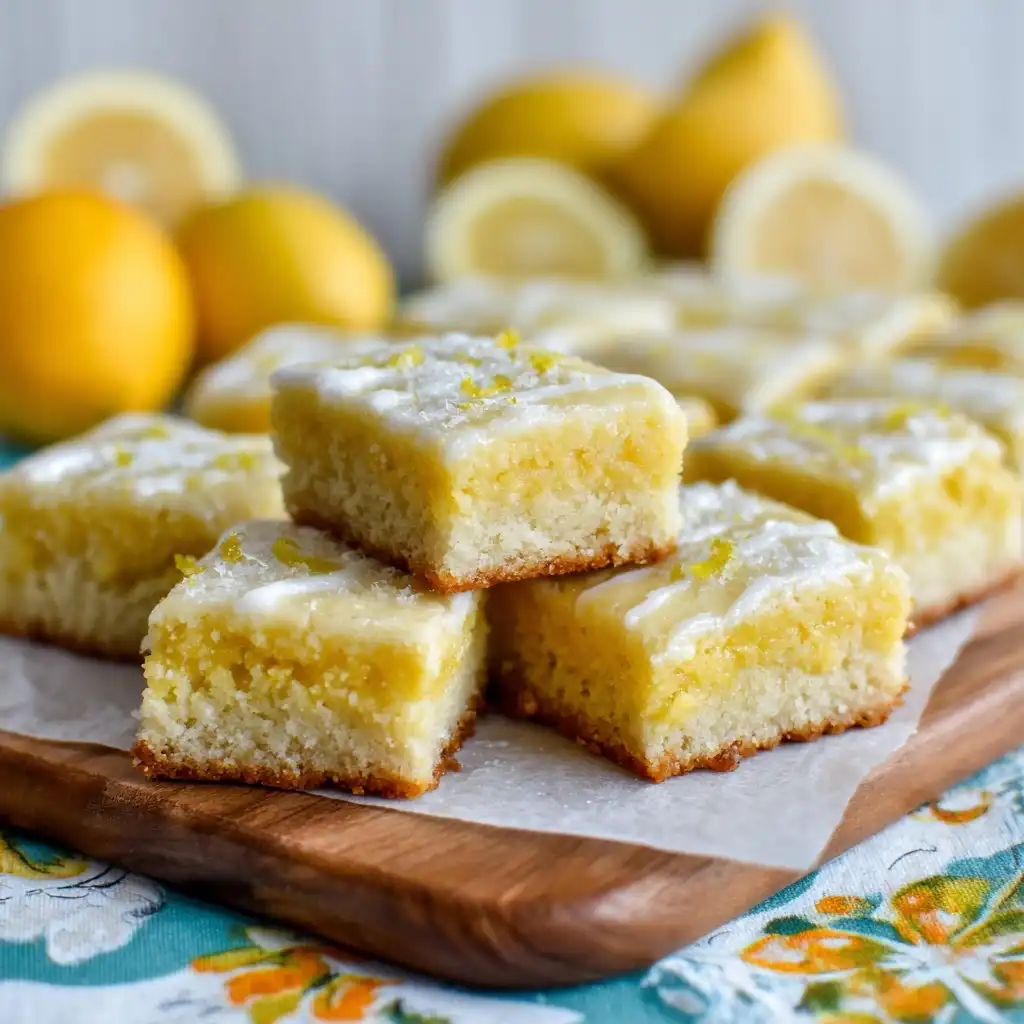
- Cut & Serve (5 minutes): Using parchment overhangs, lift entire slab from pan onto cutting board. With large, sharp chef’s knife wiped clean between cuts, slice into 12–16 even bars (3×4 or 4×4 grid). Dust lightly with confectioners’ sugar just before serving. Store covered in refrigerator.
Tips
- Room-Temperature Eggs Are Essential: Cold eggs can cause the warm brownie batter to seize or the lemon mixture to curdle. Take eggs out 30 minutes ahead—or place in warm water for 5 minutes.
- Measure Flour Correctly: Spoon flour into measuring cup and level with straight edge—never scoop directly from bag (compacts flour, adding up to 25% extra). Too much flour = dry, crumbly brownie base.
- Use a Metal Pan: Glass and ceramic retain heat longer, leading to overbaked edges and uneven lemon layer setting. Heavy-gauge aluminum ensures consistent results.
- Don’t Skip the Chill: Cutting warm or even slightly cool bars guarantees smearing, crumbling, and loss of distinct layers. Overnight chilling yields professional-looking, clean-cut squares with perfect texture contrast.
- Sharp Knife + Hot Water = Clean Cuts: Dip knife in hot water, wipe dry, then cut. Repeat before every slice. A serrated knife works well for the brownie base; a straight-edge chef’s knife excels for the lemon layer.
- Boost Lemon Flavor Without Extra Juice: Add ¼ tsp lemon oil (food-grade) to the warm lemon mixture after cooking—it intensifies aroma without altering consistency or acidity.
- Prevent Lemon Layer Cracking: Avoid opening oven door during final 10 minutes of baking. Cool gradually—don’t rush refrigeration right after oven. Let cool on rack 1 hour first.
- Fix a Curdled Lemon Mixture: If mixture looks separated while cooking, immediately remove from heat and vigorously whisk in 1 tsp cold water or lemon juice—often rescues emulsion.
- Perfect Brownie Doneness Test: The toothpick test is misleading here. Instead, gently press center with fingertip—it should spring back slightly but leave faint imprint. Edges should look dry and slightly shrunken.
- Enhance Visual Appeal: Before baking lemon layer, sprinkle top with 1 tsp additional lemon zest for vibrant flecks and intensified aroma upon serving.
Variations and Customizations
- Double-Chocolate Lemon Bars: Add ½ cup mini semi-sweet chocolate chips to brownie batter before baking. Or drizzle cooled bars with melted white chocolate and a pinch of flaky sea salt.
- Lemon Blueberry Swirl: Gently fold 1 cup fresh (not frozen) blueberries into lemon mixture just before pouring. For dramatic effect, swirl 2 tbsp lemon curd into batter before adding lemon layer.
- Earl Grey Infused: Steep 2 Earl Grey tea bags in warm lemon juice for 10 minutes, then strain before mixing with cornstarch. Adds sophisticated bergamot-tinged complexity.
- Vegan Adaptation: Replace butter with refined coconut oil (same volume), eggs with flax eggs (2 tbsp ground flax + 6 tbsp water for brownie; 1 tbsp flax + 3 tbsp water for lemon), and use vegan dark chocolate. Ensure cornstarch is non-GMO certified.
- Gluten-Free Version: Substitute ¾ cup measure-for-measure GF flour blend (with xanthan gum) for AP flour. Add ¼ tsp xanthan gum if blend doesn’t contain it. Verify all other ingredients (cocoa, baking powder if used) are GF-certified.
- Maple-Lemon Variation: Replace ¼ cup granulated sugar in lemon layer with pure maple syrup (reduce lemon juice by 1 tbsp to compensate for added liquid) and add ¼ tsp maple extract.
- Herbal Twist: Infuse melted butter for lemon layer with 1 tbsp fresh thyme leaves (steep 5 min, strain). Or garnish finished bars with edible lemon balm or micro basil.
- Boozy Upgrade: Stir 1 tbsp limoncello or vodka into warm lemon mixture off-heat (alcohol evaporates during baking, leaving only aroma). For adults-only version, brush cooled bars with limoncello glaze (2 tbsp limoncello + 1 tbsp confectioners’ sugar).
- Nutty Crunch Top: Sprinkle ¼ cup toasted sliced almonds or pistachios over lemon layer before final bake. Adds delightful texture contrast and visual interest.
- Mini Tartlet Version: Press brownie batter into greased mini muffin tin cups (fill ¾ full), bake 12–14 min, cool, then top with 1 tsp lemon mixture per cup. Bake 10–12 min. Makes 24 bite-sized treats.
Health Considerations and Nutritional Value
Lemon Brownie Bars sit comfortably in the “indulgent but mindful” category—offering notable nutritional upside when approached intentionally. Per standard 2″×2″ bar (recipe yields 16), approximate values are: Calories: 215, Total Fat: 11g (7g saturated), Carbohydrates: 28g (20g sugars), Protein: 3g, Fiber: 1g, Vitamin C: 12mg (20% DV), Iron: 1.5mg (8% DV). Key health insights include:
- Cocoa Benefits: Natural-process cocoa is rich in flavanols—potent antioxidants linked to improved endothelial function, reduced blood pressure, and enhanced cognitive circulation. Opting for dark chocolate (60–70% cacao) in the base boosts these benefits without excessive added sugar.
- Lemon Power: Fresh lemon juice and zest provide bioavailable vitamin C, supporting immune function and collagen synthesis. Lemon polyphenols (hesperidin, eriocitrin) exhibit anti-inflammatory and lipid-lowering properties in clinical studies.
- Portion Control Built-In: The 9×13 pan format encourages smaller, satisfying servings—easier to manage than a whole cake or pie. Cutting into 16 bars (rather than 12) reduces calories per portion by ~18%.
- Reduced Refined Sugar Options: Substitute up to ¼ cup granulated sugar in brownie base with coconut sugar (lower glycemic index) or replace half the sugar in lemon layer with erythritol (keto-friendly, zero-calorie, non-cariogenic). Note: sugar plays structural roles—reductions beyond 30% may impact texture.
- Dairy-Free Flexibility: Easily made with plant-based butter and milk alternatives, accommodating lactose intolerance or vegan diets without sacrificing richness.
- What to Mind: High saturated fat content (from butter/chocolate) warrants moderation for those managing cholesterol. The lemon layer’s acidity may trigger reflux in sensitive individuals—serving at cool (not cold) temperature mitigates this. Always use fresh lemons; avoid high-sodium store-bought lemon juice which adds unnecessary sodium (up to 50mg per tbsp).
- Functional Upgrade Idea: Stir 2 tbsp ground flaxseed or chia seeds into brownie batter for added omega-3s and fiber—no flavor compromise, just enhanced satiety and heart health support.
Ingredients
- 1 cup (2 sticks / 227g) unsalted butter, cubed & chilled — for brownie base
- 6 oz (170g) high-quality dark chocolate (60–70% cacao), finely chopped — optional but recommended for depth
- 1¼ cups (250g) granulated sugar — for brownie base
- 2 large eggs, room temperature — for brownie base
- 1 teaspoon pure vanilla extract — for brownie base
- ¾ cup (95g) all-purpose flour, spooned & leveled
- ¾ cup (75g) natural-process unsweetened cocoa powder
- ⅛ teaspoon fine sea salt — for brownie base
- 4–5 medium organic lemons (yielding ½ cup fresh juice + 2 tablespoons finely grated zest)
- ½ cup (100g) granulated sugar — for lemon layer
- 2 tablespoons (16g) cornstarch, sifted
- 1 large egg yolk, room temperature — for lemon layer
- ½ cup (1 stick / 113g) unsalted butter, melted & slightly cooled — for lemon layer
- ¼ teaspoon pure vanilla extract — for lemon layer
- Pinch of fine sea salt — optional, for lemon layer
- Confectioners’ sugar, for dusting (optional)
Directions
- Preheat oven to 350°F (175°C). Grease a 9×13-inch heavy-gauge aluminum baking pan, then line with parchment paper, leaving 2-inch overhangs on two opposite sides. Grease parchment.
- In a heatproof bowl set over barely simmering water (double boiler), melt chilled butter and chopped chocolate, stirring until smooth. Remove from heat; cool 5 minutes.
- Whisk in 1¼ cups granulated sugar until combined. Add eggs one at a time, whisking vigorously for 30 seconds after each until thickened and pale. Stir in vanilla.
- Sift together flour, cocoa powder, and ⅛ tsp salt. Fold into chocolate mixture with silicone spatula using 10–12 gentle strokes—just until no dry streaks remain.
- Pour batter into prepared pan. Spread evenly with offset spatula. Tap pan firmly twice on counter.
- Bake 20–22 minutes—until top is set, edges pull away slightly, and toothpick 1 inch from edge has moist crumbs. Cool completely in pan on wire rack (60+ minutes) or refrigerate 30 minutes.
- While brownie cools, zest lemons (2 tbsp) and juice them (½ cup strained juice).
- In small saucepan, whisk lemon juice, cornstarch, ½ cup sugar, egg yolk, lemon zest, melted butter, vanilla, and optional pinch salt until completely smooth.
- Cook over medium-low heat, stirring constantly with heatproof spatula, until thickened and coats back of spoon (8–10 min). Remove from heat; cool 5 minutes.
- Pour warm lemon mixture over cooled brownie base. Tilt pan to spread evenly. Tap gently.
- Bake 25–28 minutes—until lemon layer is set with slight jiggle in center and edges are lightly golden. Toothpick should come out clean.
- Cool on wire rack 1 hour. Refrigerate uncovered minimum 3 hours (ideally overnight).
- Using parchment overhangs, lift slab onto cutting board. Cut into 16 bars with hot, clean knife. Dust with confectioners’ sugar before serving.
FAQ
- Can I make these ahead of time?
- Absolutely—and highly recommended! Lemon Brownie Bars taste even better after 24–48 hours of refrigeration, as flavors fully meld and textures harmonize. They keep beautifully for up to 5 days refrigerated, tightly covered. Unfrosted, they freeze exceptionally well for up to 3 months—wrap individual bars in parchment + foil, or freeze whole slab. Thaw overnight in fridge.
- Why did my lemon layer crack?
- Cracking most commonly occurs due to rapid temperature shifts: opening oven door too soon, cooling too quickly (e.g., placing hot pan directly in freezer), or overbaking. Ensure gradual cooling—1 hour on rack before refrigerating—and avoid drafts. A splash of cream or 1 tsp corn syrup in lemon mixture can also improve flexibility.
- My lemon layer didn’t set properly—what went wrong?
- Three likely culprits: 1) Undercooking—mixture must reach 170°F/77°C to fully activate cornstarch; 2) Insufficient chilling—minimum 3 hours required; 3) Too much lemon juice or not enough cornstarch. Always strain juice and measure cornstarch precisely. If still soft, return pan to oven at 325°F for 5–7 minutes.
- Can I use bottled lemon juice?
- We strongly advise against it. Bottled juice lacks volatile aromatic compounds, contains preservatives (like sodium benzoate) that inhibit cornstarch gelation, and often has added citric acid that throws off pH balance—resulting in flat flavor and potential separation. Fresh is irreplaceable here.
- How do I prevent the brownie base from becoming cakey?
- Avoid overmixing after adding flour/cocoa, don’t overbake (err on underdone side), and use natural-process cocoa—not Dutch-process. Also, ensure eggs are room temperature and butter is properly melted—not overheated. The “wet, fudgy” stage is intentional and necessary.
- Can I double the recipe?
- Yes—but bake in two separate 9×13 pans rather than one larger pan. Doubling in a single pan causes uneven baking, poor layer adhesion, and inconsistent texture. Use same temps/times.
- What’s the best way to transport these?
- Chill thoroughly first. Place bars in single layer in rigid container with parchment between layers. Keep cold with ice packs during transit. For gifting, arrange in decorative box with parchment liners and attach a card noting “Keep Refrigerated.”
- Are these safe for pregnant people?
- Yes—the lemon layer is fully cooked to food-safe temperatures (170°F+), and eggs are pasteurized via baking. As always, consult your healthcare provider regarding dietary choices during pregnancy.
- Can I make them nut-free?
- Easily—this recipe contains no nuts. Just verify all chocolate and extracts are processed in nut-free facilities if severe allergy is a concern.
- Why does the recipe specify “natural-process” cocoa?
- Natural cocoa is acidic (pH ~5.5), which reacts favorably with lemon’s acidity to create brighter, more vibrant flavor synergy. Dutch-process cocoa is alkalized (pH ~7–8), muting lemon’s brightness and potentially causing curdling due to pH mismatch with egg proteins.
Summary
Lemon Brownie Bars are a masterclass in balanced indulgence—melding the deep, fudgy comfort of chocolate brownies with the radiant, palate-cleansing brilliance of fresh lemon, all held together by meticulous technique and premium ingredients.
With make-ahead ease, endless customization potential, surprising nutritional perks from cocoa and citrus, and showstopping visual appeal, these bars aren’t just dessert—they’re a versatile, joyful celebration of seasonal brightness and timeless chocolate luxury, perfected slice by glorious slice.