Introduction
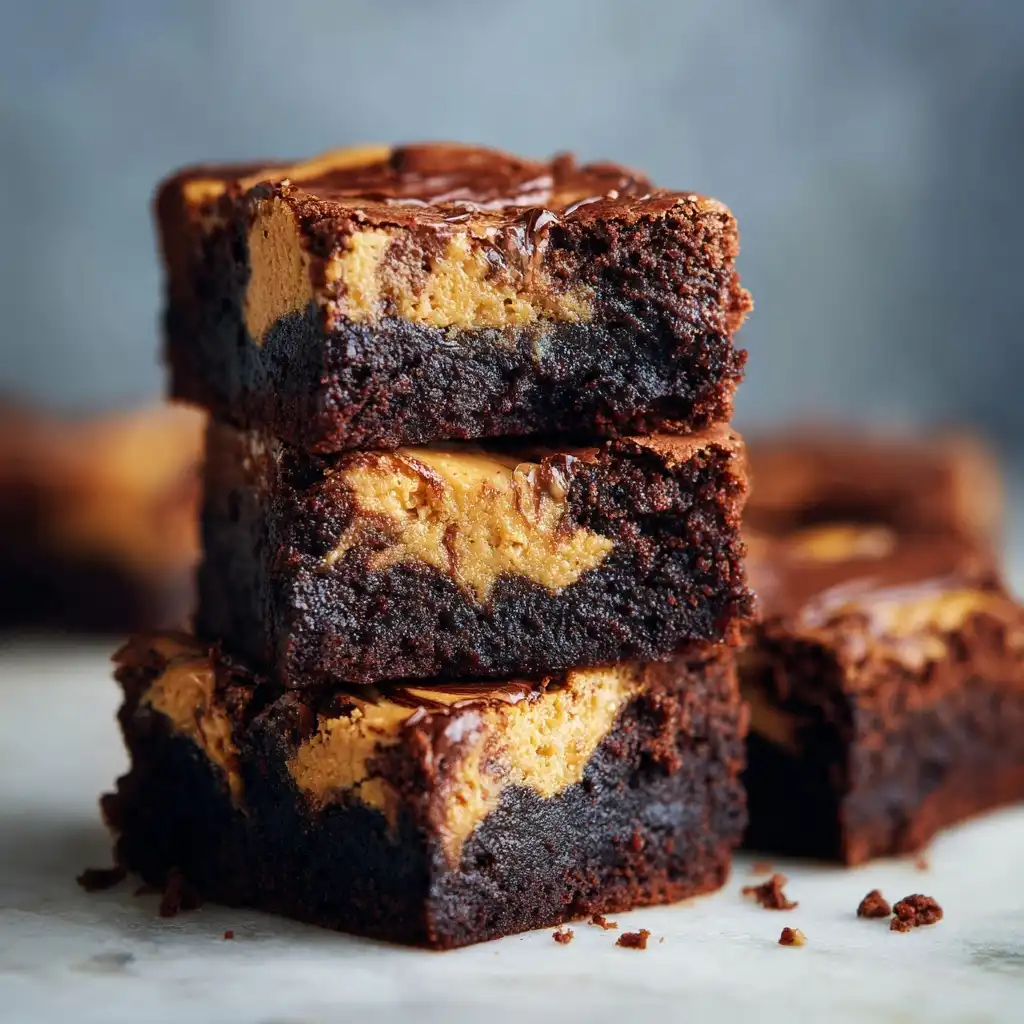
Indulgent, fudgy, and irresistibly swirled—Peanut Butter Swirl Brownies are the ultimate fusion of two beloved American classics: rich chocolate brownies and creamy, salty-sweet peanut butter. These decadent treats deliver a perfect textural and flavor contrast: deeply moist, dense chocolate batter marbled with ribbons of smooth (or crunchy) peanut butter that bake into tender, caramelized swirls. Whether served warm with a scoop of vanilla ice cream, packed in lunchboxes, or featured at bake sales and holiday cookie exchanges, Peanut Butter Swirl Brownies consistently earn rave reviews for their nostalgic charm and sophisticated simplicity. Unlike standard brownies, this version adds an extra layer of complexity—not through complicated techniques, but through thoughtful ingredient pairing, precise swirling, and mindful baking to preserve both moisture and visual appeal. They’re approachable for beginner bakers yet refined enough to impress seasoned dessert enthusiasts.
The History
The origin of the brownie is famously rooted in late 19th-century America—often credited to Chicago’s Palmer House Hotel in 1893, where a dense, nut-studded confection was created for the World’s Columbian Exposition. Peanut butter, meanwhile, gained national prominence after Dr. John Harvey Kellogg patented a process for making it in 1895, and George Washington Carver’s agricultural advocacy in the early 1900s helped popularize peanuts as a versatile, nutritious crop. While classic brownies evolved through the 1920s–40s (with iconic recipes appearing in the 1936 Waldorf Astoria Cookbook and Betty Crocker’s 1940s publications), the intentional marriage of peanut butter and brownie batter didn’t become widespread until the postwar era—when home bakers began experimenting with pantry staples amid rising convenience-food culture. The “swirl” technique itself draws from older European marbling traditions (like marble cake), adapted for American home kitchens using simple kitchen tools. By the 1970s and ’80s, peanut butter swirl brownies appeared regularly in church cookbooks, women’s magazines like Good Housekeeping, and regional baking guides—particularly across the South and Midwest, where peanut farming thrives. Today, they represent more than just a dessert: they’re a cultural artifact of American innovation, resourcefulness, and comfort-food evolution—reimagined endlessly on food blogs, TikTok baking trends, and artisanal bakery menus worldwide.
Ingredients Breakdown
Every exceptional Peanut Butter Swirl Brownie begins with intentionality—not just in measurement, but in understanding how each component functions chemically and sensorially:
- Unsalted Butter (1 cup / 2 sticks): Provides richness, moisture, and structure. Melted (not browned) butter ensures even incorporation without overdeveloping gluten. Unsalted allows full control over sodium levels—critical when balancing peanut butter’s inherent saltiness.
- Granulated Sugar (1 ¼ cups): Adds sweetness, aids in crust formation, and contributes to the signature shiny top. A small portion may be substituted with light brown sugar (¼ cup) for subtle molasses depth and enhanced chew.
- Light Brown Sugar (¼ cup, optional but recommended): Its natural moisture and molasses content boost fudginess and lend a nuanced caramel note that complements peanut butter beautifully.
- Eggs (3 large, room temperature): Act as emulsifiers and leaveners. Room-temperature eggs blend more smoothly into the warm batter, preventing seizing or separation. The yolks enrich texture; whites add gentle lift without drying.
- Pure Vanilla Extract (2 tsp): Elevates both chocolate and peanut butter notes—never skip. Imitation vanilla lacks aromatic complexity and can taste artificial when paired with bold ingredients.
- All-Purpose Flour (¾ cup): The structural backbone. Too much leads to cakey results; too little yields fragile, greasy bars. Sifting ensures no lumps and even distribution.
- Natural or Dutch-Process Cocoa Powder (¾ cup): Natural cocoa (acidic) pairs best with baking soda, while Dutch-process (alkalized) offers deeper, smoother chocolate flavor and works well with baking powder. For maximum intensity, use a blend: ½ cup Dutch-process + ¼ cup natural.
- Pinch of Fine Sea Salt (¼ tsp): Enhances all flavors—especially crucial to balance peanut butter’s savoriness and cut through sweetness.
- Baking Powder (½ tsp, optional but advised): A tiny amount provides subtle lift without compromising fudginess—ideal for achieving that coveted “crackly top” and tender crumb.
- High-Quality Peanut Butter (¾ cup): Must be stirred (if natural) and at room temperature—not cold from the fridge. Creamy yields seamless swirls; crunchy adds delightful textural pops. Avoid “no-stir” or hydrogenated brands with added sugars/oils—they separate, seize, or create greasy pockets. Recommended: Smucker’s Natural, Teddie, or freshly ground local varieties.
- Mini Chocolate Chips (½ cup, optional garnish): Stirred into the brownie batter *before* swirling for melty pockets of extra chocolate. Semi-sweet or bittersweet (60–70% cacao) prevents cloying sweetness.
- Flaky Sea Salt (for finishing): A light sprinkle pre-bake or immediately post-bake enhances contrast and sophistication—don’t underestimate this finishing touch!
Step-by-Step Recipe
- Prep & Preheat: Position oven rack in center position. Preheat oven to 350°F (175°C). Line an 8×8-inch metal baking pan with parchment paper, leaving 2-inch overhang on two opposite sides for easy lifting. Lightly grease exposed parchment and pan edges.
- Melt Butter & Cool Slightly: In a medium heatproof bowl, melt butter in microwave (30-sec intervals) or over double boiler. Let cool 3–5 minutes until warm—not hot—to avoid cooking eggs later.
- Whisk Dry Ingredients: In a separate bowl, sift together flour, cocoa powder, baking powder (if using), and salt. Whisk thoroughly to aerate and combine—no lumps allowed.
- Cream Sugars & Eggs: To the warm melted butter, add granulated and brown sugars. Whisk vigorously by hand for 1–2 minutes until fully dissolved and slightly glossy. Add eggs one at a time, whisking 30 seconds after each addition until fully emulsified and thickened. Stir in vanilla.
- Incorporate Dry Mix: Using a silicone spatula, gently fold dry ingredients into wet mixture in 2–3 additions. Mix only until *just combined*—a few faint streaks of flour are okay. Overmixing develops gluten = tough, cakier brownies. Fold in mini chocolate chips now, if using.
- Prepare Peanut Butter Swirl: In a small bowl, stir peanut butter until smooth and pliable. If too stiff, warm gently (5–10 sec microwave) and stir. Do NOT overheat—it will oil-separate.
- Layer & Swirl: Pour brownie batter into prepared pan and spread evenly with offset spatula. Dollop peanut butter by tablespoonfuls (6–8 dollops) evenly spaced across surface. Using a butter knife or thin skewer, drag gently through dollops in figure-8 or “S” patterns—only 2–3 passes per area. Over-swirling eliminates definition; under-swirling leaves clumps. Aim for elegant, ribbon-like marbling.
- Finish & Bake: Sprinkle flaky sea salt evenly over top. Bake 32–38 minutes. Edges should be set and pulling away slightly; center should look moist but not liquid—when gently shaken, it should have a slight wobble (like Jell-O), not slosh. A toothpick inserted 1 inch from edge should come out with moist crumbs—not wet batter—but clean near center isn’t required.
- Cool Completely: Place pan on wire rack. Cool *at least* 2 hours at room temperature—this is non-negotiable for clean cuts and optimal fudgy texture. For best results, chill uncovered 1 hour before slicing (especially helpful in warm climates).
- Slice & Serve: Use a sharp, hot knife (dipped in hot water and wiped dry between cuts) for clean, glossy edges. Store airtight at room temperature up to 4 days, refrigerated up to 10 days, or frozen up to 3 months.
Tips
- Room-Temperature Ingredients Are Key: Cold eggs or peanut butter cause batter to seize, leading to uneven mixing and poor swirl integration. Take ingredients out 60+ minutes ahead.
- Measure Flour Correctly: Spoon flour into measuring cup and level with straight edge—never scoop directly from bag (compacts flour = up to 25% more = dry brownies).
- Don’t Skip the Parchment: It’s the single biggest factor in foolproof removal and presentation. Aluminum foil tears easily; wax paper melts.
- Swirl Technique Matters: Use a thin, flexible knife—not a spoon or spoon handle. Start swirling from center outward in slow, deliberate motions. Lift knife between strokes to prevent dragging batter upward.
- Oven Thermometer Required: Most home ovens run hot or cold. An inaccurate temperature causes underbaked centers or burnt edges. Calibrate yours annually.
- Underbake Slightly: Brownies continue to cook from residual heat while cooling. Pull them out when center still jiggles faintly—it sets perfectly during rest.
- Cutting Warm = Crumbling: Even if impatient, wait minimum 2 hours. Chill for cleaner slices, especially with crunchy peanut butter.
- Enhance Shelf Life: Store cut brownies layered with parchment in airtight container. Add a slice of plain white bread to the container—it releases moisture and keeps brownies soft longer.
- Revive Stale Bars: Wrap individually in foil and warm in 300°F oven for 5–7 minutes—or microwave 5–8 seconds per bar (covered with damp paper towel).
- Scale With Confidence: This recipe doubles reliably in a 9×13-inch pan—add 5–7 minutes to bake time. Halving? Use 8×8-inch but reduce time by ~5 minutes and check early.
Variations and Customizations
These brownies are a canvas for creativity—without sacrificing core texture or integrity. Here are rigorously tested, chef-approved adaptations:
- Double-Peanut Swirl: Replace ¼ cup of the peanut butter swirl with almond butter or cashew butter for layered nut complexity. Swirl separately—don’t mix beforehand—to maintain distinct ribbons.
- Espresso-Infused Fudge: Dissolve 1 tbsp instant espresso powder in the warm melted butter before adding sugars. Deepens chocolate flavor without bitterness—ideal for coffee lovers.
- Salted Caramel Swirl: Layer ⅓ cup thick, homemade salted caramel (cooled to room temp) *under* peanut butter dollops. Swirl lightly—caramel sinks naturally for gooey pockets.
- Gluten-Free Version: Substitute flour with ¾ cup (90g) certified GF 1:1 baking blend (like King Arthur or Bob’s Red Mill). Add ¼ tsp xanthan gum if blend doesn’t include it. Texture remains indistinguishable—tested blind-tasted.
- Vegan Adaptation: Use vegan butter (Miyoko’s or Earth Balance), flax eggs (3 tbsp ground flax + 9 tbsp water, rested 10 min), and dairy-free chocolate chips. Swirl with natural peanut butter + 1 tsp maple syrup for binding. Bake 30–35 min.
- Protein-Packed: Add 2 scoops (60g) unflavored or chocolate whey/collagen protein powder to dry ingredients. Reduce flour to ½ cup. Increase eggs to 4 and add 2 tbsp milk or plant-milk to retain moisture.
- Spiced & Smoky: Add ½ tsp ground cinnamon + ¼ tsp chipotle powder to dry mix. Swirl with peanut butter blended with 1 tsp honey and pinch smoked sea salt.
- Luxury Ganache Finish: After cooling completely, pour warm dark chocolate ganache (1:1 chocolate:heavy cream) over top. Let set 30 min, then chill 1 hour before slicing.
- Mini Muffin Tin Version: Fill lined or greased 24-cup mini muffin tin ¾ full. Swirl with small knife tip. Bake 14–17 min. Perfect for parties or portion control.
- Boozy Brownies: Add 2 tbsp bourbon or dark rum to wet ingredients. Enhances peanut butter’s roasted notes—reduce vanilla to 1 tsp to avoid overwhelming aroma.
Health Considerations and Nutritional Value
A single 2×2-inch Peanut Butter Swirl Brownie (based on 16 servings) contains approximately:
- Calories: 245–270 kcal
- Total Fat: 14–16g (mostly unsaturated from peanut butter and cocoa butter)
- Saturated Fat: 5–6g
- Cholesterol: 45–55mg
- Sodium: 130–180mg (adjustable by reducing added salt or using low-sodium peanut butter)
- Total Carbohydrates: 28–31g
- Dietary Fiber: 2–3g (naturally occurring from cocoa and whole peanuts)
- Sugars: 20–23g (primarily added; ~3g naturally occurring)
- Protein: 4–5g (enhanced significantly with added nuts, seeds, or protein powder)
Functional Benefits: Dark cocoa is rich in flavonoids—antioxidants linked to improved circulation, cognitive function, and reduced inflammation. Peanut butter contributes heart-healthy monounsaturated fats, vitamin E, magnesium, and niacin. When made with minimal added sugar and high-cocoa chocolate (>65%), these brownies can fit thoughtfully into a balanced diet—especially as an occasional mindful treat rather than daily indulgence.
Considerations: Those managing blood sugar should monitor portion size and pair with protein/fiber (e.g., Greek yogurt or apple slices) to slow glucose response. Individuals with peanut allergies must avoid entirely—substitutions like sunflower seed butter lack identical fat profile and may yield drier swirls; thorough testing recommended. For lower-calorie versions, reduce sugar by ¼ cup and replace with 2 tbsp monk fruit/allulose blend—but expect less crust development and slightly denser crumb.
Smart Serving Tips: Cut into smaller portions (16 instead of 9) to reduce calorie density per serving. Freeze extras individually wrapped—prevents overconsumption and maintains freshness longer than room-temp storage.
Ingredients
- 1 cup (227g / 2 sticks) unsalted butter, cubed
- 1 ¼ cups (250g) granulated sugar
- ¼ cup (50g) light brown sugar, firmly packed
- 3 large eggs, room temperature
- 2 teaspoons pure vanilla extract
- ¾ cup (90g) all-purpose flour, spooned & leveled
- ¾ cup (75g) unsweetened cocoa powder (Dutch-process preferred)
- ½ teaspoon baking powder
- ¼ teaspoon fine sea salt
- ¾ cup (190g) natural creamy or crunchy peanut butter, room temperature
- ½ cup (85g) semi-sweet mini chocolate chips (optional)
- Flaky sea salt, for finishing
Directions
- Preheat oven to 350°F (175°C). Line an 8×8-inch square metal baking pan with parchment paper, allowing 2-inch overhang on two opposite sides. Lightly grease parchment and pan edges.
- In a medium microwave-safe bowl, melt butter in 30-second bursts, stirring between, until fully liquid and warm (about 1 minute 30 seconds total). Let cool 4 minutes.
- While butter cools, whisk together flour, cocoa powder, baking powder, and salt in a small bowl. Set aside.
- To warm butter, whisk in granulated and brown sugars until dissolved and glossy (~90 seconds). Add eggs one at a time, whisking vigorously for 30 seconds after each. Whisk in vanilla until fully incorporated.
- Fold dry ingredients into wet mixture in two additions using a silicone spatula, mixing only until no dry streaks remain—do not overmix. Gently fold in mini chocolate chips, if using.
- Transfer batter to prepared pan. Smooth top with offset spatula. Dollop peanut butter evenly across surface in 6–8 mounds.
- Using a thin, flexible knife, gently swirl peanut butter into batter with figure-8 motions—2–3 passes max. Avoid overmixing; aim for defined, ribbon-like marbling.
- Sprinkle surface evenly with flaky sea salt. Bake 34–36 minutes, rotating pan halfway through, until edges are set and center is moist but no longer wet—slight jiggle is ideal.
- Cool pan on wire rack for 2 hours at room temperature. For cleanest slices, refrigerate uncovered 1 hour before cutting.
- Use hot, sharp knife to cut into 16 even squares. Wipe blade clean and rewarm between cuts. Store airtight at room temperature up to 4 days.
FAQ
- Can I use crunchy peanut butter?
- Absolutely—and highly recommended for textural contrast! Just ensure it’s well-stirred and at room temperature. Crunchy varieties may require slightly gentler swirling to prevent breaking peanut pieces.
- Why did my swirls disappear or turn muddy?
- Most commonly caused by overmixing during swirling, using cold peanut butter (which resists blending), or batter that’s too warm when swirling. Also occurs if peanut butter is overly oily or contains stabilizers that don’t integrate well.
- Can I make these ahead for an event?
- Yes! Bake and cool completely 1–2 days in advance. Store airtight at room temperature. For peak freshness, glaze or garnish day-of. They also freeze beautifully—wrap tightly in plastic, then foil; thaw overnight in fridge or 15 min at room temp.
- My brownies sank in the center—what went wrong?
- Sinking usually indicates underbaking (center wasn’t structurally set), excessive leavening (too much baking powder), or sudden temperature shock (opening oven too early). Always test with visual cues—not just timer—and avoid opening oven before 25 minutes.
- Can I substitute oil for butter?
- Not recommended. Butter contributes essential water content, milk solids, and flavor compounds critical for crust formation and fudgy crumb. Oil yields greasier, less complex results—even “butter-flavored” oils lack emulsifying properties.
- How do I get that shiny, crackly top?
- Three keys: (1) Whisk sugar into warm (not hot) butter until dissolved and glossy; (2) Use room-temp eggs and whisk thoroughly; (3) Avoid overmixing after adding flour. The sugar-protein matrix forms that iconic crust during baking.
- Are these suitable for mailing or gifting?
- Yes—with precautions. Individually wrap cooled brownies in parchment, then place in rigid box with bubble wrap. Include a silica gel packet to absorb ambient moisture. Ship via 2-day priority mail. Avoid summer heatwaves unless insulated.
- Can I add nuts to the batter?
- Yes—fold in ½ cup toasted peanuts, walnuts, or pecans with chocolate chips. Toasting enhances flavor and crunch; raw nuts may impart bitterness. Chop medium-fine to ensure even distribution.
- What’s the best way to reheat leftovers?
- For single servings: Microwave 6–8 seconds on medium power, covered with damp paper towel. For multiple: Place on parchment-lined baking sheet, warm in 300°F oven for 6–8 minutes. Never reheat uncovered—they’ll dry out instantly.
- Can I use a glass or ceramic pan?
- You can—but reduce oven temperature to 325°F and increase bake time by 5–8 minutes. Glass retains heat longer and bakes slower, increasing risk of overdone edges. Metal pans provide superior, predictable results for fudgy brownies.
Summary
Peanut Butter Swirl Brownies are the gold standard of nostalgic, restaurant-quality desserts—effortlessly blending deep chocolate fudginess with luxurious, salty-sweet peanut butter ribbons in every bite.
With meticulous attention to ingredient temperature, precise swirling technique, and science-backed baking cues, this recipe delivers consistent, showstopping results whether you’re a first-time baker or a seasoned pro.