Introduction
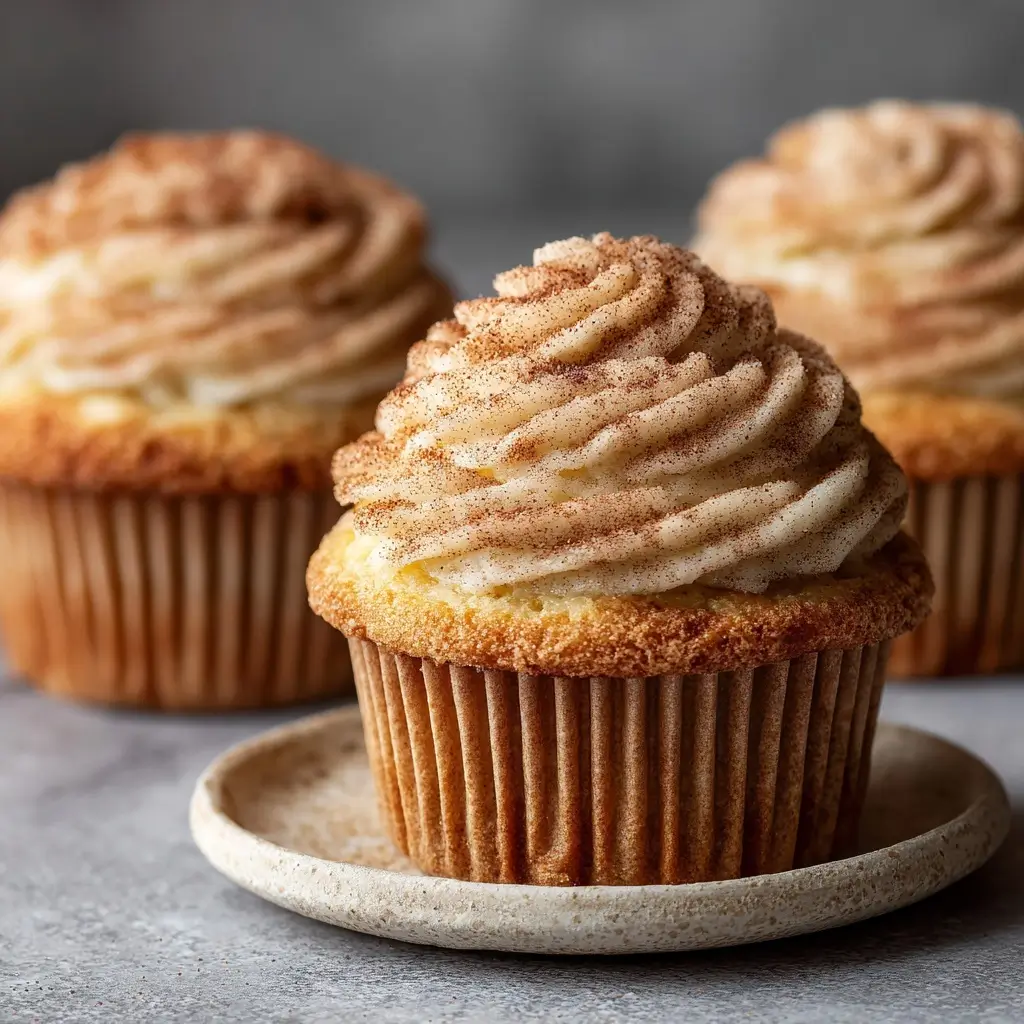
Snickerdoodle Cupcakes are the irresistible, nostalgic lovechild of two beloved American classics: the soft, spiced warmth of a classic snickerdoodle cookie and the light, tender crumb of a perfectly baked cupcake. Imagine everything you adore about that cinnamon-sugar-dusted, slightly tangy, melt-in-your-mouth cookie—elevated into an elegant, portion-controlled, celebratory format. These cupcakes deliver the signature buttery richness, subtle cream of tartar tang, and that iconic crackly, sugary crust—but with the structural integrity, moist texture, and visual charm of a well-crafted cupcake. Whether served at birthday parties, holiday gatherings, bridal showers, or simply as a comforting treat on a rainy afternoon, Snickerdoodle Cupcakes strike the perfect balance between playful nostalgia and refined dessert sophistication. Their versatility makes them equally at home under a dusting of powdered sugar or crowned with a luxurious cinnamon buttercream swirl—and their unmistakable aroma—cinnamon, brown sugar, vanilla, and warm butter—will draw guests into your kitchen long before the first bite.
The History
The story of the Snickerdoodle Cupcake begins not with a single inventor, but with the slow, delicious evolution of American baking traditions. At its core lies the snickerdoodle cookie, a staple of late 19th- and early 20th-century New England and Midwest home kitchens. Though its exact origins remain delightfully debated—some trace it to German Schneckennudeln (cinnamon “snail noodles”), others to Dutch snickerboodle (a corruption of the Dutch word for “snail cake” or possibly “bunch of noodles”), and still others believe it’s simply an Americanized phonetic twist—the defining features were consistent: a soft, chewy, slightly crisp-edged cookie leavened with cream of tartar and baking soda (giving it a gentle tang), rolled generously in a mixture of cinnamon and granulated sugar before baking.
By the mid-20th century, as cupcake popularity surged—fueled by Betty Crocker cookbooks, improved home ovens, and the rise of decorative baking—bakers began reimagining classic cookies as cupcakes. The snickerdoodle was a natural candidate: its flavor profile translated beautifully to cake form, and its signature cinnamon-sugar coating offered instant visual and textural appeal. Early adaptations appeared in regional church cookbooks and women’s magazines in the 1950s and 60s, often labeled “Cinnamon-Sugar Cupcakes” or “Snickerdoodle-Style Cakes.” It wasn’t until the cupcake renaissance of the 2000s—spurred by bakeries like Magnolia Bakery and the rise of food blogs—that the term “Snickerdoodle Cupcake” became standardized, widely recognized, and celebrated for its intentional homage to the cookie’s heritage while embracing modern techniques like stabilized frostings, gourmet spice blends, and sophisticated presentation. Today, it stands as a testament to American culinary ingenuity: honoring tradition while constantly reinventing comfort in new, delightful forms.
Ingredients Breakdown
Every exceptional Snickerdoodle Cupcake relies on the precise synergy of its components—not just for flavor, but for texture, structure, and that signature tangy-sweet harmony. Here’s why each ingredient matters:
- All-Purpose Flour: The foundational structure. Its moderate protein content (10–12%) provides enough gluten for tenderness without toughness. Sifting is non-negotiable—it aerates the flour, prevents dense cupcakes, and ensures even distribution of leaveners and spices.
- Cream of Tartar & Baking Soda: This dynamic duo is the *heart* of the snickerdoodle identity. Cream of tartar (potassium bitartrate) is an acidic salt naturally occurring in wine-making; when combined with baking soda (sodium bicarbonate), it creates an immediate, powerful carbon dioxide reaction *both* during mixing and in the oven’s heat. This dual-action lift yields the cupcake’s characteristic light-yet-chewy crumb and contributes significantly to the subtle, bright tang that distinguishes it from plain cinnamon cupcakes. Omitting either component sacrifices authenticity.
- Unsalted Butter (Room Temperature): Provides unparalleled richness, moisture, and flavor. Room temperature (65–68°F) is critical—it allows for proper creaming with sugar, trapping air bubbles that expand during baking for optimal rise and tenderness. Cold butter won’t cream; melted butter creates greasiness and poor structure.
- Granulated Sugar & Brown Sugar (Light or Dark): Granulated sugar offers sweetness and aids in creaming/structure. Brown sugar adds moisture (thanks to molasses), deep caramel notes, and enhances chewiness. Light brown sugar is traditional for balance; dark brown intensifies molasses richness—choose based on desired depth.
- Eggs (Large, Room Temperature): Act as emulsifiers (binding fat and water), provide structure (proteins coagulate), and contribute moisture and richness. Room temperature eggs incorporate more smoothly into the batter, preventing curdling and ensuring a uniform texture.
- Whole Milk (or Buttermilk Substitute): Adds necessary liquid and fat. Whole milk ensures richness and tenderness. For an *enhanced* tang and extra tenderness, substitute ½ cup whole milk + ½ tsp white vinegar or lemon juice, allowed to sit for 5 minutes (creating a DIY buttermilk).
- Pure Vanilla Extract: Not optional. High-quality pure extract (not imitation) delivers complex floral, woody, and sweet notes that complement, not compete with, the cinnamon. Bourbon-vanilla beans offer an even more luxurious layer.
- Ground Cinnamon (High-Quality, Freshly Ground Preferred): The aromatic soul. Ceylon cinnamon (“true cinnamon”) offers delicate, citrusy, complex warmth; Cassia cinnamon (more common) is stronger, spicier, and bolder. For authenticity, use a blend or high-grade Cassia. Freshly grinding whole sticks moments before use unlocks volatile oils for maximum fragrance and potency.
- Fine Sea Salt: A small amount is essential—not for saltiness, but to heighten all other flavors, balance sweetness, and enhance the perception of cinnamon’s warmth.
- Cinnamon-Sugar Topping: The crowning glory. A coarse, generous mix of granulated sugar and cinnamon (often with a pinch of fine salt) applied *before* baking creates the iconic crackly, shatteringly crisp, intensely flavorful crust. The sugar melts and recrystallizes; the cinnamon infuses the surface with concentrated aroma. Using superfine sugar here dissolves too quickly—stick with regular granulated for texture.
Step-by-Step Recipe
Follow this meticulous process for foolproof, bakery-quality Snickerdoodle Cupcakes every time:
- Prep & Preheat: Line a standard 12-cup muffin tin with high-quality paper liners (grease-proof or foil-lined recommended for easy release). Preheat your oven to 350°F (175°C). Position the oven rack in the center. Allow all refrigerated ingredients (butter, eggs, milk) to come fully to room temperature (65–68°F) – this takes 1–2 hours. Measure all dry ingredients precisely using the spoon-and-level method.
- Whisk Dry Ingredients: In a medium bowl, whisk together 1 ¾ cups (210g) all-purpose flour, 2 tsp cream of tartar, ½ tsp baking soda, 1 ½ tsp ground cinnamon, and ¼ tsp fine sea salt. Whisk vigorously for 30 seconds to fully aerate and evenly distribute the leaveners and spice. Set aside.
- Cream Butter & Sugars: In the bowl of a stand mixer fitted with the paddle attachment (or a large bowl with a hand mixer), beat ¾ cup (170g) unsalted butter, ¾ cup (150g) granulated sugar, and ½ cup (100g) light brown sugar on medium-high speed for 3–4 minutes, until the mixture is very pale, fluffy, and noticeably increased in volume. Scrape down the bowl thoroughly with a silicone spatula halfway through.
- Incorporate Eggs & Vanilla: Add 2 large room-temperature eggs one at a time, beating on medium speed for 30–45 seconds after each addition until fully incorporated and the mixture is smooth and glossy. Add 2 tsp pure vanilla extract and beat for another 15 seconds. Scrape down the bowl completely.
- Alternate Dry & Wet Ingredients: With the mixer on low speed, add ⅓ of the dry ingredient mixture. Mix just until the flour disappears (about 15 seconds). Add ½ cup (120ml) room-temperature whole milk (or DIY buttermilk) and mix on low for 10 seconds. Repeat, alternating dry-wet-dry, ending with the final third of dry ingredients. Mix *only* until no streaks of flour remain—do not overmix. Overmixing develops excess gluten, leading to tough, dense cupcakes. The batter will be thick, smooth, and slightly shiny.
- Fill & Top: Using a large cookie scoop (¼ cup measure) or ice cream scoop, divide the batter evenly among the 12 lined cups, filling each liner **¾ full** (approx. 3.5–4 tbsp per cup). This ensures proper dome formation without overflow. Immediately prepare the topping: In a small bowl, combine ¼ cup (50g) granulated sugar and 1 ½ tsp ground cinnamon (and a tiny pinch of salt if desired). Using your fingers or a small spoon, generously sprinkle the cinnamon-sugar mixture over the top of *each* cupcake batter mound, pressing it down *very lightly* to adhere. Do not stir it in!
- Bake: Place the tin in the preheated center oven rack. Bake for 18–22 minutes. Begin checking at 18 minutes: cupcakes are done when a toothpick inserted into the center (avoiding the cinnamon-sugar crust) comes out with *moist crumbs* (not wet batter, not completely clean). The tops should be puffed, lightly golden, and the cinnamon-sugar crust should look set and slightly crackled. Rotate the pan front-to-back halfway through baking for even cooking.
- Cool: Remove the tin from the oven and place it on a wire cooling rack. Let cupcakes cool in the pan for 5 minutes—this allows them to set slightly and prevents sticking. After 5 minutes, carefully lift each cupcake out of the liner using a small offset spatula or butter knife, and transfer them directly onto the wire rack to cool completely (45–60 minutes). Cooling completely is crucial before frosting—warm cupcakes will melt buttercream and cause it to slide off.
Tips
- Room Temperature is Non-Negotiable: Butter that’s too cold won’t cream; too warm will cause greasy separation. Eggs and milk must be room temp to prevent the batter from seizing or curdling. To speed up warming, cut butter into small cubes and leave out for 30–45 minutes. Place eggs in warm (not hot) water for 5–10 minutes.
- Weigh Your Ingredients: Volume measurements (cups) for flour are notoriously inaccurate and lead to dry, dense cupcakes. A kitchen scale ensures perfect consistency every time. 1 cup all-purpose flour = 120g.
- Don’t Skip the Cream of Tartar: Substituting with only baking powder or baking soda alone will eliminate the signature tang and alter the crumb texture dramatically. It’s the defining element.
- Measure Cinnamon Carefully: Too much can make the cupcakes taste medicinal or bitter. Stick to the recipe’s 1 ½ tsp for balanced warmth. Taste your cinnamon—if it smells dusty or weak, replace it.
- Fill Liners Consistently: Use a scoop for uniform size, bake time, and appearance. Underfilling leads to flat cupcakes; overfilling causes messy overflow and uneven baking.
- Apply Topping Immediately: Sprinkle the cinnamon-sugar *right after filling*, before any resting time. If you wait, the batter surface sets slightly, and the sugar won’t adhere properly.
- Rotate Your Pan: Ovens have hot spots. Rotating the pan 180 degrees halfway through baking ensures even browning and rise.
- Test Doneness Correctly: Insert the toothpick into the *center of the cake part*, not the cinnamon-sugar crust. Look for moist crumbs, not dryness. Overbaking dries them out instantly.
- Cool Completely Before Frosting: Warm cupcakes create steam, causing frosting to become runny and slide off. Patience is key! You can even chill them for 15 minutes before frosting for cleaner application.
- Store Properly: Unfrosted cupcakes keep well in an airtight container at room temperature for 2 days, or frozen unfrosted for up to 3 months (wrap individually in plastic wrap, then place in a freezer bag). Frosted cupcakes are best consumed within 2 days, stored covered in the fridge (bring to room temp before serving for best texture).
Variations and Customizations
The Snickerdoodle Cupcake is a wonderfully adaptable canvas. Explore these popular and innovative twists:
- Snickerdoodle Swirl: Prepare the base batter as directed. In a separate small bowl, mix ¼ cup softened butter, ¼ cup brown sugar, 1 tsp cinnamon, and 1 tbsp flour until crumbly. Drop spoonfuls of this mixture onto the batter in each cup, then use a toothpick to gently swirl it in—creating beautiful marbled pockets of intense cinnamon-sugar flavor and texture.
- Maple Snickerdoodle: Replace the ½ cup milk with an equal amount of pure maple syrup (reduce granulated sugar by 2 tbsp to balance sweetness). Add 1 tsp pure maple extract along with the vanilla. Top with a maple-cinnamon sugar blend (¾ cup sugar + 2 tsp cinnamon + 2 tbsp pure maple syrup, mixed into coarse crystals).
- Apple-Cinnamon Snickerdoodle: Fold 1 cup finely diced, peeled Granny Smith apple (tossed in 1 tsp lemon juice to prevent browning) into the finished batter. Increase cinnamon to 2 tsp. Optional: Add ¼ tsp freshly grated nutmeg for warmth.
- Snickerdoodle-Stuffed: Pipe or spoon 1 tsp of thick apple butter, salted caramel sauce, or even a small chunk of softened cream cheese into the center of each batter-filled liner *before* adding the cinnamon-sugar topping. Creates a decadent, gooey surprise.
- Gluten-Free Snickerdoodle: Substitute the all-purpose flour with a high-quality 1:1 gluten-free baking blend (like Bob’s Red Mill or King Arthur). Ensure your cream of tartar, baking soda, and cinnamon are certified GF. Add ½ tsp xanthan gum if your blend doesn’t include it. Expect a slightly denser, more tender crumb.
- Vegan Snickerdoodle: Use vegan butter (Miyoko’s or Earth Balance), flax eggs (2 tbsp ground flax + 6 tbsp water, rested 10 mins), unsweetened almond or soy milk + 1 tsp vinegar (for buttermilk), and vegan brown sugar. Ensure all spices and extracts are vegan-certified. Texture will be slightly more delicate.
- Mini Snickerdoodle Cupcakes: Fill mini muffin tins ⅔ full. Reduce baking time to 10–13 minutes. Perfect for parties and portion control. Yield: ~36 minis.
- Snickerdoodle Whoopie Pies: Bake the batter in two 8-inch round cake pans (greased & floured) for 25–30 minutes. Cool completely, then sandwich with cinnamon buttercream. A fun, handheld twist!
- Boozy Snickerdoodle: Add 1–2 tbsp of high-quality bourbon or spiced rum to the wet ingredients. The alcohol bakes off, leaving deep, complex caramel and oak notes that pair beautifully with cinnamon.
- Spiced Chai Snickerdoodle: Add 1 tsp ground ginger, ½ tsp ground cardamom, ¼ tsp ground cloves, and ¼ tsp ground allspice to the dry ingredients alongside the cinnamon. A sophisticated, aromatic variation.
Health Considerations and Nutritional Value
While Snickerdoodle Cupcakes are undeniably a treat, understanding their nutritional profile helps with mindful enjoyment. A standard unfrosted cupcake (based on the base recipe, approx. 3.5 oz / 100g) contains approximately:
- Calories: ~280–320 kcal
- Total Fat: ~12–14g (primarily from butter; includes ~7–8g saturated fat)
- Carbohydrates: ~42–48g (of which ~28–32g are sugars, mostly added from granulated and brown sugar)
- Protein: ~3–4g
- Fiber: ~0.5g (naturally low in refined flour)
- Sodium: ~180–220mg (from butter, cream of tartar, baking soda, and salt)
Key Considerations:
- Cream of Tartar Note: While it contributes sodium, the amount per cupcake is minimal and poses no concern for most individuals. However, those on strict low-sodium diets (e.g., for heart failure) should consult their healthcare provider regarding overall intake.
- Sugar Content: The combination of granulated and brown sugar provides significant sweetness. For reduced sugar, consider replacing up to ¼ cup granulated sugar with a high-quality monk fruit or erythritol blend (note: may affect browning and texture slightly). Avoid reducing brown sugar entirely, as it contributes vital moisture.
- Butter vs. Oil: Butter provides the authentic flavor and structure. Substituting with oil results in a greasier, less tender crumb and diminishes the classic richness. For a slightly lighter option, use a high-quality European-style butter with higher fat content (82–86%), allowing you to use slightly less.
- Flour Options: Whole wheat pastry flour (up to 50% substitution) adds fiber and a nutty note but yields a denser, less lofty cupcake. Oat flour (1:1 substitution) requires additional binder (1 tsp xanthan gum) and often benefits from extra liquid.
- Portion Control: Enjoying one cupcake as part of a balanced meal is perfectly reasonable. Pairing it with a source of protein (e.g., Greek yogurt) or healthy fat (e.g., a handful of almonds) can help moderate blood sugar response.
- Allergens: Contains dairy (butter, milk), eggs, and wheat (gluten). Naturally free from nuts, soy (if using soy-free butter/milk), and shellfish.
Remember: Nutrition is about patterns, not single foods. These cupcakes are a celebration food—savor them mindfully, share them generously, and enjoy the joy they bring without guilt.
Ingredients
For the Cupcakes:
- 1 ¾ cups (210g) all-purpose flour, spooned & leveled
- 2 tsp cream of tartar
- ½ tsp baking soda
- 1 ½ tsp ground cinnamon (high-quality, preferably Ceylon or premium Cassia)
- ¼ tsp fine sea salt
- ¾ cup (170g) unsalted butter, room temperature
- ¾ cup (150g) granulated sugar
- ½ cup (100g) light brown sugar, packed
- 2 large eggs, room temperature
- 2 tsp pure vanilla extract
- ½ cup (120ml) whole milk, room temperature (or DIY buttermilk: ½ cup milk + ½ tsp vinegar/lemon juice, rested 5 mins)
For the Cinnamon-Sugar Topping:
- ¼ cup (50g) granulated sugar
- 1 ½ tsp ground cinnamon
- (Optional) Tiny pinch of fine sea salt
For the Classic Cinnamon Buttercream (Optional but Highly Recommended):
- 1 cup (227g) unsalted butter, room temperature
- 3–4 cups (360–480g) confectioners’ sugar, sifted
- 2–3 tbsp heavy cream or whole milk
- 2 tsp pure vanilla extract
- 1 ½ tsp ground cinnamon
- ¼ tsp fine sea salt
- (Optional) 1–2 tbsp light corn syrup for extra sheen and stability
Directions
- Preheat & Prep: Preheat oven to 350°F (175°C). Line a 12-cup standard muffin tin with paper liners. Ensure butter, eggs, and milk are at room temperature (65–68°F).
- Mix Dry Ingredients: In a medium bowl, whisk together flour, cream of tartar, baking soda, cinnamon, and salt until fully combined and aerated. Set aside.
- Cream Butter & Sugars: In a stand mixer with paddle attachment (or large bowl with hand mixer), beat butter, granulated sugar, and brown sugar on medium-high for 3–4 minutes until pale, fluffy, and voluminous. Scrape bowl.
- Add Eggs & Vanilla: Beat in eggs one at a time, 30–45 seconds each, until fully incorporated and smooth. Add vanilla; beat 15 seconds. Scrape bowl.
- Alternate Dry & Wet: On low speed, add ⅓ dry ingredients; mix 15 sec. Add ½ milk; mix 10 sec. Repeat, ending with dry ingredients. Mix *just* until no flour streaks remain. Do not overmix.
- Fill & Top: Scoop batter into liners, filling ¾ full. In a small bowl, mix topping sugar and cinnamon. Generously sprinkle over each cupcake, pressing lightly to adhere.
- Bake: Bake 18–22 minutes, rotating pan halfway, until toothpick in center (avoiding crust) has moist crumbs. Tops should be puffed and crust set.
- Cool: Cool in pan 5 minutes. Transfer cupcakes to wire rack to cool completely (45–60 mins) before frosting.
- Make Buttercream (If Using): Beat butter until creamy (2 mins). Gradually add 3 cups confectioners’ sugar on low. Add cream, vanilla, cinnamon, and salt; beat 1 min. Add remaining sugar ¼ cup at a time until desired consistency (stiff for piping, softer for spreading). Beat 2 more mins on medium-high until light and fluffy. Adjust cream/milk for consistency.
- Frost & Serve: Pipe or spread buttercream onto cooled cupcakes. Garnish with extra cinnamon-sugar or a light dusting of cinnamon. Serve at room temperature.
FAQ
- Q: Can I make these ahead of time?
- A: Absolutely! Unfrosted cupcakes freeze exceptionally well for up to 3 months. Cool completely, wrap *individually* in plastic wrap, then place in a freezer-safe bag. Thaw overnight in the fridge or at room temperature for 2–3 hours before frosting. Frosted cupcakes are best made the day of serving or the day before, stored covered in the fridge.
- Q: Why do my cupcakes sink in the middle?
- A: This is usually caused by underbaking (toothpick test too early), opening the oven door too soon (causing temperature shock), or overmixing the batter (developing too much gluten). Ensure your oven is properly preheated and calibrated, avoid opening the door for the first 15 minutes, and mix the batter *only* until combined.
- Q: My cinnamon-sugar topping melted and disappeared! What happened?
- A: This happens if the topping isn’t applied *immediately* after filling the liners, or if the batter was too warm. Ensure your batter is at room temp and apply the topping right away. Also, make sure you’re using granulated sugar—not powdered sugar, which dissolves instantly.
- Q: Can I use baking powder instead of cream of tartar + baking soda?
- A: Technically yes (substitute 2 tsp baking powder for the cream of tartar + baking soda), but you’ll lose the essential tangy flavor and nuanced crumb texture that defines a true snickerdoodle. The cream of tartar is integral to the identity.
- Q: How do I get the perfect crackly top?
- A: The key is the *combination* of the cream of tartar/baking soda reaction creating steam and lift, coupled with the coarse sugar topping melting and recrystallizing as it cools. Ensure your oven is at the correct temperature (use an oven thermometer!) and don’t skip the