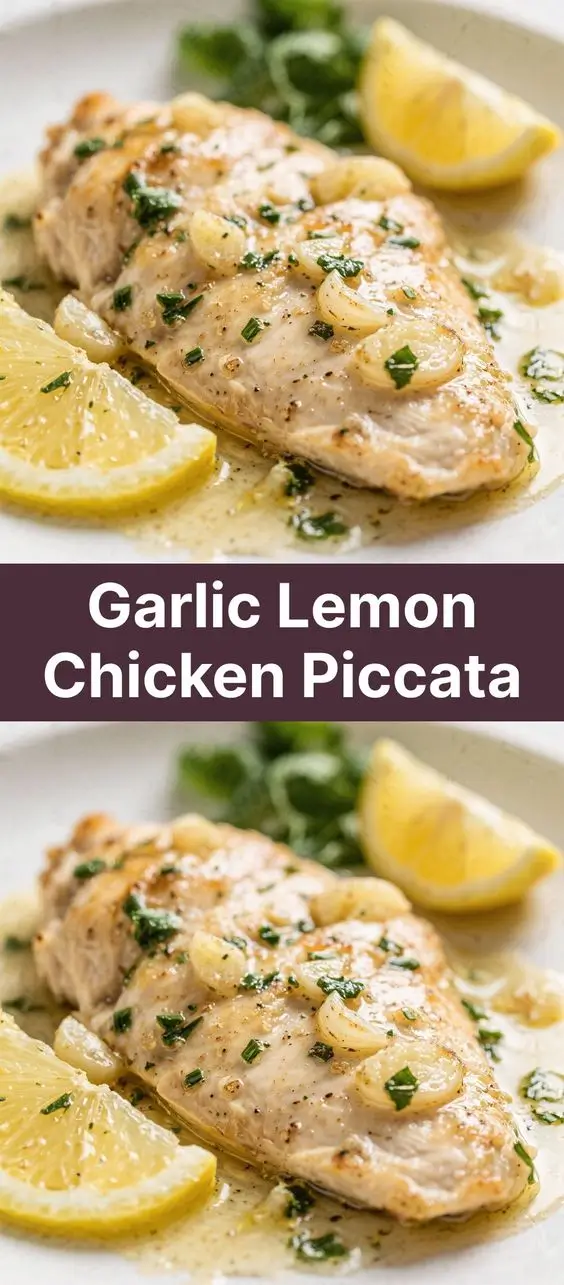
Garlic Lemon Chicken Piccata: A Zesty Italian Classic
The History of Chicken Piccata
Chicken Piccata, known in Italian as “Piccata di Pollo,” has its roots deeply embedded in traditional Italian cuisine, particularly from the southern regions such as Sicily and Campania. The term “piccata” comes from the Italian word “piccante,” meaning “piquant” or “tangy,” which perfectly describes the dish’s hallmark flavor profile—bright, sharp, and refreshingly acidic. Originally, piccata was prepared using veal (known as scaloppine al limone), where thin slices of meat were dredged in flour, quickly sautéed, and finished with a sauce made of lemon juice, butter, capers, and parsley.
As Italian immigrants brought their culinary traditions to America in the late 19th and early 20th centuries, chicken began replacing veal due to its affordability and availability. Thus, Chicken Piccata evolved into the beloved version we know today—a lighter, citrus-forward entrée that balances richness and acidity with elegance. It became a staple on Italian-American restaurant menus across the United States, celebrated for its simplicity, vibrant taste, and quick preparation time. Over the decades, Garlic Lemon Chicken Piccata has become synonymous with comfort food elevated by gourmet flair, often gracing dinner tables during family gatherings, romantic dinners, and special occasions.
The addition of garlic to the classic recipe is a modern enhancement, amplifying the savory depth without overshadowing the lemon’s brightness. This fusion of bold garlic and zesty lemon has cemented Garlic Lemon Chicken Piccata as a contemporary favorite among home cooks and professional chefs alike.
Ingredients Breakdown
To create an authentic and flavorful Garlic Lemon Chicken Piccata, every ingredient plays a crucial role in building layers of taste and texture. Here’s a detailed breakdown:
- Chicken breasts (boneless, skinless): The star of the dish. Opt for evenly sized breasts to ensure uniform cooking. Thin-cut cutlets work best, but you can pound thicker breasts between plastic wrap using a meat mallet to achieve a ¼-inch thickness.
- All-purpose flour: Used for light dredging, it creates a delicate golden crust and helps thicken the sauce slightly when browned in the pan (a process known as making a roux).
- Salt and freshly ground black pepper: Essential seasonings that enhance the natural flavors of the chicken and other ingredients.
- Olive oil: Provides a fruity base for searing the chicken. Use extra virgin olive oil for maximum flavor, though a blend with regular olive oil can prevent burning at higher temperatures.
- Unsalted butter: Adds richness and silkiness to the sauce. It also contributes to the browning of the flour-coated chicken. Using unsalted butter allows better control over the dish’s overall salt content.
- Garlic (freshly minced): The aromatic powerhouse. Fresh garlic provides a pungent, warm depth that infuses the entire dish. Avoid pre-minced jarred garlic if possible, as it lacks freshness and vibrancy.
- Chicken broth (low-sodium preferred): Forms the liquid base of the sauce, adding savory umami notes. Low-sodium versions allow you to adjust seasoning more precisely.
- Fresh lemon juice: The soul of Piccata. Always use freshly squeezed juice rather than bottled—it makes a dramatic difference in brightness and flavor complexity.
- Lemon zest: Often overlooked but incredibly important. The oils in the zest intensify the lemon flavor without increasing acidity. Use a microplane grater for fine, even strips.
- Capers (drained and rinsed): These briny flower buds add a salty-tangy pop that defines Piccata. Rinsing removes excess vinegar and prevents the dish from becoming too sharp.
- Fresh parsley (flat-leaf/Italian): Used both during cooking and as garnish, parsley adds a fresh herbal note and color contrast. Never substitute dried parsley here—freshness is key.
- Optional additions: Some variations include a splash of white wine (like Sauvignon Blanc or Pinot Grigio) to deglaze the pan, deepening the sauce’s complexity.
Step-by-Step Recipe
- Prepare the chicken: Place chicken breasts between two sheets of plastic wrap or parchment paper. Using a meat mallet or rolling pin, gently pound them to about ¼ inch thickness. Cut larger breasts into smaller, manageable cutlets if needed. Season both sides generously with salt and pepper.
- Dredge in flour: Spread all-purpose flour onto a shallow plate. Lightly coat each chicken cutlet in flour, shaking off any excess. This ensures a crisp sear and prevents clumping in the pan.
- Heat the skillet: In a large skillet (preferably stainless steel or non-stick), heat 2 tablespoons of olive oil and 1 tablespoon of butter over medium-high heat until shimmering and hot but not smoking.
- Sear the chicken: Add the floured chicken cutlets in a single layer, avoiding overcrowding. Cook for 3–4 minutes per side, until golden brown and cooked through (internal temperature should reach 165°F). Transfer to a plate and cover loosely with foil to keep warm.
- Sauté the garlic: Reduce heat to medium. Add another tablespoon of butter to the same pan. Once melted, add minced garlic and sauté for 30–60 seconds, just until fragrant—be careful not to burn it.
- Build the sauce: Pour in ½ cup low-sodium chicken broth, scraping the bottom of the pan with a wooden spoon to release the flavorful browned bits (fond). This step enriches the sauce significantly.
- Add acidity: Stir in ⅓ cup freshly squeezed lemon juice and 1 teaspoon of finely grated lemon zest. Bring the mixture to a gentle simmer.
- Incorporate capers: Add 2 tablespoons of drained and rinsed capers. Let the sauce reduce slightly for 2–3 minutes, allowing flavors to meld.
- Finish with butter and herbs: Reduce heat to low. Swirl in 1–2 tablespoons of cold unsalted butter piece by piece, creating a glossy, emulsified sauce. Stir in chopped parsley.
- Return chicken to pan: Gently place the cooked chicken back into the skillet, spooning sauce over each piece. Simmer for 1–2 minutes to reheat and absorb flavors.
- Serve immediately: Plate the chicken and generously drizzle with the lemon-garlic-caper sauce. Garnish with additional parsley and lemon slices.
Tips for Perfect Garlic Lemon Chicken Piccata
- Pound chicken evenly: Uniform thickness ensures consistent cooking—no dry edges or undercooked centers.
- Don’t skip the fond: Those browned bits left after searing are packed with flavor. Deglazing the pan is essential for a rich sauce.
- Use room-temperature chicken: Cold chicken straight from the fridge may lower the pan’s temperature, leading to steaming instead of searing.
- Control the heat: High enough to sear, but not so high that garlic burns or butter browns excessively. Medium-high is ideal.
- Fresh lemon is non-negotiable: Bottled lemon juice contains preservatives and lacks the bright, clean taste required for this dish.
- Add butter off-heat: To avoid breaking the emulsion, remove the pan from heat before whisking in cold butter for a silky finish.
- Don’t overcook the sauce: Prolonged boiling can make lemon juice bitter. Simmer just long enough to reduce and blend flavors.
- Rest the sauce briefly: Letting the sauce sit for a minute after adding butter allows it to thicken naturally through emulsification.
- Prep everything ahead: Mise en place is critical—this is a fast-paced recipe, and having ingredients ready ensures smooth execution.
- Serve immediately: Chicken Piccata tastes best fresh out of the pan. The sauce can separate if held too long.
Variations and Customizations
While traditional Garlic Lemon Chicken Piccata is timeless, numerous creative adaptations can suit different dietary preferences and flavor desires:
Protein Swaps
- Veal Piccata: Return to the original with thinly pounded veal cutlets for a more tender, delicate texture.
- Shrimp Piccata: Replace chicken with large peeled shrimp. Sear for only 1–2 minutes per side to avoid overcooking.
- Mushroom Piccata (Vegan): Use thick portobello or king oyster mushrooms as a meaty alternative. Grill or sear before saucing.
Sauce Enhancements
- White Wine Addition: After sautéing garlic, deglaze with ¼ cup dry white wine before adding broth. Let it reduce by half for deeper flavor.
- Creamy Piccata: Stir in 2–3 tablespoons of heavy cream or crème fraîche at the end for a richer, milder sauce.
- Herb Variations: Add fresh thyme, tarragon, or chives along with parsley for nuanced herbal tones.
Dietary Modifications
- Gluten-Free: Substitute all-purpose flour with rice flour, almond flour, or a gluten-free flour blend. Ensure broth and capers are certified GF.
- Dairy-Free: Replace butter with vegan butter or olive oil. Note: the sauce will be less creamy but still flavorful.
- Low-Sodium: Use homemade or sodium-free chicken broth and rinse capers thoroughly. Limit added salt.
- Keto-Friendly: Skip the flour dredge entirely or use a small amount of almond flour. Increase healthy fats with extra olive oil or butter.
Serving Style Twists
- Piccata Pasta: Toss with linguine, fettuccine, or orzo. Reserve some pasta water to adjust sauce consistency.
- Piccata Stuffed Peppers: Shred leftover chicken and mix with sauce, then stuff into halved bell peppers and bake.
- Piccata Salad: Slice chilled chicken and serve over arugula with cherry tomatoes, olives, and shaved Parmesan.
- Piccata Tacos: Serve shredded chicken in warm tortillas with slaw, avocado, and a dollop of sour cream.
Health Considerations and Nutritional Value
Garlic Lemon Chicken Piccata can be part of a balanced, nutritious diet when prepared with mindful ingredient choices. Here’s a nutritional analysis per serving (assuming 4 servings, one breast per serving):
| Nutrient | Amount (Approx.) |
|---|---|
| Calories | 320 kcal |
| Protein | 35g |
| Total Fat | 14g |
| Saturated Fat | 5g |
| Carbohydrates | 8g |
| Dietary Fiber | 1g |
| Sugars | 2g |
| Sodium | 580mg |
| Vitamin C | 30mg (50% DV) |
| Iron | 1.2mg |
Health Benefits:
- Lean Protein Source: Chicken breast supports muscle repair and satiety without excessive fat.
- Rich in Vitamin C: From fresh lemon juice, which boosts immunity and enhances iron absorption.
- Antioxidant Properties: Garlic contains allicin, known for anti-inflammatory and heart-protective effects.
- Low in Carbs: Naturally suitable for low-carb and paleo diets, especially when modified.
Considerations:
- Sodium Content: Capers and broth contribute to higher sodium levels. Rinsing capers and using low-sodium broth reduces this.
- Butter and Fat: While butter adds flavor, those monitoring cholesterol may opt for reduced amounts or healthier fat alternatives.
- Balanced Meal Pairing: Serve with whole grains (like quinoa), steamed vegetables (asparagus, broccoli), or a mixed green salad to increase fiber and nutrients.
Full Ingredients List
- 4 boneless, skinless chicken breasts (about 6 oz each)
- ½ cup all-purpose flour (or gluten-free alternative)
- 1 tsp salt (plus more to taste)
- ½ tsp freshly ground black pepper
- 3 tbsp olive oil (divided)
- 4 tbsp unsalted butter (divided)
- 4 cloves garlic, minced
- ½ cup low-sodium chicken broth
- ⅓ cup fresh lemon juice (from 2–3 lemons)
- 1 tsp lemon zest
- 2 tbsp capers, drained and rinsed
- ¼ cup fresh parsley, chopped (plus extra for garnish)
- Lemon slices, for garnish (optional)
Directions
- Pound chicken breasts to ¼-inch thickness using a meat mallet. Season both sides with salt and pepper.
- Place flour in a shallow dish. Dredge each chicken cutlet lightly, shaking off excess.
- Heat 2 tablespoons olive oil and 1 tablespoon butter in a large skillet over medium-high heat.
- Add chicken in batches (do not overcrowd) and cook 3–4 minutes per side until golden and internal temperature reaches 165°F. Transfer to a plate and cover.
- Reduce heat to medium. Add 1 tablespoon butter to the same pan. Stir in garlic and cook 30 seconds until fragrant.
- Pour in chicken broth, scraping up browned bits from the bottom of the pan.
- Add lemon juice, lemon zest, and capers. Simmer 2–3 minutes to reduce slightly.
- Lower heat and swirl in remaining 2 tablespoons butter, one piece at a time, until sauce is glossy.
- Stir in chopped parsley.
- Return chicken to the skillet. Spoon sauce over cutlets and simmer 1–2 minutes to reheat.
- Remove from heat. Serve immediately with sauce drizzled on top.
FAQ
Can I make Chicken Piccata ahead of time?
Yes, but it’s best served fresh. You can prep ingredients (chop garlic, squeeze lemon, measure broth) in advance. Cooked chicken can be stored separately from the sauce and reheated gently in the sauce just before serving to prevent sogginess.
Why is my sauce too thin or separating?
A thin sauce may result from insufficient reduction or too much liquid. To thicken, simmer longer or add a cornstarch slurry (1 tsp cornstarch + 1 tsp water). If the sauce breaks (oil separates), remove from heat, add a splash of cold water or broth, and whisk vigorously to re-emulsify.
Can I freeze Chicken Piccata?
Freezing is not recommended—the delicate lemon flavor fades, and the sauce may separate upon thawing. However, uncooked floured chicken cutlets can be frozen for up to 3 months.
What wine pairs well with Chicken Piccata?
A crisp, acidic white wine complements the dish beautifully. Try Sauvignon Blanc, Pinot Grigio, Vermentino, or a dry Italian Soave. For red lovers, a light Pinot Noir works if not overly oaked.
Can I use bottled lemon juice?
While convenient, bottled lemon juice lacks the bright, nuanced flavor of fresh lemons and may contain preservatives that dull the taste. Freshly squeezed is always best for this dish.
How do I prevent rubbery chicken?
Overcooking is the main culprit. Pound chicken evenly, use medium-high heat, and cook only until the internal temperature hits 165°F. Let it rest covered—carryover cooking finishes the process gently.
Are capers necessary?
They’re traditional and highly recommended for authentic flavor, but if unavailable, you can omit them or substitute with chopped green olives for a similar briny kick.
Summary
Garlic Lemon Chicken Piccata is a vibrant, restaurant-quality dish that combines tender chicken cutlets with a tangy lemon-garlic sauce enriched with capers and butter. Quick to prepare and bursting with Mediterranean flavors, it’s perfect for weeknight dinners or impressing guests.
This versatile recipe adapts easily to gluten-free, dairy-free, or keto diets, and pairs wonderfully with pasta, rice, or roasted vegetables—making it a timeless favorite in any home cook’s repertoire.