Classic Marble Cake: A Timeless Dessert Delight
Introduction
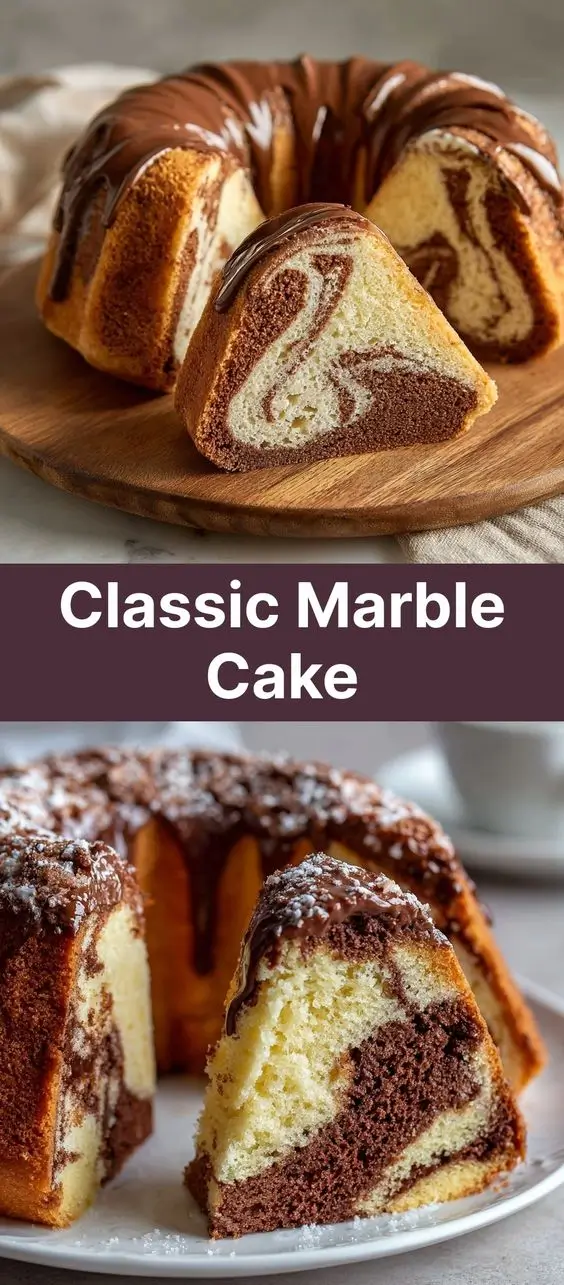
The Classic Marble Cake is a beloved staple in American baking, cherished for its beautiful swirls of vanilla and chocolate that create a marbled effect with every slice. This cake strikes the perfect balance between richness and lightness, making it ideal for birthdays, family gatherings, or simply as a comforting treat with afternoon tea. Its moist crumb and tender texture have made it a favorite across generations, combining the best of both chocolate and vanilla cakes into one harmonious dessert.
What sets marble cake apart is not just its visual appeal but also its versatility. Whether served plain, dusted with powdered sugar, or topped with a silky chocolate glaze, this cake adapts effortlessly to any occasion. It’s the kind of recipe that feels both nostalgic and timeless—simple enough for beginner bakers yet impressive enough to serve at elegant events. In this comprehensive guide, we’ll explore everything you need to know about crafting the perfect Classic Marble Cake, from its historical roots to modern variations and nutritional insights.
The History
The origins of the marble cake can be traced back to 19th-century Germany, where it was known as “Marmorkuchen.” German immigrants brought this dessert to America, where it evolved into the version we recognize today. The technique of swirling two batters together was likely inspired by traditional European marbling methods used in decorative arts, translated into the culinary world through baking innovation.
Marble cake gained widespread popularity in the United States during the early 20th century, particularly after the advent of chemical leaveners like baking powder and baking soda, which made cake-making more accessible to home cooks. The development of commercially available cocoa powder also played a crucial role, allowing bakers to easily incorporate chocolate flavor without relying on expensive or hard-to-process chocolate bars.
By mid-century, marble cake had become a standard offering in American bakeries and home kitchens alike. It appeared frequently in community cookbooks, church fundraisers, and school events. Its enduring charm lies in its ability to satisfy both chocolate and vanilla lovers simultaneously—a diplomatic solution to dessert debates everywhere. Over time, regional adaptations emerged, incorporating local ingredients and preferences, but the core concept remained unchanged: a beautifully swirled, tender-crumbed cake that celebrates duality in flavor and form.
Ingredients Breakdown
To achieve the signature texture and flavor of a Classic Marble Cake, each ingredient plays a vital role. Let’s examine them in detail:
- All-Purpose Flour: Provides the structural foundation of the cake. It contains moderate protein content (around 10–12%), which ensures a soft yet sturdy crumb. Sifting the flour helps eliminate lumps and aerates it for a lighter texture.
- Granulated Sugar: Adds sweetness and aids in moisture retention. When creamed with butter, sugar also contributes to aeration, resulting in a fluffier cake.
- Unsalted Butter: Offers rich flavor and tenderness. Using unsalted butter allows control over the salt content. Room-temperature butter blends smoothly with sugar, creating an emulsion essential for volume and even texture.
- Eggs: Act as binders and add structure while contributing to leavening. Eggs also enrich the batter with fat (from yolks) and protein (from whites), enhancing both flavor and color.
- Whole Milk: Moistens the batter and activates gluten formation slightly, ensuring the cake isn’t too dense. Whole milk is preferred for its fat content, which improves mouthfeel and softness.
- Vanilla Extract: Enhances the overall flavor profile, especially in the vanilla portion of the batter. Pure extract offers superior aroma and depth compared to artificial versions.
- Baking Powder: A double-acting leavener that produces carbon dioxide when mixed with liquid and again when exposed to heat, helping the cake rise evenly.
- Salt: Balances sweetness and enhances other flavors. Even a small amount makes a noticeable difference in taste perception.
- Cocoa Powder (Unsweetened, Natural): Gives the chocolate swirl its deep, earthy flavor. Natural cocoa reacts well with baking soda, though in this recipe, baking powder provides most of the lift. Dutch-process cocoa can be substituted, but it may alter pH and color slightly.
Optional glaze ingredients include confectioners’ sugar, melted chocolate, heavy cream, or milk for drizzling over the cooled cake to enhance presentation and flavor.
Step-by-Step Recipe
Follow these detailed instructions to bake a flawless Classic Marble Cake with a moist crumb and stunning marbled pattern.
- Preheat Oven & Prepare Pan: Preheat your oven to 350°F (175°C). Grease a 9×5-inch loaf pan or a 9-inch round springform pan and line the bottom with parchment paper for easy removal.
- Mix Dry Ingredients: In a medium bowl, whisk together 2 cups (250g) all-purpose flour, 1½ teaspoons baking powder, and ¼ teaspoon salt. Set aside.
- Cream Butter and Sugar: In a large mixing bowl, beat ½ cup (1 stick or 113g) softened unsalted butter with 1¾ cups (350g) granulated sugar using an electric mixer on medium speed until light and fluffy—about 3–4 minutes.
- Add Eggs: Add 3 large room-temperature eggs, one at a time, beating well after each addition. Scrape down the sides of the bowl as needed.
- Incorporate Vanilla: Mix in 2 teaspoons pure vanilla extract.
- Alternate Wet and Dry Ingredients: Gradually add the dry ingredients in three parts, alternating with ¾ cup (180ml) whole milk in two parts. Begin and end with the dry ingredients. Mix on low speed just until combined—do not overmix.
- Divide the Batter: Transfer exactly half of the plain vanilla batter into a separate bowl.
- Prepare Chocolate Portion: To one half of the batter, sift in ¼ cup (20g) unsweetened natural cocoa powder. Fold gently with a spatula until fully incorporated and uniformly dark brown.
- Layer and Swirl: Alternate spoonfuls of vanilla and chocolate batters into the prepared pan. Once all the batter is in the pan, use a knife or skewer to gently swirl the two batters together in a figure-eight motion. Be careful not to over-swirl, or the marbling effect will be lost.
- Bake: Place the pan in the center of the preheated oven. Bake for 45–55 minutes, or until a toothpick inserted into the center comes out clean or with a few moist crumbs.
- Cool: Allow the cake to cool in the pan for 15 minutes. Then, run a knife around the edges and invert onto a wire rack to cool completely before slicing.
- Optional Glaze: For a finishing touch, prepare a simple glaze by mixing 1 cup (120g) confectioners’ sugar with 2–3 tablespoons milk or heavy cream and ½ teaspoon vanilla extract. Drizzle over the cooled cake.
Tips
- Room-Temperature Ingredients: Ensure butter, eggs, and milk are at room temperature to create a smooth, emulsified batter that rises evenly.
- Don’t Overmix: Once flour is added, mix only until incorporated. Overmixing develops gluten, leading to a tough cake.
- Swirling Technique: Use a thin knife or chopstick and make no more than 5–6 gentle swirls to preserve contrast between the colors.
- Oven Thermometer: Use an oven thermometer to ensure accurate temperature. Hot spots or incorrect temps can cause uneven baking.
- Check Doneness Early: Start checking the cake at 40 minutes. Ovens vary, and overbaking leads to dryness.
- Even Batter Division: Use a kitchen scale to divide the batter precisely for balanced marbling.
- Parchment Paper Lining: Prevents sticking and allows you to lift the cake out cleanly for neat slicing.
- Cool Completely: Cutting into a warm cake can cause it to crumble. Wait at least 1–2 hours before slicing.
Variations and Customizations
The beauty of the Classic Marble Cake lies in its adaptability. Here are several creative twists to personalize your bake:
- Buttermilk Version: Replace whole milk with buttermilk for a tangier, denser crumb. The acidity also enhances tenderness and works well with baking soda if adjusted accordingly.
- Spiced Marble Cake: Add ½ teaspoon cinnamon, a pinch of nutmeg, and a dash of cloves to the dry ingredients for a warm, autumnal twist.
- Gluten-Free Option: Substitute all-purpose flour with a high-quality 1:1 gluten-free baking blend. Add ¼ teaspoon xanthan gum if not already included.
- Dairy-Free Marble Cake: Use plant-based butter (like coconut oil or vegan sticks) and almond, oat, or soy milk instead of dairy products.
- Double Chocolate Swirl: Increase cocoa to ⅓ cup and add mini chocolate chips to the chocolate batter for extra decadence.
- Lemon-Marble Cake: Add 1 tablespoon lemon zest and 1 teaspoon lemon juice to the vanilla batter for a citrusy contrast against the chocolate.
- Espresso Marble Cake: Dissolve 1 teaspoon instant espresso powder into the milk before adding to the chocolate portion for a mocha kick.
- Almond-Infused: Replace 1 teaspoon vanilla with almond extract in the vanilla batter for a subtle nutty note.
- Layered Sheet Cake: Spread the batter in a 9×13-inch pan for a sheet version, perfect for parties. Frost with chocolate-vanilla swirl buttercream.
- Cupcake Form: Bake as marble cupcakes at 350°F for 18–22 minutes. Fill liners halfway and swirl with a toothpick.
- Boozy Twist: Brush the cooled cake with a syrup made from ¼ cup hot water, 2 tablespoons sugar, and 1 tablespoon bourbon, rum, or Kahlúa.
- Nut Toppings: Sprinkle chopped walnuts, pecans, or hazelnuts on top before baking for added crunch.
Health Considerations and Nutritional Value
While the Classic Marble Cake is undeniably delicious, it’s important to enjoy it in moderation due to its sugar and fat content. Here’s a general nutritional breakdown per slice (based on 12 slices):
| Nutrient | Amount per Slice |
|---|---|
| Calories | 280–320 |
| Total Fat | 12–15g |
| Saturated Fat | 7–9g |
| Cholesterol | 60–80mg |
| Sodium | 150–200mg |
| Total Carbohydrates | 40–45g |
| Dietary Fiber | 1–2g |
| Sugars | 25–30g |
| Protein | 4–5g |
Health Notes:
- The cake contains refined sugars and carbohydrates, which can spike blood glucose levels. Diabetics should consume sparingly or consider sugar substitutes like erythritol or monk fruit sweetener.
- Using whole wheat pastry flour can increase fiber content slightly, though it may affect texture.
- Reducing sugar by ¼ cup is often tolerable in most recipes without sacrificing too much moisture.
- Replacing some butter with unsweetened applesauce (up to half) can reduce fat and calories, though the crust may be less crisp.
- Cocoa powder contains flavonoids—antioxidants linked to heart health—but alkalized (Dutch-process) cocoa has fewer due to processing.
- Those with lactose intolerance or egg allergies should explore plant-based alternatives carefully, noting that texture and rise may differ.
Ingredients
Makes one 9×5-inch loaf or 9-inch round cake (10–12 servings)
- 2 cups (250g) all-purpose flour
- 1¾ cups (350g) granulated sugar
- ½ cup (113g or 1 stick) unsalted butter, softened
- 3 large eggs, room temperature
- ¾ cup (180ml) whole milk, room temperature
- 2 teaspoons pure vanilla extract
- 1½ teaspoons baking powder
- ¼ teaspoon salt
- ¼ cup (20g) unsweetened natural cocoa powder
Optional Glaze:
- 1 cup (120g) confectioners’ sugar
- 2–3 tablespoons milk or heavy cream
- ½ teaspoon vanilla extract
Directions
- Preheat oven to 350°F (175°C). Grease and line a 9×5-inch loaf pan or 9-inch round pan with parchment paper.
- In a medium bowl, whisk together flour, baking powder, and salt. Set aside.
- In a large bowl, beat softened butter and sugar with an electric mixer on medium speed for 3–4 minutes, until pale and fluffy.
- Add eggs one at a time, beating well after each addition. Scrape down the bowl as needed.
- Mix in vanilla extract.
- Gradually add the dry ingredients alternately with milk, beginning and ending with dry ingredients. Mix on low speed just until combined.
- Transfer half the batter to another bowl.
- Sift cocoa powder into one half and fold until smooth and evenly colored.
- Spoon alternating dollops of vanilla and chocolate batters into the prepared pan.
- Use a knife to gently swirl the batters in a figure-eight pattern—about 5–6 strokes.
- Bake for 45–55 minutes, until a toothpick comes out clean.
- Cool in the pan for 15 minutes, then transfer to a wire rack to cool completely.
- (Optional) Whisk glaze ingredients and drizzle over cooled cake.
- Slice and serve at room temperature.
FAQ
Q: Why did my marble cake turn out dry?
A: Overbaking is the most common cause. Check the cake early and use a toothpick test. Also, avoid overmixing the batter, which develops gluten and reduces tenderness.
Q: Can I make this cake ahead of time?
A: Yes! Bake and cool completely, then wrap tightly in plastic wrap. Store at room temperature for up to 2 days or freeze for up to 3 months.
Q: Why didn’t my swirls show up clearly?
A: You may have over-swirled or mixed the batters too thoroughly. Use a light hand and limit the number of swirls to preserve definition.
Q: Can I use self-rising flour?
A: Not recommended unless adjusting for added leaveners and salt. Self-rising flour already contains baking powder and salt, so substitutions require recalculating ingredients.
Q: How do I store leftover marble cake?
A: Keep in an airtight container at room temperature for 2–3 days. For longer storage, refrigerate for up to 5 days or freeze individual slices.
Q: Can I use oil instead of butter?
A: Yes, substitute with ⅓ cup neutral oil (like canola or vegetable). The texture will be more moist but less rich and flavorful.
Q: Is this cake suitable for freezing?
A: Absolutely. Wrap the cooled, unglazed cake tightly in plastic and foil. Thaw at room temperature before serving.
Q: Can I make this into a bundt cake?
A: Yes! Use a greased and floured 10-cup bundt pan. Bake for 50–60 minutes, checking for doneness. The shape enhances the marbled appearance dramatically.
Summary
The Classic Marble Cake is a timeless dessert that combines the best of chocolate and vanilla in a beautifully swirled, moist, and tender loaf. Easy to customize and perfect for any occasion, it remains a favorite among bakers and dessert lovers worldwide.