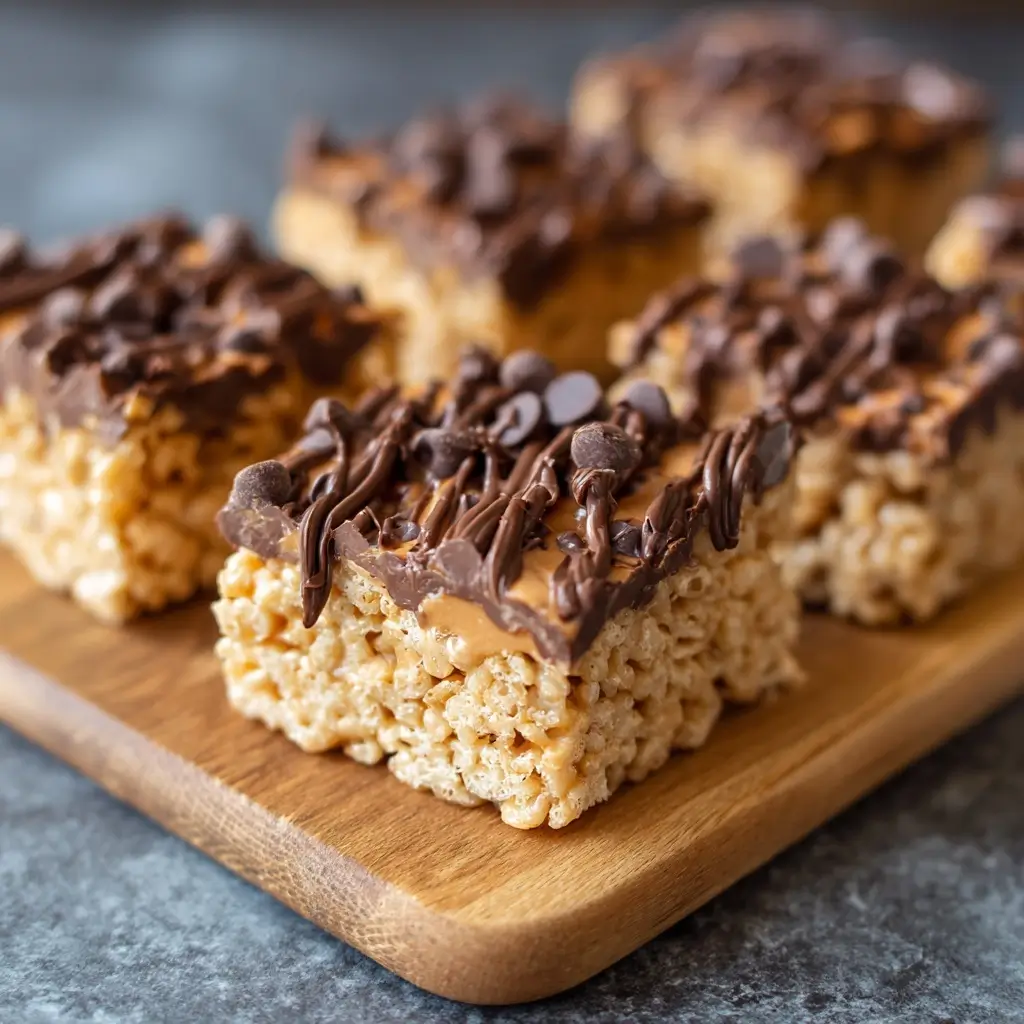
Peanut Butter Chocolate Rice Krispie Treats: A Decadent Twist on a Classic Favorite
There’s something undeniably nostalgic about Rice Krispie Treats—their soft, chewy texture, the gentle snap of the crispy rice, and that sweet vanilla aroma that instantly transports you back to childhood. But what happens when you elevate this classic American dessert with rich peanut butter and decadent chocolate? Enter the Peanut Butter Chocolate Rice Krispie Treats—a luxurious fusion of flavors and textures that satisfies both sweet and salty cravings in one irresistible bite.
The History Behind the Treat
Rice Krispie Treats were first introduced in the 1930s by Kellogg’s as a clever way to promote their Rice Krispies cereal. Originally called “Rice Marshmallow Squares,” the recipe was created by Kellogg employees Malitta Jensen and Mildred Day at the Kellogg Company home economics department. It quickly gained popularity due to its simplicity—only requiring three ingredients: Rice Krispies, marshmallows, and butter. The recipe was published on the back of cereal boxes and became a staple in American homes, school bake sales, and potluck dinners.
Over the decades, countless variations have emerged, from holiday-themed treats to gourmet versions with premium ingredients. The addition of peanut butter brings a creamy, nutty depth that complements the sweetness, while chocolate introduces a layer of indulgence reminiscent of a Reese’s Peanut Butter Cup. This modern twist honors the original spirit of creativity and convenience while transforming it into a more sophisticated dessert experience suitable for any occasion—from birthday parties to gourmet gift baskets.
Ingredients Breakdown: What Goes Into the Perfect Batch?
Creating the ultimate Peanut Butter Chocolate Rice Krispie Treats requires a careful balance of ingredients to achieve the ideal texture, flavor, and melt-in-your-mouth quality. Here’s a detailed breakdown of each component:
- Rice Krispies Cereal (6 cups): The foundation of the treat. Choose original, unsweetened Rice Krispies for the best texture. Avoid honey-flavored or frosted versions, as they can alter the taste and consistency.
- Mini Marshmallows (10 oz / about 4 cups): Mini marshmallows melt more evenly than large ones, creating a smoother, more cohesive mixture. They provide the signature chewiness essential to any great Rice Krispie Treat.
- Unsalted Butter (½ cup / 1 stick): Adds richness and helps melt the marshmallows smoothly. Unsalted butter allows you to control the sodium level. For a deeper flavor, consider browning the butter slightly before adding the marshmallows.
- Peanut Butter (¾ cup creamy): Use high-quality, natural creamy peanut butter without added sugar or oils for the best flavor. Alternatively, processed brands like Jif or Skippy work well too. The peanut butter adds creaminess, protein, and a savory contrast to the sweetness.
- Semi-Sweet Chocolate Chips (1 cup): Melted and swirled into the base or used as a topping, these add a rich cocoa flavor. You can substitute dark, milk, or even white chocolate depending on your preference.
- Vanilla Extract (1 tsp): Enhances overall flavor and rounds out the sweetness. Pure extract is recommended over imitation for superior taste.
- Salt (¼ tsp): A small amount enhances all the other flavors and balances the sweetness—don’t skip it!
- Optional Add-ins: Crushed peanuts, mini chocolate chips, sea salt flakes, crushed pretzels, or even a drizzle of caramel can take these treats to the next level.
Step-by-Step Recipe: How to Make Peanut Butter Chocolate Rice Krispie Treats
Follow these detailed instructions to create perfectly textured, flavor-packed treats every time:
- Prepare Your Pan: Line a 9×13-inch baking pan with parchment paper, leaving an overhang on two sides for easy removal. Lightly grease the parchment with non-stick spray or a thin layer of butter.
- Melt the Base: In a large saucepan over low heat, melt the butter completely. Add the mini marshmallows and stir continuously until fully melted and smooth. This process should take 4–5 minutes. Do not rush with high heat, as it can burn the marshmallows and result in a grainy texture.
- Incorporate Peanut Butter: Once the marshmallows are melted, remove the saucepan from heat. Stir in the peanut butter until fully combined and silky. The mixture will thicken slightly—this is normal.
- Add Flavor Enhancers: Mix in the vanilla extract and salt. Taste and adjust if needed—some may prefer a pinch more salt for that sweet-and-salty punch.
- Combine with Cereal: Pour the hot marshmallow-peanut butter mixture over the Rice Krispies in a large mixing bowl. Gently fold with a silicone spatula or wooden spoon until all the cereal is evenly coated. Be careful not to crush the cereal—gentle folding preserves the crunch.
- Add Chocolate: There are two ways to include chocolate:
- Swirled-In: Melt ½ cup of chocolate chips and gently swirl into the mixture before pressing into the pan.
- Topping: Reserve ½ cup of chocolate chips, melt them, and spread or drizzle over the top after pressing the mixture into the pan.
- Press into Pan: Transfer the mixture to the prepared pan. Use a greased spatula or wax paper to press down evenly. Apply firm but gentle pressure to avoid compacting too much—over-packing leads to dense treats.
- Cool and Set: Allow the treats to cool at room temperature for at least 1–2 hours. For faster setting, refrigerate for 30–45 minutes.
- Cut into Squares: Use the parchment overhang to lift the slab out of the pan. Cut into 2-inch squares using a sharp knife dipped in hot water for clean edges.
- Serve or Store: Enjoy immediately or store for later. Optionally, drizzle with extra melted chocolate or sprinkle with crushed peanuts before serving.
Pro Tips for Success
- Use Fresh Ingredients: Stale cereal makes for soggy treats. Ensure your Rice Krispies are crisp and your marshmallows are soft and fresh.
- Low and Slow Melting: Rushing the melting process causes burnt marshmallows. Keep the heat low and stir constantly.
- Grease Your Tools: Coat your spatula, hands, and spoon with butter or cooking spray to prevent sticky messes during mixing and pressing.
- Don’t Overmix: Folding too vigorously breaks the cereal, leading to a denser final product. Fold just until combined.
- Customize the Texture: For chewier treats, use slightly less cereal. For crunchier bars, add up to ½ cup more cereal.
- Double-Dip the Chocolate: For maximum chocolate impact, dip cooled squares halfway into melted chocolate and place on parchment to set.
- Make Ahead: These treats keep well and often taste better the next day as flavors meld. Prepare up to 3 days in advance.
Variations and Customizations
The beauty of Rice Krispie Treats lies in their versatility. Here are some creative twists to personalize your Peanut Butter Chocolate version:
- Nutella Swirl: Replace half the peanut butter with Nutella for a hazelnut-chocolate fusion.
- Reese’s Copycat: Layer the base with chopped Reese’s cups or mix in mini cups before pressing.
- Gluten-Free: Use certified gluten-free Rice Krispies (like those from Schär or Nature’s Path) to make this treat safe for gluten-sensitive individuals.
- Vegan Version: Substitute with vegan marshmallows (e.g., Dandies), plant-based butter, and dairy-free chocolate chips. Use natural peanut butter without honey.
- Protein-Packed: Add 1–2 scoops of unflavored or vanilla protein powder to the melted marshmallow mixture for a post-workout treat.
- Crunch Factor: Mix in crushed pretzels, toasted nuts, or granola for added texture.
- Holiday Themes: Add food coloring, sprinkles, or seasonal candies (e.g., red & green M&Ms for Christmas, pastel colors for Easter).
- Salted Caramel Drizzle: Swirl warm salted caramel sauce on top before chilling for a gourmet touch.
- Layered Bars: Create a trifle-style bar by alternating layers of classic, peanut butter, and chocolate-only Rice Krispie mixtures.
- Mini Bites: Press mixture into a muffin tin lined with cupcake liners for individual servings.
Health Considerations and Nutritional Value
While undeniably delicious, Peanut Butter Chocolate Rice Krispie Treats are a dessert best enjoyed in moderation. Here’s a nutritional overview per average square (based on 12 servings):
- Calories: ~280–320 kcal
- Fat: 14–18g (mostly from peanut butter and butter; includes healthy monounsaturated fats)
- Saturated Fat: 6–8g
- Carbohydrates: 38–42g (primarily from sugars and refined cereal)
- Sugars: 20–25g (from marshmallows and chocolate)
- Protein: 5–7g (thanks to peanut butter and cereal)
- Sodium: 180–220mg
Health Notes:
- Peanut butter contributes heart-healthy fats, protein, and essential vitamins like niacin and vitamin E.
- These treats lack fiber and significant micronutrients due to the processed nature of the base ingredients.
- High sugar content means they’re not ideal for diabetics or low-sugar diets unless modified (e.g., sugar-free marshmallows, low-sugar chocolate).
- To boost nutrition, consider adding flaxseed meal, chia seeds, or oats to the mixture.
- Portion control is key—stick to one square instead of multiple.
Full Ingredient List
- 6 cups Rice Krispies cereal (original)
- 10 oz (about 4 cups) mini marshmallows
- ½ cup (1 stick) unsalted butter
- ¾ cup creamy peanut butter (natural or conventional)
- 1 cup semi-sweet chocolate chips (divided)
- 1 tsp pure vanilla extract
- ¼ tsp salt
- Optional: crushed peanuts, sea salt flakes, caramel, pretzels
Detailed Directions
- Line a 9×13-inch baking dish with parchment paper and lightly grease.
- In a large saucepan over low heat, melt butter.
- Add marshmallows and stir continuously until completely melted and glossy.
- Remove from heat. Stir in peanut butter, vanilla, and salt until smooth.
- In a large bowl, combine Rice Krispies and any dry add-ins (e.g., crushed peanuts).
- Pour marshmallow mixture over cereal. Fold gently until fully coated.
- Melt ½ cup chocolate chips and swirl into mixture OR reserve for topping.
- Transfer to pan. Press firmly with a greased spatula.
- Melt remaining ½ cup chocolate and drizzle/spread over the top.
- Sprinkle with sea salt or extras if desired.
- Cool for 1–2 hours at room temperature or 30–45 minutes in fridge.
- Lift out using parchment. Cut into squares with a hot knife.
- Store in an airtight container.
Frequently Asked Questions (FAQ)
Q: Can I use crunchy peanut butter instead of creamy?
A: Absolutely! Crunchy peanut butter adds a pleasant texture and nutty bite. Just ensure it’s well stirred before using to avoid separation.
Q: Why are my treats too hard or too soft?
A: Hard treats usually result from overcooking the marshmallows or over-pressing the mixture. Soft or sticky treats may mean insufficient cereal or under-cooling. Adjust ratios and cooling time accordingly.
Q: How long do these last?
A: Stored in an airtight container at room temperature, they stay fresh for 3–4 days. In the refrigerator, they last up to 1 week. Freeze for up to 2 months—wrap individually and thaw at room temperature.
Q: Can I make them without marshmallows?
A: Traditional texture relies on marshmallows. However, vegan or homemade marshmallow alternatives exist. Substitutes like honey and gelatin or date paste won’t yield the same chew.
Q: Are they safe for people with nut allergies?
A: No—peanut butter is a primary ingredient. For nut-free versions, try sunflower seed butter (ensure no cross-contamination) and label clearly.
Q: Can I bake them?
A: No—these treats are no-bake and rely on stovetop melting. Baking will dry them out and burn the sugar.
Q: Can I use milk or dark chocolate?
A: Yes! Milk chocolate makes it sweeter and creamier, while dark chocolate offers a more sophisticated, bitter contrast to the peanut butter.
Q: Why did my chocolate crack when I cut them?
A: If the chocolate topping is thick, chill the treats longer before cutting. Use a warm knife and wipe between cuts for clean lines.
Summary
Peanut Butter Chocolate Rice Krispie Treats combine the nostalgic charm of a classic dessert with the rich, indulgent flavors of peanut butter and chocolate, creating a crowd-pleasing treat perfect for any occasion. Easy to make, endlessly customizable, and universally loved, they’re a sweet masterpiece that bridges generations and tastes.