Introduction
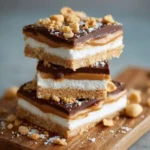
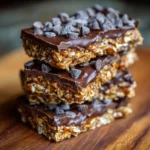
No-Bake Chocolate Oat Bars are the quintessential pantry hero — a blissfully simple, no-oven-required dessert that delivers rich chocolatey depth, chewy-crisp oat texture, and nostalgic comfort in every bite. Whether you’re a busy parent packing school lunches, a college student craving something sweet without turning on the stove, or a seasoned baker seeking a quick crowd-pleaser for potlucks and holidays, these bars check every box: minimal equipment, under 20 minutes of active time, naturally gluten-free adaptable, and endlessly customizable. Unlike traditional baked bars that rely on precise oven temperatures and leavening agents, this version harnesses the binding power of melted chocolate, nut butter, and sticky sweeteners to create a dense, fudgy, sliceable confection that sets beautifully in the fridge — no guesswork, no stress, just pure, unadulterated satisfaction.
The History
While the exact origin of no-bake chocolate oat bars remains delightfully unpatented and unrecorded, their roots stretch back to mid-20th-century American home economics and wartime ingenuity. During World War II, when rationing limited access to eggs, butter, sugar, and flour, resourceful cooks turned to pantry staples like rolled oats, cocoa powder, honey, and peanut butter to create satisfying, shelf-stable treats — precursors to what we now know as “no-bake energy bites” and “refrigerator bars.” The iconic combination of oats and chocolate gained mainstream popularity in the 1950s and ’60s through community cookbooks, women’s magazines (like Good Housekeeping and Ladies’ Home Journal), and early versions of “Oatmeal Fudge Bars” that relied on condensed milk and melted chocolate chips. By the 1970s, health-conscious adaptations emerged with natural sweeteners and seed butters, and in the 2000s, the rise of clean-eating blogs and Instagram food culture propelled variations like “Vegan Chocolate Oat Squares” and “Protein-Packed No-Bake Bars” into viral status. Today, this humble recipe stands as a global canvas — reimagined across cultures with matcha and red bean paste in Japan, tahini and date syrup in the Middle East, and dulce de leche and quinoa flakes in Latin America — proving that simplicity, when rooted in quality ingredients, is timeless.
Ingredients Breakdown
Understanding each component isn’t just about following a list — it’s about mastering function, flavor, and flexibility:
- Old-Fashioned Rolled Oats (not instant or steel-cut): The structural backbone. Their flat, flaky surface absorbs moisture, provides chewy texture, and binds seamlessly when combined with sticky elements. Gluten-free certified oats are essential for those with celiac disease or gluten sensitivity — cross-contamination is common in standard oat processing.
- Natural Creamy Peanut Butter (or alternative nut/seed butter): Acts as both binder and flavor enhancer. Opt for unsweetened, oil-separated varieties (stirred well before use) — avoid hydrogenated oils and added sugars found in many commercial brands. Almond butter lends a milder, slightly sweeter note; sunflower seed butter offers a nut-free, subtly earthy alternative; tahini adds a complex, bittersweet depth perfect for sophisticated variations.
- Unsweetened Cocoa Powder (Dutch-processed or natural): Provides intense chocolate flavor without excess sugar. Dutch-processed cocoa is less acidic and richer in color; natural cocoa offers brighter, fruitier notes. Both work — just ensure it’s 100% pure cocoa with no added alkalizers or fillers.
- Pure Maple Syrup or Raw Honey: The primary liquid sweetener and humectant — it retains moisture, prevents drying out, and contributes subtle floral or woody complexity. Maple syrup is vegan-friendly and adds caramelized warmth; honey offers antimicrobial properties and a distinctive floral bouquet (note: not suitable for infants under 1 year or strict vegans).
- Vanilla Extract (pure, not imitation): An aromatic amplifier — it rounds out bitterness, enhances sweetness perception, and adds a warm, comforting background note. Madagascar bourbon vanilla is ideal for its creamy, spicy profile.
- Pinch of Fine Sea Salt: A critical flavor catalyst. It doesn’t make the bars taste salty — instead, it heightens chocolate’s richness, balances sweetness, and creates dimensional contrast. Flaky Maldon or fine grey sea salt both work beautifully.
- Optional Add-Ins (see Variations section): These aren’t mere garnishes — they’re functional upgrades. Chia or ground flax seeds add omega-3s and extra binding power; mini chocolate chips or cacao nibs deliver textural pops and antioxidant boosts; toasted coconut brings tropical aroma and crunch; dried tart cherries or cranberries offer bright acidity to cut through richness.
Step-by-Step Recipe
This method prioritizes control, consistency, and foolproof results — no thermometer required, no stovetop babysitting, and zero risk of seizing chocolate.
- Prepare Your Pan: Line an 8×8-inch square baking pan with parchment paper, leaving a 2-inch overhang on two opposite sides for easy lifting. Lightly grease the parchment with coconut oil or neutral oil — this ensures clean release after chilling.
- Toast the Oats (Highly Recommended Step): Spread 2 cups of rolled oats evenly on a dry, ungreased skillet or baking sheet. Toast over medium-low heat for 4–6 minutes, stirring constantly, until fragrant and golden — watch closely, as oats burn easily. Let cool completely. Toasting deepens flavor, reduces raw graininess, and improves texture integrity. Skip only if short on time — but never skip cooling.
- Melt the Chocolate Base: In a microwave-safe bowl, combine ¾ cup creamy nut butter, ⅓ cup unsweetened cocoa powder, ½ cup maple syrup (or honey), 1 tsp pure vanilla extract, and ¼ tsp fine sea salt. Microwave in 20-second bursts, stirring vigorously between each, until fully melted and glossy — usually 60–90 seconds total. Do NOT overheat — overheated nut butter can separate or become greasy. Alternatively, use a double boiler over simmering (not boiling) water, stirring constantly until smooth.
- Combine Wet & Dry: Pour the warm chocolate mixture over the cooled, toasted oats in a large mixing bowl. Using a sturdy silicone spatula or wooden spoon, fold gently but thoroughly until every oat is uniformly coated and no dry streaks remain. The mixture will be thick, glossy, and slightly sticky — resist adding extra liquid; patience and proper folding yield perfect cohesion.
- Press Firmly Into Pan: Transfer the mixture to your prepared pan. Use the back of a greased measuring cup or a piece of parchment to press down with even, firm pressure — aim for a uniform ¾-inch thickness. Pressing too lightly leads to crumbly bars; pressing too hard can compact them excessively. Take 60–90 seconds to ensure full density — this step is non-negotiable for clean slicing.
- Chill to Set (Not Just Cool): Refrigerate uncovered for a minimum of 3 hours — ideally 4–6 hours or overnight. This allows the fats in the nut butter and cocoa to fully solidify, the syrup to set, and the oats to hydrate and bind. Do not rush this step with freezer time — rapid freezing causes condensation and sugar bloom on the surface, leading to dull appearance and grainy texture.
- Score & Slice With Precision: Before cutting, run a sharp chef’s knife under hot water, dry thoroughly, and slice with gentle sawing motion — rewarm and dry the blade between cuts. For clean edges, score shallow lines while still chilled, then let sit at room temperature for 2–3 minutes before final slicing. Store bars in an airtight container with parchment layers between stacks.
Tips
- Temperature Is Everything: All ingredients should be at room temperature before mixing — cold nut butter won’t emulsify properly; chilled syrup can cause premature seizing. If your kitchen is below 65°F (18°C), gently warm the nut butter and syrup separately for 10 seconds before combining.
- Oats Must Be Cooled: Adding warm oats to warm chocolate mixture creates steam, which leads to condensation, sogginess, and poor binding. Always toast ahead and allow full cooling — spread on a wire rack for speed.
- Stirring Technique Matters: When folding chocolate into oats, use a “fold-and-turn” motion — cut down the center, sweep across the bottom, and lift up and over. This incorporates air minimally while maximizing even coating. Overmixing warms the mixture and makes it greasy.
- Chill Time ≠ Optional: Cutting before full setting guarantees crumbling. If you must serve sooner, freeze for 45 minutes, then refrigerate 1 hour — but never skip the full chill. Test readiness by pressing a finger gently — it should leave no indentation and feel firm, not springy.
- Cutting Tools Are Critical: A dull knife crushes rather than slices. Keep a honing steel nearby. For ultra-clean edges, dip the knife in boiling water, wipe, then cut — repeat every 2 bars.
- Storage Wisdom: These bars thrive in the fridge (up to 2 weeks) but also freeze beautifully for 3 months. Wrap individually in parchment + beeswax wrap or foil, then store in a freezer bag. Thaw in fridge 30 minutes before serving — never at room temperature, which softens nut butter unevenly.
- Troubleshooting Guide: If crumbly? Not enough binder — next time, add 1 tbsp extra nut butter or 1 tsp chia gel (1 tsp chia + 3 tsp water, rested 5 mins). If too soft? Likely under-chilled or too much syrup — reduce syrup by 1 tbsp next batch. If greasy/oily surface? Overheated nut butter or insufficient stirring — melt more gently and stir longer during emulsification.
Variations and Customizations
These bars are a masterclass in adaptability — each variation maintains structural integrity while offering distinct sensory experiences:
- Vegan Protein Power Bars: Swap honey for brown rice syrup, add 2 scoops unflavored plant-based protein powder (pea/hemp blend), and stir in 2 tbsp hemp hearts + 1 tbsp pumpkin seeds. Toast seeds with oats for deeper nuttiness.
- Espresso Dark Chocolate Bars: Add 1½ tsp finely ground espresso powder + 1 tbsp instant coffee granules to the dry cocoa mix. Stir in ¼ cup coarsely chopped 85% dark chocolate for bitter contrast.
- Coconut-Almond Bliss: Use almond butter, replace ½ cup oats with unsweetened shredded coconut, add 1 tsp almond extract with vanilla, and top with toasted slivered almonds before chilling.
- Spiced Mexican Hot Chocolate: Add ½ tsp ground cinnamon, ¼ tsp chipotle powder, 1 pinch cayenne, and 1 tsp orange zest to the wet mix. Fold in ⅓ cup crushed pepitas and 2 tbsp cacao nibs.
- Keto-Friendly Version: Replace oats with 1 cup roasted sunflower seeds + ½ cup crushed pecans + ¼ cup unsweetened coconut flour. Use sugar-free maple-flavored syrup (erythritol-based) and 1 tsp stevia glycerite. Add 2 tbsp MCT oil for binding.
- Gluten-Free + Grain-Free: Substitute oats with 1 cup cassava flour + ½ cup tiger nuts + ½ cup ground golden flax. Add 1 tsp psyllium husk powder for elasticity.
- Child-Friendly Fun: Stir in rainbow sprinkles (use natural dye versions), mini marshmallows (add last, gently fold), or freeze-dried strawberry pieces. Press into fun shapes using cookie cutters after chilling 2 hours.
- Seasonal Twists: Fall: Add 1 tsp pumpkin pie spice + 2 tbsp cooked, mashed sweet potato (cooled). Winter: Stir in crushed candy canes + peppermint extract. Spring: Lemon zest + poppy seeds + white chocolate drizzle. Summer: Freeze-dried mango + lime zest + toasted macadamia nuts.
Health Considerations and Nutritional Value
A 1.5″ x 1.5″ bar (approx. 45g) made with standard ingredients provides approximately:
- Calories: 185–210 kcal (varies by nut butter and sweetener density)
- Protein: 5–7g (primarily from oats and nut butter — complete amino acid profile when paired with seeds)
- Fiber: 3–4g (oats contribute beta-glucan, a soluble fiber clinically shown to support heart health and glycemic control)
- Healthy Fats: 10–12g (monounsaturated and polyunsaturated fats from nuts/seeds — supports brain function and anti-inflammatory pathways)
- Antioxidants: Rich in flavonoids (epicatechin, procyanidins) from cocoa — linked to improved endothelial function and reduced oxidative stress
- Glycemic Impact: Moderate (GI ~55–60) — significantly lower than baked cookies or granola bars due to absence of refined flour and slower digestion from fat/fiber combo
Dietary Notes: Naturally dairy-free and egg-free. Easily made vegan (maple syrup/honey substitute), nut-free (sunflower seed butter), soy-free, and refined sugar-free. For low-FODMAP diets: use maple syrup (in moderation), certified low-FODMAP oats, and limit servings to 1 bar per sitting. Those managing blood sugar should pair with a source of protein or healthy fat (e.g., a handful of almonds) to further blunt glucose response. While nutrient-dense, these remain energy-concentrated — mindful portioning supports sustained satiety without caloric excess.
Ingredients
- 2 cups old-fashioned rolled oats (certified gluten-free if needed)
- ¾ cup creamy natural peanut butter (or almond, sunflower, or tahini)
- ⅓ cup unsweetened cocoa powder (Dutch-processed or natural)
- ½ cup pure maple syrup or raw honey
- 1 teaspoon pure vanilla extract
- ¼ teaspoon fine sea salt
- Optional add-ins: ¼ cup mini chocolate chips, 2 tablespoons chia seeds, ⅓ cup dried cranberries, 2 tablespoons toasted coconut flakes
Directions
- Line an 8×8-inch baking pan with parchment paper, leaving overhang on two sides. Lightly grease parchment with coconut oil.
- In a dry skillet over medium-low heat, toast oats, stirring constantly, until fragrant and golden (4–6 minutes). Transfer to a plate and cool completely (15–20 minutes).
- In a microwave-safe bowl, combine peanut butter, cocoa powder, maple syrup, vanilla, and salt. Microwave in 20-second intervals, stirring vigorously between each, until smooth and glossy (60–90 seconds total). Alternatively, use a double boiler.
- In a large bowl, combine cooled oats and any optional add-ins. Pour warm chocolate mixture over oats. Fold gently but thoroughly until fully combined and no dry spots remain.
- Transfer mixture to prepared pan. Press firmly and evenly with a greased measuring cup or parchment paper until compacted to ¾-inch thickness.
- Refrigerate uncovered for at least 3 hours, preferably 4–6 hours or overnight.
- Using a hot, dry knife, cut into 16 equal squares. Store in an airtight container in the refrigerator for up to 2 weeks, or freeze for up to 3 months.
FAQ
- Can I use quick oats or steel-cut oats?
- No — quick oats turn gummy and lose structure; steel-cut oats remain unpleasantly gritty and won’t absorb moisture properly. Stick exclusively to old-fashioned rolled oats for optimal texture and binding.
- Why did my bars crumble when I cut them?
- Most commonly: insufficient chilling time, under-toasted or warm oats, or inadequate pressing. Ensure full 4+ hour chill, cooled oats, and firm, even pressure during pan assembly.
- Can I make these nut-free?
- Absolutely — sunflower seed butter is the gold standard substitute. Ensure it’s unsweetened and stirred well. Avoid “natural” seed butters with added sugars or palm oil, which affect setting.
- My mixture looks too dry — can I add more syrup?
- Resist the urge! What feels dry pre-chill often binds perfectly once chilled. If truly crumbly, add 1 tablespoon extra nut butter first — it adds fat and binding without excessive sweetness.
- Can I bake these to make them crispier?
- Technically yes — but you’ll lose the “no-bake” magic, alter flavor (roasted vs. raw cocoa notes), and risk burning edges. If crispness is desired, try adding 2 tbsp puffed quinoa or toasted rice cereal to the mix before chilling.
- How do I prevent the chocolate layer from cracking when cutting?
- Use a sharp knife, warm it in hot water, dry thoroughly, and cut with slow, confident strokes — no sawing. Let bars sit at room temp for 2 minutes before final cuts. Score lightly first, then deepen cuts.
- Are these safe for kids with peanut allergies?
- Yes — when made with certified peanut-free facilities’ sunflower seed butter or soy-free, tree-nut-free alternatives like pumpkin seed butter. Always verify labels for shared equipment warnings.
- Can I use cocoa powder with added sugar?
- Not recommended — it throws off sweetness balance, adds unnecessary refined sugar, and often contains dairy solids or stabilizers that interfere with binding. Stick to 100% unsweetened cocoa.
- Why does my batch look shinier or duller than photos?
- Surface sheen depends on cocoa type (Dutch-processed yields glossier finish), cooling rate (slow fridge chill = better shine), and nut butter oil content. Dullness is harmless and doesn’t affect taste or texture.
- Can I double the recipe?
- Yes — use a 9×13-inch pan and increase chill time to 5–7 hours. Stir in add-ins in two batches to ensure even distribution. Do not triple — mixing becomes unwieldy and cooling inconsistent.
Summary
No-Bake Chocolate Oat Bars are a triumph of minimalist, ingredient-driven cooking — requiring no oven, no special equipment, and under 20 minutes of hands-on time, yet delivering deeply satisfying chocolate intensity, wholesome fiber-rich oats, and customizable nutrition. With smart technique, thoughtful substitutions, and respect for the science of binding and chilling, they transform from humble pantry staples into elegant, nourishing treats worthy of any occasion — from weekday fuel to holiday centerpiece.