Molten Chocolate Lava Cakes for Two: A Decadent Delight in Under 30 Minutes
Introduction
Imagine slicing into a warm, delicate chocolate cake and watching a rich, velvety river of molten chocolate slowly ooze out—this is the magic of a Molten Chocolate Lava Cake. Also known as “chocolate fondant” or “chocolate pudding cake,” this dessert has captured hearts around the world with its perfect balance of elegance and indulgence. Despite its sophisticated appearance, it’s surprisingly simple to make, requiring just a handful of ingredients and about 25 minutes from start to finish. Ideal for romantic dinners, intimate gatherings, or simply treating yourself, these individual-sized cakes deliver restaurant-quality decadence right in your own kitchen. In this comprehensive guide, we’ll walk you through everything you need to know about crafting the perfect lava cake for two—complete with historical insights, ingredient analysis, detailed instructions, expert tips, customization ideas, nutritional considerations, and answers to frequently asked questions.
The History
The origins of the molten chocolate lava cake are often credited to French chef Michel Bras or French-American chef Jean-Georges Vongerichten, though the exact story varies depending on whom you ask. One popular tale recounts that in the late 1980s, Jean-Georges accidentally underbaked a chocolate sponge cake at his New York City restaurant. Upon tasting the still-warm center, he discovered the luxurious, flowing chocolate core and decided to turn the “mistake” into a signature dish. This serendipitous error quickly became a sensation, launching a global trend in fine dining.
While similar desserts existed in France—such as the classic moelleux au chocolat (soft chocolate cake) — it was Vongerichten’s version that popularized the dramatic “lava” effect in American restaurants during the 1990s. The cake’s rise coincided with the growing popularity of minimalist, experiential desserts where texture and temperature played starring roles. Today, molten lava cakes are a staple on dessert menus worldwide and have become a beloved challenge for home bakers aiming to master the art of the perfect runny center.
Ingredients Breakdown
The beauty of molten chocolate lava cake lies in its simplicity. With only six core ingredients, each plays a crucial role in achieving the ideal structure and flow:
- Dark Chocolate (70% cocoa): High-quality dark chocolate is essential. It provides intense flavor and forms the molten core when slightly undercooked. Opt for couverture chocolate if possible—it contains more cocoa butter, which ensures a smoother melt and silkier texture.
- Unsalted Butter: Adds richness and helps create a moist, tender crumb. Using unsalted butter allows you to control the salt content precisely. The fat also aids in emulsifying the batter and contributes to the glossy flow of the center.
- Eggs: Provide structure and leavening. When whipped slightly, they incorporate air into the batter, helping the cake rise gently while maintaining a soft interior. Fresh, room-temperature eggs blend more smoothly into the mixture.
- Granulated Sugar: Sweetens the cake without overpowering the deep chocolate notes. It also stabilizes the egg foam slightly during beating, contributing to a light yet dense texture.
- All-Purpose Flour: Just a small amount is needed to give the outer layer enough structure to hold its shape while allowing the center to remain liquid. Too much flour will result in a fully baked cake with no lava effect.
- Salt (optional pinch): Enhances the complexity of the chocolate flavor by balancing sweetness and bitterness.
Optional additions include a splash of espresso powder (to deepen chocolate flavor), orange zest (for a citrus twist), or liqueur like Grand Marnier, Amaretto, or Baileys (for adult variations).
Step-by-Step Recipe
Yields: 2 servings
Prep Time: 10 minutes
Bake Time: 12–14 minutes
Total Time: ~25 minutes
Ingredients
- 4 oz (115g) high-quality dark chocolate (70% cocoa), finely chopped
- 4 tbsp (57g) unsalted butter, cubed
- 1 large egg
- 1 large egg yolk
- 3 tbsp (36g) granulated sugar
- Pinch of salt (optional)
- 1 tbsp (8g) all-purpose flour
- Butter and cocoa powder (for ramekin prep)
- Powdered sugar, fresh berries, vanilla ice cream, or whipped cream (for serving)
Directions
- Preheat Oven & Prepare Ramekins: Preheat your oven to 425°F (220°C). Generously butter two 6-ounce ramekins (ceramic or porcelain work best). Dust the insides with cocoa powder, tapping out any excess. This prevents sticking and adds a subtle chocolate note.
- Melt Chocolate and Butter: In a heatproof bowl set over a pot of simmering water (double boiler method), add the chopped chocolate and butter. Stir frequently until completely melted and smooth. Remove from heat and let cool slightly (about 1–2 minutes).
- Whisk Eggs and Sugar: In a separate bowl, whisk together the whole egg, egg yolk, sugar, and salt until pale, thickened, and slightly foamy—about 2–3 minutes with a hand mixer or vigorous whisking by hand.
- Combine Mixtures: Slowly pour the warm chocolate mixture into the egg mixture, whisking constantly to avoid cooking the eggs. Blend until fully incorporated and shiny.
- Fold in Flour: Sift in the flour and gently fold it in using a spatula. Be careful not to overmix; stop as soon as no streaks of flour remain. Overmixing develops gluten and can make the cake tough.
- Fill Ramekins: Divide the batter evenly between the prepared ramekins. They should be filled almost to the top—about ¾ full.
- Bake: Place ramekins on a baking sheet (for easy handling) and bake for 12 to 14 minutes. The edges should be set and slightly puffed, but the center should still appear soft and jiggly when gently shaken. For a true lava flow, err on the side of underbaking.
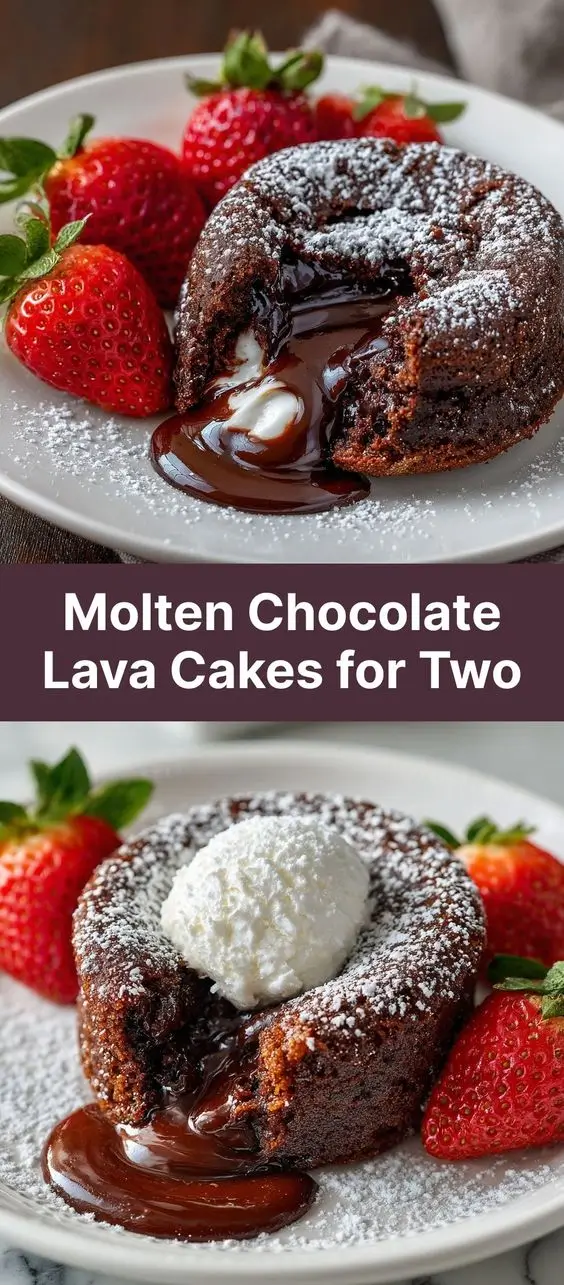
- Cool Slightly and Serve: Let the cakes rest for 60–90 seconds. Then, carefully run a knife around the edge of each cake. Place a dessert plate upside-down over the ramekin and flip quickly but confidently. Lift the ramekin off to reveal the risen cake. Serve immediately with powdered sugar dusting, fresh raspberries, and a scoop of vanilla ice cream or dollop of whipped cream.
Tips for Perfect Molten Lava Cakes
- Use Room-Temperature Eggs: Cold eggs can cause the chocolate-butter mixture to seize when combined. Letting them sit out for 20–30 minutes improves emulsification.
- Don’t Overbake: This is the #1 rule. Even an extra minute can turn your lava into a fully cooked cake. Start checking at 12 minutes—the center should look un-set when you peek.
- Invest in Good Chocolate: Since chocolate is the star, choose one you’d enjoy eating on its own. Avoid chocolate chips, which contain stabilizers that affect melting behavior.
- Uniform Ramekins: Use identical ramekins so both cakes bake evenly. Standard 6 oz (¾ cup) size works perfectly.
- Rest Before Flipping: Allowing the cakes to cool briefly helps the outer crust firm up slightly, making unmolding easier without collapsing.
- Make Ahead Option: You can prepare the batter ahead of time—pour into greased ramekins, cover with plastic wrap, and refrigerate for up to 24 hours. Bake straight from the fridge, adding 1–2 minutes to baking time.
- Check Your Oven Temperature: Use an oven thermometer to ensure accuracy. Hot spots or incorrect temps can lead to uneven baking.
Variations and Customizations
Once you’ve mastered the classic version, feel free to experiment! Here are some creative twists:
- White Chocolate Raspberry: Replace half the dark chocolate with white chocolate and fold in a few fresh raspberries before baking.
- Peppermint Lava Cake: Add ¼ tsp peppermint extract to the batter and serve with crushed candy cane or mint ice cream.
- Spiced Mexican Chocolate: Mix in a pinch of cinnamon, cayenne pepper, and a dash of vanilla for a warm, spicy kick.
- Almond or Hazelnut Flavor: Add ½ tsp almond extract or fold in 1 tbsp finely ground toasted nuts.
- Boozy Version: Stir in 1–2 tsp of your favorite liqueur—Grand Marnier, Kahlúa, Chambord, or even bourbon—to enhance depth of flavor.
- Gluten-Free: Substitute the all-purpose flour with rice flour, almond flour, or a certified gluten-free flour blend. Results may vary slightly in texture.
- Vegan Option: Use dairy-free chocolate and coconut oil instead of butter. Replace eggs with flax eggs (1 tbsp ground flaxseed + 3 tbsp water per egg), though the texture will be denser and the lava effect less predictable.
- Larger Batch: Easily scale the recipe to serve more—just double, triple, or quadruple as needed. Use matching ramekins and rotate the baking sheet halfway through for even cooking.
Health Considerations and Nutritional Value
While undeniably indulgent, molten chocolate lava cake does offer some redeeming qualities when enjoyed in moderation.
Nutritional Profile (Per Serving, Approximate)
- Calories: ~380–420 kcal
- Fat: 28–32g (mostly from cocoa butter and butter)
- Saturated Fat: 17–20g
- Carbohydrates: 30–35g
- Sugars: 25–28g
- Protein: 5–6g
- Fiber: 2–3g (from dark chocolate)
- Cholesterol: ~120mg
- Sodium: ~50–70mg
Health Notes
- Antioxidants: Dark chocolate (especially 70% or higher) is rich in flavonoids and polyphenols, antioxidants linked to improved heart health and reduced inflammation.
- Mood Enhancement: Chocolate contains compounds like theobromine and phenylethylamine, which may promote feelings of well-being and alertness.
- Portion Control: Because this dessert serves only two and is rich, it naturally encourages mindful eating. Sharing one cake can reduce calorie intake further.
- Dietary Modifications: Lower-sugar chocolates or natural sweeteners like erythritol can be used for reduced sugar versions. However, altering sugar content may impact texture and browning.
- Heart Health: In moderation, dark chocolate has been associated with lower blood pressure and improved vascular function—but excessive saturated fat and sugar can counteract these benefits.
Best enjoyed occasionally as part of a balanced diet. Pair with fresh fruit or Greek yogurt instead of ice cream to lighten the overall dish.
FAQ
Why didn’t my lava cake have a molten center?
Most likely, it was overbaked. Ovens vary widely, so always check at the 12-minute mark. Also, ensure you’re using high-quality chocolate with good melting properties. If the batter was chilled before baking, it may require additional time—adjust accordingly.
Can I make lava cakes in advance?
You can prepare the batter and fill the ramekins up to 24 hours ahead. Cover and refrigerate, then bake directly from cold, adding 1–2 minutes to the baking time. Do not fully bake and reheat—they lose their signature gooey center.
Can I use milk or semi-sweet chocolate?
Yes, but the flavor and texture will differ. Milk chocolate contains less cocoa and more sugar and milk solids, resulting in a sweeter, softer center. Semi-sweet (55–60%) works well too, offering a balance between richness and sweetness.
What if I don’t have ramekins?
You can use muffin tins, silicone molds, or even oven-safe teacups. Grease and dust them thoroughly. Adjust baking time slightly based on size and material.
Is it safe to eat undercooked eggs?
The brief baking time (12+ minutes at 425°F) heats the eggs sufficiently to make them safe for most healthy adults. However, pregnant individuals, young children, elderly persons, or those with compromised immune systems may prefer to use pasteurized eggs for added safety.
Can I freeze molten lava cakes?
Freezing after baking ruins the texture. However, unbaked filled ramekins can be frozen for up to 1 month. Thaw overnight in the fridge before baking, adding 2–3 minutes to cook time.
How do I know when the cakes are done?
The tops should look set and cracked slightly, the sides slightly pulled away, and the center should jiggle softly when gently shaken. A toothpick inserted near the edge comes out clean, but one in the center will be wet with chocolate—that’s exactly what you want.
Summary
Molten Chocolate Lava Cakes for Two are an elegant, quick-to-make dessert that combines rich dark chocolate with a magical flowing center, perfect for special moments. With precise timing and quality ingredients, you can recreate a gourmet experience at home in under half an hour.