Introduction
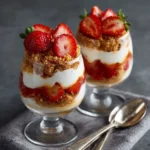
Mini No-Bake Cheesecake Jars are the perfect marriage of elegance, convenience, and indulgence—ideal for modern home bakers seeking a fuss-free yet impressive dessert. These charming individual servings combine the creamy richness of classic New York–style cheesecake with the effortless charm of no-bake preparation, all nestled in portable, Instagram-worthy mason jars or elegant glass containers. Whether you’re preparing for a summer picnic, hosting an intimate dinner party, celebrating a birthday, or simply treating yourself after a long day, these miniature delights deliver big flavor in bite-sized portions. Their layered structure—crumbly base, velvety filling, and artful topping—offers textural harmony and visual appeal, while their no-oven, no-water-bath, no-chilling-for-hours-required approach makes them accessible to beginners and time-crunched cooks alike. Best of all? Each jar is fully customizable, portion-controlled, and effortlessly transportable—making them as practical as they are decadent.
The History
The evolution of the cheesecake traces back over 2,000 years—to ancient Greece, where early versions made with honey-sweetened cheese, flour, and wheat were served to athletes at the first Olympic Games in 776 BCE as a source of sustained energy. The Romans later adopted and adapted the recipe, spreading it across their empire and adding eggs and crushed cheese curds. By the Middle Ages, European monasteries preserved cheesecake traditions, often using ricotta or cottage cheese. In the 18th and 19th centuries, American settlers—particularly in New York—began experimenting with cream cheese (first commercially produced by William Lawrence in Chester, NY, in 1872), paving the way for the dense, tangy, ultra-creamy style we now associate with iconic American cheesecake. The “no-bake” iteration emerged mid-20th century alongside refrigerated cream cheese innovations and the rise of convenient, set-with-gelatin desserts like Jell-O molds and chilled pies. However, it wasn’t until the 2010s—fueled by the food blogging boom, Pinterest aesthetics, and the popularity of mason jar meals—that the mini no-bake cheesecake jar truly blossomed as a distinct cultural phenomenon. Its ascent mirrored broader culinary trends: portion-conscious eating, grab-and-go wellness culture, artisanal presentation, and the democratization of gourmet techniques. Today, it stands not just as a dessert—but as a canvas for creativity, nostalgia, and mindful celebration.
Ingredients Breakdown
Understanding each component—and why it matters—elevates your mini cheesecake jars from good to extraordinary:
- Graham Cracker Crumbs (or Alternative Base): Provides structure, sweetness, and a subtle toasted flavor. Standard graham crackers contain cinnamon and honey, contributing warm complexity. Gluten-free, vegan, or nut-based alternatives (like almond flour or oat crumbs) offer dietary flexibility without sacrificing crunch.
- Unsalted Butter (Melted): Acts as the binding agent for the crust—melting the crumbs into a cohesive, pressable layer. Unsalted butter ensures precise control over sodium levels and avoids off-flavors from rancid salted butter.
- Cream Cheese (Full-Fat, Room Temperature): The cornerstone of texture and tang. Full-fat ensures richness, stability, and proper emulsification; low-fat versions often separate or yield a grainy, watery filling. Room temperature (65–70°F) is non-negotiable—it allows smooth blending without lumps or overmixing.
- Powdered Sugar (Confectioners’ Sugar): Dissolves instantly, adds sweetness and fine texture, and contains cornstarch—which helps stabilize the filling and prevent weeping. Granulated sugar would leave grittiness and hinder smoothness.
- Heavy Cream (36–40% Fat): Adds luxurious mouthfeel, aids in whipability, and contributes to clean-set firmness when chilled. Lower-fat creams (like half-and-half or whole milk) won’t whip properly and risk a runny, unstable filling.
- Vanilla Extract (Pure, Not Imitation): Deepens flavor with warm, floral notes. Alcohol-based pure extract integrates seamlessly and enhances other aromatics—imitation versions taste flat and chemical.
- Unflavored Gelatin (Optional but Recommended for Stability): A small amount (¼–½ tsp per 2 cups filling) reinforces structure—especially important for layered jars, transport, or warm-weather serving. Bloomed in cold water then gently melted, it prevents slumping without altering flavor or texture.
- Sour Cream or Greek Yogurt (Optional Enhancer): Adds brightness, balances sweetness, and introduces subtle acidity for depth—mimicking traditional baked cheesecake’s complexity. Full-fat plain Greek yogurt offers a slightly healthier twist with added protein.
- Pinch of Fine Sea Salt: Not for saltiness—but to heighten all other flavors, reduce perceived cloyingness, and harmonize sweet-tart balance.
Each ingredient plays a functional *and* sensory role—omitting or substituting without understanding its purpose risks compromising texture, stability, or taste.
Step-by-Step Recipe
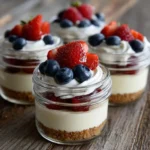
- Prepare Your Jars: Select 4-ounce wide-mouth mason jars, reusable glass dessert cups, or vintage-style apothecary jars (ensure they’re clean, dry, and chill-resistant). Place them on a tray or baking sheet for stability during assembly.
- Make the Crust Layer: In a food processor or zip-top bag with rolling pin, pulse 1½ cups graham cracker crumbs (about 10 full sheets) until fine. Add 3 tbsp melted unsalted butter and 1 tbsp granulated sugar; pulse or stir until evenly moistened and clumping when squeezed. Divide evenly among jars (approx. 2 tbsp per 4 oz jar), then firmly press down using the back of a spoon or a small tamper. Refrigerate uncovered for at least 15 minutes to set.
- Softening & Prepping Cream Cheese: Remove 16 oz (2 standard blocks) full-fat cream cheese from refrigerator 1–1.5 hours before use. It should yield slightly to gentle pressure—not squishy, not rock-hard. Cut into 1-inch cubes for even, rapid softening.
- Whip the Filling Base: In the bowl of a stand mixer fitted with the paddle attachment (or using a hand mixer + large bowl), beat softened cream cheese on medium-low for 1 minute until smooth and glossy—scraping sides and bottom halfway. Add ¾ cup powdered sugar and 1 tsp pure vanilla; beat 1 more minute until fully incorporated and airy. Scrape thoroughly.
- Incorporate Acid & Stabilizers: Beat in ½ cup full-fat sour cream (or plain Greek yogurt) and ¼ tsp fine sea salt on low until just combined—do not overmix. If using gelatin: bloom ½ tsp unflavored gelatin in 1 tbsp cold water for 5 minutes, then gently warm in microwave (5–8 sec) until liquid—no bubbles. With mixer running on low, slowly drizzle in melted gelatin; mix 15 seconds only.
- Whip the Cream: In a separate chilled bowl, whip 1 cup very cold heavy cream (chill bowl & beaters 10 min prior) on medium-high until soft peaks form—about 1 minute 30 seconds. Do not overwhip to stiff or grainy.
- Fold, Don’t Beat: Using a flexible silicone spatula, gently fold whipped cream into cream cheese mixture in 3 additions—cutting down center, sweeping around bottom, and lifting up—until *just* uniform. Overmixing deflates air, causing denseness or separation.
- Layer with Intention: Spoon or pipe filling over chilled crust—fill to within ¼ inch of rim. Tap jar lightly on counter once to release air bubbles and level surface.
- Chill Strategically: Cover jars loosely with parchment or plastic wrap (avoid touching surface). Refrigerate upright for minimum 6 hours—but ideally 10–12 hours or overnight. This slow, steady chilling allows full gelatin setting, fat crystallization, and flavor melding—critical for clean sliceability and balanced tang.
- Add Final Flourishes: Just before serving, top each jar with your choice: fresh berries, berry compote, salted caramel drizzle, toasted coconut flakes, edible flowers, crumbled cookies, or a delicate mint sprig. For extra elegance, pipe a rosette of stabilized whipped cream on top.
Tips
- Temperature Is Everything: Cold cream = stable whipped cream. Room-temp cream cheese = lump-free filling. Chilled bowls/beaters = faster, stiffer peaks. Never skip tempering ingredients—this is the #1 cause of failure.
- Measure by Weight When Possible: 1 cup graham cracker crumbs = ~100g; 1 cup powdered sugar = ~120g. Volume measurements vary wildly based on packing—weight guarantees consistency.
- Acid Balance Matters: If your filling tastes overly sweet or flat, add ½ tsp fresh lemon juice or ¼ tsp apple cider vinegar—it brightens without making it “lemony.”
- Prevent Weeping: Avoid opening the fridge frequently during chilling. Condensation forms, then drips onto filling. Also, ensure gelatin is fully dissolved—not granular—and never boiled.
- Crust Crispness Hack: For extra crunch that lasts 48+ hours, toast graham cracker crumbs in a dry skillet over medium-low heat for 3–4 minutes before mixing with butter.
- Smooth Surface Secret: After layering filling, dip a metal offset spatula or knife in hot water, dry thoroughly, then gently glide across surface for a mirror finish.
- Storage Without Sogginess: Store assembled jars (untopped) in fridge for up to 5 days. Add wet toppings (compotes, sauces) only within 2 hours of serving to preserve texture.
- Freezing Success: Fully assembled, unfrosted jars freeze beautifully for up to 3 weeks. Thaw overnight in fridge—not at room temp—to retain texture and prevent condensation rings.
- Scale With Confidence: This recipe yields 8–10 (4 oz) jars. To double: use same ratios—but mix filling in two batches to avoid overloading mixer and overheating motor.
- Sanitize Your Tools: Wipe beaters, spatulas, and bowls with vinegar or food-safe sanitizer before use—residual grease or sugar crystals can destabilize whipped cream.
Variations and Customizations
Let your imagination—and pantry—lead the way. These variations maintain structural integrity while offering bold new experiences:
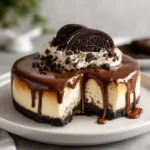
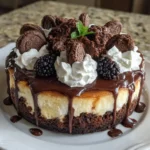
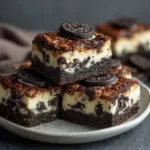
- Chocolate Lover’s Jar: Add ¼ cup sifted unsweetened cocoa powder + 2 tbsp melted dark chocolate (cooled) to cream cheese base. Top with chocolate shavings and raspberries.
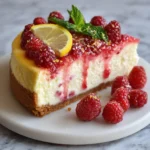
- Lemon Blueberry Swirl: Fold in ⅓ cup lemon curd + ½ cup fresh blueberries (lightly tossed in 1 tsp cornstarch to absorb juice) in ribbons—not fully mixed—for marbled effect.
- Matcha Green Tea: Whisk 1½ tsp ceremonial-grade matcha into powdered sugar before adding to cream cheese. Garnish with white chocolate curls and black sesame seeds.
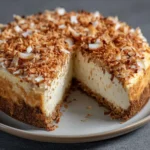
- Maple Pecan Crunch: Replace graham crust with maple-sweetened pecan-oat crumble (toasted pecans, rolled oats, maple syrup, butter). Top with candied pecans and bourbon-maple drizzle.
- Strawberry Balsamic: Simmer 1 cup sliced strawberries + 1 tbsp balsamic vinegar + 2 tbsp honey until thick (10 min). Cool completely, then layer 1 tbsp beneath filling and swirl 1 tsp on top before chilling.
- Vegan Version: Use soaked cashews (1½ cups), coconut cream (1 can, chilled), maple syrup (⅓ cup), lemon juice (2 tbsp), vanilla, and agar-agar (1 tsp bloomed) instead of dairy and gelatin. Soak cashews overnight or boil 15 min for creaminess.
- Protein-Powered: Blend in 2 scoops unflavored collagen peptides or vanilla whey isolate (ensure it dissolves fully in warm cream cheese mixture) —adds 15–20g protein per jar without altering texture.
- Earl Grey Infusion: Steep 2 Earl Grey tea bags in ¼ cup warm heavy cream for 5 min, strain, cool completely, then whip into cream. Add 1 tsp bergamot extract to filling for aromatic lift.
- Spiced Chai: Infuse cream with 1 cinnamon stick, 4 cardamom pods, 3 cloves, and ½ tsp black peppercorns (simmer 5 min, cool, strain). Stir in 1 tsp ground ginger + pinch of nutmeg to filling.
- Black Forest Style: Layer crust → 1 tsp cherry compote → filling → top with dark chocolate curls, fresh cherries, and kirsch-infused whipped cream.
Pro tip: Keep a “flavor journal” noting ratios, textures, and guest feedback—your personal R&D lab for next-level jars.
Health Considerations and Nutritional Value
A single 4-ounce Mini No-Bake Cheesecake Jar (standard graham crust, full-fat dairy, no added toppings) contains approximately:
- Calories: 320–360 kcal
- Total Fat: 22–25g (14–16g saturated)
- Carbohydrates: 28–32g (22–26g sugars, primarily from added sugar & graham crackers)
- Protein: 5–7g
- Sodium: 220–280mg
- Calcium: ~60mg (10% DV from dairy)
- Vitamin A: ~120mcg RAE (15% DV from cream cheese & heavy cream)
Nutritionally Speaking: While undeniably indulgent, this dessert delivers valuable nutrients—including bone-supportive calcium and vitamin A, satiating healthy fats, and gut-friendly probiotics (if using live-culture sour cream or yogurt). That said, mindful modifications can enhance nutritional alignment without sacrificing joy:
- Lower-Sugar Options: Reduce powdered sugar to ½ cup and boost flavor with 1 tsp vanilla bean paste, ¼ tsp almond extract, or citrus zest. Or use monk fruit–erythritol blend (1:1 ratio).
- Increased Fiber: Swap half the graham crumbs for toasted oat or flaxseed meal (2 tbsp per jar adds 1.5g fiber and omega-3s).
- Boosted Protein: Incorporate 1 scoop unflavored collagen or plant-based protein (pea/rice blend). Ensure it’s cold-soluble and add during cream cheese mixing phase.
- Reduced Saturated Fat: Substitute half the heavy cream with chilled coconut cream (the thick top layer only)—adds MCTs and tropical nuance. Note: flavor shifts subtly.
- Allergen Awareness: For nut-free: avoid almond flour crusts and check graham cracker labels (some contain soy or wheat derivatives). For dairy-free: use certified vegan cream cheese, coconut cream, and agar-agar.
- Portion Mindfulness: At 4 oz, these jars naturally support intuitive eating—smaller than traditional slices (often 6–8 oz), with built-in visual cues to pause and savor.
Remember: Nutrition is holistic. Enjoying a well-made, lovingly prepared treat contributes to emotional wellness, social connection, and culinary confidence—equally vital components of a balanced life.
Ingredients
Makes 8–10 (4 oz) jars
- 1½ cups (100g) graham cracker crumbs (about 10 full sheets; gluten-free or honey-free if needed)
- 3 tablespoons (42g) unsalted butter, melted and slightly cooled
- 1 tablespoon (12g) granulated sugar (optional, for crust)
- 16 ounces (454g) full-fat brick-style cream cheese, room temperature
- ¾ cup (90g) powdered sugar, sifted
- 1 teaspoon (5ml) pure vanilla extract
- ½ cup (120g) full-fat sour cream or plain whole-milk Greek yogurt
- ¼ teaspoon fine sea salt
- ½ teaspoon (2g) unflavored gelatin (optional but highly recommended for stability)
- 1 tablespoon (15ml) cold water (for blooming gelatin)
- 1 cup (240ml) very cold heavy whipping cream (36–40% fat)
- Optional Toppings: Fresh seasonal berries, berry compote, salted caramel, toasted nuts, edible flowers, mint, lemon zest, chocolate shavings
Directions
- Prep Jars & Chill: Wash and dry eight to ten 4-ounce wide-mouth mason jars or dessert glasses. Arrange on a rimmed baking sheet for easy handling. Place in refrigerator for 10 minutes to chill.
- Make Crust: In a medium bowl, combine graham cracker crumbs, melted butter, and optional granulated sugar. Mix with fork until evenly moistened and clumping. Divide evenly among chilled jars (~2 tablespoons per jar). Press firmly with back of spoon or small measuring cup to create compact, even layer. Refrigerate uncovered for 15 minutes.
- Bloom Gelatin (if using): In a small dish, sprinkle gelatin over cold water. Let sit 5 minutes until spongy. Microwave on low for 5–8 seconds until fully liquefied—do not boil. Set aside.
- Cream Cheese Base: In bowl of stand mixer with paddle attachment (or large mixing bowl), beat room-temperature cream cheese on medium-low for 60 seconds until smooth and creamy. Scrape bowl. Add powdered sugar and vanilla; beat 1 minute until light and fluffy. Scrape again.
- Add Acid & Salt: Beat in sour cream (or yogurt) and sea salt on low speed until just combined—about 20 seconds. Scrape bowl. With mixer on low, slowly drizzle in bloomed gelatin; mix 15 seconds only.
- Whip Cream: In separate chilled bowl, whip cold heavy cream with hand or stand mixer on medium-high until soft peaks form—about 1 min 20 sec. Do not overwhip.
- Fold Gently: Using silicone spatula, fold one-third of whipped cream into cream cheese mixture until mostly combined. Repeat twice more, rotating bowl and folding from bottom upward—stopping as soon as no streaks remain. Overmixing causes density or separation.
- Layer & Chill: Spoon filling over chilled crust, filling to ¼ inch below rim. Tap jar once on counter. Cover loosely with parchment or plastic wrap (not touching surface). Refrigerate upright for minimum 6 hours—but best results at 10–12 hours or overnight.
- Finish & Serve: Within 2 hours of serving, add desired toppings. Serve chilled straight from fridge. Store covered in refrigerator up to 5 days (toppings added separately).
FAQ
- Can I make these ahead for a party?
- Absolutely! Assemble up to 3 days in advance (without fresh fruit or sauce toppings). They taste even better on Day 2 as flavors deepen. Add delicate garnishes just before guests arrive.
- Why did my filling get grainy or lumpy?
- Almost always due to cold cream cheese. Even “room temp” from the fridge isn’t enough—let it sit 90 minutes. Also, beating too fast or too long after adding cold ingredients can cause curdling. Always mix on low and scrape thoroughly.
- Can I use low-fat cream cheese or Neufchâtel?
- We strongly advise against it. These contain higher water content and stabilizers that impede proper emulsification, leading to weeping, splitting, or a rubbery texture. Full-fat is non-negotiable for authentic richness and stability.
- My crust is soggy after chilling—what went wrong?
- Two likely culprits: (1) Butter was too hot when mixed—melting crumbs instead of binding them; let butter cool 2 minutes after melting. (2) Filling was added while still warm or not fully chilled—always wait 15 min after pressing crust before adding filling.
- How do I prevent air bubbles in the filling?
- Tap jars firmly (but gently) on counter after filling. Also, avoid overmixing whipped cream into base—fold slowly and deliberately. Letting filling rest 5 minutes before layering also allows micro-bubbles to rise and pop.
- Can I use flavored yogurt instead of sour cream?
- Plain, unsweetened Greek yogurt works beautifully. Flavored yogurts contain added sugars, thickeners, and acids that destabilize the emulsion and mute cheesecake flavor—stick with unflavored varieties.
- Is there a substitute for gelatin if I’m vegetarian or vegan?
- Yes—agar-agar powder (1 tsp agar + 1 tbsp cold water, simmered 1 minute, cooled slightly) works well. For vegan versions, use kappa carrageenan (½ tsp) or commercial vegan gelatin blends designed for dairy-free applications.
- Can I pipe the filling instead of spooning?
- Yes—with caveats. Use a large star tip and chilled piping bag. Fill no more than ⅔ full to avoid warming filling. Pipe slowly and steadily. Chilled filling holds shape best—don’t attempt if ambient temperature exceeds 72°F.
- What’s the best way to transport these?
- Place jars upright in a rigid container lined with non-slip mat or folded towel. Keep chilled with ice packs inside insulated cooler bag. Avoid stacking or jostling. Ideal for picnics, potlucks, or office treats.
- Can kids help make these?
- Yes! It’s a fantastic family activity. Kids can measure crumbs, stir crust mixture, press bases, fold whipped cream (with supervision), and choose fun toppings. No oven = safe, joyful participation.
Summary
Mini No-Bake Cheesecake Jars are an elegantly simple, endlessly adaptable dessert that transforms humble pantry staples into restaurant-worthy individual treats—requiring no oven, no water bath, and minimal active time, yet delivering rich, creamy satisfaction with every spoonful.
With smart ingredient choices, temperature discipline, and creative customization options—from vegan and keto-friendly swaps to globally inspired flavor infusions—they delight every palate, accommodate diverse dietary needs, and turn everyday moments into memorable celebrations.