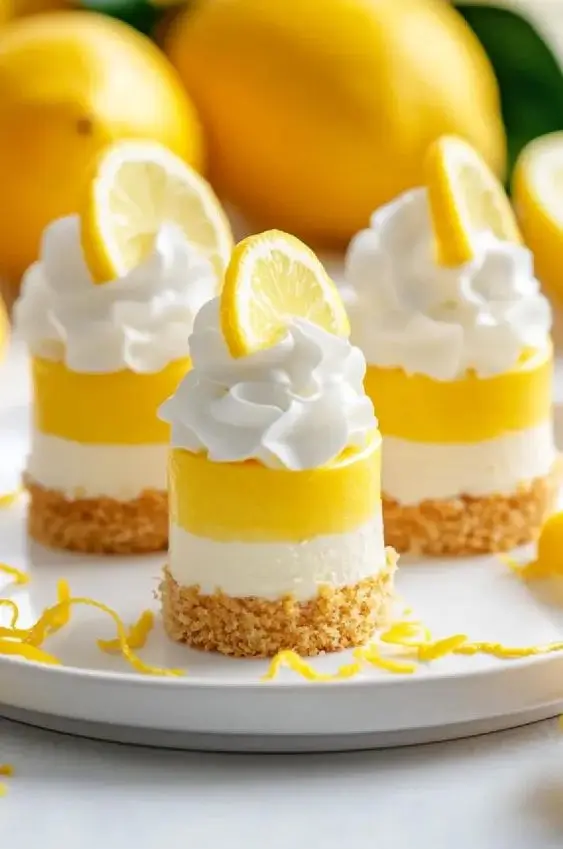
Mini Lemon Cheesecake Recipe: Easy Printable Dessert (PDF Download)
The History of Mini Lemon Cheesecake
Cheesecake has a history that stretches back thousands of years, with origins believed to date as far back as ancient Greece. The Greeks served cheesecakes at athletic events like the first Olympic Games in 776 BC, believing the rich dessert provided strength and energy. When the Romans conquered Greece, they adopted the recipe and spread it throughout their empire. Over centuries, cheesecake evolved across Europe, with each region adding its own twist—whether through cheese type, crust ingredients, or flavorings.
Lemon cheesecake, specifically, gained popularity in the 20th century as citrus flavors became more accessible and desirable in Western desserts. The bright, tangy zest of lemon provided a refreshing contrast to the creamy richness of traditional cheesecake. As home baking surged during the mid-1900s, especially in the United States, bakers began experimenting with individual-sized portions. Mini cheesecakes emerged as a convenient, elegant option for parties, potlucks, and family dinners—offering all the decadence of full-sized cheesecake without the need for slicing or serving platters.
Today, mini lemon cheesecakes are beloved for their perfect balance of sweet and tart, portable size, and versatility. They’ve become a staple in dessert rotations, appearing on holiday tables, bridal showers, and summer picnics. With modern tools like muffin tins and springform pans, creating these bite-sized treats is easier than ever—even for beginner bakers. This recipe honors that legacy while making it simple, foolproof, and deliciously satisfying every time.
Ingredients Breakdown
Understanding each ingredient helps ensure your mini lemon cheesecakes turn out perfectly creamy, zesty, and structurally sound. Here’s a detailed look at what goes into this delightful dessert:
- Cream Cheese (full-fat, softened): The star of any cheesecake. Using room-temperature cream cheese ensures a smooth, lump-free batter. Low-fat versions can result in a denser texture and may crack during baking.
- Granulated Sugar: Adds sweetness and helps create a tender crumb. It also contributes to the slight caramelization on the edges when baked.
- Eggs (room temperature): Act as a binder and provide structure. Cold eggs can cause the mixture to curdle, so warming them slightly before use is recommended.
- Fresh Lemon Juice: Provides the signature tartness and brightness. Always opt for freshly squeezed juice—bottled lemon juice lacks the vibrant flavor and can taste artificial.
- Lemon Zest: Packed with aromatic oils, zest intensifies the lemon flavor without adding extra liquid. Use a fine grater and avoid the bitter white pith.
- Vanilla Extract: Enhances overall flavor complexity and rounds out the sharpness of the lemon.
- Sour Cream (or Greek yogurt): Adds moisture, tang, and silkiness to the filling. It prevents the cheesecakes from becoming too dense.
- Flour or Cornstarch (optional but recommended): A small amount stabilizes the batter, reducing the chance of cracking and improving texture.
- Graham Cracker Crumbs: Forms the base of the crust. You can substitute digestive biscuits, vanilla wafers, or even shortbread cookies for variation.
- Melted Butter: Binds the crumbs together and adds richness. Unsalted butter gives you better control over salt levels.
- Brown Sugar (optional in crust): Deepens the flavor of the crust with a hint of molasses-like warmth.
- Salt: A pinch enhances all other flavors and balances sweetness.
For garnish and finishing touches:
- Whipped Cream: Lightly sweetened whipped cream adds a cloud-like finish.
- Lemon Slices or Twists: For visual appeal and an extra burst of citrus aroma.
- Fresh Berries: Raspberries, blueberries, or strawberries complement the lemon flavor beautifully.
- Lemon Glaze: A simple mix of powdered sugar and lemon juice drizzled over cooled cheesecakes for shine and added sweetness.
Step-by-Step Recipe
- Prepare Your Muffin Tin: Preheat your oven to 325°F (160°C). Line a standard 12-cup muffin tin with parchment paper liners or aluminum foil liners. Alternatively, grease each cup lightly with non-stick spray if not using liners. Parchment makes removal much easier and prevents sticking.
- Make the Crust: In a medium bowl, combine 1 ½ cups graham cracker crumbs, ¼ cup granulated sugar, ⅛ tsp salt, and 6 tablespoons melted unsalted butter. Mix until the crumbs resemble wet sand and hold together when pressed. Spoon about 1–2 tablespoons of the mixture into each muffin cup and press firmly with the back of a spoon or a small measuring cup to form an even layer. Chill in the refrigerator while you prepare the filling.
- Beat the Cream Cheese: In a large mixing bowl, beat 24 oz (three 8-oz packages) of softened cream cheese with an electric mixer on medium speed until smooth and creamy, about 2 minutes. Scrape down the sides of the bowl as needed.
- Add Sugar and Vanilla: Gradually add ⅔ cup granulated sugar and 1 tsp vanilla extract. Beat until fully incorporated and fluffy, another 1–2 minutes.
- Incorporate Eggs: Add 3 large room-temperature eggs one at a time, beating just until each is blended. Do not overmix—this can incorporate too much air and lead to cracking.
- Stir in Sour Cream and Lemon: Gently fold in ⅓ cup sour cream (or Greek yogurt), 3 tablespoons fresh lemon juice, 1 tablespoon finely grated lemon zest, and 1 tablespoon all-purpose flour (or cornstarch). Mix on low speed or by hand until uniform. Overmixing after adding eggs increases the risk of cracks.
- Fill the Cups: Remove the muffin tin from the fridge. Divide the batter evenly among the prepared cups, filling each about ¾ full. Tap the tin gently on the counter to release any trapped air bubbles.
- Bake: Place the muffin tin in the center of the preheated oven. Bake for 18–22 minutes, or until the edges are set and the centers have a slight jiggle (like Jell-O). They will continue to firm up as they cool.
- Cool Gradually: Turn off the oven, crack the door open slightly, and let the cheesecakes sit inside for 15 minutes. This gradual cooling helps prevent sudden temperature changes that cause cracks.
- Chill Thoroughly: Remove from the oven and cool completely at room temperature. Then refrigerate for at least 4 hours, preferably overnight, to allow the texture to fully set.
- Serve: Carefully lift the cheesecakes out using the parchment edges. Top with whipped cream, lemon zest, berries, or glaze before serving.
Tips for Perfect Mini Lemon Cheesecakes
- Room-Temperature Ingredients Are Key: Cold cream cheese or eggs can cause lumps and uneven texture. Take all dairy products out 1–2 hours before baking.
- Avoid Overmixing: Once you add the eggs, mix only until combined. Excess air leads to rising and falling, which causes cracks.
- Use Fresh Lemons: Bottled lemon juice often contains preservatives and lacks the bright, clean flavor of fresh-squeezed juice.
- Don’t Skip the Water Bath (Optional but Helpful): For ultra-smooth texture, place the muffin tin inside a larger roasting pan filled with ½ inch of hot water. This steam bath regulates heat and prevents cracking.
- Line with Parchment: Cut strips of parchment paper long enough to hang over the edges of each cup. These act as handles for easy removal after chilling.
- Prevent Sticking: Even with liners, lightly greasing the bottom ensures seamless release.
- Chill Before Serving: These must be cold to achieve the proper creamy consistency. Never serve warm.
- Freeze for Later: Wrap individually in plastic wrap and freeze for up to 2 months. Thaw in the fridge overnight.
- Wipe the Bowl: After scraping down the sides, wipe the mixer beaters and inside of the bowl with a damp cloth to remove any stray crumbs or residue.
- Test Doneness Properly: The center should still wobble slightly when gently shaken. If it looks dry or puffed, they’re overbaked.
Variations and Customizations
This mini lemon cheesecake recipe is incredibly adaptable. Try these creative twists to suit different tastes, seasons, or dietary needs:
- Berry Swirl: Drop a teaspoon of raspberry or strawberry puree onto each filled cup and swirl with a toothpick before baking.
- Lime or Orange Version: Replace lemon juice and zest with lime or orange for a tropical twist. Pair lime with coconut crust for a piña colada vibe.
- Gluten-Free Option: Use gluten-free graham crackers or almond flour for the crust, and replace flour with cornstarch or arrowroot powder.
- Dairy-Free/Vegan Cheesecake: Substitute cream cheese with cashew-based vegan cream cheese, use plant-based butter, and replace eggs with flax eggs or commercial egg replacers (results may vary; best with tested vegan recipes).
- Crust Alternatives: Try crushed Oreos, ginger snaps, shortbread, or chocolate cookies for a richer base. Add cocoa powder to graham crumbs for a chocolate crust.
- Herbal Infusion: Add a few drops of lavender extract or finely chopped fresh basil for an unexpected herbal note that pairs well with lemon.
- Mini Mason Jar Cheesecakes: Skip baking altogether—layer no-bake filling with crust in small mason jars and chill. Great for outdoor events without access to an oven.
- Chocolate-Dipped: After chilling, dip the bottom half in melted white or dark chocolate and sprinkle with zest or crushed nuts.
- Almond Flavor: Add ½ tsp almond extract to the filling for a marzipan-like depth.
- Honey-Sweetened: Replace granulated sugar with honey (reduce liquid slightly elsewhere) for a floral sweetness.
- Protein Boost: Stir in unflavored collagen peptides or protein powder (adjust liquids accordingly) for a more satiating treat.
Health Considerations and Nutritional Value
While mini lemon cheesecakes are undeniably indulgent, understanding their nutritional profile can help you enjoy them mindfully:
Nutrition Facts (per serving, approximately one mini cheesecake):
- Calories: ~280–320
- Total Fat: 20–24g (mostly saturated from cream cheese and butter)
- Carbohydrates: 22–26g
- Sugars: 16–19g (natural and added)
- Protein: 5–6g
- Cholesterol: ~55mg
- Sodium: ~200–250mg
- Dietary Fiber: 0.5–1g (unless using whole grain crust)
Health Notes:
- High in Saturated Fat: Due to cream cheese, butter, and egg yolks. Enjoy in moderation, especially if monitoring heart health.
- Calcium Source: Cream cheese and sour cream contribute calcium, supporting bone health.
- Lemon Benefits: Rich in vitamin C and antioxidants, which support immune function and skin health.
- Low Fiber: Traditional recipe lacks fiber. Increase it by using whole wheat crumbs, oats, or nut-based crusts.
- Suitable for Keto? Not traditionally. High in sugar and carbs. For keto versions, use erythritol or monk fruit sweetener, almond flour crust, and reduce portion size.
- Allergens: Contains dairy, eggs, wheat (in graham crackers), and potential gluten. Always check labels if serving those with allergies.
- Balanced Indulgence: Pair with a side of mixed berries or a green salad to balance the meal nutritionally.
Ingredients
- 1 ½ cups graham cracker crumbs (about 10 full sheets)
- 6 tbsp unsalted butter, melted
- ¼ cup granulated sugar (for crust)
- ⅛ tsp salt (for crust)
- 24 oz (three 8-oz blocks) full-fat cream cheese, softened
- ⅔ cup granulated sugar (for filling)
- 3 large eggs, room temperature
- ⅓ cup sour cream or plain Greek yogurt
- 3 tbsp fresh lemon juice (about 1–2 lemons)
- 1 tbsp lemon zest (from 1–2 lemons)
- 1 tsp vanilla extract
- 1 tbsp all-purpose flour or cornstarch
- Optional: Whipped cream, berries, lemon slices, or glaze for topping
Directions
- Preheat oven to 325°F (160°C). Line a 12-cup muffin tin with parchment or foil liners. Lightly grease if needed.
- In a bowl, mix graham cracker crumbs, ¼ cup sugar, salt, and melted butter. Press 1–2 tbsp into each cup. Chill.
- In a large bowl, beat cream cheese until smooth. Add ⅔ cup sugar and vanilla; beat until fluffy.
- Add eggs one at a time, mixing just until incorporated. Do not overbeat.
- Fold in sour cream, lemon juice, lemon zest, and flour/cornstarch. Mix until smooth.
- Divide batter evenly over crusts, filling ¾ full. Tap tin to remove air bubbles.
- Bake 18–22 minutes until edges are set and centers jiggle slightly.
- Turn off oven, open door, and let sit 15 minutes. Cool completely on counter.
- Refrigerate at least 4 hours or overnight.
- Remove using parchment tabs. Garnish and serve chilled.
FAQ
Q: Can I make these ahead of time?
A: Absolutely! These keep well refrigerated for up to 5 days or frozen for 2 months. Make them 1–2 days in advance for stress-free entertaining.
Q: Why did my cheesecakes crack?
A: Cracking usually results from overmixing, sudden temperature changes, or overbaking. Use room-temp ingredients, avoid overbeating, and cool gradually in the oven.
Q: Can I use a different pan?
A: Yes! A silicone muffin pan works well and allows easy release. Mini tart pans or silicone molds also work but may require longer setting time.
Q: How do I get smooth batter?
A: Ensure all ingredients are room temperature. Beat cream cheese thoroughly before adding others. Strain the batter through a fine sieve if needed for silkiness.
Q: Can I make a no-bake version?
A: Yes, though texture differs. Use melted gelatin or agar-agar to set the filling and chill for 6+ hours. Best with stabilized whipped cream.
Q: Are mini cheesecakes supposed to wobble?
A: Yes—the center should jiggle slightly when done. They firm up fully after chilling.
Q: Can I double the recipe?
A: Yes, but bake in batches unless you have two muffin tins. Overcrowding affects airflow and baking time.
Q: What’s the best way to store leftovers?
A: Keep covered in the refrigerator. Place parchment between layers if stacking. Freeze without toppings for best quality.
Q: Can I use low-fat cream cheese?
A: Not recommended. It results in a less creamy texture and may cause curdling or weeping.
Q: How do I prevent soggy crusts?
A: Pre-bake the crust for 5–7 minutes at 325°F before filling. Let cool slightly before adding batter.
Summary
These mini lemon cheesecakes deliver a burst of citrusy freshness in a creamy, dreamy bite-sized package—perfect for any occasion. Easy to make, customizable, and sure to impress, they’re a timeless dessert favorite.