Introduction
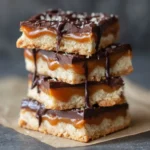
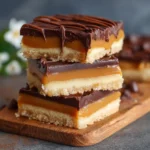
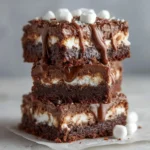
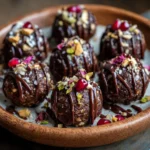
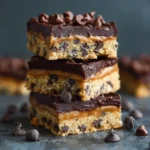
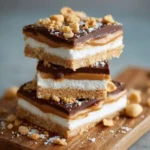
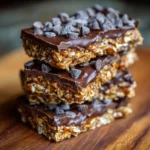
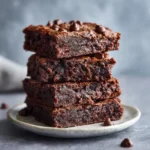
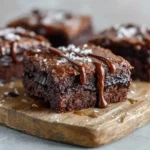
Marshmallow Chocolate Fudge Bars are the ultimate indulgence—a rich, decadent, no-bake (or minimal-bake) dessert that marries the deep, velvety intensity of premium chocolate with the airy, pillowy sweetness of marshmallows and the dense, chewy luxury of fudge. These bars deliver a symphony of textures: a crisp, slightly crumbly base (often graham cracker or chocolate wafer), a molten layer of bittersweet or semi-sweet chocolate ganache or fudge, crowned with toasted marshmallows that blister and caramelize at the edges—creating golden-brown peaks and smoky-sweet pockets of air. Whether served at holiday gatherings, summer barbecues, birthday parties, or simply as a weekend treat to uplift the spirit, these bars consistently earn rave reviews for their nostalgic charm, stunning visual appeal, and deeply satisfying flavor profile. They’re more than just a dessert—they’re a sensory experience: glossy chocolate sheen, crackling marshmallow crust, soft give under the fork, and a lingering cocoa finish balanced by gentle vanilla and caramelized sugar notes.
The History
The origins of Marshmallow Chocolate Fudge Bars trace back to mid-20th-century American home baking culture—a time when convenience met creativity, and pantry staples were transformed into showstopping sweets. While traditional fudge dates to the late 1800s (with documented recipes appearing in Boston and Baltimore cookbooks by the 1880s), the marriage of fudge with marshmallows emerged more distinctly in the post-WWII era, fueled by the mass availability of shelf-stable marshmallows (thanks to innovations like Jet-Puffed by Kraft in 1955) and the rise of “bars” as a popular, shareable, slice-and-serve format. The iconic “Rocky Road” concept—originally a chocolate ice cream flavor invented in Oakland, CA in 1920 featuring nuts and marshmallows—laid conceptual groundwork; bakers soon adapted its trio of chocolate, nuts, and marshmallows into baked and no-bake bar formats. By the 1960s and ’70s, community cookbooks, Betty Crocker publications, and women’s magazines featured variations under names like “Chocolate Marshmallow Squares,” “Fudgy Campfire Bars,” and “S’mores Bars”—the latter gaining momentum alongside the cultural ubiquity of campfire cooking and the s’mores tradition. Modern iterations evolved with gourmet ingredients (Valrhona chocolate, Madagascar bourbon vanilla, artisanal sea salt), refined techniques (torched vs. broiled marshmallows), and dietary adaptations (vegan marshmallows, gluten-free crusts, keto-friendly sweeteners). Today, Marshmallow Chocolate Fudge Bars stand as both a beloved retro classic and a canvas for contemporary pastry innovation—honoring history while embracing evolution.
Ingredients Breakdown
Every exceptional batch begins with intentionality—not just measuring, but understanding *why* each ingredient matters:
- Base Layer: Graham cracker crumbs (or digestive biscuits/chocolate wafers) provide structure and a subtle honeyed, buttery counterpoint. Melted unsalted butter binds them, while a touch of brown sugar adds molasses depth and enhances browning during pre-baking.
- Fudge Layer: High-quality semi-sweet or bittersweet chocolate (60–70% cocoa) forms the core richness. Granulated sugar ensures proper texture development and prevents graininess; light corn syrup (or golden syrup) inhibits sugar crystallization for silkiness; heavy cream delivers fat and moisture for melt-in-the-mouth consistency; unsalted butter adds gloss and mouthfeel; pure vanilla extract rounds out flavor; and a pinch of flaky sea salt intensifies chocolate notes and balances sweetness.
- Marshmallow Topping: Large marshmallows (not mini) offer optimal surface area for toasting and structural integrity. Their composition—gelatin, corn syrup, sugar, and vanilla—creates the signature puff and caramelization. For vegan versions, agar-based or carrageenan-enriched marshmallows (like Dandies or Sweet & Sara) are essential—and require slight adjustments in toasting time due to different melting points.
- Optional Enhancements: Toasted walnuts or pecans add crunch and nutty bitterness; espresso powder amplifies chocolate without adding coffee flavor; a drizzle of caramel or dulce de leche introduces buttery complexity; flaky Maldon salt sprinkled post-toasting provides bursts of salinity; and a dusting of cocoa powder or crushed freeze-dried raspberries adds visual contrast and bright acidity.
Step-by-Step Recipe
- Prepare the Pan: Line a 9×13-inch metal baking pan with two overlapping sheets of parchment paper, allowing generous overhang on two opposite sides for easy lifting. Lightly grease the parchment and pan edges with butter or nonstick spray.
- Make the Crust: In a food processor, pulse 1 ½ cups graham cracker crumbs (about 10 full sheets), ¼ cup packed light brown sugar, and ¼ tsp fine sea salt until combined. Add 6 tbsp melted unsalted butter and pulse until mixture resembles wet sand. Transfer to the prepared pan and press firmly and evenly into the bottom using the back of a measuring cup or flat-bottomed glass. Refrigerate for 20 minutes (or freeze for 10) to set.
- Bake the Crust (Optional but Recommended): Preheat oven to 350°F (175°C). Bake chilled crust for 10–12 minutes until fragrant and lightly golden. Cool completely on a wire rack—this step prevents soggy bottoms and improves texture contrast.
- Prepare the Fudge Layer: In a medium heavy-bottomed saucepan, combine 1 cup heavy cream, 1 cup granulated sugar, ¼ cup light corn syrup, and ¼ tsp salt. Stir over medium heat until sugar dissolves, then bring to a full, rolling boil—do not stir once boiling begins. Clip a candy thermometer to the side and cook, swirling gently if needed, until mixture reaches 234°F (soft-ball stage), ~8–10 minutes. Remove from heat.
- Temper and Finish Fudge: Immediately pour hot syrup over 12 oz finely chopped high-quality chocolate (semi-sweet or bittersweet) and 6 tbsp cold unsalted butter, cut into small cubes, in a heatproof bowl. Let sit undisturbed for 2 minutes, then whisk gently from center outward until smooth, glossy, and fully emulsified—about 60–90 seconds. Stir in 1 ½ tsp pure vanilla extract and ½ tsp flaky sea salt. Pour immediately over cooled crust and spread evenly with an offset spatula. Tap pan sharply on counter 3–4 times to release air bubbles and level surface. Refrigerate uncovered for 45–60 minutes, until fudge layer is firm but still slightly cool to the touch (not cold).
- Toast the Marshmallows: Arrange 30–36 large marshmallows (2 per square, arranged snugly) in a single layer over the chilled fudge. For best results, use a kitchen torch: hold flame 3–4 inches away, moving steadily in circular motions until marshmallows puff, turn golden-brown, and develop delicate caramelized blisters (~60–90 seconds). Alternatively, broil on high for 60–90 seconds—watch constantly, rotating pan halfway, until evenly toasted (door ajar helps prevent overheating). Do not walk away—marshmallows ignite rapidly!
- Chill and Slice: Return bars to refrigerator for at least 2 hours (preferably overnight) to fully set layers and ensure clean cuts. Use a hot, dry knife (dipped in hot water and wiped dry between cuts) to slice into 3×4-inch bars (12 total) or 2×3-inch squares (24 smaller servings). Wipe knife thoroughly before each cut for pristine edges.
Tips
- Chocolate Quality Is Non-Negotiable: Use couverture or baking chocolate with at least 60% cocoa solids. Avoid chocolate chips—they contain stabilizers that hinder smooth melting and create a waxy texture.
- Crumb Consistency Matters: Graham cracker crumbs should be fine but not powdery. Too coarse = crumbly crust; too fine = greasy, dense base. Pulse in short bursts and check frequently.
- Thermometer Precision: A reliable digital candy thermometer is essential for fudge success. Calibrate it before use (ice water = 32°F / boiling water = 212°F at sea level). Undercooking yields sticky, soft fudge; overcooking causes graininess and hardness.
- Cool Before Toasting: Never toast marshmallows over warm fudge—the heat will cause them to slump, slide, or melt into the surface instead of puffing. Chill until surface is cool to the touch (about 65°F).
- Torch Technique: Keep the torch moving—pausing creates black spots. Aim for even golden-brown color with subtle blisters, not charred blackness. If using a broiler, position rack 6 inches below heating element and use the oven light—not opening the door—to monitor progress.
- Cutting Like a Pro: Warm your knife in hot water for 15 seconds, dry completely, slice firmly downward (no sawing), then wipe and reheat before next cut. For ultra-clean edges, chill bars for 10 minutes after cutting and serve straight from fridge.
- Storage Wisdom: Store covered in refrigerator for up to 1 week. For longer storage, freeze unfrosted (pre-toasted) bars for up to 3 months—thaw overnight in fridge, then torch marshmallows fresh before serving.
- Altitude Adjustments: At elevations above 3,000 ft, reduce fudge temperature by 2°F for every 1,000 ft (e.g., cook to 230°F at 5,000 ft) to compensate for lower boiling points.
Variations and Customizations
These bars invite endless creativity—here are rigorously tested, chef-approved adaptations:
- S’mores Deluxe: Add 1 cup toasted mini marshmallows + ¾ cup crushed graham crackers *into* the fudge layer before pouring. Top with whole marshmallows and finish with a drizzle of homemade salted caramel and crushed graham pieces.
- Espresso Dark Chocolate: Stir 1 tbsp instant espresso powder into hot cream mixture before boiling. Use 72% dark chocolate and top with dark chocolate shavings and a sprinkle of cocoa nibs.
- Peanut Butter Swirl: After pouring fudge, dollop ½ cup creamy peanut butter over surface. Use a knife to swirl gently—don’t overmix. Toast marshmallows as usual; garnish with roasted peanuts.
- Vegan & Gluten-Free: Use GF graham-style crackers or almond flour crust (1 ½ cups almond flour + ¼ cup coconut sugar + 5 tbsp melted coconut oil). Replace dairy cream with full-fat coconut milk (canned, shaken well), butter with refined coconut oil, and marshmallows with certified vegan brand. Set fudge layer in freezer for 90 minutes before torching.
- White Chocolate Raspberry: Substitute white chocolate for dark in fudge layer (reduce cream to ¾ cup; omit corn syrup). Fold in ½ cup freeze-dried raspberry powder before pouring. Top with marshmallows and finish with fresh raspberries and white chocolate curls.
- Spiced Mexican Hot Chocolate: Infuse cream with 1 cinnamon stick, 3 whole cloves, and ¼ tsp ancho chili powder (simmer 5 min, strain). Use bittersweet chocolate and add ¼ tsp ground cinnamon + pinch cayenne to fudge. Garnish with candied pepitas and flaky salt.
- Keto/Low-Sugar: Crust: 1 ¼ cups almond flour + ¼ cup powdered erythritol + 4 tbsp melted butter. Fudge: 8 oz sugar-free chocolate, ⅔ cup heavy cream, ¼ cup powdered erythritol, 2 tbsp MCT oil, 1 tsp vanilla. Skip marshmallows or use keto-certified version; torch briefly.
- Mini Mason Jar Version: Layer crust, chilled fudge, and 1–2 mini marshmallows in 4-oz wide-mouth mason jars. Torch individually with mini torch. Perfect for gifts or portion control.
Health Considerations and Nutritional Value
While Marshmallow Chocolate Fudge Bars are inherently indulgent, mindful preparation can enhance nutritional integrity without sacrificing pleasure:
- Macronutrient Profile (Per Standard 2×3-inch Bar): ~285–320 kcal | 16–18g total fat (9–11g sat) | 34–38g carbs (28–32g sugars) | 2.5–3.5g protein | 0.5g fiber. Primary sources: saturated fat from chocolate/butter, simple sugars from marshmallows/corn syrup, minimal protein.
- Chocolate Benefits: High-cocoa chocolate (>70%) contributes flavonoids (epicatechin, catechin) linked to improved endothelial function, reduced oxidative stress, and modest blood pressure support—when consumed in moderation (1–2 small squares daily).
- Marshmallow Notes: Traditional marshmallows contain gelatin (collagen-derived), offering negligible but bioavailable amino acids (glycine, proline); however, sugar content remains high. Vegan versions use tapioca/agar—fiber-free but allergen-friendly.
- Smart Swaps for Balance: Reduce added sugar by 15% in fudge layer (compensate with extra vanilla/sea salt); use dark chocolate with >70% cocoa; replace half the butter with avocado oil for monounsaturated fats; incorporate 2 tbsp ground flaxseed into crust for omega-3s and fiber.
- Dietary Restrictions: Naturally nut-free (verify labels on chocolate/marshmallows); easily made gluten-free (certified GF crackers); vegan options exist but require vigilance (many “marshmallow creme” products contain egg whites). Always check for soy lecithin, dairy derivatives, or artificial dyes if sensitivities exist.
- Mindful Enjoyment: Serve smaller portions (1.5×2 inches), pair with tart fruit (raspberries, orange segments) or unsweetened herbal tea to balance richness, and savor slowly—enhancing satiety signals and reducing likelihood of overconsumption.
Ingredients
- For the Crust:
- 1 ½ cups (150g) graham cracker crumbs (about 10 full sheets)
- ¼ cup (50g) packed light brown sugar
- ¼ tsp fine sea salt
- 6 tbsp (85g) unsalted butter, melted
- For the Fudge Layer:
- 1 cup (240ml) heavy cream (36–40% fat)
- 1 cup (200g) granulated sugar
- ¼ cup (60ml) light corn syrup
- ¼ tsp fine sea salt
- 12 oz (340g) high-quality semi-sweet or bittersweet chocolate (60–70% cocoa), finely chopped
- 6 tbsp (85g) unsalted butter, cold, cubed
- 1 ½ tsp pure vanilla extract
- ½ tsp flaky sea salt (e.g., Maldon), for finishing fudge layer
- For the Marshmallow Topping:
- 30–36 large marshmallows (standard 1-inch size)
- Optional: Flaky sea salt, chocolate shavings, toasted nuts, or caramel drizzle for garnish
Directions
- Line a 9×13-inch metal baking pan with parchment paper (two sheets, overlapping), leaving 2-inch overhang on two opposite sides. Lightly grease parchment and pan edges.
- In a food processor, combine graham cracker crumbs, brown sugar, and ¼ tsp salt; pulse to blend. Add melted butter and pulse until mixture resembles damp sand. Press firmly and evenly into pan bottom. Refrigerate 20 minutes.
- Preheat oven to 350°F (175°C). Bake crust 10–12 minutes until fragrant and lightly golden. Cool completely on wire rack (≈45 min).
- In heavy-bottomed saucepan, combine cream, sugar, corn syrup, and ¼ tsp salt. Stir over medium heat until sugar dissolves. Bring to full, rolling boil—do not stir. Attach candy thermometer. Boil until 234°F (soft-ball stage), 8–10 minutes. Remove from heat.
- Immediately pour hot mixture over chopped chocolate and cold butter in heatproof bowl. Let sit 2 minutes. Whisk gently from center outward until smooth and glossy (60–90 sec). Stir in vanilla and ½ tsp flaky salt.
- Pour fudge over cooled crust. Spread evenly with offset spatula. Tap pan sharply 3–4 times. Refrigerate uncovered 45–60 minutes until firm but cool to touch.
- Arrange marshmallows snugly in single layer over fudge. Using kitchen torch, toast evenly until puffed and golden-brown (60–90 sec). Watch closely.
- Refrigerate bars at least 2 hours (ideally overnight). Using hot, dry knife, cut into 12 (3×4) or 24 (2×3) bars, wiping knife clean between cuts.
- Store covered in refrigerator up to 1 week. Serve chilled for cleanest texture.
FAQ
- Can I make these without a candy thermometer?
- Yes—but with significantly higher risk of grainy or overly hard fudge. Use the cold water test: drop ½ tsp syrup into ice water; if it forms a soft, pliable ball that flattens when removed, it’s ready (~234°F). Practice is required for accuracy.
- Why did my fudge layer separate or look oily?
- This usually occurs from overheating the syrup, adding cold chocolate too quickly, or vigorous stirring during emulsification. Ensure chocolate is at room temp, pour hot syrup all at once, wait 2 minutes before whisking gently—not vigorously—and avoid cooling the bowl prematurely.
- Can I use marshmallow fluff instead of whole marshmallows?
- Not recommended for topping—it lacks structure, browns unevenly, and becomes sticky/gummy when torched. However, you *can* swirl ½ cup fluff into warm fudge *before* pouring for a marbled effect.
- My marshmallows caught fire! What went wrong?
- Proximity and duration. Hold torch 3–4 inches away and move constantly. Broiling requires vigilance—oven lights help; opening the door disrupts heat and invites flare-ups. Always have a lid or metal tray nearby to smother flames.
- Can I prepare components ahead of time?
- Absolutely. Crust can be baked and stored airtight at room temp 3 days ahead. Fudge layer can be poured and chilled up to 2 days ahead—just cover tightly with plastic wrap touching surface to prevent drying. Toast marshmallows day-of for peak texture.
- Are these bars suitable for freezing?
- Yes—with caveats. Freeze *before* toasting marshmallows: wrap tightly in plastic + foil, freeze up to 3 months. Thaw overnight in fridge, then torch fresh. Freezing toasted marshmallows causes sogginess and loss of texture.
- How do I prevent the crust from crumbling when cutting?
- Chill thoroughly before slicing, use a sharp knife, and press down firmly—not saw back and forth. If crust is too dry, add 1 extra tsp melted butter next time. Pre-baking the crust is the #1 preventative measure.
- Can I double this recipe for a larger batch?
- Yes—scale all ingredients by 2x and use a 13×18-inch half-sheet pan. Increase crust bake time by 2–3 minutes; fudge cook time remains same, but pouring and smoothing will require more care. Toast marshmallows in sections if torch is small.
Summary
Marshmallow Chocolate Fudge Bars are a masterclass in layered luxury—featuring a buttery graham cracker crust, a luxuriously smooth and deeply chocolate fudge layer cooked to precise soft-ball perfection, and a crown of expertly torched, golden-brown marshmallows that deliver ethereal sweetness and captivating texture.
With customizable variations—from vegan and keto adaptations to espresso-infused or s’mores-deconstructed versions—and grounded in time-tested technique and ingredient wisdom, these bars satisfy nostalgia while inviting modern innovation, making them a timeless, crowd-pleasing centerpiece for any occasion.