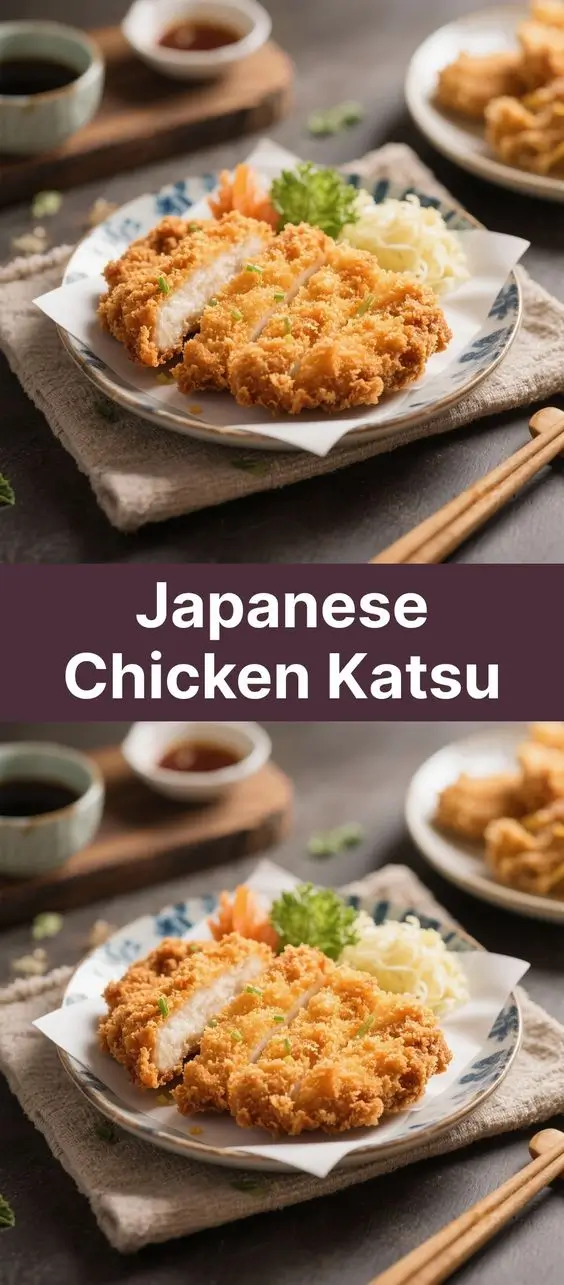
Japanese Chicken Katsu: A Crispy, Golden Delight from the Heart of Japanese Cuisine
The History of Japanese Chicken Katsu
The origins of Japanese Chicken Katsu trace back to the late 19th century during Japan’s Meiji Restoration, a period when the country opened its doors to Western influences. One such influence was European-style cutlets, particularly the French côtelette de veau and the Austrian Schnitzel. The Japanese adopted these breaded and fried meat dishes but reimagined them with their own culinary sensibilities, giving birth to what is now known as “katsu.”
The word “katsu” is actually a shortened form of “karē katsu,” which refers to a cutlet served with curry, but over time, it evolved into a standalone term for any breaded and deep-fried cutlet. While pork katsu (tonkatsu) was the original version, chicken katsu (torikatsu) gained immense popularity in the 20th century due to its lighter texture, lower fat content, and broader appeal across households and restaurants.
By the post-World War II era, katsu had become a staple in Japanese home cooking and bento boxes. It also found its way into restaurant menus both in Japan and abroad, often served with shredded cabbage, rice, miso soup, and tonkatsu sauce. Today, Chicken Katsu stands as a beloved comfort food, symbolizing the harmonious blend of East and West in Japanese gastronomy.
Ingredients Breakdown: What Makes Chicken Katsu Irresistible?
The magic of Chicken Katsu lies in its simple yet carefully balanced ingredients. Each component plays a crucial role in achieving that signature crisp exterior and juicy interior. Here’s a detailed look at what goes into an authentic Chicken Katsu:
- Chicken Breast or Thigh: Boneless, skinless chicken breasts are most commonly used for their lean texture and uniform shape. However, some prefer chicken thighs for their juiciness and richer flavor. If using breast, butterflying and pounding it ensures even thickness and tenderness.
- Panko Breadcrumbs: Unlike regular breadcrumbs, panko is made from crustless white bread, resulting in larger, flakier crumbs that create a lighter, crunchier coating. This is essential for achieving the airy, golden crust that defines great katsu.
- All-Purpose Flour: Used as the first layer in the breading process, flour helps the egg adhere to the chicken and creates a dry base for the panko to stick to.
- Eggs: Beaten eggs act as the glue between the flour and panko layers. They also contribute to browning and add richness to the final texture.
- Salt and Pepper: For seasoning the chicken before breading. Some variations include garlic powder, onion powder, or even a dash of soy sauce for extra umami.
- Cooking Oil: A neutral oil with a high smoke point—such as vegetable, canola, or peanut oil—is ideal for deep frying. The oil must be hot enough (around 350°F / 175°C) to ensure quick crisping without absorbing excess grease.
- Tonkatsu Sauce: A thick, tangy-sweet Japanese condiment made from fruit puree, soy sauce, vinegar, and spices. Brands like Bulldog are popular, but homemade versions can include ketchup, Worcestershire sauce, soy sauce, and grated apple.
- Optional Garnishes: Shredded cabbage, lemon wedges, pickled ginger (beni shoga), and steamed rice complement the dish beautifully.
Step-by-Step Recipe: How to Make Perfect Japanese Chicken Katsu at Home
Follow this detailed guide to make restaurant-quality Chicken Katsu in your own kitchen. With attention to technique and temperature, you’ll achieve a golden, shatteringly crisp exterior and tender, flavorful chicken inside.
- Prepare the Chicken: Start with two boneless, skinless chicken breasts. Butterfly each breast horizontally to open it like a book, then cover with plastic wrap and gently pound to about ½-inch (1.25 cm) thickness using a meat mallet or rolling pin. This ensures even cooking and prevents dry spots. Season both sides lightly with salt and pepper.
- Set Up the Breading Station: Prepare three shallow bowls:
- Bowl 1: All-purpose flour (about 1 cup)
- Bowl 2: 2 large eggs, beaten until smooth
- Bowl 3: Panko breadcrumbs (about 2 cups)
Arrange them in order: flour → egg → panko.
- Bread the Chicken:
- Dredge one chicken breast in flour, shaking off excess.
- Dip into the beaten egg, allowing any excess to drip off.
- Press firmly into the panko, turning to coat evenly. Make sure the entire surface is covered. Repeat with the second piece.
- Let the breaded chicken rest on a wire rack for 5–10 minutes. This helps the coating adhere better during frying.
- Heat the Oil: In a large, heavy-bottomed skillet or Dutch oven, heat 1–2 inches of neutral oil to 350°F (175°C). Use a deep-fry thermometer to monitor the temperature accurately. If the oil is too cool, the katsu will absorb oil and become greasy; if too hot, the outside will burn before the inside cooks.
- Fry the Chicken: Carefully place one breaded chicken breast into the hot oil. Do not overcrowd the pan—fry one at a time if necessary. Fry for 4–5 minutes per side, or until golden brown and the internal temperature reaches 165°F (74°C). Flip once halfway through using tongs.
- Drain and Rest: Remove the cooked katsu and place it on a wire rack set over a baking sheet (not paper towels, which can trap steam and soften the crust). Let it rest for 2–3 minutes before slicing.
- Serve Immediately: Slice the katsu into strips if desired, and serve hot with tonkatsu sauce, shredded cabbage, steamed rice, and optional garnishes like lemon wedges or pickled ginger.
Tips for Achieving the Best Chicken Katsu
- Don’t Skip the Resting Step: After breading, letting the chicken sit for a few minutes allows the layers to bond, reducing the chance of the coating falling off during frying.
- Maintain Oil Temperature: Keep the oil steady around 350°F. Adjust the heat as needed. If frying multiple pieces, let the oil reheat between batches.
- Use Fresh Panko: Stale panko can become soggy. For maximum crunch, use fresh, dry panko. You can lightly toast it in a dry pan beforehand for extra crispness.
- Double-Dip for Extra Crunch (Optional): For a thicker crust, repeat the egg and panko steps for a double-coated katsu. This works well for larger portions or when serving with curry.
- Butterfly Evenly: Uneven thickness leads to uneven cooking. Aim for uniformity to avoid overcooked edges and undercooked centers.
- Avoid Overhandling: Press the panko gently but firmly—too much pressure compacts the crumbs and reduces airiness.
- Serve Immediately: Katsu is best eaten fresh out of the fryer. The crust begins to soften quickly due to moisture from the chicken.
Variations and Customizations
While traditional Chicken Katsu is delicious on its own, there are countless ways to customize it for different tastes and dietary preferences:
- Chicken Katsu Curry: Serve the katsu over steamed rice with a rich, mildly spiced Japanese curry sauce. This fusion dish is a national favorite and widely available in izakayas and department store food halls.
- Katsu Sandwich (Katsusando): Place a whole or sliced katsu between soft milk bread with tonkatsu sauce and shredded lettuce. Add cheese or a fried egg for extra indulgence.
- Gluten-Free Katsu: Substitute regular flour with rice flour or a gluten-free blend, and use gluten-free panko breadcrumbs. Ensure all sauces are certified gluten-free.
- Oven-Baked Katsu: For a healthier version, spray the breaded chicken with cooking oil and bake at 425°F (220°C) for 20–25 minutes, flipping halfway. Results are less crispy but still tasty.
- Spicy Katsu: Add chili flakes, cayenne pepper, or sriracha to the egg wash or mix spicy mayo into the sauce for a kick.
- Vegetarian Katsu: Use firm tofu, eggplant, or seitan as a base. Press tofu well to remove moisture before breading.
- Mini Chicken Katsu Bites: Cut chicken into strips, bread, and fry for fun appetizers or bento additions.
- Soy Sauce Marinade: Marinate the chicken in a mixture of soy sauce, mirin, and garlic for 30 minutes before breading for deeper flavor.
Health Considerations and Nutritional Value
While Chicken Katsu is undeniably delicious, it is a fried dish and should be enjoyed in moderation, especially for those monitoring fat, sodium, or calorie intake.
Nutritional Breakdown (per serving, approx. 6 oz chicken breast with breading and fried in oil):
- Calories: ~400–500 kcal
- Protein: 35–40 g (excellent source)
- Fat: 20–25 g (mostly from frying oil)
- Carbohydrates: 25–30 g (mainly from flour and panko)
- Sodium: Varies widely depending on seasoning and sauce (~800–1200 mg)
Health Tips:
- Air Fryer Option: Use an air fryer at 375°F (190°C) for 12–15 minutes, flipping halfway. Lightly spray with oil for crispiness. This reduces fat by up to 70%.
- Lean Protein Choice: Chicken breast is naturally low in fat and high in protein, making it a nutritious base when prepared healthily.
- Watch the Sauce: Tonkatsu sauce can be high in sugar and sodium. Opt for reduced-sugar versions or make your own with natural sweeteners.
- Balanced Meal: Pair katsu with fiber-rich sides like steamed vegetables, miso soup, and brown rice to improve overall nutritional balance.
- Portion Control: Stick to one breast per serving and avoid oversized cuts to manage calorie intake.
Full Ingredients List
- 2 boneless, skinless chicken breasts (about 6 oz each)
- 1 cup all-purpose flour (or rice flour for gluten-free)
- 2 large eggs, beaten
- 2 cups panko breadcrumbs (gluten-free if needed)
- Salt and freshly ground black pepper, to taste
- 1–2 cups neutral oil (vegetable, canola, or peanut) for frying
- Tonkatsu sauce, for serving
- Shredded cabbage, for garnish
- Steamed white or brown rice, for serving
- Lemon wedges and pickled ginger (optional)
Directions Recap
- Butterfly and pound chicken breasts to ½-inch thickness. Season with salt and pepper.
- Set up breading station: flour → beaten eggs → panko.
- Dredge each breast in flour, dip in egg, then coat with panko. Press gently to adhere.
- Let breaded chicken rest for 5–10 minutes.
- Heat oil to 350°F (175°C) in a deep skillet.
- Fry chicken 4–5 minutes per side until golden and internal temperature reaches 165°F.
- Drain on a wire rack. Rest 2–3 minutes before serving.
- Slice, serve hot with tonkatsu sauce, cabbage, and rice.
FAQ: Frequently Asked Questions About Japanese Chicken Katsu
Can I make Chicken Katsu ahead of time?
It’s best served fresh, but you can bread the chicken up to 2 hours in advance and keep it refrigerated on a tray. Reheat leftovers in an oven or air fryer (not microwave) to restore crispness.
Why did my coating fall off during frying?
This usually happens if the chicken wasn’t patted dry before breading, the oil wasn’t hot enough, or the layers weren’t properly adhered. Letting the breaded chicken rest helps prevent this.
Can I freeze Chicken Katsu?
Yes! Freeze uncooked, breaded chicken on a tray, then transfer to a freezer bag. Fry directly from frozen, adding 1–2 minutes to cooking time. Cooked katsu can also be frozen and reheated in the oven.
Is Chicken Katsu the same as Chicken Parmesan?
No. While both involve breaded and fried chicken, Chicken Parmesan is Italian-American, typically includes tomato sauce and melted cheese, and uses regular breadcrumbs. Chicken Katsu is Japanese, uses panko, and is served with tonkatsu sauce or curry.
Can I use chicken thighs instead of breasts?
Absolutely. Thighs are more forgiving and stay juicier during frying. Just trim excess fat and pound to even thickness.
What can I substitute for panko?
You can use regular breadcrumbs, but the result will be denser and less crispy. Crushed cornflakes or cracker crumbs offer a similar crunch.
Is Chicken Katsu kid-friendly?
Yes! Kids love the mild flavor and crunchy texture. Serve with rice and a small bowl of sauce for dipping.
Summary
Japanese Chicken Katsu is a golden, crispy fried cutlet that embodies the perfect harmony of Western influence and Japanese culinary precision. Made with tender chicken, light panko breadcrumbs, and served with savory tonkatsu sauce, it’s a satisfying meal that delights both adults and children.
Whether enjoyed solo, in a sandwich, or smothered in curry, Chicken Katsu remains a timeless favorite in Japanese cuisine—easy to make, endlessly customizable, and always irresistibly delicious.