Icebox Cake: A Chilled Classic That Melts in Your Mouth
The icebox cake, a beloved dessert that has stood the test of time, is as much a cultural icon as it is a culinary delight. Simple yet sophisticated, this no-bake treat originated from necessity and ingenuity during an era when refrigeration was still a novelty. With its layers of creamy filling and crisp cookies, the icebox cake transforms humble ingredients into something magical—just by chilling. Whether served at summer picnics, holiday gatherings, or as a weeknight indulgence, the icebox cake continues to captivate taste buds across generations. This guide dives deep into every aspect of the icebox cake—from its fascinating history to ingredient nuances, detailed preparation steps, creative variations, health considerations, and frequently asked questions—to help you master this timeless dessert.
The History of the Icebox Cake
The origins of the icebox cake trace back to the early 20th century in the United States, when electric refrigerators began replacing traditional iceboxes—wooden cabinets insulated with sawdust and cooled by blocks of ice. Before reliable freezing technology, desserts requiring chilling were limited. However, once households gained access to consistent cold storage, recipes that relied on refrigeration flourished.
One of the earliest known versions of the icebox cake appeared in the 1920s, featuring layers of sweetened whipped cream and graham crackers. The concept was simple: assemble layers of cookies and cream, then allow the mixture to set in the “icebox” (the precursor to the modern refrigerator) for several hours. Over time, the moisture from the cream would soften the crackers, creating a texture similar to custard or mousse.
The dessert gained widespread popularity during World War II, when eggs and ovens were rationed. Since the icebox cake required no baking and used shelf-stable ingredients like canned condensed milk and packaged cookies, it became a go-to dessert for American families. Brands such as Nabisco even promoted their cookies—especially chocolate wafers and graham crackers—as ideal for icebox cakes, further cementing the dessert’s place in American kitchens.
By the 1950s and 60s, the icebox cake had evolved into many forms, incorporating flavors like coffee, chocolate, fruit, and even citrus. It became a staple at potlucks, church suppers, and family reunions. In Latin America, particularly in countries like the Philippines, Brazil, and Mexico, local adaptations emerged using dulce de leche, mango, or coconut. Today, the icebox cake enjoys a renaissance among food bloggers and chefs who celebrate its simplicity, versatility, and nostalgic charm.
Ingredients Breakdown: What Makes an Icebox Cake Work?
The magic of an icebox cake lies not in complexity but in the synergy between a few core ingredients. While variations abound, most traditional recipes rely on three fundamental components: cookies, dairy-based filling, and flavor enhancers. Let’s break down each element and explore why they matter.
- Cookies: Typically thin, crisp, and slightly sweet, cookies form the structural backbone of the cake. Graham crackers are the classic choice, providing a honeyed, slightly nutty base that softens beautifully. Chocolate wafer cookies offer a richer, cocoa-forward alternative. Other popular options include vanilla wafers, ladyfingers, shortbread, or even Oreo cookies for a modern twist. The key is uniformity—cookies should be similar in size and thickness to ensure even layering and consistent texture after chilling.
- Dairy Filling: This component binds the layers and provides the cake’s signature creamy texture. Most recipes use either sweetened whipped cream, condensed milk, or a combination of both. Whipped cream made from heavy cream and sugar gives a light, airy mouthfeel, while sweetened condensed milk delivers a denser, caramel-like richness. Some bakers blend mascarpone, cream cheese, or yogurt into the mixture for added tang and stability. For vegan versions, coconut cream or cashew-based fillings can replicate the luxurious consistency.
- Sweeteners and Flavorings: Sugar is essential, especially when whipping cream, but other sweeteners like honey, maple syrup, or powdered sugar may be used depending on dietary preferences. Vanilla extract is the most common flavor booster, but extracts such as almond, mint, or orange also work well. Cocoa powder, instant espresso, cinnamon, or citrus zest can elevate the profile further. Salt is often added in small amounts to balance sweetness and enhance overall flavor.
- Optional Add-ins: To customize the cake, ingredients like fresh fruit (strawberries, bananas, peaches), jams, chocolate shavings, crushed nuts, or liqueurs (Kahlúa, Grand Marnier) can be layered between the cookies. These additions introduce contrasting textures and complex flavor notes without compromising the cake’s integrity.
The beauty of the icebox cake is that there’s no strict formula—only principles. As long as the filling is thick enough to hold the layers and the cookies can absorb moisture without disintegrating, you’re on the right track.
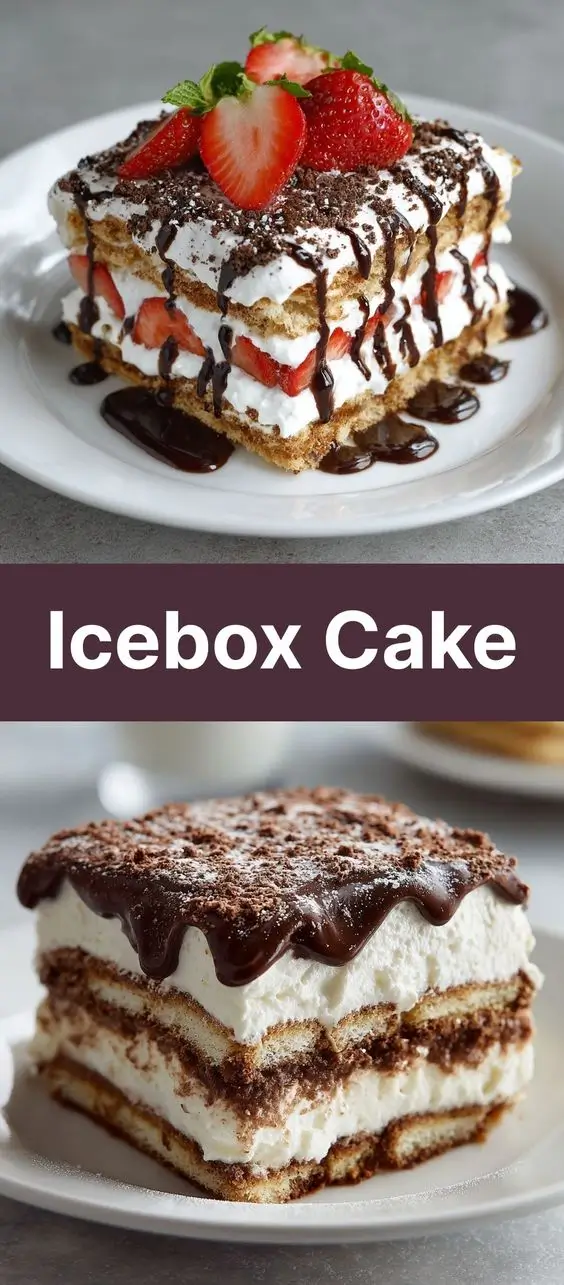
Step-by-Step Recipe: How to Make a Classic Icebox Cake
Follow this detailed guide to create a rich, velvety chocolate icebox cake—the perfect balance of decadence and ease. This version uses chocolate wafers and a two-part filling combining whipped cream and sweetened condensed milk for optimal texture and flavor.
Ingredients
- 4 cups heavy whipping cream (cold)
- 1 can (14 oz) sweetened condensed milk
- 2 teaspoons pure vanilla extract
- ½ teaspoon salt
- 1 package (12 oz) chocolate wafer cookies (about 40–45 cookies)
- Optional: ¼ cup unsweetened cocoa powder (for dusting or mixing into cream)
- Optional garnishes: chocolate curls, fresh berries, mint leaves
Directions
- Chill Equipment: Place your mixing bowl and beaters (or whisk attachment) in the freezer for 10–15 minutes. Cold tools help the cream whip faster and hold its shape better.
- Prepare the Filling: In the chilled bowl, pour the heavy cream. Begin beating on medium speed until soft peaks begin to form (about 3–4 minutes). Gradually add the sweetened condensed milk in a slow, steady stream while continuing to beat. Add vanilla extract and salt. Increase speed to high and beat until stiff peaks form—this means the cream holds its shape when the beater is lifted. Be careful not to overbeat, or the cream may turn grainy or buttery.
- Prepare the Pan: Select a loaf pan, springform pan, or any container with straight sides (approximately 9×5 inches). For easy removal, line the pan with plastic wrap, leaving an overhang on all sides. This will allow you to lift the cake out cleanly after chilling.
- Layer the Cookies and Cream: Place a single layer of chocolate wafers at the bottom of the pan, breaking some if needed to fit gaps. Spread about ¾ cup of the whipped filling evenly over the cookies using a spatula. Repeat the process—add another layer of cookies, then more filling—until all cookies are used or the pan is nearly full. Aim for 6–8 layers total. Finish with a generous layer of filling on top.
- Smooth and Seal: Use the spatula to smooth the top surface. Fold the overhanging plastic wrap over the top to cover the cake completely. This prevents the cream from drying out and absorbs excess moisture from the cookies as they soften.
- Chill Thoroughly: Refrigerate the cake for at least 6 hours, but ideally overnight (8–12 hours). This allows the cookies to fully absorb the cream and transform into a cohesive, pudding-like texture. Avoid freezing unless specified by a recipe—excessive cold can alter the texture and cause separation.
- Serve: Remove the cake from the refrigerator 10–15 minutes before serving for easier slicing. Lift it out using the plastic wrap overhang. Peel back the wrap and transfer to a serving platter. Garnish with chocolate curls, berries, or a dusting of cocoa powder. Slice with a sharp knife dipped in warm water for clean cuts.
Note: Leftovers can be stored in the refrigerator for up to 4 days. The texture will continue to soften over time, so enjoy within the first 2–3 days for best quality.
Tips for the Perfect Icebox Cake
- Use Cold Ingredients: Ensure your cream is very cold before whipping. Warm cream won’t whip properly and may result in a runny filling.
- Avoid Overmixing: Stop whipping once stiff peaks form. Overbeating can cause the fat in the cream to separate, leading to a grainy or curdled texture.
- Choose the Right Cookie: Opt for sturdy, dry cookies that won’t dissolve immediately. Soft or buttery cookies may become mushy too quickly.
- Uniform Layers: Try to keep each layer of filling consistent in thickness to prevent pooling or dry spots.
- Patience is Key: Don’t rush the chilling process. The longer it sets, the better the texture. Six hours is the minimum; overnight yields superior results.
- Prevent Weeping: If using fruit, pat it dry or toss with a little cornstarch to absorb excess juice, which could make the cake soggy.
- Customize Presentation: Press crushed cookies onto the sides for a rustic look, or pipe decorative borders using leftover whipped cream.
- Make it Ahead: Icebox cakes are excellent make-ahead desserts. Prepare them 1–2 days in advance for stress-free entertaining.
Variations and Customizations
One of the greatest strengths of the icebox cake is its adaptability. Here are some inspired twists to suit different tastes, seasons, and dietary needs:
- Graham Cracker S’mores Icebox Cake: Use graham crackers, layer with marshmallow fluff mixed into the whipped cream, and sprinkle mini chocolate chips between layers. Top with torched meringue or extra fluff for a campfire effect.
- Strawberry Shortcake Icebox Cake: Alternate vanilla wafers with whipped cream and sliced fresh strawberries. Add a splash of lemon zest for brightness.
- Oreo Dream Icebox Cake: Crush Oreos and mix some into the whipped cream for a speckled effect. Use whole Oreos for layering. Optionally, blend cream cheese into the filling for a cheesecake-like richness.
- Coffee Tiramisu Icebox Cake: Dip ladyfingers briefly in strong brewed coffee (cooled), then layer with a mascarpone-cream mixture flavored with Kahlúa and cocoa. Dust the top with cocoa powder.
- Mango Coconut Icebox Cake (Tropical Style): Use coconut-flavored cookies or shredded coconut pressed into layers. Combine whipped cream with sweetened condensed milk and fold in diced ripe mango. Garnish with toasted coconut flakes.
- Peppermint Chocolate Icebox Cake: Add crushed candy canes or peppermint extract to the whipped cream. Layer with chocolate wafers and top with shaved dark chocolate.
- Vegan Icebox Cake: Use coconut cream (chilled overnight, solid part only) instead of dairy cream. Sweeten with maple syrup or agave. Choose plant-based cookies and layer with fruit or nut butter spreads.
- Low-Sugar/Keto Version: Substitute sweetened condensed milk with homemade keto condensed milk (using heavy cream and erythritol). Use low-carb sweetener in the whipped cream and keto-friendly cookies like almond flour crackers.
- Seasonal Themes: Create a pumpkin spice version in fall with spiced whipped cream and ginger snaps. For summer, try a blueberry-lime variation with graham crackers and lime zest.
Health Considerations and Nutritional Value
While undeniably delicious, traditional icebox cakes are high in sugar, saturated fat, and calories due to their reliance on heavy cream, sweetened condensed milk, and processed cookies. A typical slice (1/8 of a standard cake) may contain:
- Approximately 350–450 calories
- 25–35g of fat (mostly saturated)
- 30–40g of carbohydrates
- 20–25g of sugar
- 3–5g of protein
For those managing conditions like diabetes, heart disease, or obesity, modifications are recommended:
- Reduce Sugar: Use reduced-sugar condensed milk or make your own with a sugar substitute. Limit additional sweeteners in whipped cream.
- Lower Fat: Replace half the heavy cream with Greek yogurt (full-fat for stability). Note: this may affect texture and shelf life.
- Gluten-Free: Use certified gluten-free cookies such as Schär or homemade almond flour biscuits.
- Dairy-Free: Opt for coconut cream, oat cream, or soy-based whipped toppings paired with non-dairy cookies.
- Balanced Pairing: Serve with fresh fruit or a side salad to offset richness. Enjoy in moderation as part of a balanced diet.
Pregnant individuals should ensure all dairy products are pasteurized and avoid raw eggs (not typically used in icebox cakes, but good to confirm). Those with lactose intolerance may benefit from lactose-free cream and milk alternatives.
Frequently Asked Questions (FAQ)
Q: Can I freeze an icebox cake?
A: Yes, but with caution. Freezing can alter the texture—cream may weep upon thawing, and cookies can become overly soft. If freezing, wrap tightly in plastic and aluminum foil. Thaw overnight in the refrigerator before serving.
Q: Why is my icebox cake runny?
A: This usually happens if the whipped cream wasn’t stiff enough, the cake wasn’t chilled long enough, or too much liquid (like fruit juice) was introduced. Always whip to stiff peaks and chill for at least 6–8 hours.
Q: Can I use regular milk instead of sweetened condensed milk?
A: No—sweetened condensed milk is crucial for sweetness, thickness, and binding. Regular milk lacks the sugar and reduced water content needed for proper setting.
Q: How long does an icebox cake last in the fridge?
A: Up to 4 days when stored covered. After that, the texture deteriorates, and spoilage risks increase due to dairy content.
Q: Can I make an icebox cake without cookies?
A: Technically yes, but it wouldn’t be a traditional icebox cake. Some bakers use layers of crepes, brownie sheets, or sponge cake, but these change the identity and texture significantly.
Q: Can I use Cool Whip instead of whipped cream?
A: Yes, and many convenience-style recipes do. However, homemade whipped cream tastes fresher and less artificial. If using Cool Whip, fold in some melted white chocolate or pudding mix for better structure.
Q: Why are my layers sliding apart?
A: Ensure even spreading of filling and avoid overloading one area. Letting the cake chill gradually helps stabilize the layers. Using a pan with higher sides also prevents slippage.
Q: Can I make mini icebox cakes?
A: Absolutely! Use mason jars, parfait glasses, or silicone molds for individual servings. They’re perfect for parties and portable desserts.
Summary
The icebox cake is a timeless, no-bake dessert that combines simple ingredients—cookies and creamy filling—into an elegant, melt-in-your-mouth treat through the magic of chilling. Easy to customize, make ahead, and share, it remains a favorite across cultures and generations.