Cupcake Cones – Baking with Blondie
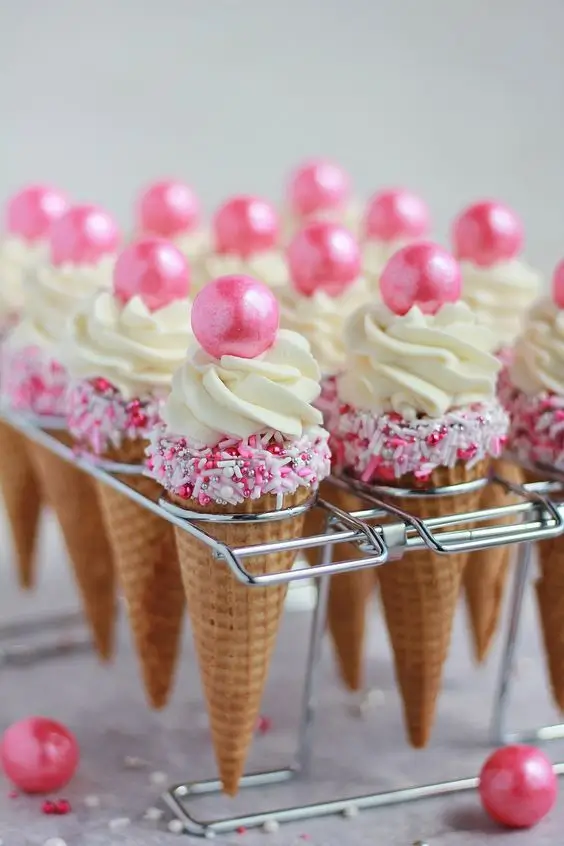
Welcome to another delightful adventure in the kitchen with Baking with Blondie! Today, we’re diving into one of the most fun, creative, and delicious dessert innovations you’ll ever make at home: Cupcake Cones. Imagine combining the soft, fluffy texture of a freshly baked cupcake with the crispy, sweet satisfaction of an ice cream cone—all wrapped into one handheld treat. These aren’t just cupcakes; they’re edible works of art that bring joy to every bite.
Whether you’re planning a birthday party, a baby shower, or simply want to impress your friends with something truly unique, Cupcake Cones are guaranteed to turn heads and satisfy sweet cravings. They’re perfect for kids and adults alike, easy to transport, mess-free to eat, and endlessly customizable. So tie on your apron, preheat your oven, and let’s get baking!
The History of Cupcake Cones
The concept of Cupcake Cones may seem like a modern twist born from social media trends and food innovation, but its roots can be traced back to the growing desire for portable, shareable desserts that blend multiple textures and flavors. The idea likely emerged in the early 2010s when food bloggers and bakers began experimenting with hybrid treats—cupcake-stuffed waffles, cake pops, and cookie sandwiches paving the way.
Baking with Blondie has always been inspired by nostalgia, whimsy, and a love for classic American baking. When I first saw a photo of a cupcake baked inside a waffle cone, I was instantly intrigued. It reminded me of childhood summers—running through sprinkler water with a melting ice cream cone in hand—and my teenage years spent frosting cupcakes with rainbow sprinkles. Merging those memories into a single dessert felt like fate.
After months of testing different batters, cone types, fillings, and baking methods, I perfected the recipe that would become our signature Cupcake Cone. What started as a quirky experiment quickly became a fan favorite at local bake sales, family gatherings, and eventually, this very blog. Now, it’s time to share it with you—complete with all the secrets, tips, and variations that make these treats truly magical.
Ingredients Breakdown
The beauty of Cupcake Cones lies not only in their appearance but also in the thoughtful selection of ingredients that work together to create balance—sweetness without being cloying, moisture without sogginess, and structure without stiffness. Let’s break down each component:
- Waffle Ice Cream Cones (Sugar or Wafer): These form the edible vessel. Sugar cones are sturdier and sweeter, adding a caramel-like crunch, while wafer cones are lighter and more neutral. Choose based on your desired texture and sweetness level.
- All-Purpose Flour: Provides the base structure for the cupcake. Sifted to ensure a light crumb.
- Granulated Sugar: Sweetens the batter and helps create a tender texture.
- Baking Powder: The leavening agent responsible for the rise and fluffiness.
- Salt: Enhances flavor and balances sweetness.
- Unsalted Butter (Room Temperature): Adds richness and moisture. Using room temperature ensures even mixing and a smooth batter.
- Eggs (Large, Room Temperature): Bind the ingredients and contribute to structure and volume.
- Vanilla Extract: Imparts classic warm flavor. Use pure extract for best results.
- Whole Milk (or Buttermilk for Extra Tenderness): Adds moisture and activates the baking powder. Buttermilk introduces slight tang and extra softness.
- Filling Options (Optional): Chocolate ganache, fruit compote, buttercream, custard, or jam can be piped into the center before or after baking.
- Frosting and Decorations: Classic vanilla buttercream, cream cheese frosting, whipped ganache, or stabilized whipped cream. Top with sprinkles, edible glitter, mini chocolate chips, or fresh berries.
Each ingredient plays a vital role—not just in taste, but in how the cupcake sets inside the cone during baking. Precision matters, especially when working with delicate cones that can crack under high heat or excess moisture.
Step-by-Step Recipe
Ingredients
- 6–8 sugar or wafer ice cream cones (with flat bottoms for stability)
- 1 ½ cups (190g) all-purpose flour
- 1 cup (200g) granulated sugar
- 1 ½ tsp baking powder
- ¼ tsp salt
- ½ cup (115g) unsalted butter, softened
- 2 large eggs, room temperature
- 1 tsp pure vanilla extract
- ½ cup (120ml) whole milk (or buttermilk)
- Optional: ¼ cup filling (chocolate chips, jam, custard, etc.)
Directions
- Preheat Oven & Prepare Pan: Preheat your oven to 350°F (175°C). Place a muffin tin on your countertop. Gently insert each ice cream cone into a muffin cup, pressing down slightly to stabilize. If the cones are too narrow, wrap aluminum foil around the base to prevent tipping.
- Make the Batter: In a medium bowl, whisk together flour, sugar, baking powder, and salt. Set aside.
- Cream Butter and Sugar: In a large mixing bowl, beat softened butter with an electric mixer on medium speed until creamy (about 1 minute). Gradually add sugar and beat for 2–3 minutes until light and fluffy.
- Add Eggs and Vanilla: Add eggs one at a time, beating well after each addition. Scrape down the sides of the bowl as needed. Mix in vanilla extract.
- Incorporate Dry and Wet Ingredients: Alternate adding the flour mixture and milk to the butter mixture, starting and ending with flour. Mix on low speed after each addition until just combined. Do not overmix—this keeps the cupcakes tender.
- Fill the Cones: Using a spoon or small cookie scoop, carefully fill each cone halfway with batter (about 2 tablespoons per cone). For filled cupcakes, drop ½ teaspoon of jam, chocolate ganache, or custard into the center, then cover with another spoonful of batter to seal.
- Bake: Place the muffin tin in the preheated oven. Bake for 18–22 minutes, or until a toothpick inserted near the center comes out clean. The tops should be golden and spring back when lightly touched.
- Cool Completely: Remove from oven and let cool in the pan for 5 minutes. Then transfer each cone to a wire rack to cool completely before frosting. This step is crucial—frosting a warm cone can cause condensation, leading to sogginess or collapse.
- Decorate: Once cooled, pipe on your favorite frosting using a star tip or simple round nozzle. Add sprinkles, drizzle with melted chocolate, or top with fresh fruit.
- Serve and Enjoy! Arrange on a platter or pack in individual boxes for gifting. Best served the day they’re made, but can be stored properly (see tips below).
Expert Tips for Perfect Cupcake Cones
- Choose the Right Cones: Opt for cones with flat bottoms and thick walls. Sugar cones hold up better than wafers during baking. Avoid flavored cones unless part of your design (e.g., chocolate cones for chocolate cupcakes).
- Stabilize the Cones: Use a standard muffin tin and wrap foil around the base if needed. You can also place mini cupcake liners in the bottom of the muffin cups to elevate and support the cones.
- Don’t Overfill: Fill only ¾ full to allow room for rising. Overflowing batter can stick to the pan and damage the cone’s integrity.
- Use Room Temperature Ingredients: Cold eggs or butter can curdle the batter or prevent proper aeration, leading to dense cupcakes.
- Check Early: Ovens vary. Start checking at 16 minutes. Overbaking dries out the cake and weakens the cone.
- Avoid Moist Frostings if Storing: Whipped cream or cream cheese frostings should be added just before serving if storing longer than 2 hours.
- Work Quickly: Once frosted, serve or refrigerate. Sunlight or heat can soften both frosting and cone rapidly.
- Transport Smartly: Use a container with dividers or line them in a muffin tin to prevent tipping. Cover loosely with parchment paper—never plastic wrap directly on frosting.
Variations and Customizations
One of the greatest joys of Baking with Blondie recipes is how easily they adapt to any occasion, dietary need, or flavor craving. Here are some crowd-pleasing variations:
Flavor Twists
- Chocolate Cupcake Cones: Replace ¼ cup flour with cocoa powder and add chocolate chips to the batter.
- Lemon Blueberry: Add lemon zest and juice to the batter, fold in fresh blueberries, and fill with lemon curd.
- Red Velvet: Add red food coloring and a dash of vinegar for that classic Southern flair.
- Spiced Chai: Infuse milk with chai spices (cinnamon, cardamom, cloves), strain, then use in the batter.
Dietary Modifications
- Gluten-Free: Substitute flour with a 1:1 gluten-free baking blend. Add ¼ tsp xanthan gum if not included.
- Dairy-Free: Use plant-based butter and almond, oat, or soy milk. Opt for dairy-free chocolate in fillings.
- Egg-Free: Replace each egg with ¼ cup unsweetened applesauce or commercial egg replacer.
- Vegan: Combine gluten-free, dairy-free, and egg-free substitutions. Use vegan sugar (some brands filter with bone char).
Occasion-Specific Designs
- Birthday Bash: Rainbow batter swirls, colorful sprinkles, and themed toppers (mini flags, fondant numbers).
- Valentine’s Day: Heart-shaped sprinkles, pink buttercream, and a drizzle of white chocolate.
- Halloween: Orange cupcakes in chocolate cones, black frosting “spiderwebs,” and candy eyes.
- Wedding or Baby Shower: Pastel colors, floral piping, edible pearls, and personalized tags.
Health Considerations and Nutritional Value
While Cupcake Cones are undeniably indulgent, understanding their nutritional profile helps you enjoy them mindfully. A standard serving (one cupcake cone with vanilla buttercream) contains approximately:
- Calories: 320–380 kcal
- Total Fat: 14–18g (mostly from butter and cone)
- Saturated Fat: 8–10g
- Carbohydrates: 48–55g
- Sugars: 30–36g (naturally occurring and added)
- Protein: 4–5g
- Sodium: 180–220mg
To make healthier versions:
- Reduce sugar by ¼ cup in the batter or use coconut sugar.
- Use Greek yogurt instead of butter (partial substitution) for added protein.
- Opt for fruit-based fillings like mashed banana or apple sauce to cut fat.
- Serve smaller portions—mini cones yield cuter treats with fewer calories.
- Offer alongside fresh fruit skewers or yogurt parfaits for balanced dessert spreads.
Remember: moderation is key. Desserts are meant to be enjoyed, not feared. One Cupcake Cone is a celebration in itself—savor every layer.
Frequently Asked Questions (FAQ)
Can I make Cupcake Cones ahead of time?
Yes! Bake and cool the cupcakes in cones up to 1 day in advance. Store unfrosted in an airtight container at room temperature. Frost within 2–3 hours of serving.
Do the cones get soggy?
Not if handled correctly. Cooling completely before frosting prevents steam buildup. Also, avoid overly wet fillings or frostings unless serving immediately.
Can I freeze Cupcake Cones?
We do not recommend freezing once assembled. The cone absorbs moisture and becomes brittle. However, you can freeze the baked cupcakes (without cones) for up to 1 month. Thaw and insert into fresh cones later.
Why did my cones crack during baking?
This usually happens due to rapid temperature change or thin-walled cones. Always use room-temperature batter and sturdy cones. Pre-warming cones slightly (1 minute in oven empty) can help, but don’t overdo it.
Can I use paper cones?
No. Paper cones are not oven-safe and will burn or disintegrate. Only use edible waffle or sugar cones labeled for baking or serving ice cream.
How many does this recipe make?
This recipe yields 6–8 Cupcake Cones, depending on cone size and batter distribution.
Can kids help make these?
Absolutely! Kids love scooping batter, decorating, and choosing toppings. Assign safe tasks like mixing dry ingredients, filling cones (with supervision), and adding sprinkles.
Summary
Cupcake Cones are the ultimate fusion of nostalgia, creativity, and deliciousness—fluffy homemade cupcakes baked right inside crispy waffle cones for a treat that’s as fun to eat as it is to look at.
Brought to you by Baking with Blondie, this show-stopping dessert combines classic techniques with playful innovation, making it perfect for celebrations, gifts, or simply treating yourself to something extraordinary.