Chocolate Sandwich Cookies with Cream Filling: The Ultimate Guide
Introduction
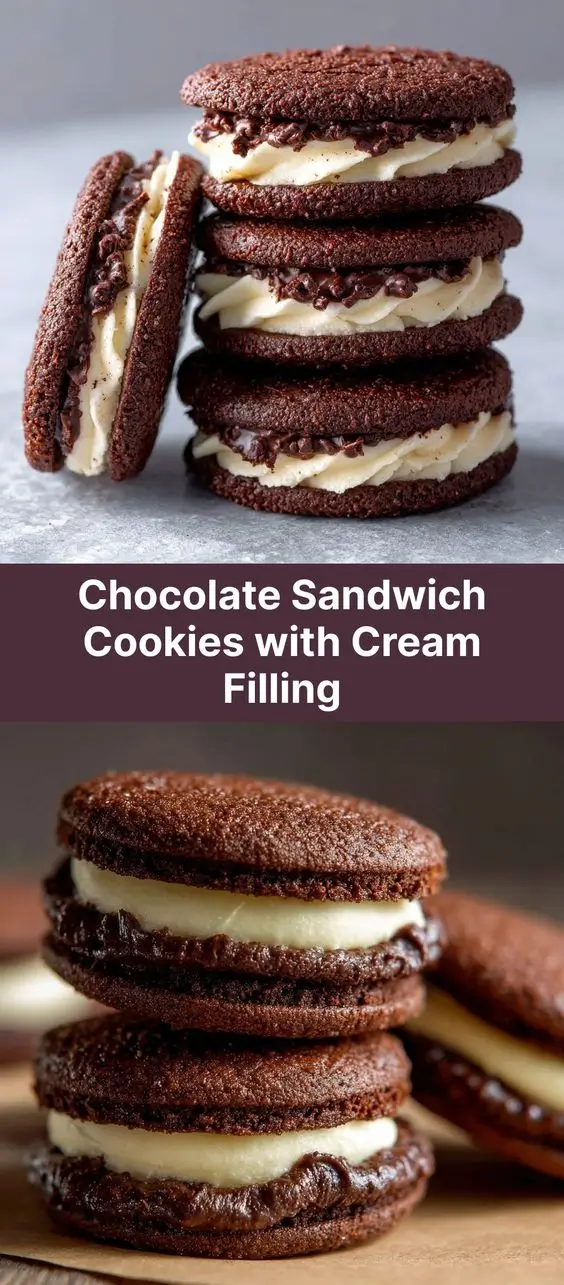
There’s something undeniably magical about chocolate sandwich cookies with cream filling. Whether you grew up unwrapping them in lunchboxes or discovered them later in life, their rich cocoa flavor, tender texture, and luscious creamy center make them a timeless treat loved by people of all ages. These indulgent delights combine the best of both worlds: the deep satisfaction of chocolate and the velvety smoothness of sweetened cream. In this comprehensive guide, we’ll take you through everything you need to know—from the origins of this beloved cookie to how to craft your own at home with precision and care. Whether you’re a seasoned baker or a curious beginner, this detailed recipe and exploration will help you create the perfect homemade chocolate sandwich cookies that rival (or even surpass) any store-bought version.
The History
The story of chocolate sandwich cookies begins in the late 19th century, during a time when industrial baking was transforming the food landscape. While soft chocolate cakes and biscuits had existed for decades, the idea of a filled chocolate sandwich cookie emerged as bakers sought ways to combine convenience, indulgence, and shelf stability. One of the earliest known commercial versions was introduced by Nabisco in 1912—Oreo cookies. Though their exact origin remains debated (with claims ranging from Canadian influence to American innovation), Oreos quickly became iconic, setting the standard for what a chocolate sandwich cookie should be: crisp yet tender wafers with a sweet vanilla cream center.
Over the years, countless variations have popped up around the world. From Argentina’s “Tita” to South Africa’s “Choco-Chip,” nearly every culture has embraced its own version of this classic treat. What started as a simple bakery experiment evolved into a global phenomenon, inspiring gourmet interpretations, limited-edition flavors, and even artisanal handmade versions. Today, chocolate sandwich cookies are more than just snacks—they’re cultural symbols, nostalgic comfort foods, and a canvas for culinary creativity. By making your own at home, you tap into this rich history while adding your personal flair to a legacy that spans over a century.
Ingredients Breakdown
Crafting the perfect chocolate sandwich cookie starts with understanding each ingredient and its role in creating the ideal texture, flavor, and structure. Here’s a detailed look at what goes into these decadent treats:
- All-Purpose Flour: Provides the structural base of the cookie. It contains gluten-forming proteins that give the cookies their shape and slight chewiness when combined with liquid and fat.
- Cocoa Powder (Unsweetened, Dutch-Process Preferred): The star of the show. Cocoa powder delivers intense chocolate flavor and color. Dutch-process cocoa is less acidic and offers a smoother, richer taste compared to natural cocoa, though either can be used depending on preference.
- Baking Soda: A leavening agent that helps the cookies rise slightly and spread evenly during baking. It reacts with acidic ingredients (like brown sugar or buttermilk if used) to create air bubbles.
- Salt: Enhances overall flavor by balancing sweetness and highlighting the depth of the chocolate. Even a small amount makes a noticeable difference.
- Butter (Unsalted, Room Temperature): Adds richness, tenderness, and flavor. Creaming butter with sugar incorporates air, contributing to a lighter texture. Using room temperature butter ensures even mixing and prevents curdling.
- Granulated Sugar: Provides sweetness and contributes to the crisp outer edge of the cookie. It also aids in browning through caramelization.
- Brown Sugar (Light or Dark): Adds moisture and chewiness due to its molasses content. Dark brown sugar imparts a deeper, more caramel-like flavor, which pairs beautifully with chocolate.
- Egg (Large, Room Temperature): Acts as a binder, helping hold the dough together. It also adds moisture and structure, contributing to the final texture.
- Vanilla Extract: Enhances the aroma and complements the chocolate without overpowering it. Pure extract yields better flavor than artificial.
- Milk or Heavy Cream (Optional, for Dough Consistency): Sometimes needed if the dough is too dry. A tablespoon can make the dough easier to work with and improve creaminess.
For the Cream Filling:
- Butter (Unsalted, Softened): Forms the base of the filling, providing smoothness and body. Must be softened but not melted.
- Powdered Sugar (Confectioners’ Sugar): Sweetens and thickens the filling. Sifted to avoid lumps and ensure a silky texture.
- Vanilla Extract: Reinforces the sweet, aromatic profile of the filling.
- Milk or Cream (Heavy Preferred): Adjusts consistency—just enough to make the filling spreadable but not runny.
- Salted Caramel, Peanut Butter, or Melted Chocolate (Optional Add-ins): For gourmet twists that elevate the flavor profile.
Step-by-Step Recipe
Ingredients
Makes approximately 24 sandwich cookies (48 individual wafers)
Chocolate Cookie Wafers:
- 1 ¾ cups (220g) all-purpose flour
- ¾ cup (65g) unsweetened cocoa powder (Dutch-process recommended)
- ½ teaspoon baking soda
- ¼ teaspoon salt
- ½ cup (113g) unsalted butter, at room temperature
- ¾ cup (150g) granulated sugar
- ¼ cup (50g) packed light or dark brown sugar
- 1 large egg, room temperature
- 1 ½ teaspoons pure vanilla extract
- 1–2 tablespoons whole milk or heavy cream (if needed)
Cream Filling:
- ½ cup (113g) unsalted butter, softened
- 2 cups (240g) powdered sugar, sifted
- 1 ½ teaspoons vanilla extract
- 2–3 tablespoons heavy cream or whole milk
- Pinch of salt (optional, enhances flavor)
Directions
- Prepare the Dough: In a medium bowl, whisk together the flour, cocoa powder, baking soda, and salt. Set aside.
- Cream the Butter and Sugars: In a large mixing bowl, beat the softened butter, granulated sugar, and brown sugar together using an electric mixer on medium speed until light and fluffy (about 3–4 minutes). Scrape down the sides as needed.
- Add Wet Ingredients: Beat in the egg and vanilla extract until fully incorporated and smooth. The mixture should be creamy and homogenous.
- Incorporate Dry Ingredients: Gradually add the dry ingredients to the wet mixture, mixing on low speed until just combined. Do not overmix. If the dough feels too stiff or crumbly, add one tablespoon of milk or cream at a time until it comes together into a soft, pliable dough.
- Chill the Dough: Shape the dough into a ball, flatten slightly into a disc, wrap in plastic wrap, and refrigerate for at least 1 hour (up to 48 hours). Chilling firms the butter, prevents excessive spreading, and enhances flavor development.
- Preheat Oven & Prepare Baking Sheets: Preheat oven to 350°F (175°C). Line two baking sheets with parchment paper or silicone mats.
- Roll and Cut the Cookies: On a lightly floured surface, roll out the chilled dough to about ⅛-inch thickness. Use a round cookie cutter (approximately 1.5 to 2 inches in diameter) to cut out shapes. Place them 1 inch apart on the baking sheet.
- Bake: Bake for 8–10 minutes, rotating the pan halfway through. Cookies are done when they appear set and slightly cracked on top. Avoid overbaking—they will firm up as they cool.
- Cool Completely: Let cookies cool on the baking sheet for 5 minutes before transferring to a wire rack. Allow them to cool completely before filling (at least 30 minutes).
- Make the Cream Filling: In a clean bowl, beat the softened butter until creamy (about 1 minute). Gradually add the sifted powdered sugar, beating on low at first, then increasing to medium. Add vanilla, pinch of salt, and 2 tablespoons of cream. Beat until smooth and fluffy, adding more cream only if needed to reach a spreadable consistency.
- Assemble the Sandwiches: Pair similar-sized cookies. Flip half of them upside down. Pipe or spread a generous dollop (about 1 tsp to 1 tbsp depending on size) of cream onto the flat side of one cookie, then gently press another cookie on top to form a sandwich. Repeat with remaining cookies.
- Set and Serve: For best texture, let assembled cookies sit at room temperature for 30 minutes to allow the filling to meld slightly with the wafers. Alternatively, refrigerate for 15 minutes to firm up before serving.
Tips
- Use Quality Cocoa: Since cocoa is the dominant flavor, invest in high-quality Dutch-process cocoa like Valrhona or Ghirardelli for a richer, smoother taste.
- Dough Consistency Matters: If the dough cracks when rolling, it’s too cold. Let it warm up for 5–10 minutes. If it’s sticky, chill longer or add a touch more flour.
- Uniform Thickness: Roll the dough between two sheets of parchment paper with guide strips (like rolling pin rings or chopsticks) to ensure even thickness and consistent baking.
- Don’t Overbake: These cookies continue to cook slightly on the hot tray after removal from the oven. Remove them when the edges are set but centers still look soft.
- Cool Fully Before Filling: Warm cookies will melt the filling and make assembly messy. Patience pays off!
- Filling Tools: Use a piping bag with a round tip for neat, professional-looking filling application. A small offset spatula works well for spreading too.
- Storage Tip: Store assembled cookies in an airtight container at room temperature for up to 5 days. They often taste better the second day as the cream softens the wafers slightly.
Variations and Customizations
One of the joys of making homemade chocolate sandwich cookies is the ability to customize them endlessly. Here are some creative ideas to inspire your next batch:
- Double Chocolate: Add ½ cup of mini chocolate chips to the cookie dough for an extra-rich, melty experience.
- Gluten-Free Version: Substitute all-purpose flour with a 1:1 gluten-free baking blend (like Bob’s Red Mill). Ensure other ingredients are certified GF.
- Vegan Option: Replace butter with plant-based sticks (e.g., Earth Balance), use flax egg (1 tbsp ground flax + 3 tbsp water), and swap cream for coconut cream. Use vegan powdered sugar.
- Flavored Fillings: Infuse the cream with espresso powder, orange zest, peppermint extract, or cinnamon for seasonal flair.
- Nut Butter Swirl: Mix ¼ cup of almond or peanut butter into the cream filling, or swirl it in for a marbled effect.
- Colored Cookies: Add natural food coloring (like beet powder or spirulina for green) to create festive holiday-themed batches.
- Stuffed Center: Place a small piece of caramel, marshmallow, or chocolate truffle in the center before sandwiching for a surprise inside.
- Mini or Jumbo Sizes: Use smaller cutters for bite-sized versions or go oversized (3-inch) for dramatic dessert platters.
- Cookie Shapes: Try hearts, stars, or letters for personalized gifts or party favors.
- Dipped Edges: Melt dark, milk, or white chocolate and dip half of each sandwich cookie for an elegant finish.
Health Considerations and Nutritional Value
While chocolate sandwich cookies are undeniably delicious, it’s important to enjoy them mindfully as part of a balanced diet. Each sandwich cookie (based on standard recipe) contains approximately:
- Calories: ~120–150 kcal
- Total Fat: 7–9g (mostly from butter)
- Saturated Fat: 4–5g
- Carbohydrates: 16–20g (including 10–12g sugars)
- Protein: 1–2g
- Fiber: 1g (from cocoa and flour)
Considerations:
- Sugar Content: High in added sugars. Those managing blood sugar levels may want to reduce portion sizes or experiment with sugar substitutes like erythritol or monk fruit in both dough and filling.
- Gluten and Dairy: Contains both unless modified. Always check labels if allergies or intolerances are a concern.
- Portion Control: These cookies are rich and satisfying—a few can curb cravings more effectively than larger quantities.
- Nutrient Density: Low in essential vitamins/minerals. Best enjoyed occasionally rather than daily.
- Kids and Energy: Provide quick energy but lack sustained nutrition. Pair with fruit or milk for a more balanced snack.
For a healthier twist, consider using black bean or avocado-based doughs (though texture differs), reducing sugar by 25%, or boosting fiber with oat flour blends.
FAQ
Q: Can I freeze the cookie dough?
A: Yes! Wrap the dough disc tightly in plastic and freeze for up to 3 months. Thaw overnight in the refrigerator before rolling and baking.
Q: Can I make these ahead of time?
A: Absolutely. Baked cookies (unfilled) can be stored in an airtight container for up to 1 week. The cream filling can be made 2 days in advance and kept refrigerated; bring to room temperature before assembling.
Q: Why did my cookies spread too much?
A: Likely causes include butter that was too soft, insufficient chilling, or skipping the flour measurement (using too little flour). Always measure flour correctly—spoon and level, don’t scoop.
Q: Can I use oil instead of butter?
A: Not recommended. Oil changes the texture significantly, resulting in greasy, flat cookies. Butter provides both flavor and structure crucial for this recipe.
Q: How do I prevent cracks on top?
A: Minor cracking is normal and adds charm. To minimize, avoid over-creaming butter/sugar and don’t overbake. Chilling the dough thoroughly also helps.
Q: Can I make these without eggs?
A: Yes, substitute with a flax egg (1 tbsp ground flaxseed + 3 tbsp water, let sit 5 mins) or applesauce (¼ cup per egg), though texture may be slightly denser.
Q: My filling is too runny—how can I fix it?
A: Add more sifted powdered sugar, one tablespoon at a time, until desired thickness is reached. Chill briefly to firm up.
Summary
Homemade chocolate sandwich cookies with cream filling offer a rich, nostalgic experience that combines perfectly baked cocoa wafers with a luxuriously smooth center—customizable, satisfying, and deeply comforting. From their historic roots to modern kitchen adaptations, these treats remain a symbol of joy, creativity, and sweet indulgence.