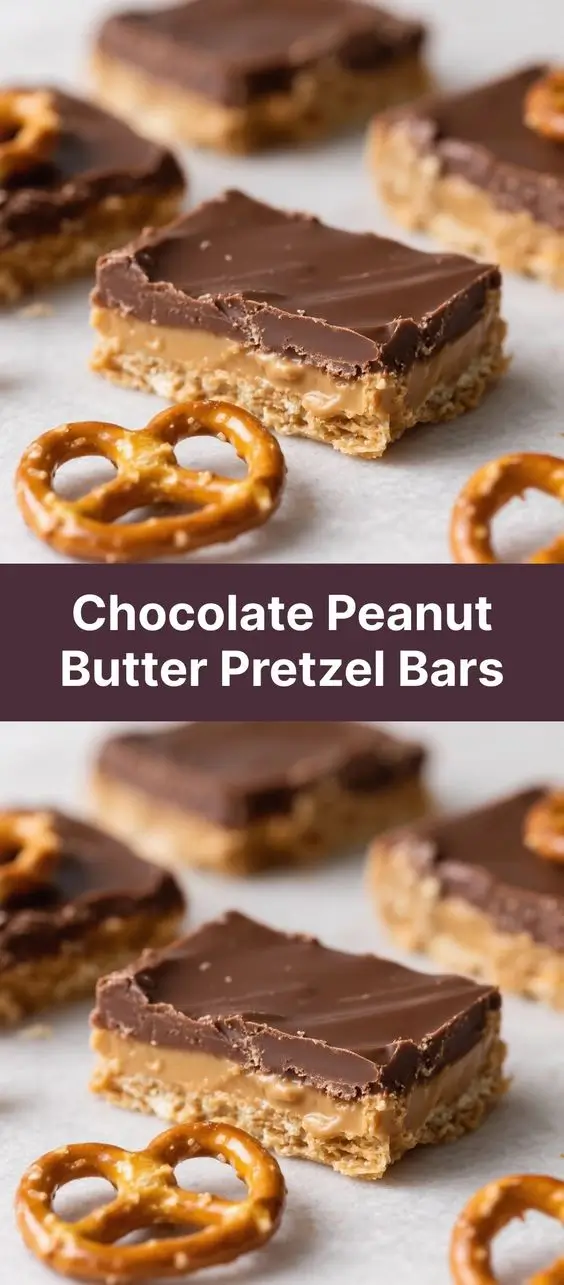
Chocolate Peanut Butter Pretzel Bars: The Ultimate Sweet & Salty Treat
The History of Chocolate Peanut Butter Pretzel Bars
The irresistible combination of chocolate, peanut butter, and pretzels has its roots in the American love affair with contrasting flavors—specifically, the perfect balance between sweet and salty. While there’s no definitive origin story for chocolate peanut butter pretzel bars as a standalone dessert, their inspiration can be traced back to classic confections like chocolate-covered pretzels, which gained popularity in the United States during the late 20th century.
Peanut butter, a staple in American pantries since the early 1900s, found its way into countless desserts, from cookies to fudge. When combined with the crisp saltiness of pretzels and the rich indulgence of chocolate, it created a trifecta of taste sensations that quickly captured the hearts (and taste buds) of snack lovers everywhere. These bars emerged as a homemade favorite in the 2000s, often shared at potlucks, bake sales, and holiday gatherings. Their no-bake convenience, minimal ingredient list, and crowd-pleasing flavor profile made them a go-to treat for home bakers looking to impress without spending hours in the kitchen.
Today, chocolate peanut butter pretzel bars are celebrated not just for their deliciousness but also for their versatility. From gourmet bakery versions with sea salt and dark chocolate to kid-friendly iterations loaded with candy pieces, these bars have evolved into a modern classic—a testament to the power of simple ingredients coming together in harmony.
Ingredients Breakdown
What makes chocolate peanut butter pretzel bars so satisfying is the thoughtful layering of textures and flavors. Each ingredient plays a crucial role in creating the final product:
- Pretzels – Provide a crunchy, salty base that contrasts beautifully with the sweet layers. Choose thin, unsalted or lightly salted pretzel sticks or twists for optimal texture.
- Peanut Butter – Acts as the creamy, rich binder. Opt for smooth, natural peanut butter for a healthier option, or go for a classic brand like Jif or Skippy for extra sweetness and stability.
- Butter – Adds richness and helps melt the peanut butter into a smooth, spreadable consistency. Unsalted butter is preferred to control the overall salt level.
- Powdered Sugar – Gives structure and sweetness to the peanut butter layer, helping it firm up when chilled.
- Vanilla Extract – Enhances the overall flavor profile, adding warmth and depth to the peanut butter mixture.
- Salt – A pinch enhances all the other flavors and balances the sweetness—especially important if using unsalted pretzels.
- Semi-Sweet Chocolate Chips – Create a luxurious top layer that hardens into a glossy, snappable coating. You can substitute with milk chocolate, dark chocolate, or even white chocolate for different flavor profiles.
- Coconut Oil or Shortening – Often mixed with the chocolate to help it set firmly and provide a smooth, shiny finish when cooled.
Step-by-Step Recipe
Ingredients
- 2 cups crushed pretzels (about 3–4 oz)
- 1 cup creamy peanut butter
- ½ cup (1 stick) unsalted butter
- 1 ½ cups powdered sugar
- 1 teaspoon vanilla extract
- Pinch of salt (optional, depending on pretzel saltiness)
- 1 ½ cups semi-sweet chocolate chips
- 1 tablespoon coconut oil or vegetable shortening
Directions
- Prepare the Pan: Line an 8×8-inch baking dish with parchment paper, leaving overhang on two sides for easy removal. Lightly grease the parchment for added security.
- Make the Pretzel Base: In a food processor or sealed plastic bag, crush the pretzels into coarse crumbs—some larger pieces are fine for texture. Spread evenly across the bottom of the prepared pan and press down gently to form a firm layer.
- Prepare the Peanut Butter Layer: In a medium saucepan over low heat, combine the peanut butter and butter. Stir continuously until fully melted and smooth, about 3–5 minutes.
- Mix in Dry Ingredients: Remove from heat. Gradually whisk in the powdered sugar until fully incorporated and thickened. Stir in the vanilla extract and a pinch of salt if desired. The mixture should be thick and dough-like.
- Spread the Peanut Butter Mixture: Transfer the peanut butter mixture to the pan. Use a spatula dipped in warm water to spread it evenly over the pretzel crust. Take care to keep the layer uniform for consistent bites.
- Chill the Base: Place the pan in the refrigerator for at least 30 minutes to firm up the peanut butter layer. This step is crucial before adding the chocolate topping.
- Make the Chocolate Topping: In a heat-safe bowl, combine chocolate chips and coconut oil. Melt using either a double boiler or microwave in 30-second intervals, stirring well after each, until completely smooth and glossy.
- Pour Chocolate Over the Bars: Remove the pan from the fridge. Pour the melted chocolate over the chilled peanut butter layer. Use a spatula to spread it evenly, covering the entire surface.
- Optional Garnish: Sprinkle with additional crushed pretzels, sea salt flakes, chopped peanuts, or drizzled peanut butter for visual appeal and extra crunch.
- Final Chill: Return the pan to the refrigerator for at least 45 minutes, or until the chocolate is completely firm and no longer leaves a fingerprint when touched.
- Cut into Bars: Using the parchment overhang, lift the block out of the pan. Place on a cutting board and slice into 16 squares (or rectangles) using a sharp knife wiped clean between cuts for neat edges.
- Serve and Store: Serve chilled. Store leftovers in an airtight container in the refrigerator for up to 2 weeks, or freeze for up to 3 months.
Tips for Perfect Chocolate Peanut Butter Pretzel Bars
- Use Quality Ingredients: Since this recipe has few components, each one shines through. High-quality peanut butter and real chocolate make a noticeable difference.
- Don’t Over-Crush Pretzels: A mix of fine crumbs and small chunks provides the best texture contrast. Over-processing can turn them into dust, losing that signature crunch.
- Prevent Sticking: Always use parchment paper—it’s essential for clean removal and effortless slicing.
- Control Melting: When melting peanut butter and chocolate, use low heat to avoid separation or burning. Stir constantly and never walk away.
- Chill Thoroughly: Rushing the chilling process leads to messy layers. Allow adequate time for each layer to set before proceeding.
- Sharpen Your Knife: For clean cuts, use a sharp chef’s knife and wipe it with a warm, damp cloth between slices to prevent smearing.
- Room Temperature Serving: Let bars sit out for 5–10 minutes before serving for a slightly softer, more decadent texture.
Variations and Customizations
One of the greatest strengths of this recipe is its adaptability. Whether you’re catering to dietary needs, experimenting with flavors, or just want to switch things up, here are some creative twists:
- Different Nut Butters: Substitute almond butter, cashew butter, or sunflower seed butter (great for nut-free versions) for a new flavor dimension.
- Gluten-Free Option: Use certified gluten-free pretzels to make these bars safe for those with gluten sensitivities.
- Vegan Version: Use plant-based butter, dairy-free chocolate chips, and ensure your pretzels are vegan-friendly. Maple syrup can replace powdered sugar in some recipes, though texture may vary.
- Flavor Infusions: Add a dash of cinnamon, espresso powder, or orange zest to the peanut butter layer for a gourmet twist.
- Layered Look: Create a marble effect by drizzling melted peanut butter over the chocolate layer before it sets, then swirling with a toothpick.
- Add Mix-Ins: Fold mini marshmallows, chopped peanuts, chocolate chunks, or even crushed potato chips into the peanut butter layer for extra fun.
- Double Chocolate: Add cocoa powder to the peanut butter layer (2–3 tablespoons) to create a chocolate-peanut butter hybrid base.
- No-Bake Energy Bar Style: Reduce sugar, add oats and flaxseed, and use natural sweeteners like honey to turn these into a more nutritious snack bar.
- Mini Bars: Use a muffin tin lined with paper liners to make individual-sized treats—perfect for parties or lunchboxes.
- Seasonal Themes: Add red and green sprinkles for holidays, orange candy for Halloween, or pastel colors for spring celebrations.
Health Considerations and Nutritional Value
While chocolate peanut butter pretzel bars are undeniably indulgent, understanding their nutritional content can help you enjoy them mindfully.
Nutritional Overview (Per Serving, 1 of 16 Bars):
- Calories: ~220–250
- Fat: 14–17g (mostly from peanut butter and butter; includes saturated fat)
- Carbohydrates: 22–26g (includes sugars from powdered sugar and chocolate)
- Sugar: 14–18g
- Protein: 4–5g (from peanut butter)
- Sodium: 150–250mg (varies based on pretzel and peanut butter salt content)
Health Notes:
- Portion Control is Key: These bars are rich and satisfying—a little goes a long way. Stick to one square to enjoy without overindulging.
- Healthy Fats: Peanut butter contains monounsaturated fats, which are heart-healthy in moderation.
- Low Fiber: Traditional versions lack fiber unless whole grain pretzels or add-ins like oats are used.
- Allergens: Contains peanuts, tree nuts (if using nut butter), dairy, and gluten (unless substitutions are made). Always label accordingly when sharing.
- Refined Sugars: Powdered sugar and chocolate chips contribute significant added sugars. Consider reducing quantities or using sugar alternatives like erythritol or monk fruit blends for lower-sugar versions.
- Balanced Indulgence: Best enjoyed occasionally as part of a balanced diet. Pair with fruit or yogurt for a more complete snack.
Frequently Asked Questions (FAQ)
- Can I make these bars without powdered sugar?
- Yes, though the texture will change. Alternatives include maple syrup, honey, or a powdered sugar substitute like Swerve Confectioners. Note: liquid sweeteners may make the layer softer and require longer chilling.
- Why did my chocolate layer crack?
- This usually happens if the peanut butter layer is too cold when chocolate is added, or if the chocolate wasn’t tempered properly. Let the base sit at room temperature for 5 minutes before topping, and ensure chocolate is smooth and warm (not hot).
- Can I freeze chocolate peanut butter pretzel bars?
- Absolutely! Wrap individually or store in a freezer-safe container with parchment between layers. Freeze for up to 3 months. Thaw in the fridge for 30 minutes before serving.
- How do I store these bars?
- Keep in an airtight container in the refrigerator for up to 2 weeks. They can dry out at room temperature, and the chocolate may soften or melt in warm environments.
- Can I use crunchy peanut butter?
- Yes! Crunchy peanut butter adds extra texture and is a great choice if you enjoy more bite in your bars.
- Why did my bars turn out too soft?
- Not chilling long enough is the most common cause. Ensure each layer sets completely before moving to the next step. Also, using low-fat peanut butter or skipping the butter can reduce firmness.
- Can I make these in a larger pan?
- You can use a 9×13-inch pan for thinner bars. Adjust ingredients proportionally—use 1.5x the recipe for proper thickness.
- Are these bars gluten-free?
- Only if you use certified gluten-free pretzels. Regular pretzels are made from wheat flour.
- Can I use milk instead of butter?
- No—milk won’t provide the fat needed for texture and binding. Stick to butter or a butter substitute.
- Can I make these ahead of time?
- Yes! These bars actually improve in flavor and texture after chilling overnight. Make them 1–2 days in advance for stress-free entertaining.
Summary
Chocolate Peanut Butter Pretzel Bars deliver the ultimate sweet-and-salty experience with layers of crunchy pretzels, creamy peanut butter, and rich chocolate—all without turning on the oven.
Easy to customize, simple to make, and universally loved, these no-bake bars are perfect for holidays, snacks, or anytime cravings strike.