Introduction
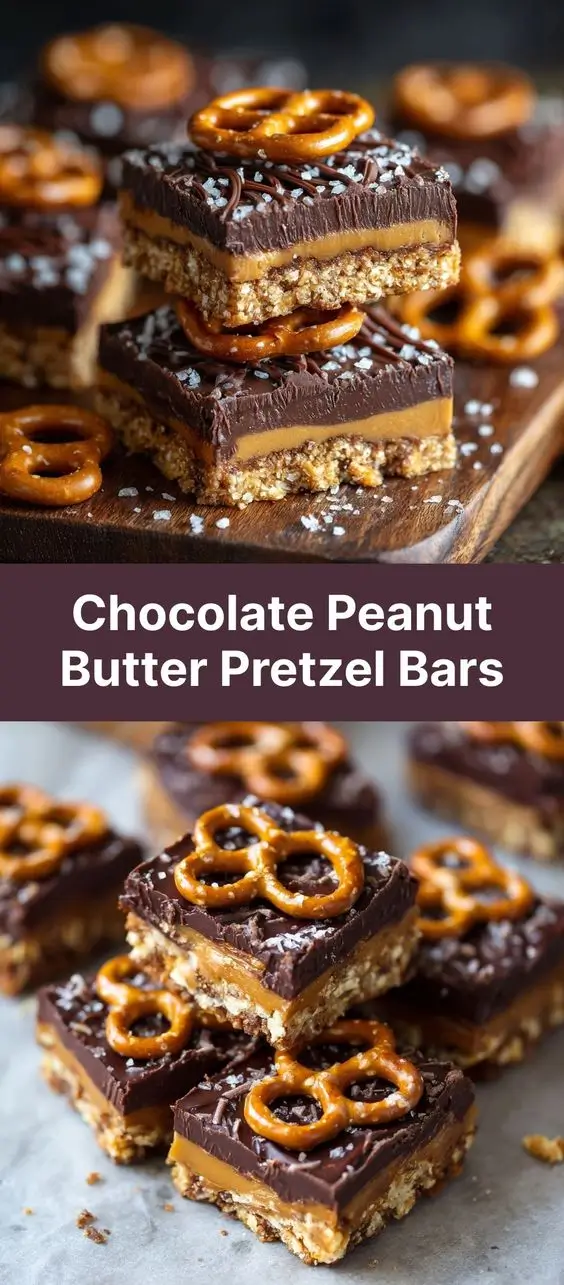
Indulge in the ultimate sweet-and-salty sensation with these irresistible Chocolate Peanut Butter Pretzel Bars. A harmonious blend of rich chocolate, creamy peanut butter, and crunchy salted pretzels come together to create a no-bake dessert that’s as easy to make as it is delicious to devour. Whether you’re preparing for a party, packing school snacks, or simply treating yourself, these bars offer a perfect balance of textures and flavors that appeal to kids and adults alike. With minimal ingredients and no oven required, they’re ideal for last-minute cravings or when you want a fuss-free treat that still feels decadent.
The History
The concept of combining chocolate, peanut butter, and pretzels traces back to American culinary traditions where sweet and salty flavor profiles began gaining popularity in the mid-20th century. The rise of processed snack foods and the availability of shelf-stable ingredients like Reese’s Peanut Butter Cups and chocolate-covered pretzels laid the foundation for homemade confections that mimic store-bought favorites. No-bake desserts became especially popular during summer months when families wanted to avoid heating up their kitchens. Recipes for peanut butter squares and chocolate cracker bars evolved over time, often passed down through family cookbooks or shared at community events. The modern version of Chocolate Peanut Butter Pretzel Bars likely emerged from this tradition—inspired by treats like magic cookie bars, seven-layer bars, and chocolate bark—but elevated with the satisfying crunch of pretzels and the smooth richness of peanut butter. Today, these bars are a staple at potlucks, bake sales, and holiday gatherings across the United States and beyond, beloved for their simplicity and crowd-pleasing taste.
Ingredients Breakdown
Understanding each ingredient helps ensure your Chocolate Peanut Butter Pretzel Bars turn out perfectly every time:
- Pretzels: Use small twists or mini pretzels for even distribution. They provide a crisp texture and a salty contrast that cuts through the sweetness.
- Peanut Butter: Opt for creamy, unsweetened natural peanut butter or classic brands like Jif or Skippy. Avoid oily or freshly ground varieties unless well-stirred, as excess oil can affect consistency.
- Butter: Unsalted butter gives better control over sodium levels. It adds richness and helps bind the base layer while enhancing flavor.
- Powdered Sugar: Also known as confectioners’ sugar, it sweetens the peanut butter mixture without adding graininess and helps firm up the filling.
- Vanilla Extract: Enhances overall flavor complexity with a warm, aromatic note.
- Salt: A pinch enhances all other flavors; use kosher or sea salt for balanced seasoning.
- Chocolate Chips: Semi-sweet, milk, or dark chocolate chips work depending on preference. High-quality chips melt smoothly and set with a nice snap.
- Coconut Oil or Shortening (optional): Added to chocolate for a shinier finish and easier slicing once cooled.
- Toppings (optional): Extra crushed pretzels, chopped peanuts, flaky sea salt, or drizzled white chocolate for garnish.
Each component plays a role in creating a layered dessert that’s both texturally exciting and deeply flavorful.
Step-by-Step Recipe
- Prepare the Pan: Line an 8×8-inch or 9×9-inch baking pan with parchment paper, leaving overhang on two sides for easy removal. Lightly grease the paper if needed.
- Make the Pretzel Base: Spread 2 cups of broken or mini pretzels evenly across the bottom of the prepared pan. Press gently to form a loose, even layer.
- Melt the Peanut Butter Mixture: In a medium saucepan over low heat, melt ½ cup (1 stick) of unsalted butter. Stir in 1 cup of creamy peanut butter until fully combined and smooth.
- Sweeten the Filling: Remove from heat and gradually whisk in 1½ cups of powdered sugar until no lumps remain. Add 1 teaspoon of vanilla extract and a pinch of salt. Mix thoroughly until the filling is thick and spreadable.
- Layer the Peanut Butter: Pour the warm peanut butter mixture over the pretzel base. Use a spatula to spread it into an even layer, ensuring full coverage and sealing the pretzels underneath.
- Chill the Base: Place the pan in the refrigerator for at least 30 minutes to allow the peanut butter layer to firm up completely.
- Melt the Chocolate Topping: In a heatproof bowl, combine 1½ cups of chocolate chips with 1 tablespoon of coconut oil or vegetable shortening. Melt using a double boiler or microwave in 30-second intervals, stirring between each until silky smooth.
- Top with Chocolate: Pour the melted chocolate over the chilled peanut butter layer. Use a spatula to spread evenly, covering the entire surface.
- Add Final Touches: While the chocolate is still wet, sprinkle with additional crushed pretzels, chopped peanuts, or a light dusting of flaky sea salt for extra flair.
- Final Chill: Return the pan to the refrigerator for another 45–60 minutes, or until the chocolate is completely set and holds its shape when touched.
- Cut Into Bars: Using the parchment overhang, lift the slab out of the pan. Place on a cutting board and slice into 12–16 uniform bars using a sharp knife. Wipe the blade between cuts for clean edges.
- Serve or Store: Enjoy immediately or store in an airtight container for later. These bars can be served chilled or brought to room temperature for a softer bite.
Tips
- Use Fresh Pretzels: Stale pretzels lose their crunch. For maximum texture contrast, use a recently opened bag.
- Don’t Overmelt Chocolate: Overheating can cause chocolate to seize. Always melt slowly and stir frequently.
- Room Temperature Ingredients: Ensure peanut butter isn’t too cold before mixing—it blends more smoothly when slightly warmed.
- Even Spreading: Dip your spatula in hot water and dry it before spreading sticky layers for smoother application.
- Sharp Knife Is Key: Warm the knife under hot water, dry it, and slice gently to prevent cracking or smearing.
- Chill Time Matters: Rushing the chilling process leads to messy bars. Allow adequate time for each layer to set.
- Double the Recipe? Consider using a 9×13-inch pan for larger batches. Adjust ingredient quantities accordingly.
- Freeze for Longevity: These bars freeze well for up to 3 months. Thaw in the fridge before serving.
Variations and Customizations
These Chocolate Peanut Butter Pretzel Bars are highly adaptable—here are some creative twists to try:
- Nut-Free Version: Replace peanut butter with sunflower seed butter or soy nut butter for a safe option for schools or allergies.
- Different Crackers: Swap pretzels for graham crackers, vanilla wafers, or cinnamon snaps for a new flavor profile.
- White Chocolate Drizzle: After the dark/milk chocolate sets, drizzle melted white chocolate on top for visual appeal and added sweetness.
- Reese’s-Inspired Bars: Press mini Reese’s cups into the chocolate layer before it sets.
- Cookie Butter Twist: Use Biscoff or speculoos spread instead of peanut butter for a spiced, caramelized flavor.
- Protein Boost: Add a scoop of unflavored or vanilla protein powder to the peanut butter layer (adjust powdered sugar as needed).
- Gluten-Free Option: Use certified gluten-free pretzels to accommodate dietary restrictions.
- Vegan Version: Use plant-based butter, dairy-free chocolate, and ensure your pretzels are vegan-friendly.
- Mini Bars: Make bite-sized versions in a muffin tin lined with paper liners for party favors or lunchbox treats.
- Seasonal Themes: Add festive sprinkles, colored pretzels, or themed decorations for holidays like Christmas, Halloween, or Valentine’s Day.
Health Considerations and Nutritional Value
While undeniably delicious, it’s important to enjoy Chocolate Peanut Butter Pretzel Bars in moderation due to their high sugar, fat, and calorie content. However, they do contain some beneficial nutrients:
- Healthy Fats: Peanut butter provides monounsaturated and polyunsaturated fats, which support heart health when consumed in balance.
- Protein: Peanut butter contributes about 3–4 grams of protein per serving, helping with satiety.
- Energy Boost: The combination of carbs and fats makes these bars a quick source of energy—ideal for pre-workout snacks or hiking fuel (in moderation).
However, consider the following:
- Sugar Content: With powdered sugar and chocolate, one bar may contain 10–15 grams of sugar. Those managing blood sugar should limit portion size.
- Sodium Levels: Pretzels and peanut butter contribute sodium, so individuals on low-sodium diets should monitor intake.
- Allergens: Contains peanuts, dairy (butter, chocolate), and wheat (pretzels)—common allergens. Always label clearly when sharing.
- Portion Control: Cut into smaller squares and serve alongside fruit or yogurt to balance the indulgence.
For healthier modifications: use reduced-sugar chocolate, low-sodium pretzels, natural peanut butter with no added sugar, and reduce powdered sugar by ¼ cup (though texture may be less firm).
Ingredients
- 2 cups mini pretzel twists (or broken pretzels)
- ½ cup (1 stick / 113g) unsalted butter
- 1 cup (250g) creamy peanut butter (natural or regular)
- 1½ cups (180g) powdered sugar
- 1 teaspoon pure vanilla extract
- Pinch of salt (skip if using salted butter and pretzels)
- 1½ cups (270g) chocolate chips (semi-sweet, milk, or dark)
- 1 tablespoon coconut oil or vegetable shortening (optional, for smoother chocolate)
- Optional toppings: crushed pretzels, chopped peanuts, flaky sea salt, white chocolate drizzle
Directions
- Line an 8×8-inch or 9×9-inch baking dish with parchment paper, allowing overhang on two sides. Lightly grease the paper.
- Spread the pretzels evenly across the bottom of the pan to create a base layer.
- In a saucepan over low heat, melt the butter. Stir in the peanut butter until smooth and fully incorporated.
- Remove from heat. Gradually mix in the powdered sugar until smooth and thick. Stir in vanilla and a pinch of salt.
- Pour the peanut butter mixture over the pretzels. Use a spatula to spread into an even, compact layer.
- Refrigerate for 30 minutes to set.
- While the base chills, prepare the topping: combine chocolate chips and coconut oil in a heat-safe bowl. Melt using a double boiler or microwave (30-second bursts, stirring between), until smooth.
- Pour the melted chocolate over the chilled peanut butter layer. Spread evenly with a spatula.
- Immediately add desired toppings—crushed pretzels, nuts, or sea salt—before the chocolate sets.
- Return to the refrigerator for 45–60 minutes, or until the chocolate is firm.
- Lift the bars out using the parchment overhang. Place on a cutting board and slice into bars with a sharp knife.
- Store in an airtight container in the fridge for up to 2 weeks, or freeze for longer storage.
FAQ
Can I make these bars without powdered sugar?
You can try substituting with maple syrup or honey, but this will change the texture significantly—making the filling runnier and less stable. You may need to increase chill time or add more pretzels to absorb moisture.
Why did my chocolate crack when I cut the bars?
This usually happens if the chocolate was too cold or hardened too quickly. Let the pan sit at room temperature for 5–10 minutes before slicing, and always use a warm knife.
Can I use chunky peanut butter?
Yes! Chunky peanut butter adds more texture, though it may make spreading slightly harder. Ensure it’s well mixed with butter for a smooth pour.
How long do these bars last?
They keep well in the refrigerator for up to 2 weeks or in the freezer for 3 months when stored in an airtight container.
Can I make them ahead of time?
Absolutely! These bars actually benefit from being made 1–2 days in advance—the flavors meld and the texture firms up beautifully.
Are these bars suitable for freezing?
Yes. Wrap individually or store in layers separated by parchment. Thaw in the fridge for 1 hour before serving.
Can I use milk instead of butter?
No—butter is essential for binding and richness. Milk will not provide the same structure and may result in a soggy bar.
What if I don’t have coconut oil?
It’s optional. You can melt the chocolate chips alone, but adding a bit of shortening or neutral oil improves spreadability and prevents blooming.
Summary
Deliciously crunchy, richly creamy, and perfectly balanced between sweet and salty, these Chocolate Peanut Butter Pretzel Bars are a no-bake dream come true for any occasion.
Easy to customize, simple to store, and always a hit, they’re the ultimate homemade treat that tastes like a gourmet candy bar.