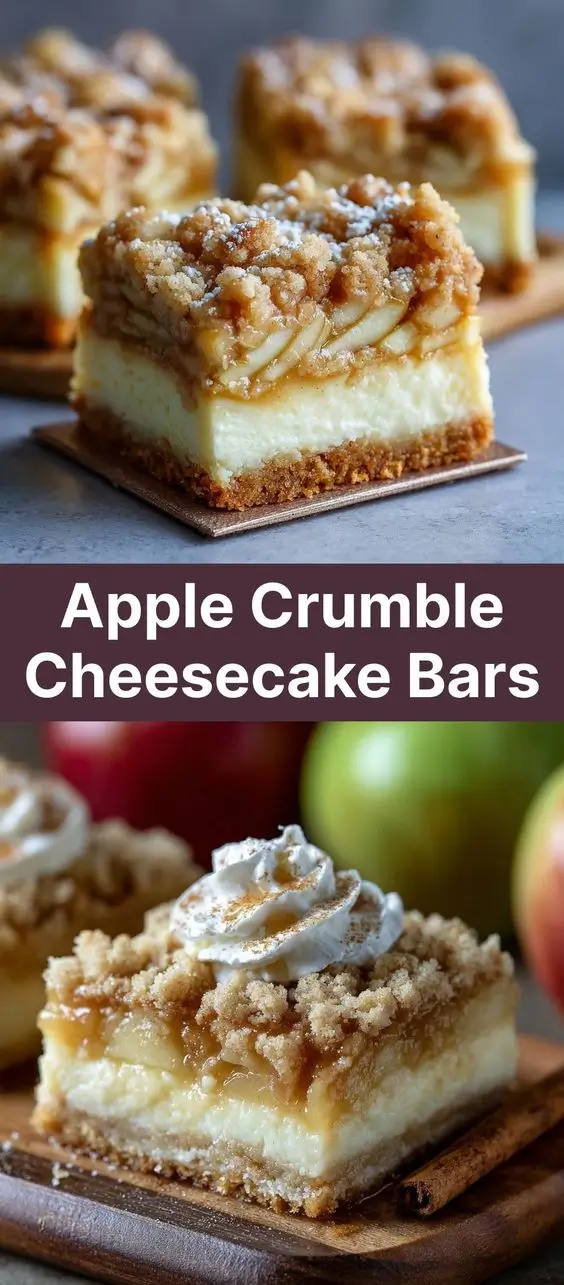
Apple Crumble Cheesecake Bars: The Ultimate Fusion Dessert
If you’re a fan of creamy cheesecake, warm apple crumbles, and buttery shortbread crusts, then these Apple Crumble Cheesecake Bars are your new dessert soulmate. Combining the best elements of three beloved treats into one decadent, portable bar, this recipe delivers rich flavor, contrasting textures, and an irresistible aroma that will have everyone asking for seconds. Whether you’re preparing for a holiday gathering, a potluck, or simply treating yourself to something special, these bars offer elegance without the stress.
The History Behind the Layers
Dessert evolution is often a story of happy accidents and cultural blending. Cheesecake itself dates back to ancient Greece, where it was served to athletes during the first Olympic games. Over centuries, it evolved—adopted by Romans, reinvented in America with cream cheese in the 20th century (thanks to the Philadelphia brand), and eventually becoming a staple at celebrations.
Meanwhile, apple crumble—or “apple crisp” as it’s known in North America—originated during World War II when ingredients like flour and sugar were rationed. Bakers created simple oat-based toppings to stretch fruit desserts further, giving rise to the now-iconic crumbly, spiced topping we love today.
The fusion of cheesecake and fruit crumble emerged more recently, likely influenced by the popularity of no-bake desserts and layered bars in American home baking. Apple Crumble Cheesecake Bars are a modern twist on this tradition—a hybrid dessert that satisfies multiple cravings in every bite. They bring together the velvety richness of New York-style cheesecake, the homey comfort of baked apples, and the buttery crunch of a shortbread base, all in a convenient, sliceable form.
Ingredients Breakdown: What Makes These Bars So Irresistible?
Each component of these bars plays a crucial role in building flavor, texture, and structure. Let’s break them down layer by layer:
1. The Crust – Buttery Shortbread Foundation
- All-Purpose Flour: Provides structure and a tender crumb.
- Unsalted Butter: Cold butter ensures flakiness; when baked, it creates a rich, melt-in-your-mouth base.
- Granulated Sugar: Adds sweetness and helps with browning.
- Pinch of Salt: Enhances overall flavor and balances sweetness.
2. The Cheesecake Layer – Creamy Centerpiece
- Cream Cheese (Full-Fat): The star ingredient. Must be softened for smooth blending and zero lumps.
- Granulated Sugar: Sweetens the filling and helps create a slight crust on top when baked.
- Large Egg + Egg Yolk: The egg provides structure, while the extra yolk adds silkiness and richness.
- Vanilla Extract: Deepens flavor and complements both apple and cheese notes.
- Sour Cream (or Greek Yogurt): Adds tanginess, moisture, and prevents cracking.
3. The Apple Filling – Spiced Autumn Heart
- Apples (Granny Smith, Honeycrisp, or Braeburn): Choose firm, tart apples that hold their shape when baked.
- Brown Sugar: Caramelizes beautifully and enhances natural apple flavors.
- Cinnamon & Nutmeg: Warm spices that define the essence of apple pie.
- Lemon Juice: Brightens the mix and prevents browning.
- Cornstarch: Thickens juices so your bars don’t turn soggy.
4. The Crumble Topping – Golden Crunch Crown
- Old-Fashioned Oats: Rolled oats provide chew and rustic texture.
- Flour & Brown Sugar: Builds the base of the streusel.
- Cinnamon: Echoes spice from the apples.
- Cold Butter: When cut into dry ingredients, forms clumps that bake into crisp clusters.
- Optional Add-ins: Chopped walnuts, pecans, or even a splash of bourbon for depth.
Step-by-Step Recipe: How to Make Perfect Apple Crumble Cheesecake Bars
Makes 16 bars | Prep time: 30 minutes | Bake time: 50–60 minutes | Chill time: 4+ hours
Ingredients
For the Crust:
- 1 ½ cups (190g) all-purpose flour
- ½ cup (100g) granulated sugar
- ¼ tsp salt
- ¾ cup (170g / 1.5 sticks) cold unsalted butter, cubed
For the Cheesecake Layer:
- 16 oz (450g) full-fat cream cheese, softened
- ⅓ cup (65g) granulated sugar
- 1 large egg + 1 egg yolk
- 1 tsp pure vanilla extract
- 2 tbsp sour cream or Greek yogurt
For the Apple Filling:
- 3 medium apples, peeled, cored, and diced (about 3 cups)
- ¼ cup (50g) packed brown sugar
- 1 tsp ground cinnamon
- ¼ tsp ground nutmeg
- 1 tbsp lemon juice
- 1 tbsp cornstarch
For the Crumble Topping:
- ½ cup (45g) old-fashioned rolled oats
- ¼ cup (30g) all-purpose flour
- ⅓ cup (65g) packed brown sugar
- ½ tsp cinnamon
- ¼ tsp salt
- ¼ cup (55g / 0.5 stick) cold unsalted butter, cubed
- ¼ cup chopped walnuts or pecans (optional)
Directions
- Preheat oven to 350°F (175°C). Line a 9×9-inch baking pan with parchment paper, leaving overhang on two sides for easy removal. Lightly grease any exposed pan.
- Make the crust: In a food processor, pulse flour, sugar, and salt. Add cold cubed butter and pulse until mixture resembles coarse sand with some pea-sized pieces. Alternatively, use a pastry cutter or fork. Press evenly into the bottom of the prepared pan. Bake for 18–20 minutes until lightly golden. Cool slightly while preparing filling.
- Prepare the apple filling: In a medium saucepan over medium heat, combine diced apples, brown sugar, cinnamon, nutmeg, lemon juice, and cornstarch. Cook for 8–10 minutes, stirring frequently, until apples are tender but not mushy and liquid has thickened. Remove from heat and let cool completely (warm apples can melt the cream cheese layer).
- Make the cheesecake layer: In a large bowl, beat softened cream cheese with an electric mixer until smooth and fluffy (about 2 minutes). Gradually add sugar and beat until incorporated. Scrape down sides. Add egg, egg yolk, vanilla, and sour cream; beat on low until just combined. Do not overmix—this prevents air bubbles and cracks.
- Assemble the layers: Spread the cheesecake batter evenly over the cooled crust. Spoon cooled apple filling over the cheesecake layer and gently spread, leaving about ½ inch border around edges to prevent overflow. It’s okay if it’s uneven—rustic looks charming!
- Make the crumble topping: In a small bowl, mix oats, flour, brown sugar, cinnamon, and salt. Cut in cold butter using a fork, pastry cutter, or fingers until clumps form (some pea-sized, others smaller). Stir in nuts if using. Sprinkle evenly over apples.
- Bake: Place pan in oven and bake for 40–50 minutes. The cheesecake should be set around the edges but still have a slight jiggle in the center. The topping should be golden brown and crisp. If the topping browns too quickly, tent loosely with foil.
- Cool completely: Let bars cool at room temperature for 1 hour, then refrigerate uncovered for at least 4 hours (preferably overnight) to fully set.
- Cut and serve: Use parchment overhang to lift bars out of pan. Place on cutting board and slice into 16 squares with a sharp knife dipped in hot water for clean cuts.
Tips for Success: Avoid Common Pitfalls
- Use room-temperature cream cheese: Cold cream cheese leads to lumpy batter. Take it out 1–2 hours before mixing.
- Cook apples thoroughly: Raw apples release too much moisture and can make the bar soggy. Pre-cooking ensures they’re flavorful and stable.
- Let everything cool: Adding warm apple filling to the cream cheese layer can cause separation and melting.
- Don’t overbake: A slight wobble in the center is normal—it will set as it chills.
- Chill thoroughly: This step is non-negotiable. Without proper chilling, the bars won’t hold their shape when cut.
- Wipe the knife between cuts: For pristine slices, dip your knife in hot water and wipe dry after each cut.
- Line the pan well: Parchment paper is essential for lifting the entire block out cleanly.
Variations and Customizations
These bars are incredibly versatile! Here are creative ways to adapt them for different tastes, diets, and occasions:
Dietary Modifications
- Gluten-Free: Substitute all-purpose flour in crust and crumble with a 1:1 gluten-free blend. Ensure oats are certified GF.
- Dairy-Free: Use plant-based butter (like Miyoko’s or Earth Balance) and dairy-free cream cheese (Kite Hill or Violife work well).
- Lower Sugar: Reduce sugar in cheesecake and apple layers by 25%, or use coconut sugar for a less refined option.
- Vegan Option: Combine dairy-free substitutes with a flax egg (1 tbsp ground flax + 3 tbsp water = 1 egg).
Flavor Twists
- Pear & Ginger: Swap apples for ripe pears and add ½ tsp ground ginger or crystallized ginger bits.
- Caramel Drizzle: Swirl store-bought or homemade caramel into the apple layer before adding crumble.
- Streusel Upgrade: Add 2 tbsp chopped crystallized ginger or dried cranberries to the topping.
- Nutty Crunch: Toast the nuts before adding to topping for deeper flavor.
- Berry Bliss: Replace apples with cooked blueberries or mixed berries (adjust cornstarch to 1.5 tbsp).
- Spice Boost: Add cardamom, allspice, or clove for a more complex spice profile.
Holiday Versions
- Thanksgiving Mini Bars: Bake in a 9×13-inch pan and cut into tiny squares for dessert platters.
- Christmas Spice: Add orange zest and a pinch of cloves to the apple mix.
- Easter Pastels: Top with candied lemon zest or edible flowers for spring events.
Health Considerations and Nutritional Value
While undeniably indulgent, Apple Crumble Cheesecake Bars can be enjoyed mindfully. Here’s what you need to know:
Nutrition Per Bar (Approximate):
- Calories: ~320–360
- Fat: 20–24g (mostly from butter and cream cheese)
- Saturated Fat: 12–14g
- Carbohydrates: 35–40g
- Sugars: 22–26g (includes natural sugars from apples)
- Protein: 4–5g
- Fiber: 1.5–2g (from apples and oats)
Health Notes:
- Rich in Calcium & Vitamin A: From dairy ingredients, supporting bone and eye health.
- Apples Provide Fiber & Antioxidants: Particularly quercetin, which supports immune function.
- High in Saturated Fat: Best enjoyed in moderation, especially for those managing cholesterol.
- Low in Sodium: With minimal added salt, these bars aren’t a sodium concern unless using salted butter.
- Balanced Treat: Pair with a cup of green tea or serve alongside fresh berries to balance richness.
Portion Control Tip:
Cut into 20 smaller bars instead of 16 to reduce portion size. Store extras in the freezer for future cravings.
Frequently Asked Questions (FAQ)
Can I make these bars ahead of time?
Absolutely! These bars taste even better the next day. Prepare up to 3 days in advance and store covered in the refrigerator. You can also freeze them for up to 3 months—wrap individually in plastic and thaw in fridge overnight.
Why did my cheesecake layer crack?
Cracking is usually due to overmixing, overbaking, or sudden temperature changes. Avoid opening the oven door early, and ensure you don’t beat the batter too long after adding eggs.
Can I skip pre-cooking the apples?
We strongly recommend against it. Raw apples release excess moisture during baking, which can sink the cheesecake layer and make the texture watery.
Can I use canned apple pie filling?
You can, but it often contains artificial flavors, colors, and excessive sugar. Homemade filling gives better control over sweetness and consistency.
How do I store leftovers?
Keep bars in an airtight container in the refrigerator for up to 5 days. For longer storage, freeze on a tray first, then transfer to a freezer-safe bag.
Can I bake this in a larger pan?
Yes. Use a 9×13-inch pan for thinner bars. Reduce baking time by 5–10 minutes and monitor closely.
Is a water bath necessary?
No. Unlike traditional cheesecakes, the thin layer and surrounding crust protect against cracking, so a water bath isn’t needed here.
Can I make mini versions?
Yes! Use a muffin tin lined with parchment cups. Fill each with crust, cheesecake, apples, and crumble. Bake for 20–25 minutes. Perfect for parties!
Summary
Apple Crumble Cheesecake Bars unite the creamy luxury of cheesecake, the cozy warmth of spiced baked apples, and the buttery crunch of a shortbread-oat crumble—all in one stunning, sliceable dessert. Easy to prepare and impossible to resist, they’re perfect for holidays, brunches, or anytime you crave comfort in a bite.