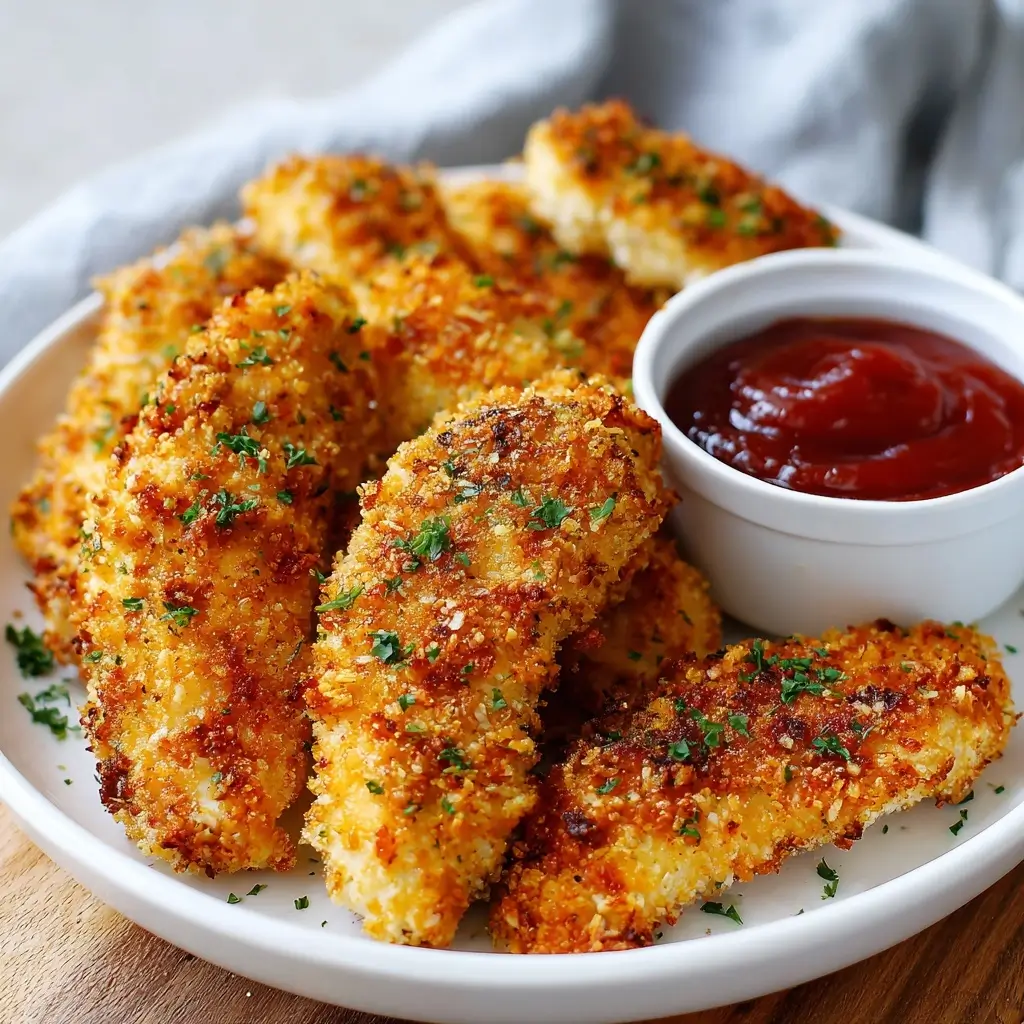
Crispy Baked Chicken Tenders
Crispy Baked Chicken Tenders: A Healthier Twist on a Classic Favorite
If you’re craving something crunchy, golden, and satisfying without the guilt of deep frying, crispy baked chicken tenders are your go-to solution. These tender strips of juicy chicken breast are coated in a flavorful, crisp breading and oven-baked to perfection—retaining all the crunch you love with significantly less oil. Whether you’re preparing a quick weeknight dinner, packing school lunches, or serving up game-day snacks, this recipe delivers restaurant-quality results right from your own kitchen. Plus, it’s easily customizable, kid-friendly, and perfect for meal prepping.
The History of Chicken TendersChicken tenders, also known as chicken fingers or goujons, have become a staple in American cuisine, but their origins trace back to Southern cooking traditions where fried chicken was a weekend favorite. The term “tender” refers to the pectoralis minor muscles located under the chicken breast—naturally tender, thin cuts ideal for quick cooking. However, most modern recipes use sliced chicken breasts due to availability.
While fried chicken has been enjoyed for centuries, the rise of chicken tenders as a distinct menu item began in the 1970s and 80s, particularly in fast food restaurants and casual dining chains. Establishments like Puritan Backroom in New Hampshire claim to have invented the breaded and fried chicken strip in the 1970s, marketing it as a more approachable, less messy alternative to whole fried chicken. Over time, these bite-sized portions gained popularity among children and adults alike, becoming synonymous with comfort food.
As health awareness grew in the 2000s, home cooks and chefs sought healthier alternatives to deep-fried versions. Enter the baked chicken tender—an innovative twist using oven baking, panko breadcrumbs, and light sprays of oil to achieve that beloved crunch without excess fat. Today, crispy baked chicken tenders represent the perfect fusion of nostalgia and modern wellness.
Ingredients Breakdown: What Makes Them Crispy and Delicious
The magic behind perfectly crispy baked chicken tenders lies in the careful selection and layering of ingredients. Each component plays a crucial role in texture, flavor, and moisture retention:
- Chicken Breast: Boneless, skinless chicken breasts are the foundation. For even cooking, slice them into uniform 1-inch wide strips. Using fresh chicken ensures juiciness; avoid overcooking to prevent dryness.
- Eggs: Acts as the binding agent in the breading process. Whisked eggs help the flour and breadcrumb coatings adhere to the chicken, forming a solid crust during baking.
- Buttermilk (Optional): Adds tanginess and tenderizes the meat. Soaking chicken in buttermilk for 30 minutes to 4 hours enhances moisture and promotes better breading adhesion.
- All-Purpose Flour: The first coating layer creates a base for the egg wash to stick to. It also contributes to a slightly crispier texture when combined with seasonings.
- Panko Breadcrumbs: Japanese-style panko crumbs are lighter, flakier, and crispier than regular breadcrumbs. They brown beautifully and give that signature crunch without becoming soggy.
- Grated Parmesan Cheese (Optional): Adds umami depth and helps form a golden, savory crust. It also boosts protein content and supports browning.
- Seasonings: A blend of garlic powder, onion powder, smoked paprika, salt, black pepper, and dried herbs (like oregano or thyme) elevates the flavor profile beyond basic blandness.
- Cooking Spray or Olive Oil: A light mist of olive oil or avocado oil spray before baking encourages Maillard reaction (browning), enhancing crispiness without drowning the tenders in grease.
Step-by-Step Recipe: How to Make Crispy Baked Chicken Tenders at Home
Follow this detailed method to achieve perfectly golden, juicy-on-the-inside, crunchy-on-the-outside chicken tenders every time.
Ingredients
- 1.5 lbs (680g) boneless, skinless chicken breasts, sliced into 1-inch thick strips
- 2 large eggs
- 1/4 cup milk or buttermilk (optional)
- 1/2 cup all-purpose flour
- 1 cup panko breadcrumbs
- 1/4 cup grated Parmesan cheese (optional)
- 1 tsp garlic powder
- 1 tsp onion powder
- 1 tsp smoked paprika
- 1/2 tsp salt
- 1/2 tsp black pepper
- 1/2 tsp dried oregano or thyme (optional)
- 2–3 tbsp olive oil or avocado oil spray
Directions
- Prep the Chicken: Cut chicken breasts into even 1-inch wide strips. If they’re too thick, pound them gently between plastic wrap to about 1/2 inch thickness for consistent cooking.
- Optional Buttermilk Soak: In a bowl, mix eggs with milk or buttermilk. Add chicken strips and let marinate for 30 minutes to 4 hours in the refrigerator. This step adds moisture and tenderness.
- Set Up Breading Station: Prepare three shallow bowls:
- Bowl 1: Flour mixed with salt, pepper, garlic powder, onion powder, paprika, and dried herbs.
- Bowl 2: Whisked eggs (and milk/buttermilk if not already used in soaking).
- Bowl 3: Panko breadcrumbs blended with Parmesan cheese and a pinch of seasoning for extra flavor.
- Bread the Chicken: Working one piece at a time:
- Dredge each chicken strip in the seasoned flour, shaking off excess.
- Dip into the egg mixture, allowing excess to drip off.
- Press firmly into the panko-Parmesan mix, ensuring full coverage. Place on a plate or wire rack.
- Preheat Oven: Set oven to 400°F (200°C). Line a large baking sheet with parchment paper or foil and place a wire rack on top. Lightly grease the rack with oil or non-stick spray.
- Arrange Tenders: Lay breaded chicken strips on the rack in a single layer, leaving space between each for air circulation.
- Spray with Oil: Lightly mist the tops of the tenders with olive oil or avocado oil spray. This promotes browning and crispiness.
- Bake: Place in the center of the oven and bake for 15 minutes. Flip each tender carefully using tongs, then spray lightly again. Bake another 10–12 minutes until golden brown, internal temperature reaches 165°F (74°C), and juices run clear.
- Cool Slightly: Let rest for 3–5 minutes before serving to allow the crust to set and retain crispness.
Tips for Achieving Maximum Crispiness
- Use a Wire Rack: Elevating the tenders allows hot air to circulate underneath, preventing sogginess on the bottom and promoting even browning.
- Don’t Skip the Oil Spray: Even a small amount of oil makes a big difference in achieving that golden, crunchy exterior.
- Avoid Overcrowding: Bake in batches if needed. Crowded tenders steam instead of bake, leading to softer texture.
- Double-Dip for Extra Crunch: For thicker, crunchier coating, dip in egg and panko twice after the initial breading.
- Toast the Panko First (Optional): Lightly toast panko in a dry skillet with a bit of oil until golden before mixing with seasonings. This enhances nuttiness and crunch.
- Chill Before Baking (Optional): After breading, refrigerate tenders for 20–30 minutes. This helps the coating set and reduces shedding during baking.
- Check Internal Temperature: Use a meat thermometer to ensure doneness without overcooking. Remove at 160°F—the temp will rise to 165°F while resting.
Variations and Customizations
One of the best things about this recipe is its versatility. Try these creative twists to keep meals exciting:
- Gluten-Free: Substitute all-purpose flour with rice flour or gluten-free flour blend, and use certified gluten-free panko breadcrumbs.
- Keto/Low-Carb: Replace breadcrumbs with crushed pork rinds or almond flour mixed with Parmesan. Reduce or omit flour layer.
- Spicy Kick: Add cayenne pepper, chili powder, or crushed red pepper flakes to the breading. Serve with spicy ranch or sriracha mayo.
- Honey Mustard Glazed: Brush baked tenders with a mixture of honey, Dijon mustard, and a splash of lemon juice during the last 5 minutes of baking.
- Lemon Herb: Mix lemon zest, parsley, and dill into the panko for a fresh, Mediterranean flair.
- BBQ Style: Toss cooked tenders in your favorite BBQ sauce or serve with BBQ dipping sauce.
- Nashville Hot: After baking, brush with spicy cayenne-infused butter and sprinkle with more seasoning for fiery Southern heat.
- Mini Tenders for Kids: Cut into smaller pieces for easier handling. Pair with yogurt-based dips or apple slices.
- Dairy-Free: Omit Parmesan and use nutritional yeast for cheesy flavor, or skip entirely.
- Egg-Free Breading: Use melted butter, dairy-free milk with cornstarch, or aquafaba (chickpea brine) as a binder substitute.
Health Considerations and Nutritional Value
Baked chicken tenders offer a healthier alternative to their fried counterparts. By eliminating deep frying, you significantly reduce saturated fat and calorie content while preserving high-quality protein.
Nutritional Profile (Per Serving – Approx. 4 oz / 115g of chicken with coating):
- Calories: ~220–250 kcal
- Protein: 28–32g (Excellent source for muscle repair and satiety)
- Fat: 7–10g (Mostly from oil spray and egg; much lower than fried versions)
- Carbohydrates: 10–14g (Depends on breading; can be reduced with low-carb substitutions)
- Fiber: 1–2g (Slight boost if using whole wheat panko or adding oats)
- Sodium: ~400–600mg (Adjust by reducing added salt or using low-sodium breadcrumbs)
Health Benefits:
- High in lean protein, supporting weight management and metabolic health.
- No trans fats when baked properly (unlike many fast-food versions).
- Rich in B vitamins (especially niacin and B6) essential for energy metabolism.
- Lower in cholesterol compared to fried options when prepared mindfully.
- Customizable for dietary needs: gluten-free, keto, dairy-free, etc.
Considerations:
- Portion control is key—even healthy versions can add up in calories if eaten in excess.
- Store-bought breadcrumbs may contain hidden sugars or preservatives; opt for homemade or clean-label brands.
- Overcooking leads to dry chicken; always monitor internal temperature.
- Pair with balanced sides like roasted vegetables, quinoa, or salad for a complete meal.
Frequently Asked Questions (FAQ)
Can I make these ahead of time?
Yes! Bread the chicken and store it uncooked on a tray in the fridge for up to 24 hours. You can also fully cook, cool, and refrigerate for up to 3 days. Reheat in oven at 375°F for 10–12 minutes to restore crispiness.
Can I freeze baked chicken tenders?
Absolutely. Freeze cooked tenders in a single layer on a tray, then transfer to an airtight container or freezer bag for up to 3 months. Reheat from frozen in the oven at 400°F for 18–22 minutes.
Why are my tenders not crispy?
Common causes include overcrowding the pan, skipping the oil spray, not using a wire rack, or underbaking. Ensure oven is fully preheated and finish under the broiler for 1–2 minutes if needed (watch closely).
Can I use chicken thighs instead?
Yes, though they’ll be more moist and take slightly longer to cook. Trim excess fat and slice into strips similar in size to tenders.
What dipping sauces go well with these?
Try honey mustard, ranch, blue cheese, BBQ sauce, garlic aioli, sriracha mayo, or a Greek yogurt-based dip. For a healthier option, pair with salsa or hummus.
Can I cook them in an air fryer?
Yes! Air fry at 390°F (200°C) for 10–12 minutes, flipping halfway through. Lightly spray with oil for best results. No preheating required in most models.
How do I prevent the breading from falling off?
Ensure each step is followed: flour → shake → egg → drip → panko → press. Chill before baking, avoid flipping too early, and don’t touch them too much during cooking.
Are these suitable for kids?
Extremely! Mild flavor, fun finger-food format, and customizable to picky palates. Serve with ketchup or mild ranch for universal appeal.
Summary
Crispy baked chicken tenders deliver all the crunch and flavor of fried chicken without the excess oil, making them a smart, family-friendly choice for any meal. With endless variations and easy prep, they’re destined to become a staple in your weekly rotation.