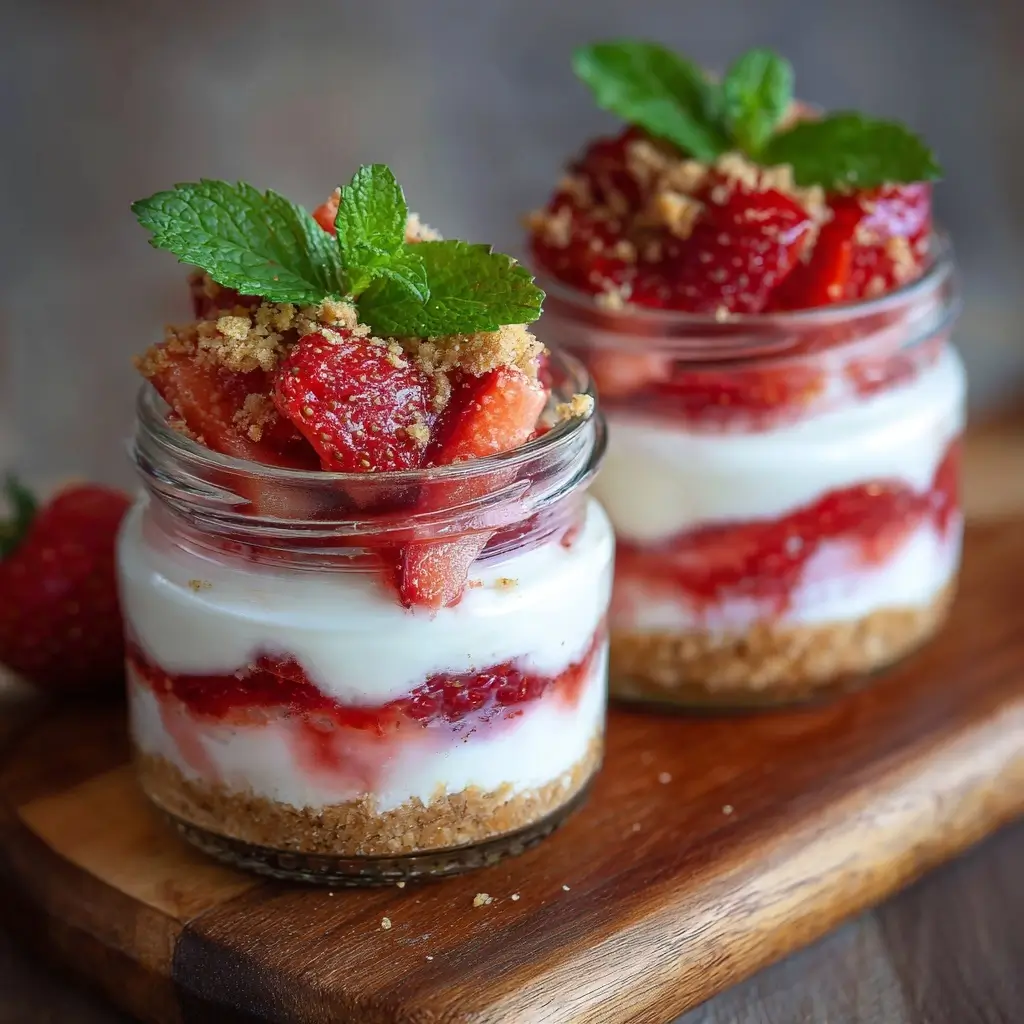
No-Bake Strawberry Cheesecake Jars
No-Bake Strawberry Cheesecake Jars: A Delightful, Portable Dessert Experience
There’s something undeniably magical about cheesecake—the creamy texture, the rich tanginess, and the way it melts on your tongue. But traditional cheesecakes require baking, cooling, and a lot of patience. Enter the No-Bake Strawberry Cheesecake Jars—a modern twist that combines convenience, freshness, and irresistible flavor in a portable, Instagram-worthy format. Perfect for picnics, potlucks, brunch gatherings, or simply satisfying your sweet tooth at home, these individual dessert jars bring all the indulgence of classic cheesecake without turning on the oven.
The History of Cheesecake and Its Evolution
Cheesecake has ancient roots, dating back to Greece around 2000 BCE, where it was served to athletes during the first Olympic Games as a source of energy. The Romans later adopted the recipe and spread it throughout Europe. Over centuries, cheesecake evolved with regional variations—New York-style known for its dense richness, Italian versions with ricotta, and Japanese soufflé cheesecakes famed for their airy lightness.
In recent decades, the no-bake variation emerged as a popular alternative, especially in American and Australian dessert culture. With the rise of health-conscious eating and time-saving kitchen hacks, no-bake desserts gained traction. The concept of layering desserts in jars began gaining popularity in the early 2010s, fueled by social media trends and meal-prep culture. Mason jar desserts became synonymous with portability, portion control, and aesthetic presentation—perfect for both casual snacking and elegant entertaining.
The No-Bake Strawberry Cheesecake Jar is a product of this evolution—combining tradition with modern culinary innovation. It preserves the essence of cheesecake while making it accessible, customizable, and fun.
Ingredients Breakdown: What Makes This Dessert Shine
The beauty of this recipe lies in its simplicity and balance of textures and flavors. Each component plays a vital role in creating a harmonious dessert experience:
- Graham Crackers (or digestive biscuits): Form the base of the crust, providing a buttery, slightly sweet crunch that contrasts beautifully with the creamy filling. Gluten-free options are available using almond flour-based cookies.
- Unsalted Butter: Binds the crushed cookies together and adds richness. Melted and mixed evenly, it ensures the crust holds its shape in the jar.
- Cream Cheese: The star of the show. Full-fat cream cheese delivers the signature tangy, velvety texture. For best results, ensure it’s softened to room temperature before mixing.
- Heavy Whipping Cream: When whipped to soft peaks and folded into the cream cheese mixture, it creates a light, airy texture that mimics traditional baked cheesecake but with less density.
- Granulated Sugar (or powdered sugar): Sweetens the filling. Powdered sugar dissolves more easily and gives a smoother consistency, though granulated works too if blended thoroughly.
- Vanilla Extract: Enhances sweetness and adds depth of flavor, rounding out the tanginess of the cream cheese.
- Fresh Strawberries: Provide natural sweetness, vibrant color, and a juicy contrast. Sliced or pureed, they elevate both taste and visual appeal.
- Lemon Juice (optional): Brightens the entire dessert, cutting through the richness and enhancing the strawberry flavor.
- Pinch of Salt: Balances sweetness and enhances overall flavor complexity.
Optional add-ins include a splash of liqueur like Chambord or Grand Marnier for an adult version, or a sprinkle of cinnamon or nutmeg in the crust for warmth.
Step-by-Step Recipe: Crafting Your Perfect Cheesecake Jar
Follow these detailed instructions to create picture-perfect No-Bake Strawberry Cheesecake Jars every time.
- Prepare the Crust: In a food processor or sealed plastic bag, crush 1 cup of graham crackers into fine crumbs. Add 2 tablespoons of melted unsalted butter and 1 tablespoon of sugar. Pulse or mix until the crumbs are uniformly moistened and resemble wet sand.
- Layer the Base: Spoon about 2 tablespoons of the crumb mixture into the bottom of each clean glass jar or container (8-ounce mason jars work perfectly). Press down firmly using the back of a spoon or a small tamper to form a compact, even layer. Set aside.
- Make the Strawberry Layer (Bottom Fruit Layer): While the crust chills, prepare fresh strawberries. Slice 1 cup of strawberries and gently toss with 1 tablespoon of sugar and a teaspoon of lemon juice. Let them macerate for 10–15 minutes to release juices. Alternatively, lightly puree half and slice the rest for texture contrast.
- Chill the Crust: Place jars in the refrigerator for at least 15 minutes to firm up the crust. This prevents it from mixing with the creamy layer.
- Whip the Cream: In a chilled bowl, beat 1 cup of cold heavy whipping cream with an electric mixer until soft peaks form. Be careful not to over-whip. Set aside.
- Prepare the Cheesecake Filling: In a separate large bowl, beat 16 oz (2 blocks) of softened cream cheese until smooth and creamy, about 2 minutes. Scrape down the sides. Add 1/3 cup of sugar (or powdered sugar), 1 teaspoon of vanilla extract, and a pinch of salt. Beat again until fully combined and fluffy.
- Combine Cream and Cheese: Gently fold the whipped cream into the cream cheese mixture in two additions, using a spatula. Fold just until no white streaks remain—overmixing can deflate the mixture.
- Assemble the Middle Layer: Remove jars from the fridge. Add a generous layer (about 2–3 tablespoons) of the macerated strawberries over the chilled crust. Drizzle some of the strawberry syrup around the edges for added color.
- Add the Cheesecake Filling: Carefully pipe or spoon the cheesecake mixture over the strawberries, filling each jar nearly to the top. Smooth the surface with the back of a spoon or offset spatula.
- Final Fruit Layer: Top each jar with a few fresh strawberry slices or a dollop of strawberry compote for garnish.
- Chill Thoroughly: Cover jars with lids or plastic wrap and refrigerate for at least 4 hours, preferably overnight. This allows the layers to set and flavors to meld.
- Serve: Enjoy straight from the jar! Optionally, garnish with mint leaves, whipped cream swirls, or edible flowers for an elegant touch.
Tips for Success: Expert Advice for Flawless Results
- Use Room Temperature Cream Cheese: Cold cream cheese won’t blend smoothly and may result in lumps. Take it out of the fridge 1–2 hours before starting.
- Don’t Skip the Chill Time: Rushing this step leads to a runny dessert. Proper chilling ensures clean layers and a firm, scoopable texture.
- Avoid Overmixing: Once you fold in the whipped cream, gentle folding preserves airiness. Overbeating deflates volume and makes the filling dense.
- Choose Ripe, Firm Strawberries: Underripe berries lack sweetness; overripe ones turn mushy. Look for bright red, fragrant strawberries with green caps intact.
- Prevent Weeping: If your cream cheese filling separates, it may be due to overmixing or warm ingredients. Ensure everything is cold except the cream cheese, which should only be softened—not warm.
- Jar Selection Matters: Use clear glass jars (like Ball mason jars or reusable dessert cups) so the beautiful layers can shine through. Wide-mouth jars make filling easier.
- Label and Date: If storing for later, label jars with contents and date. They’ll keep well for up to 5 days in the fridge.
Variations and Customizations: Make It Your Own
One of the greatest strengths of this recipe is its versatility. Here are creative ways to personalize your cheesecake jars:
- Fruit Variations: Swap strawberries for raspberries, blueberries, mango, peaches, cherries, or mixed berries. Each brings unique tartness and color.
- Chocolate Lover’s Version: Add a layer of chocolate ganache or crushed Oreos in the crust. Swirl melted dark chocolate into the filling before chilling.
- Seasonal Themes: Pumpkin spice cheesecake jars in fall (use pumpkin puree and spices), peppermint in winter (add crushed candy canes), or lemon-lime for summer.
- Protein Boost: Mix in unflavored or vanilla whey protein powder into the filling (start with 1–2 scoops) for a post-workout treat.
- Dairy-Free/Vegan Option: Use vegan cream cheese (like Kite Hill or Miyoko’s), coconut cream instead of heavy cream, and dairy-free butter. Opt for gluten-free cookies if needed.
- Keto-Friendly: Replace sugar with erythritol or monk fruit sweetener, use low-carb cookies (almond flour crust), and count net carbs carefully.
- Crunchy Toppings: Add granola, chopped nuts, cacao nibs, or toasted coconut for extra texture.
- Alcohol Infusion: A tablespoon of Baileys, Kahlua, or amaretto stirred into the filling adds sophistication for adult gatherings.
Health Considerations and Nutritional Value
While undeniably delicious, it’s important to enjoy No-Bake Strawberry Cheesecake Jars in moderation. Here’s a general nutritional breakdown per serving (one 8-oz jar):
- Calories: ~350–450 kcal
- Fat: 25–30g (mostly from cream cheese and butter)
- Saturated Fat: 15–18g
- Carbohydrates: 30–40g (including natural sugars from fruit and added sugar)
- Sugars: 20–25g
- Protein: 5–7g
- Fiber: 2–3g (from strawberries and graham crackers)
- Calcium & Vitamin C: Moderate amounts from dairy and strawberries
Health Notes:
- This dessert is high in saturated fat and added sugars. Those managing cholesterol, diabetes, or weight should consume mindfully.
- Using reduced-fat cream cheese or Greek yogurt can lower fat content, though texture may become denser.
- Fresh strawberries contribute antioxidants, vitamin C, and fiber—making this dessert more nutritious than many alternatives.
- For a lighter version, substitute half the cream cheese with plain Greek yogurt and reduce sugar by 50%.
- Always check labels for hidden sugars in pre-made cookie crumbs or flavored syrups.
Full Ingredient List
- 1 cup graham cracker crumbs (about 8 full sheets)
- 2 tbsp unsalted butter, melted
- 1 tbsp granulated sugar (for crust)
- 16 oz (2 packages) full-fat cream cheese, softened
- 1/3 cup granulated sugar or powdered sugar
- 1 tsp pure vanilla extract
- Pinch of salt
- 1 cup heavy whipping cream, cold
- 2 cups fresh strawberries, divided
- 1 tbsp granulated sugar (for macerating strawberries)
- 1 tsp fresh lemon juice (optional)
- Mint leaves or whipped cream (for garnish, optional)
Detailed Directions
- Crush the Graham Crackers: Place graham crackers in a food processor and pulse until fine crumbs form. Alternatively, place in a zip-top bag and crush with a rolling pin.
- Mix Crust Ingredients: Transfer crumbs to a bowl. Stir in melted butter and 1 tablespoon sugar until evenly coated.
- Layer in Jars: Divide the mixture among 4–6 clean jars (depending on size). Use a spoon or small glass to press down firmly into an even layer.
- Refrigerate Crust: Chill for 15 minutes to set.
- Prepare Strawberries: Hull and slice 1 cup of strawberries. Toss with 1 tablespoon sugar and lemon juice. Let sit for 10–15 minutes to soften and release syrup.
- Whip Heavy Cream: Using a chilled bowl and beaters, whip cream until soft peaks form. Do not over-whip. Set aside.
- Cream Cheese Blend: In a large bowl, beat cream cheese on medium speed until creamy (~2 min). Add sugar, vanilla, and salt. Beat until smooth and fluffy.
- Fold in Whipped Cream: Gently fold whipped cream into cream cheese mixture in two batches. Stir until just combined and silky.
- Assemble Layers: After chilling, remove jars. Add 1–2 tbsp macerated strawberries (plus syrup) over crust. Then pipe or spoon in cheesecake filling, leaving space at the top.
- Top with Fresh Berries: Garnish with fresh strawberry slices or a spoonful of compote.
- Final Chill: Cover and refrigerate for at least 4 hours, or overnight.
- Serve: Enjoy cold, straight from the jar. Store leftovers in the refrigerator for up to 5 days.
Frequently Asked Questions (FAQ)
Can I make these ahead of time?
Yes! These cheesecake jars can be made 1–2 days in advance. Assemble completely and store covered in the refrigerator. They actually taste better after chilling longer.
Can I freeze No-Bake Cheesecake Jars?
Freezing is possible but not ideal. The texture may become grainy upon thawing due to water separation in the cream cheese and whipped cream. Best enjoyed fresh from the fridge.
Why is my filling runny?
Possible causes: cream cheese was too cold, whipped cream wasn’t stiff enough, overmixing, or insufficient chilling time. Always chill for at least 4 hours.
Can I use frozen strawberries?
Not recommended. Frozen strawberries release excess moisture when thawed, making the layers watery. If necessary, thaw, drain, and pat dry before use.
How long do they last in the fridge?
Up to 5 days when stored in sealed jars. The crust may soften slightly over time but remains delicious.
Can I make mini versions in shot glasses?
Absolutely! Perfect for parties. Use smaller portions and serve within 2–3 days.
Is there a way to make them lower in sugar?
Yes. Reduce sugar in filling and crust, use naturally sweet ripe strawberries, and consider sugar substitutes like stevia or erythritol compatible with dairy.
What can I use instead of graham crackers?
Digestive biscuits, shortbread cookies, Oreo crumbs (remove filling for chocolate version), or gluten-free cookies all work well.
Summary
No-Bake Strawberry Cheesecake Jars combine creamy, dreamy cheesecake filling with a buttery graham cracker crust and juicy fresh strawberries—all layered in charming jars for a fuss-free, elegant dessert. Ready in minutes with no baking required, they’re perfect for any occasion.
Customizable, portable, and utterly delicious, these jars deliver restaurant-quality indulgence at home, one luscious bite at a time.