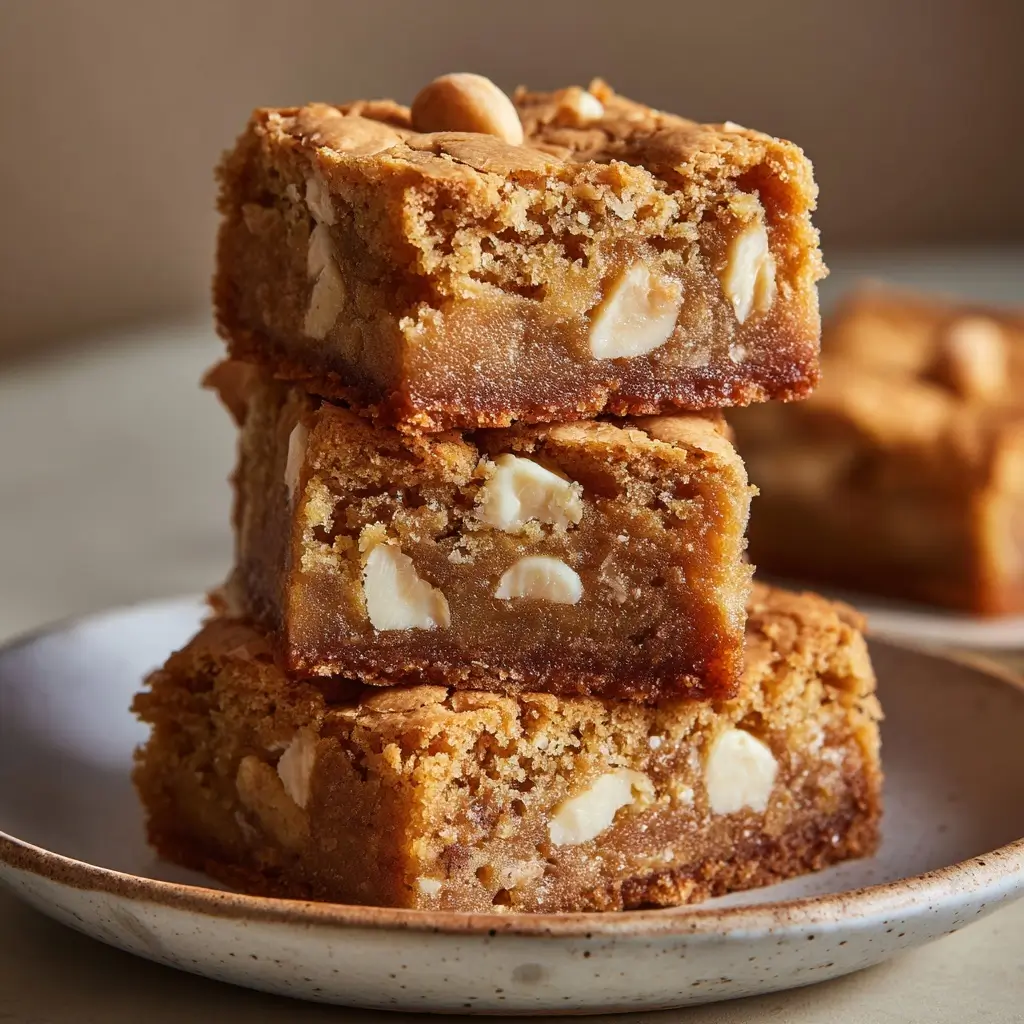
Brown Butter Blondies with White Chocolate
Brown Butter Blondies with White Chocolate: A Decadent, Buttery Delight
There’s something undeniably comforting about a warm, chewy blondie fresh from the oven—especially when it’s made with rich, nutty brown butter and studded with creamy white chocolate chunks. These Brown Butter Blondies with White Chocolate elevate the classic dessert bar to gourmet status, offering a depth of flavor that’s both sophisticated and deeply satisfying. With their golden-brown crust, fudgy interior, and irresistible aroma of toasted butter, these blondies are perfect for any occasion—from casual family gatherings to elegant dinner parties.
The History of Blondies
While chocolate brownies have long reigned supreme in the world of baked goods, their vanilla-based cousin—the blondie—has a story all its own. The origins of the blondie trace back to late 19th-century America, where home bakers began experimenting with variations of the traditional brownie recipe. By omitting cocoa powder and relying on vanilla and brown sugar for flavor, they created a lighter, golden-colored bar that quickly gained popularity.
The name “blondie” is believed to have emerged as a playful contrast to the “brownie,” reflecting not only the color but also the sweet, approachable nature of the treat. Over time, blondies evolved beyond their simple roots, embracing add-ins like nuts, chocolate chips, caramel, and even dried fruit. Today, they stand as a beloved staple in American baking, often showcasing creative twists such as brown butter, sea salt, or premium chocolates. Our version—Brown Butter Blondies with White Chocolate—is a modern homage to this heritage, combining timeless technique with luxurious ingredients for an unforgettable dessert experience.
Ingredients Breakdown: Why Each One Matters
The magic of these blondies lies in the careful selection and balance of ingredients. Here’s a detailed look at each component and its role in creating the perfect texture and flavor:
- Unsalted Butter (1 cup / 2 sticks): The foundation of this recipe. Using unsalted butter allows you to control the salt level precisely. When browned, it develops a deep, nutty, almost caramel-like flavor that transforms the entire dessert.
- All-Purpose Flour (1 ½ cups): Provides structure to the blondies. It gives them that tender crumb while maintaining a chewy texture. Be sure to whisk it well before measuring to avoid dense results.
- Light Brown Sugar (1 cup packed): Not only does it sweeten the batter, but its molasses content adds moisture and enhances the caramel notes that complement the brown butter beautifully.
- Granulated Sugar (½ cup): Adds sweetness and helps create a slightly crisp top layer while contributing to the overall chewiness.
- Large Eggs (2): Act as a binder and provide lift and richness. Room-temperature eggs integrate more smoothly into the batter, ensuring even texture.
- Vanilla Extract (2 teaspoons): Pure vanilla extract amplifies the sweet, aromatic qualities of the blondies. For extra depth, consider using a blend of vanilla bean paste and extract.
- Baking Powder (½ teaspoon): A small amount helps the blondies rise just enough without making them cakey—keeping them perfectly fudgy.
- Salt (¾ teaspoon): Enhances all the flavors in the blondies, balancing sweetness and highlighting the complexity of the brown butter.
- White Chocolate Chunks or Chips (1 ½ cups): These melt slightly during baking, creating pockets of creamy, sweet indulgence. High-quality white chocolate (with real cocoa butter) offers superior taste and texture.
- Optional Sea Salt Flakes (for topping): A sprinkle of flaky sea salt just after baking creates a delightful sweet-and-salty contrast that elevates every bite.
Step-by-Step Recipe: How to Make Brown Butter Blondies with White Chocolate
Making these decadent blondies is a rewarding process that begins with one crucial step: browning the butter. Follow these detailed instructions for flawless results every time.
- Brown the Butter: In a light-colored saucepan (so you can see color changes), melt the butter over medium heat. Stir constantly as it melts, then begins to foam. Continue cooking as the foam subsides and the milk solids at the bottom start to turn golden brown, releasing a nutty aroma. This takes about 6–8 minutes. Be careful—once it starts browning, it can burn quickly. Immediately pour the browned butter into a heatproof bowl to stop the cooking. Let it cool slightly (about 10–15 minutes) until warm but not hot.
- Preheat Oven & Prepare Pan: Preheat your oven to 350°F (175°C). Line a 9×13-inch baking pan with parchment paper, leaving overhang on two sides for easy removal. Lightly grease the parchment and edges if needed.
- Mix Sugars and Butter: In a large mixing bowl, combine the slightly cooled brown butter, brown sugar, and granulated sugar. Whisk vigorously until smooth and well blended. The mixture should be glossy and homogenous.
- Add Eggs and Vanilla: Crack in the eggs one at a time, whisking thoroughly after each addition. Then stir in the vanilla extract. The batter will become lighter in color and slightly fluffy.
- Incorporate Dry Ingredients: In a separate bowl, whisk together the flour, baking powder, and salt. Gradually add this dry mixture to the wet ingredients, folding gently with a spatula until just combined. Do not overmix—this keeps the blondies tender.
- Fold in White Chocolate: Gently fold in the white chocolate chunks or chips, distributing them evenly throughout the batter. The dough will be thick and sticky, resembling cookie dough.
- Transfer to Pan and Smooth Top: Scrape the batter into the prepared pan. Use the spatula to spread it evenly into the corners. For a professional finish, dip the spatula in cold water and smooth the surface again.
- Bake Until Golden: Bake for 25–30 minutes, or until the top is golden brown and a toothpick inserted into the center comes out with moist crumbs (not wet batter). Avoid overbaking to preserve the fudgy texture.
- Cool Completely: Allow the blondies to cool completely in the pan on a wire rack—this takes about 1–2 hours. Cooling ensures clean cuts and prevents crumbling.
- Optional Finishing Touch: Just before serving, sprinkle the top lightly with flaky sea salt for a gourmet touch.
- Cut and Serve: Use the parchment overhang to lift the blondies out of the pan. Place on a cutting board and slice into 12–16 bars, depending on desired size.
Tips for Perfect Brown Butter Blondies Every Time
- Browning Butter Safely: Use a light-colored pan so you can monitor the color change of the milk solids. Dark pans make it hard to see when the butter is properly browned. Keep stirring and never walk away—it can go from perfect to burnt in seconds.
- Cool the Butter Slightly: Adding hot brown butter directly to eggs can cook them prematurely, leading to lumpy batter. Let it cool until warm to the touch (around 110°F).
- Don’t Overmix After Adding Flour: Once the dry ingredients are added, mix only until no streaks of flour remain. Overmixing activates gluten, which can result in tough blondies.
- Use Quality White Chocolate: Many brands use vegetable fats instead of cocoa butter. Look for white chocolate labeled “couverture” or check that cocoa butter is listed among the first few ingredients.
- Chill the Batter (Optional): For thicker, chewier blondies, cover and refrigerate the batter for 1–2 hours before baking. This firms up the butter and slows spreading in the oven.
- Test Doneness Carefully: Since blondies are dense, the center may still look soft even when done. A toothpick should come out with a few damp crumbs—not wet batter. They continue to set as they cool.
- Cut Cleanly: Use a sharp knife dipped in hot water and wiped dry between cuts for neat, professional-looking squares.
Variations and Customizations
These blondies are wonderfully versatile—feel free to personalize them based on your preferences or what’s in your pantry:
- Nutty Crunch: Add ¾ cup chopped toasted pecans, walnuts, or macadamia nuts for extra texture and flavor.
- Dried Fruit Swirl: Fold in ⅔ cup dried cranberries, cherries, or golden raisins for a tart contrast to the sweet white chocolate.
- Double Chocolate Twist: Replace half the white chocolate with dark or semi-sweet chocolate chunks for a marbled effect and deeper flavor profile.
- Salted Caramel Blondies: Drizzle ½ cup of thick salted caramel sauce over the batter before baking, then swirl with a knife for a gooey surprise inside.
- Lemon Zest Brightness: Add 1 tablespoon of finely grated lemon zest to brighten the richness and add a citrusy note.
- Coconut Bliss: Mix in ¾ cup shredded coconut (toasted or raw) for a tropical flair.
- Spiced Version: Add ½ teaspoon cinnamon, a pinch of nutmeg, and a dash of cardamom for warm, autumnal vibes.
- Gluten-Free Option: Substitute the all-purpose flour with a high-quality gluten-free flour blend designed for baking. Results may vary slightly in texture.
- Vegan Adaptation: Replace butter with refined coconut oil, eggs with flax eggs (2 tbsp ground flax + 5 tbsp water), and use vegan white chocolate. Note: The flavor will differ slightly.
Health Considerations and Nutritional Value
While these blondies are undeniably indulgent, understanding their nutritional makeup can help you enjoy them mindfully.
Nutrition Facts (per serving, assuming 16 servings):
- Calories: ~280–300
- Total Fat: 16–18g (mostly from butter and chocolate)
- Saturated Fat: 10–12g
- Cholesterol: 50–60mg
- Sodium: 100–130mg
- Total Carbohydrates: 32–35g
- Dietary Fiber: 0.5–1g
- Sugars: 22–25g
- Protein: 2–3g
Considerations:
- High in Saturated Fat and Sugar: Due to butter, sugar, and white chocolate, these blondies are best enjoyed in moderation, especially for those monitoring heart health or blood sugar levels.
- Low in Fiber and Protein: As with most baked desserts, they lack significant fiber and protein, which means they may not be very filling despite the calorie content.
- Portion Control: Cutting smaller squares (e.g., 2″x2″) allows guests to enjoy the treat without overindulging.
- Dietary Modifications: Health-conscious bakers can experiment with substitutions like applesauce (partial butter replacement), coconut sugar (instead of brown sugar), or dark chocolate (lower sugar than white). However, these changes may alter texture and flavor significantly.
Full Ingredient List
- 1 cup (2 sticks / 226g) unsalted butter
- 1 ½ cups (190g) all-purpose flour
- 1 cup (200g) packed light brown sugar
- ½ cup (100g) granulated sugar
- 2 large eggs, room temperature
- 2 teaspoons pure vanilla extract
- ½ teaspoon baking powder
- ¾ teaspoon salt
- 1 ½ cups (270g) white chocolate chunks or chips
- Flaky sea salt (optional, for garnish)
Detailed Directions
Reiterating the full method with precision for optimal results:
- Place the butter in a medium saucepan over medium heat. Melt completely, then continue cooking, swirling the pan frequently, until the butter turns golden brown and emits a nutty fragrance. Transfer immediately to a bowl and let cool for 10–15 minutes.
- Preheat oven to 350°F (175°C). Line a 9×13-inch baking dish with parchment paper and lightly grease.
- In a large bowl, whisk together the warm brown butter, brown sugar, and granulated sugar until smooth and shiny.
- Add eggs one at a time, whisking well after each. Stir in vanilla extract.
- In another bowl, sift together flour, baking powder, and salt. Gradually add to the wet mixture, folding gently with a silicone spatula until just combined.
- Fold in white chocolate chunks until evenly distributed.
- Scrape batter into the prepared pan. Spread evenly and smooth the top with a wet spatula.
- Bake for 25–30 minutes, until edges are golden and center is set with a slight jiggle.
- Cool completely in the pan on a wire rack.
- Lift out using parchment overhang. Cut into bars with a sharp, hot knife.
- Optional: Sprinkle with flaky sea salt before serving.
Frequently Asked Questions (FAQ)
Can I make these blondies ahead of time?
Yes! These blondies keep well at room temperature in an airtight container for up to 4 days. You can also freeze them (individually wrapped) for up to 3 months.
Why did my blondies turn out cakey?
This usually happens due to overmixing after adding flour or using too much leavening. Stick to gentle folding and measure baking powder accurately.
Can I use salted butter?
You can, but reduce added salt to ¼ teaspoon to avoid oversalting. Unsalted butter is recommended for better control.
How do I know when the butter is properly browned?
Watch for golden-brown specks at the bottom of the pan and a rich, nutty smell. The liquid will go from foamy to clear amber with toasted milk solids settled at the bottom.
Can I double the recipe?
Absolutely. Use a 9×13-inch pan for a single batch and a 12×18-inch sheet pan for a double batch. Adjust baking time accordingly.
Do I need to chill the batter?
Not required, but chilling for 1–2 hours yields thicker, denser blondies with less spread.
Can I use white chocolate bars instead of chips?
Yes—chop a high-quality white chocolate bar into chunks for better flavor and melty pockets.
Are these blondies gluten-free?
Not by default, but you can substitute with a 1:1 gluten-free flour blend. Results may vary in texture.
Can I bake them in a smaller pan for thicker blondies?
Yes—use an 8×8-inch or 9×9-inch pan for thicker, fudgier results. Increase baking time by 5–10 minutes and monitor closely.
Summary
Indulge in rich, nutty Brown Butter Blondies swirled with creamy white chocolate for a dessert that’s both nostalgic and luxuriously modern. Perfectly chewy, golden-crusted, and bursting with caramelized depth, they’re destined to become a favorite.