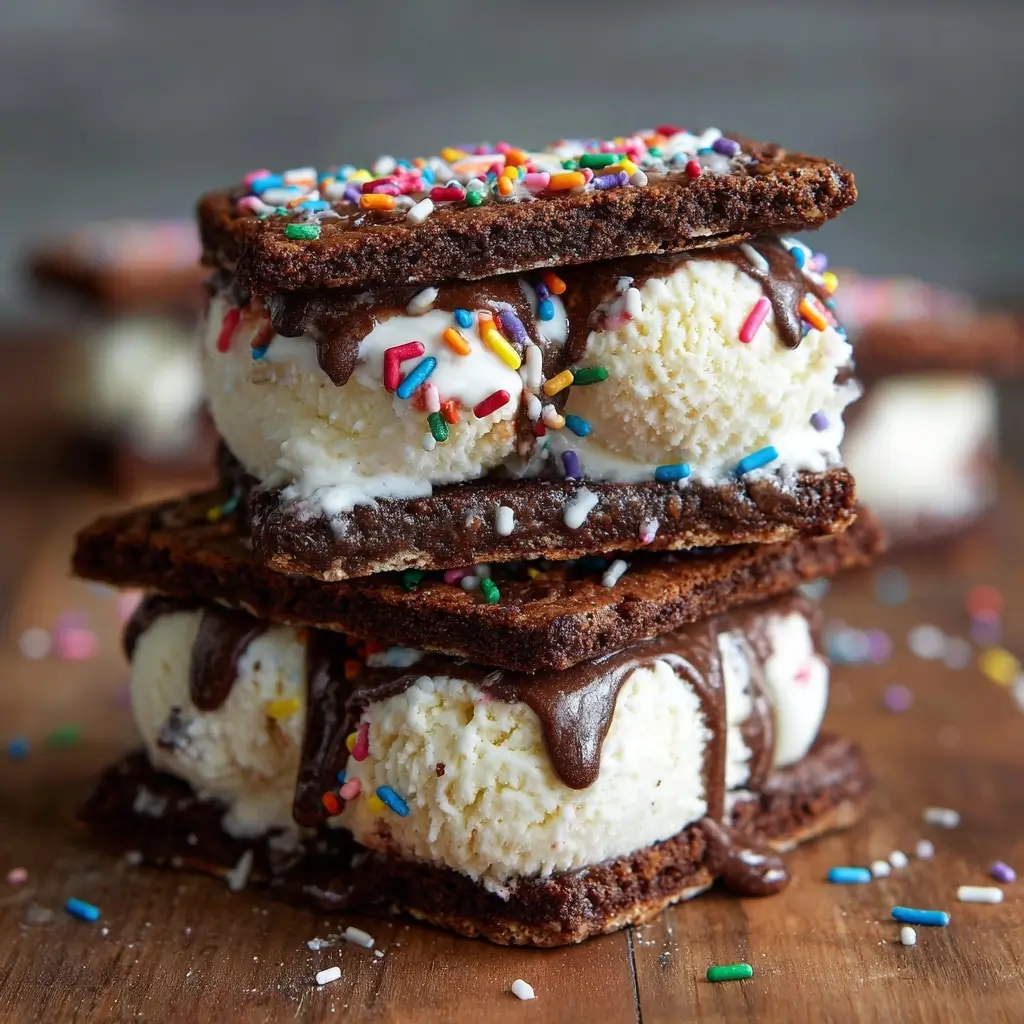
Brownie Ice Cream Sandwiches
Introduction
Brownie Ice Cream Sandwiches are the ultimate dessert fusion—rich, fudgy brownies hugging a generous layer of creamy ice cream, creating a decadent treat that satisfies every sweet craving. Whether you’re hosting a backyard barbecue, planning a summer soirée, or simply indulging in a cozy night in, these handheld delights combine the best of two beloved desserts into one irresistible bite. With their contrasting textures and temperatures, Brownie Ice Cream Sandwiches offer a perfect harmony of warm memories and cool refreshment. They’re not only visually impressive but also surprisingly easy to make at home with just a few quality ingredients and a little creativity.
The History
The concept of combining baked goods with ice cream dates back to the late 19th century, with early versions of ice cream sandwiches emerging in New York City. Originally made with sponge cake or soft cookies, these treats quickly gained popularity for their portability and delightful contrast between cold ice cream and a slightly softened outer layer. The modern twist of using brownies instead of cookies is believed to have originated in gourmet dessert shops during the 1980s and 1990s, as bakers began experimenting with richer, more indulgent bases. Brownies, already celebrated for their dense, chocolatey texture, proved to be the ideal companion for premium ice cream flavors. Over time, Brownie Ice Cream Sandwiches evolved from specialty café items to DIY favorites, embraced by home cooks and professional chefs alike for their versatility and crowd-pleasing appeal. Today, they stand as a testament to American dessert innovation—where tradition meets bold flavor and creative presentation.
Ingredients Breakdown
The magic of Brownie Ice Cream Sandwiches lies in the careful selection and balance of ingredients for both components: the brownies and the ice cream filling. Let’s break them down.
For the Brownies:
- Butter: Unsalted butter adds moisture and richness while allowing control over salt levels. It’s typically melted with chocolate to create a glossy, smooth base.
- Chocolate: High-quality semi-sweet or dark chocolate enhances depth of flavor. Chopped bars work better than chips because they melt more evenly.
- Sugar: A mix of granulated and brown sugar provides sweetness and contributes to chewiness. Brown sugar adds moisture and a subtle caramel note.
- Eggs: These bind the batter together and contribute to structure and lift. Room temperature eggs integrate more smoothly.
- Vanilla Extract: Pure vanilla extract enhances overall flavor complexity without overpowering the chocolate.
- Flour: All-purpose flour gives the brownies structure. Too much can make them cakey; too little results in crumbly edges.
- Cocoa Powder: Dutch-process or natural cocoa powder intensifies chocolate flavor. Dutch-process yields a smoother, less acidic taste.
- Salt: A pinch enhances all other flavors and balances sweetness.
- Optional Add-ins: Chocolate chunks, nuts (like walnuts or pecans), espresso powder (to deepen chocolate notes), or a swirl of peanut butter can elevate the brownie experience.
For the Ice Cream Filling:
- Ice Cream Base: Premium vanilla bean is classic, but options like chocolate, mint chip, cookies and cream, coffee, or strawberry allow for customization. Softened slightly for easy spreading.
- Mix-ins: Crushed cookies, candy pieces, chopped nuts, caramel swirls, or fruit preserves can be folded into the ice cream for added texture and flavor.
- Stabilizers (optional): Some recipes use whipped cream or marshmallow fluff blended into the ice cream to prevent excessive hardening and improve scoopability after freezing.
For Assembly & Presentation:
- Chocolate Shell Topping: Melted chocolate or confectionery coating drizzled on top adds crunch and visual flair.
- Sprinkles, Crushed Nuts, or Sea Salt: For garnish and extra dimension.
- Parchment Paper or Wax Paper: Essential for wrapping individual sandwiches to prevent sticking and ease storage.
Step-by-Step Recipe
Making the Brownies
- Preheat oven to 350°F (175°C). Grease a 9×13-inch baking pan and line it with parchment paper, leaving overhang on two sides for easy removal.
- Melt butter and chocolate. In a heatproof bowl over simmering water (double boiler), melt 1 cup (2 sticks) unsalted butter with 8 ounces of chopped semi-sweet chocolate. Stir until smooth, then remove from heat.
- Add sugars. Whisk in 1 ½ cups granulated sugar and ½ cup packed brown sugar until well combined and slightly glossy.
- Incorporate eggs. Add 4 large room-temperature eggs, one at a time, whisking thoroughly after each addition. Then stir in 2 teaspoons pure vanilla extract.
- Mix dry ingredients. In a separate bowl, sift together ¾ cup all-purpose flour, ½ cup cocoa powder, and ¼ teaspoon salt. Gradually fold into the wet mixture until just combined. Do not overmix.
- Fold in extras (optional). Stir in 1 cup chocolate chips or chopped nuts if desired.
- Pour and bake. Spread the batter evenly into the prepared pan. Bake for 25–30 minutes, or until a toothpick inserted in the center comes out with moist crumbs (not wet batter). Avoid overbaking for fudgy results.
- Cool completely. Allow brownies to cool in the pan for 30 minutes, then lift them out using the parchment overhang. Chill in the refrigerator for 1 hour to firm up for cutting.
Preparing the Ice Cream Layer
- Select your ice cream. Choose 1.5 to 2 quarts of high-quality ice cream. Remove from freezer 10–15 minutes before assembling to soften for spreading.
- Optional enhancement. For improved texture, fold in ½ cup mini marshmallows, crushed cookies, or chopped candy bars. Alternatively, blend in ½ cup whipped cream to make it more spreadable and resistant to hardening.
Assembling the Sandwiches
- Cut the brownies. Using a sharp knife, cut the cooled slab into 12 equal rectangles (approximately 3×4 inches).
- Layer the ice cream. Take half of the brownie pieces and place them flat side up on a parchment-lined tray. Evenly spread a generous ½ inch layer of softened ice cream onto each piece, leaving a small border to prevent oozing.
- Cover with top brownie. Place the remaining brownie pieces on top, pressing gently to adhere. Be careful not to squeeze out the ice cream.
- Freeze again. Wrap each sandwich individually in parchment or plastic wrap. Place them in an airtight container and freeze for at least 4 hours—or preferably overnight—to fully set.
- Optional finishing touch. Before serving, dip edges in melted chocolate or drizzle tops with chocolate sauce, then sprinkle with sea salt, crushed peanuts, or colorful sprinkles for a bakery-style finish.
Tips
- Use room temperature eggs to ensure a smooth, emulsified batter that rises evenly and has a velvety texture.
- Don’t overbake the brownies. Underbaking slightly ensures a fudgy interior, which pairs perfectly with the cold ice cream without crumbling.
- Chill brownies before cutting for clean, neat edges. Wipe the knife between cuts for precision.
- Soften ice cream properly. It should be spreadable like thick frosting—not soupy or rock-hard.
- Work quickly during assembly. Keep components cool and return sandwiches to the freezer promptly to avoid melting.
- Label and date when storing for longer periods. They keep well for up to 3 weeks.
- Use parchment paper between layers in storage containers to prevent sticking.
- Let sit for 3–5 minutes before eating to allow the ice cream to soften slightly for optimal texture.
Variations and Customizations
The beauty of Brownie Ice Cream Sandwiches lies in their adaptability. Here are some creative spins to suit different tastes and occasions:
- Seasonal Flavors: Try pumpkin spice ice cream with spiced brownies in the fall, peppermint ice cream with chocolate brownies at Christmas, or lemon sorbet between blondie-style brownies in summer.
- Dietary Adjustments: Use gluten-free flour blends or almond flour for gluten-sensitive guests. Substitute dairy-free chocolate and vegan butter for plant-based brownies, and pair with coconut milk or oat-based ice cream.
- Mini Versions: Make bite-sized sandwiches using a muffin tin brownie or cut into small squares—perfect for parties or dessert platters.
- Gourmet Twists: Incorporate adult flavors like bourbon-infused vanilla ice cream, espresso-kissed brownies, or sea salt caramel ripple for a sophisticated edge.
- Cookie Hybrid: Combine elements of cookies by placing small cookie halves at the corners or embedding mini Oreos into the ice cream layer.
- Decorative Touches: Drizzle with white chocolate, rainbow sprinkles, edible glitter, or crushed candy canes for themed events like birthdays or holidays.
- Double-Layer Ice Cream: Swirl two complementary flavors (e.g., chocolate and raspberry) before spreading for a marbled effect.
- Nutty Crunch: Press finely chopped hazelnuts, almonds, or pretzels into the sides of the ice cream layer before freezing for added texture.
Health Considerations and Nutritional Value
While undeniably indulgent, Brownie Ice Cream Sandwiches can be enjoyed mindfully with awareness of their nutritional content. A typical sandwich (depending on size and ingredients) contains approximately 350–500 calories, with significant contributions from fats (especially saturated fat from butter, chocolate, and full-fat ice cream), carbohydrates (from sugar and flour), and moderate protein from eggs and dairy.
To make lighter versions:
- Use reduced-sugar brownie recipes with natural sweeteners like maple syrup or coconut sugar (though texture may vary).
- Opt for low-fat or light ice cream alternatives, though these may become icy when frozen.
- Incorporate applesauce or mashed banana in place of some butter to reduce fat content.
- Add fiber-rich ingredients like black beans (in brownie batter) or oats for a nutrient boost.
- Serve smaller portions to satisfy cravings without overindulgence.
For those managing dietary restrictions:
- Diabetics: Monitor carbohydrate intake; consider sugar-free ice cream and low-glycemic sweeteners.
- Lactose intolerance: Choose lactose-free dairy products or plant-based substitutes.
- Allergies: Be cautious with nuts, gluten, and dairy—clear labeling is essential when serving others.
Despite their richness, these treats can be part of a balanced diet when consumed occasionally and in moderation. Their ability to bring joy and comfort makes them worth savoring—just perhaps not every day!
Ingredients
For the Brownies:
- 1 cup (2 sticks) unsalted butter
- 8 oz semi-sweet chocolate, chopped
- 1 ½ cups granulated sugar
- ½ cup packed brown sugar
- 4 large eggs, room temperature
- 2 teaspoons pure vanilla extract
- ¾ cup all-purpose flour
- ½ cup cocoa powder (Dutch-process preferred)
- ¼ teaspoon salt
- 1 cup chocolate chips or chopped nuts (optional)
For the Ice Cream Filling:
- 1.5–2 quarts premium ice cream (vanilla or preferred flavor)
- Optional: ½ cup whipped cream, mini marshmallows, or mix-ins
For Finishing (Optional):
- 1 cup melted chocolate or candy coating
- Sprinkles, crushed nuts, sea salt, or shredded coconut for garnish
Directions
- Preheat oven to 350°F (175°C). Grease and line a 9×13-inch baking pan with parchment paper.
- Melt butter and chocolate together in a double boiler until smooth. Remove from heat.
- Whisk in granulated and brown sugars until combined and glossy.
- Add eggs one at a time, mixing well after each. Stir in vanilla extract.
- Sift flour, cocoa powder, and salt into the mixture. Fold gently until just incorporated.
- Stir in chocolate chips or nuts if using. Pour batter into the pan and spread evenly.
- Bake for 25–30 minutes until a toothpick comes out with moist crumbs. Cool completely, then chill in the fridge for 1 hour.
- Cut into 12 rectangles. Soften ice cream for 10–15 minutes at room temperature.
- Spread about ½ inch of ice cream on half of the brownie pieces. Top with remaining brownies and press gently.
- Wrap each sandwich in parchment paper and freeze for at least 4 hours or overnight.
- Optional: Dip in melted chocolate and add toppings before final freeze.
- Allow to sit 3–5 minutes before serving for best texture.
FAQ
Can I make these ahead of time?
Yes! These sandwiches can be made up to 3 weeks in advance and stored in an airtight container in the freezer.
What type of ice cream works best?
High-quality, full-fat ice cream holds its shape better and offers superior flavor and creaminess. Avoid low-melt or “ice milk” varieties.
How do I prevent ice crystals?
Minimize air exposure by wrapping tightly and freezing quickly. Adding whipped cream to the ice cream helps maintain smooth texture.
Can I use store-bought brownies?
Absolutely. Just ensure they’re thick enough and not too crumbly. Fudge-style brownies work best.
Are they suitable for kids?
Yes, and children love helping assemble them. Use fun ice cream flavors and colorful toppings to make it a family activity.
Can I bake mini versions?
Yes—use a jelly roll pan or make individual rounds with a cookie cutter for party-friendly sizes.
How do I cut brownies cleanly?
Chill them first, use a sharp knife dipped in hot water, and wipe between cuts.
Can I make them nut-free or gluten-free?
Yes—simply substitute ingredients accordingly. Many gluten-free brownie recipes yield excellent results.
Summary
Brownie Ice Cream Sandwiches blend the deep, chocolatey richness of fudgy homemade brownies with creamy, dreamy ice cream for a show-stopping dessert that’s as delicious as it is customizable. Perfect for entertaining or treating yourself, this frozen favorite brings together warmth and chill in every blissful bite.