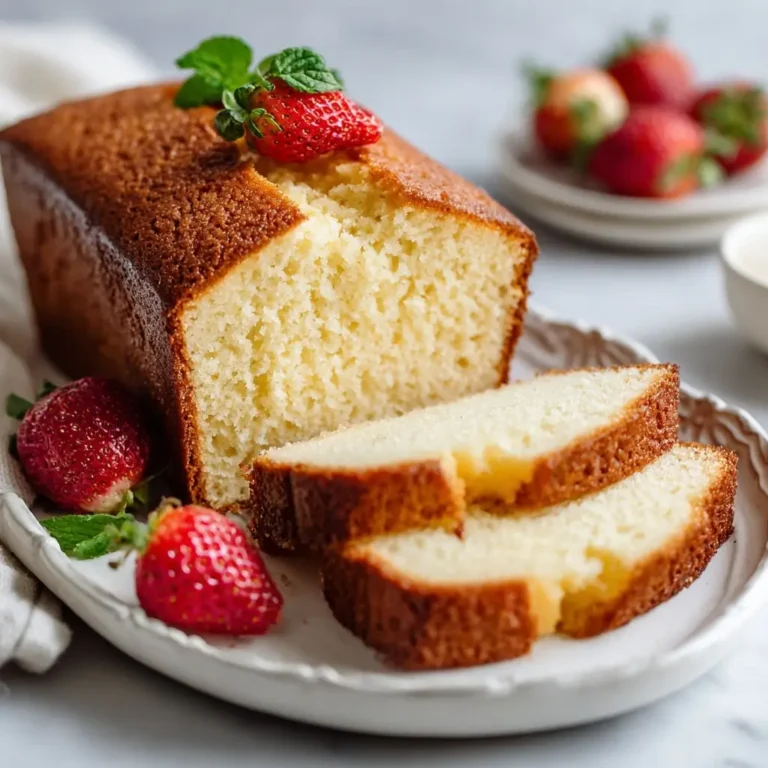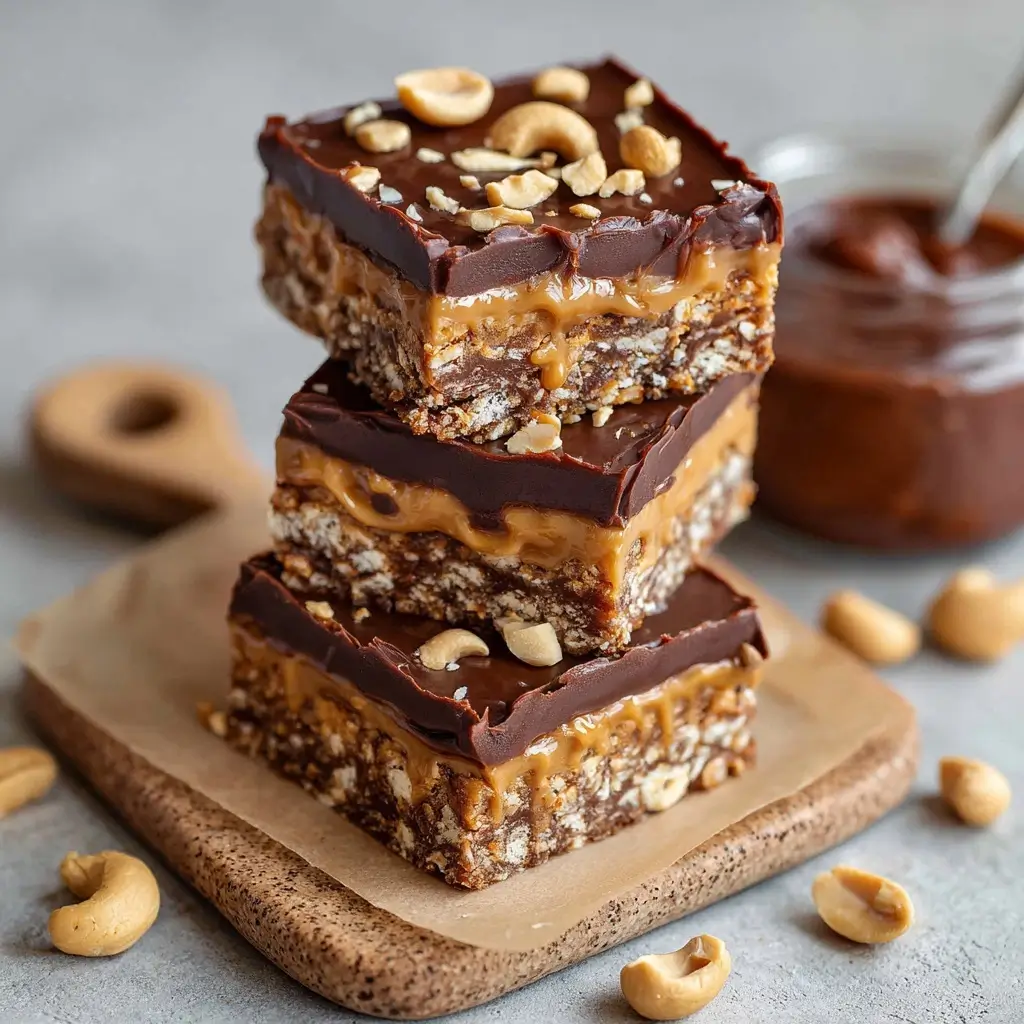
Chocolate Peanut Butter No-Bake Bars
Chocolate Peanut Butter No-Bake Bars: A Decadent, Easy-to-Make Treat
If you’re craving a rich, creamy, and satisfying dessert that requires no oven time and minimal effort, look no further than Chocolate Peanut Butter No-Bake Bars. These indulgent treats combine the smooth sweetness of chocolate with the nutty richness of peanut butter, creating a perfect harmony of flavors and textures. Whether you’re preparing for a family gathering, holiday party, or simply want a quick sweet fix, these no-bake bars are a go-to favorite. They come together in minutes, chill beautifully in the refrigerator, and are adored by both kids and adults alike.
The History Behind No-Bake Desserts
No-bake desserts have long been a staple in American kitchens, especially during the mid-20th century when convenience and simplicity became central to home cooking. With the rise of processed ingredients like powdered sugar, margarine, and pre-packaged graham crackers, recipes that didn’t require an oven gained popularity. The classic no-bake bar emerged as a clever way to use pantry staples to create something sweet, satisfying, and fuss-free.
Chocolate peanut butter no-bake bars likely evolved from traditional fudge recipes and earlier confections such as “cowboy cookies” or “refrigerator cookies.” These bars were often made with melted chocolate, butter, sugar, and peanut butter—ingredients commonly found in most households. Over time, variations began incorporating additional elements like oats, coconut, and even marshmallows, enhancing both flavor and texture. Today, these bars remain a beloved treat across generations, cherished for their nostalgic taste and effortless preparation.
Ingredients Breakdown: What Makes These Bars So Irresistible?
The magic of Chocolate Peanut Butter No-Bake Bars lies in the careful balance of a few key ingredients, each contributing to the overall texture, flavor, and structure of the dessert:
- Peanut Butter: The star ingredient! Creamy peanut butter provides a rich, nutty base and helps bind the mixture together. Opt for natural or conventional brands depending on your preference—just ensure it’s smooth and spreadable.
- Butter: Adds creaminess and helps melt the chocolate smoothly. Unsalted butter is recommended so you can control the salt level.
- Powdered Sugar (Confectioners’ Sugar): Sweetens the mixture while lending a soft, melt-in-your-mouth texture. Sifting is recommended to avoid lumps.
- Cocoa Powder: Provides deep chocolate flavor without needing to melt actual chocolate in the base layer. Use unsweetened cocoa powder for best results.
- Graham Cracker Crumbs: Form the structural foundation of the bars, offering a slightly sweet, crisp contrast to the creamy filling.
- Vanilla Extract: Enhances the overall flavor profile, rounding out the sweetness and adding aromatic depth.
- Salt: A pinch enhances all the other flavors and balances the sweetness.
- Chocolate Chips or Chunks: Melted to form the glossy top layer, providing a firm yet smooth chocolate shell when chilled.
- Optional Add-ins: Chopped peanuts, crushed pretzels, mini marshmallows, or even a drizzle of caramel can elevate the bars with extra crunch and complexity.
Step-by-Step Recipe: How to Make Chocolate Peanut Butter No-Bake Bars
Follow this detailed guide to make perfectly textured, rich, and delicious Chocolate Peanut Butter No-Bake Bars at home:
- Prepare Your Pan: Line an 8×8-inch or 9×9-inch square baking dish with parchment paper, leaving overhang on two sides for easy removal. Lightly grease the paper and any exposed edges of the pan.
- Make the Base Layer: In a large mixing bowl, combine 1 cup of graham cracker crumbs, 1/2 cup of creamy peanut butter, 1/4 cup of softened unsalted butter, 1/3 cup of powdered sugar, 1/4 cup of unsweetened cocoa powder, 1/2 teaspoon of vanilla extract, and a pinch of salt. Mix thoroughly until the mixture resembles wet sand and holds together when pressed.
- Press Into Pan: Transfer the mixture into the prepared pan. Use a flat-bottomed glass or spatula to press it down firmly and evenly into a compact layer. This ensures the bars hold their shape when cut.
- Chill the Base: Place the pan in the refrigerator for at least 20–30 minutes to set the base. This step prevents the top layer from sinking into the bottom.
- Prepare the Chocolate Topping: In a microwave-safe bowl or using a double boiler, melt 1 cup of semi-sweet or milk chocolate chips with 1 tablespoon of vegetable oil or shortening. Stir every 20–30 seconds until completely smooth and glossy. Alternatively, you can use dark chocolate for a more intense flavor.
- Pour and Spread Chocolate: Remove the pan from the fridge. Carefully pour the melted chocolate over the chilled base, spreading it evenly with a spatula to cover the entire surface.
- Add Optional Toppings: If desired, sprinkle chopped peanuts, sea salt flakes, mini Reese’s pieces, or crushed pretzels over the warm chocolate for added texture and flavor.
- Final Chill: Return the pan to the refrigerator and chill for at least 1–2 hours, or until the chocolate layer is completely firm and snaps cleanly when cut.
- Cut Into Bars: Using the parchment overhang, lift the slab out of the pan. Place it on a cutting board and slice into 12–16 even bars or squares using a sharp knife. For clean cuts, wipe the knife between slices.
- Serve and Store: Serve chilled. Store leftovers in an airtight container in the refrigerator for up to 2 weeks or freeze for longer storage.
Tips for Perfect No-Bake Bars Every Time
- Use Room Temperature Ingredients: Softened butter and peanut butter blend more easily, ensuring a smooth, lump-free mixture.
- Don’t Skip the Chill Time: Each chilling step is crucial for setting the layers properly. Rushing can lead to crumbling or uneven bars.
- Press Firmly: When forming the base, press down hard and evenly. A loose base will cause the bars to fall apart.
- Avoid Watery Peanut Butter: If using natural peanut butter, stir well and avoid versions with excessive oil separation, which can make the mixture too soft.
- Prevent Chocolate Bloom: Melt chocolate gently and avoid introducing water, which can cause it to seize. Adding a small amount of oil helps maintain a smooth finish.
- Customize Cutting Size: For bite-sized treats, cut into smaller squares. For heartier servings, go larger.
- Use Parchment Paper: It makes removal effortless and ensures clean edges.
Variations and Customizations
One of the best things about Chocolate Peanut Butter No-Bake Bars is how adaptable they are. Here are some creative twists to try:
- Nut-Free Version: Replace peanut butter with sunflower seed butter or soy nut butter to accommodate allergies.
- Gluten-Free Option: Use certified gluten-free graham crackers or substitute with crushed gluten-free cookies or oats.
- Vegan Bars: Use plant-based butter, dairy-free chocolate, and ensure your graham crackers are vegan-friendly.
- Protein-Packed Bars: Add a scoop of vanilla or chocolate protein powder to the base mixture, adjusting liquid if needed.
- Oatmeal Chocolate Peanut Butter Bars: Mix in 1/2 cup of rolled oats for a chewier texture and added fiber.
- S’mores Style: Add a layer of mini marshmallows before pouring the chocolate, then lightly toast them with a kitchen torch.
- Double Chocolate: Use chocolate graham crackers and add chocolate chips to the base for an ultra-rich version.
- Spicy Kick: Add a pinch of cayenne pepper or cinnamon to the base for a sweet-and-spicy contrast.
- White Chocolate Drizzle: After the chocolate layer sets, drizzle with melted white chocolate for visual appeal.
- Holiday Themes: Add festive sprinkles, colored sugar, or seasonal shapes when cutting for Christmas, Halloween, or birthdays.
Health Considerations and Nutritional Value
While Chocolate Peanut Butter No-Bake Bars are undeniably delicious, it’s important to enjoy them in moderation due to their high sugar and fat content. However, they do offer some nutritional benefits depending on ingredient choices:
- Peanut Butter: A good source of healthy fats, protein, and vitamin E. It promotes satiety and sustained energy.
- Dark Chocolate: Rich in antioxidants and flavonoids when used in place of milk chocolate. May support heart health in moderation.
- Graham Crackers: Typically made with whole wheat, providing small amounts of fiber, though they’re still relatively high in refined sugars.
- Butter and Sugar: High in saturated fat and added sugars, so portion control is key—especially for those managing diabetes or cardiovascular concerns.
Estimated Nutrition per Bar (based on 12 servings):
- Calories: 220–250
- Total Fat: 14–16g
- Saturated Fat: 6–7g
- Carbohydrates: 22–25g
- Sugars: 16–18g
- Protein: 4–5g
- Fiber: 1–2g
To make a healthier version, consider using reduced-sugar peanut butter, low-fat spreads, coconut oil instead of butter, and monk fruit or stevia-sweetened chocolate. You can also boost nutrition by adding flaxseed meal, chia seeds, or chopped nuts.
Ingredients
- 1 cup graham cracker crumbs (about 8 full sheets)
- 1/2 cup creamy peanut butter (regular or natural)
- 1/4 cup unsalted butter, softened
- 1/3 cup powdered sugar, sifted
- 1/4 cup unsweetened cocoa powder
- 1/2 tsp vanilla extract
- Pinch of salt
- 1 cup semi-sweet or milk chocolate chips
- 1 tbsp neutral oil (e.g., coconut, canola, or vegetable oil)
- Optional toppings: chopped peanuts, sea salt, pretzels, mini marshmallows
Directions
- Line an 8×8-inch baking pan with parchment paper and lightly grease. Set aside.
- In a large bowl, mix graham cracker crumbs, peanut butter, softened butter, powdered sugar, cocoa powder, vanilla, and salt until fully combined and crumbly but moldable.
- Press mixture firmly into the bottom of the prepared pan using a glass or spatula.
- Refrigerate for 20–30 minutes to set.
- While base chills, melt chocolate chips and oil in 20-second intervals in the microwave, stirring between each, until smooth.
- Pour melted chocolate over chilled base and spread evenly with a spatula.
- Sprinkle with optional toppings if desired.
- Chill for 1–2 hours until chocolate is firm.
- Lift bars out using parchment paper and cut into squares.
- Store in an airtight container in the refrigerator for up to 2 weeks.
FAQ
Can I make these bars ahead of time?
Yes! These bars actually improve with time as the flavors meld. Make them 1–2 days in advance and store them refrigerated.
Why are my bars too soft?
This usually happens if the base wasn’t chilled long enough or if too much oil was in the peanut butter. Ensure proper chilling and use stable ingredients.
Can I freeze Chocolate Peanut Butter No-Bake Bars?
Absolutely. Wrap individual bars in plastic wrap and store in a freezer-safe container for up to 3 months. Thaw in the fridge before serving.
Can I use crunchy peanut butter?
Yes, crunchy peanut butter adds a pleasant texture. Just be aware it may make pressing the base slightly more difficult.
What can I use instead of graham crackers?
Digestive biscuits, vanilla wafers, Oreos (with or without filling), or crushed cereal like cornflakes or rice krispies work well.
How do I prevent the chocolate from cracking?
Avoid temperature shock. Let the bars sit at room temperature for 5–10 minutes before slicing, and don’t over-chill.
Are these bars kid-friendly?
Definitely! Kids love helping mix the base and decorate the tops. Just supervise around hot melted chocolate.
Summary
Chocolate Peanut Butter No-Bake Bars are a quick, decadent dessert that combines creamy peanut butter, rich cocoa, and a smooth chocolate topping—all without turning on your oven. Perfect for holidays, potlucks, or anytime cravings strike, these easy-to-make bars deliver big flavor in every bite.