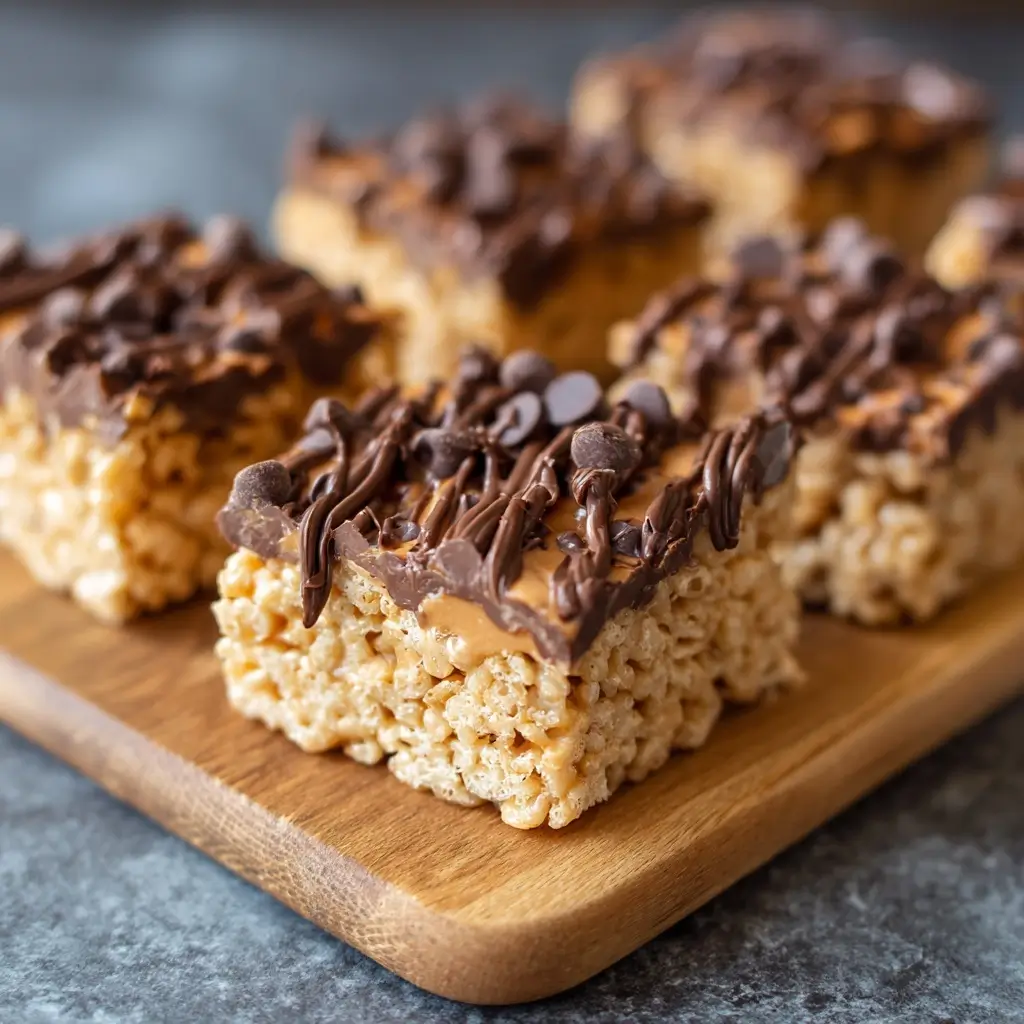
Peanut Butter Chocolate Rice Krispie Treats
Introduction
Welcome to a delectable twist on a classic American favorite—Peanut Butter Chocolate Rice Krispie Treats! These gooey, crunchy, and utterly irresistible treats combine the nostalgic charm of traditional Rice Krispie squares with the rich, creamy depth of peanut butter and the luxurious indulgence of chocolate. Perfect for kids’ parties, holiday gatherings, after-school snacks, or even as a last-minute dessert when unexpected guests arrive, these treats are as easy to make as they are delicious. Whether you’re a seasoned home baker or a kitchen novice, this recipe is guaranteed to become a staple in your culinary repertoire. With its harmonious blend of textures and flavors, each bite offers a symphony of crisp rice cereal, melty marshmallow, smooth peanut butter, and velvety chocolate—a true celebration of comfort food at its finest.
The History
The story of Rice Krispie Treats begins in the 1930s, during the Great Depression, when Kellogg’s sought creative ways to promote their newly popular Rice Krispies cereal. In 1939, the first official Rice Krispie Treat recipe was introduced by Kellogg’s via a promotional booklet that encouraged homemakers to use Rice Krispies in innovative ways. The original recipe was simple: butter, marshmallows, and cereal. It quickly gained popularity due to its affordability, ease of preparation, and kid-friendly appeal. Over the decades, Rice Krispie Treats became a cultural icon, appearing in lunchboxes, bake sales, and family picnics across America.
The evolution of the classic treat began as home cooks started experimenting with add-ins like chocolate chips, peanut butter, sprinkles, and even candies. By the 1980s and 1990s, variations exploded in popularity, especially in school fundraisers and community cookbooks. Peanut butter emerged as a beloved addition, not only for its flavor but also for its binding properties and protein content. The integration of chocolate—whether swirled into the mix, drizzled on top, or folded throughout—elevated the treat from simple snack to decadent dessert. Today, Peanut Butter Chocolate Rice Krispie Treats represent a modern fusion of tradition and innovation, combining three universally loved ingredients into one unforgettable confection.
Ingredients Breakdown
To create the perfect batch of Peanut Butter Chocolate Rice Krispie Treats, every ingredient plays a crucial role in achieving the ideal texture, flavor balance, and structural integrity. Let’s take a detailed look at each component:
- Butter (Unsalted): Provides richness and helps melt the marshmallows smoothly. Unsalted butter allows you to control the sodium level, ensuring the sweetness isn’t overpowered.
- Mini Marshmallows: The backbone of any Rice Krispie Treat, mini marshmallows melt evenly and coat the cereal uniformly, creating that signature chewy texture. They also help bind the mixture together without becoming too stiff.
- Peanut Butter (Creamy or Crunchy): Adds depth, creaminess, and a nutty flavor profile. Creamy peanut butter creates a smoother consistency, while crunchy adds delightful texture. Choose natural or processed based on preference, but ensure it’s stirred well before use.
- Vanilla Extract: Enhances the overall flavor complexity, rounding out the sweetness and adding a warm, aromatic note.
- Salt (Optional): A pinch can elevate all the flavors, balancing sweetness and enhancing the savoriness of the peanut butter.
- Rice Krispies Cereal: The foundation of the treat. Its light, airy structure absorbs the sticky marshmallow mixture while maintaining a satisfying crunch. Use plain, unsweetened Rice Krispies for best results.
- Semi-Sweet Chocolate Chips: Melted and swirled into the mixture or used as a topping, these add a rich cocoa flavor and luxurious mouthfeel. You can substitute with milk chocolate, dark chocolate, or even white chocolate depending on taste.
- Chocolate Bars or Chunks (Optional): For extra indulgence, chopped chocolate bars can be folded in for melty pockets in every bite.
- Toppings (Optional): Consider sea salt flakes, crushed peanuts, mini Reese’s pieces, chocolate sprinkles, or even caramel drizzle for gourmet flair.
Each ingredient contributes to a multi-layered experience—sweet, salty, creamy, crunchy, and chewy—all in one irresistible square.
Step-by-Step Recipe
- Prepare Your Workspace: Line an 8×8-inch or 9×13-inch baking pan with parchment paper, leaving an overhang on two sides for easy removal. Lightly grease the paper with non-stick spray or a thin layer of butter.
- Melt the Base: In a large saucepan over low heat, melt 4 tablespoons (½ stick) of unsalted butter. Stir occasionally to prevent burning.
- Add Marshmallows: Once the butter is fully melted, add 10 cups of mini marshmallows. Stir continuously with a silicone spatula or wooden spoon until the mixture becomes smooth and glossy, about 4–5 minutes. Do not rush this step—low and slow ensures even melting without scorching.
- Incorporate Peanut Butter: Remove the saucepan from heat. Stir in ¾ cup of creamy peanut butter until fully blended into the marshmallow mixture. The warmth will soften the peanut butter, making it easy to incorporate.
- Add Flavor Enhancers: Mix in 1 teaspoon of pure vanilla extract and a pinch of salt (about ¼ tsp). This enhances the overall flavor profile and balances the sweetness.
- Melt Chocolate (Optional Step for Swirl): In a microwave-safe bowl, melt 1 cup of semi-sweet chocolate chips in 20-second bursts, stirring between each, until smooth. Set aside.
- Combine with Cereal: Pour the warm marshmallow-peanut butter mixture over 6 cups of Rice Krispies cereal in a large mixing bowl. Gently fold until every piece of cereal is evenly coated. Be careful not to crush the cereal.
- Fold in Chocolate: If you’re adding melted chocolate for a marbled effect, drizzle about half of it into the mixture and gently swirl using a spatula—don’t overmix to maintain streaks of chocolate.
- Transfer to Pan: Pour the mixture into the prepared pan. Use the spatula or greased hands to press it down evenly into a compact layer. For extra neat edges, place a sheet of parchment on top and press firmly.
- Top with More Chocolate: Drizzle the remaining melted chocolate over the top in a zig-zag pattern. Use a toothpick or skewer to create decorative swirls if desired.
- Add Toppings: While the chocolate is still wet, sprinkle with optional toppings such as flaky sea salt, chopped peanuts, or mini chocolate chips.
- Cool and Set: Allow the treats to cool at room temperature for at least 1–2 hours, or speed up the process by placing them in the refrigerator for 30 minutes.
- Cut Into Squares: Using the parchment overhang, lift the slab out of the pan. Place on a cutting board and slice into even squares or rectangles using a sharp knife dipped in hot water for clean cuts.
- Serve or Store: Enjoy immediately or store in an airtight container for later.
Tips
- Use Low Heat: Always melt the butter and marshmallows over low heat to avoid browning or burning, which can impart a bitter taste.
- Grease Tools: Coat your spatula, spoon, and hands with butter or cooking spray to prevent sticking during mixing and pressing.
- Don’t Overmix: Once the cereal is added, stir just until combined. Overmixing can break down the cereal and result in a dense, mushy texture.
- Choose Fresh Cereal: Use a fresh box of Rice Krispies for maximum crispness. Stale cereal may absorb moisture and become soggy.
- Adjust Sweetness: If you find the marshmallows too sweet, reduce the amount slightly and compensate with a bit more peanut butter for balance.
- Chill Before Cutting: For cleaner edges and neater squares, refrigerate the set treats for 20–30 minutes before slicing.
- Double Batch? If making a larger batch, use a bigger pot and consider a 9×13-inch pan. Avoid overcrowding the pan to maintain proper thickness.
- Customize Texture: For chewier treats, press the mixture less firmly. For firmer bars, pack it down tightly.
- Kid-Friendly Fun: Let children help with stirring (once off heat) or decorating with toppings—it’s a safe, engaging way to involve them in cooking.
- Make Ahead: These treats keep well and actually improve in texture after resting overnight, allowing flavors to meld.
Variations and Customizations
The beauty of Peanut Butter Chocolate Rice Krispie Treats lies in their versatility. Here are some inspired variations to suit different tastes, dietary needs, and occasions:
- Reese’s Style: Fold in mini Reese’s peanut butter cups or chopped full-sized ones for a candy-bar-inspired treat.
- Double Chocolate: Add cocoa powder (2–3 tablespoons) to the melted butter-marshmallow mixture for a deeper chocolate base, then proceed with chocolate chips.
- S’mores Version: Mix in crushed graham crackers and mini marshmallows, then drizzle with chocolate and a touch of peanut butter.
- Crunchy Nut: Replace half the Rice Krispies with crushed pretzels or chopped peanuts for added crunch and saltiness.
- White Chocolate Drizzle: Swap semi-sweet for white chocolate in the topping, or use both for a beautiful contrast.
- Gluten-Free: Ensure your Rice Krispies are certified gluten-free (such as those made by Schär or Nature’s Path), and verify all other ingredients are GF-safe.
- Vegan Option: Use plant-based butter, vegan marshmallows (like Dandies), and dairy-free chocolate chips. Substitute peanut butter with almond or sunflower seed butter if needed.
- Protein-Packed: Stir in a scoop of unflavored or vanilla protein powder into the warm mixture, or use high-protein cereal blends.
- Holiday Themes: Add festive sprinkles, colored marshmallows, or seasonal shapes (like hearts for Valentine’s or pumpkins for Halloween).
- Cookie-Inspired: Mix in crushed Oreos or chocolate sandwich cookies for a cookies-and-cream twist.
- Spiced Version: Add a pinch of cinnamon or cayenne for a sweet-and-spicy kick that complements the peanut butter.
- Layered Bars: Create a bottom layer of plain Rice Krispie mix, a middle layer with peanut butter, and a top chocolate layer for a trifle-style bar.
Health Considerations and Nutritional Value
While Peanut Butter Chocolate Rice Krispie Treats are undeniably indulgent, understanding their nutritional profile can help you enjoy them mindfully. Here’s a general breakdown per serving (based on 12 servings from an 8×8 pan):
- Calories: Approximately 220–270 kcal per square
- Fat: 10–14g (mostly from peanut butter and butter; includes healthy monounsaturated fats)
- Saturated Fat: 4–6g (moderate; consider using reduced-fat peanut butter if concerned)
- Carbohydrates: 30–35g (primarily from sugar and cereal)
- Sugars: 18–22g (high due to marshmallows and chocolate; natural sugars are minimal)
- Protein: 4–6g (a decent amount thanks to peanut butter)
- Sodium: 150–200mg (can vary based on ingredients used)
- Fiber: 1–2g (low; whole grain alternatives could increase this)
Considerations:
- Sugar Content: These treats are high in added sugars. Enjoy in moderation, especially for children and individuals managing blood sugar levels.
- Allergens: Contains peanuts and often milk (in chocolate and butter). Not suitable for those with peanut or dairy allergies unless substitutions are made.
- Portion Control: Cut into smaller squares to satisfy cravings without overeating.
- Balanced Snacking: Pair with fruit or yogurt to balance the meal.
- Healthier Twists: Use honey or maple syrup-infused marshmallows (if available), reduce chocolate quantity, or incorporate oats for added fiber.
Ingredients
- 4 tablespoons (½ stick) unsalted butter
- 10 cups mini marshmallows
- ¾ cup creamy peanut butter (or crunchy, if preferred)
- 1 teaspoon pure vanilla extract
- ¼ teaspoon salt (optional)
- 6 cups Rice Krispies cereal (plain, unsweetened)
- 1 cup semi-sweet chocolate chips (plus extra for topping)
- Optional toppings: flaky sea salt, chopped peanuts, chocolate sprinkles, mini Reese’s pieces
Directions
- Line an 8×8-inch baking pan with parchment paper and lightly grease it.
- In a large saucepan over low heat, melt the butter completely.
- Add the mini marshmallows and stir constantly until fully melted and smooth.
- Remove from heat and stir in the peanut butter, vanilla extract, and salt until well combined.
- If using, melt 1 cup of chocolate chips in the microwave in 20-second intervals, stirring until smooth. Reserve half for topping.
- Pour the marshmallow mixture over the Rice Krispies in a large bowl. Fold gently until evenly coated.
- Drizzle half the melted chocolate into the mixture and swirl gently for a marbled effect.
- Transfer to the prepared pan and press down evenly with a greased spatula or hands.
- Drizzle the remaining chocolate over the top and create swirls with a toothpick.
- Sprinkle with optional toppings while chocolate is still wet.
- Let cool at room temperature for 1–2 hours or refrigerate for 30 minutes to set.
- Lift out using the parchment overhang and cut into squares with a hot, clean knife.
- Store in an airtight container at room temperature for up to 5 days.
FAQ
Can I use regular marshmallows instead of mini?
Yes, but mini marshmallows melt more evenly. If using regular, chop them into smaller pieces for consistent melting.
Why are my treats too hard?
Overheating the marshmallows or pressing the mixture too firmly can cause hardness. Use low heat and gentle pressing.
Can I make these without peanut butter?
Absolutely—try almond butter, sunflower seed butter (great for schools with nut bans), or omit entirely for a classic version.
How do I store them?
Keep in an airtight container at room temperature for up to 5 days. They can also be frozen for up to 3 months—wrap individually and thaw at room temperature.
Can I bake them?
No baking is required. The heat from the stovetop mixture is sufficient to set the treats.
Are they gluten-free?
Only if you use certified gluten-free Rice Krispies and check all labels for cross-contamination.
Can I make them ahead of time?
Yes! They taste great the next day and hold up well for events. Prepare up to 2 days in advance.
Why did my chocolate sink to the bottom?
If you mix the chocolate too thoroughly, it may settle. For a marbled effect, gently swirl rather than fully blending.
Summary
Peanut Butter Chocolate Rice Krispie Treats are a heavenly fusion of nostalgia and indulgence, combining crispy cereal, gooey marshmallows, creamy peanut butter, and rich chocolate in every bite. Easy to make, endlessly customizable, and adored by all ages, they’re the ultimate no-bake dessert for any occasion.