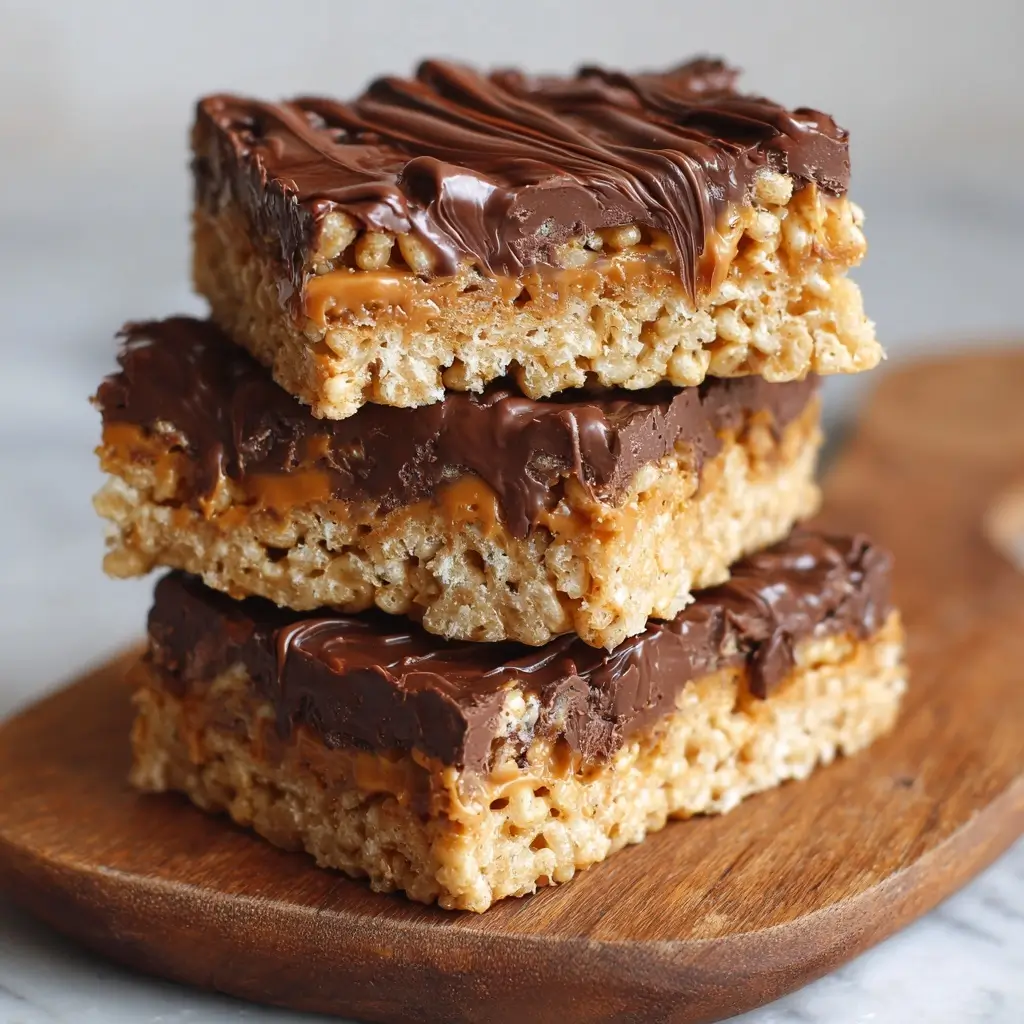
Peanut Butter Chocolate Rice Krispie Treats
Introduction
Welcome to the ultimate guide for creating a rich, indulgent, and utterly irresistible dessert: Peanut Butter Chocolate Rice Krispie Treats. This is not your average childhood snack. We’ve taken the classic Rice Krispie Treat and elevated it into a decadent confection that combines the creamy nuttiness of peanut butter with the deep, luxurious flavor of chocolate—all wrapped up in the nostalgic crunch of crispy rice cereal. Whether you’re making these for a family gathering, a holiday party, a school bake sale, or just because you need a sweet pick-me-up, these treats promise to deliver big on flavor, texture, and satisfaction. They’re easy to make, require no baking, and come together in under 30 minutes. Best of all, they’re customizable, kid-friendly, and guaranteed to disappear fast!
The History
The original Rice Krispie Treat was invented in 1939 by Kellogg’s as a clever way to promote their popular breakfast cereal, Rice Krispies. Created by Malitta Jensen and Mildred Day at the Kellogg Company, the recipe was first introduced as part of a cookbook designed to encourage homemakers to use Rice Krispies in creative ways. The simple combination of marshmallows, butter, and cereal quickly gained popularity due to its ease, affordability, and universal appeal—especially among children.
Over the decades, the basic recipe has been adapted countless times. From adding food coloring for holiday themes to mixing in candies, sprinkles, or different cereals, the Rice Krispie Treat has become a canvas for culinary creativity. Enter the era of gourmet desserts and comfort food fusion, where classics are reinvented with bold flavors. The Peanut Butter Chocolate version emerged as a favorite among fans of both peanut butter cups and gooey, chewy sweets. Inspired by the legendary Reese’s Peanut Butter Cups, this variation layers rich cocoa into the marshmallow base and swirls in creamy peanut butter, resulting in a hybrid treat that satisfies multiple cravings in one bite. Today, it stands as one of the most beloved modern twists on an American classic.
Ingredients Breakdown
To make the perfect batch of Peanut Butter Chocolate Rice Krispie Treats, each ingredient plays a crucial role in achieving the ideal balance of sweetness, richness, texture, and structure. Let’s dive deep into what goes into these heavenly squares:
- Butter (Unsalted, ½ cup / 1 stick): Provides a rich, creamy base and helps melt the marshmallows smoothly. Unsalted butter allows better control over the overall salt content, letting you adjust seasoning precisely.
- Mini Marshmallows (10 oz / about 6 cups): The glue that holds everything together. Mini marshmallows melt more evenly than large ones, ensuring a consistent texture throughout the treats.
- Cocoa Powder (¼ cup, unsweetened): High-quality natural or Dutch-process cocoa powder gives the treats their deep chocolate flavor. For best results, sift it before adding to avoid lumps.
- Peanut Butter (¾ cup, creamy): Use a smooth, high-fat peanut butter (natural or commercial) for maximum creaminess and authentic peanut flavor. Avoid low-fat versions, as they contain more stabilizers and water, which can affect texture.
- Rice Krispies Cereal (6 cups): The foundation of the treat. Light, airy, and crisp, this cereal provides the signature snap and crunch. Measure after pouring—not packed—to maintain the right ratio.
- Vanilla Extract (1 teaspoon): Enhances overall flavor depth and rounds out the sweetness with a warm, aromatic note.
- Salt (½ teaspoon): A small amount enhances all the other flavors, balancing sweetness and bringing out the nutty notes of the peanut butter.
- Optional Add-ins: Chocolate chips, chopped peanuts, mini Reese’s pieces, crushed pretzels, or a drizzle of melted chocolate on top can add extra flair and texture.
Step-by-Step Recipe
- Prepare Your Pan: Line a 9×13-inch baking pan with parchment paper, leaving some overhang on two sides for easy removal later. Lightly grease the parchment with non-stick spray or a thin layer of butter.
- Melt the Butter: In a large saucepan over medium heat, melt the butter completely. Stir occasionally to prevent browning unless you prefer a slightly toasted flavor.
- Add Marshmallows: Once the butter is fully melted, reduce the heat to low and add the mini marshmallows. Stir continuously with a heat-resistant spatula until the mixture becomes smooth and glossy, about 3–4 minutes. Be patient—this ensures even melting without scorching.
- Incorporate Cocoa Powder: Sift in the unsweetened cocoa powder to prevent clumping. Stir vigorously until fully blended and the mixture turns a rich, dark brown color with no streaks.
- Mix in Peanut Butter: Add the creamy peanut butter, vanilla extract, and salt. Continue stirring until the peanut butter is fully incorporated and the mixture is velvety and homogenous. This may take another 1–2 minutes.
- Combine with Cereal: Remove the saucepan from heat. Gradually pour in the Rice Krispies cereal, using a wooden spoon or spatula to gently fold until every piece is evenly coated. Do not overmix, as this can crush the cereal and make the treats dense.
- Press into Pan: Transfer the mixture to the prepared pan. Using a greased spatula or the back of a spoon, press down firmly and evenly to create a smooth, compact layer. Apply steady pressure to ensure the treats hold their shape when cut.
- Cool Completely: Allow the treats to cool at room temperature for at least 1 hour. For faster setting, place in the refrigerator for 20–30 minutes. Do not cut while warm, as they will be too sticky and soft.
- Cut and Serve: Once set, lift the slab out using the parchment overhang. Place on a cutting board and slice into 12–16 even squares using a sharp knife. Wipe the knife between cuts for clean edges.
- Optional Decoration: Drizzle with melted milk chocolate, dark chocolate, or white chocolate. You can also sprinkle with crushed peanuts, sea salt, or mini M&M’s for visual appeal and added taste.
Tips
- Use fresh marshmallows: Old or stale marshmallows may not melt properly and can result in a grainy texture.
- Don’t rush the melting process: Low and slow is key. High heat can burn the sugar in marshmallows, giving the treats a bitter taste.
- Grease your tools: Coat your spatula, hands, and knife with butter or cooking spray to prevent sticking during mixing and cutting.
- For extra chewiness: Slightly under-mix the cereal so there are pockets of gooey marshmallow in the final product.
- Storage tip: Keep treats in an airtight container at room temperature to maintain freshness and prevent drying out.
- Avoid humidity: Making these on very humid days can cause the treats to become sticky or weep moisture.
- Double batch caution: It’s better to make two separate batches than double the recipe in one pot, as uneven heating can occur.
Variations and Customizations
One of the greatest things about Peanut Butter Chocolate Rice Krispie Treats is how easily they can be personalized. Here are some delicious variations to try:
- Reese’s-Inspired Treats: Press mini Reese’s peanut butter cups into the top before cooling, or mix chopped pieces into the cereal blend.
- Crunchy Version: Substitute half the Rice Krispies with crushed cornflakes or chow mein noodles for added texture.
- Nutella Swirl: After pressing into the pan, drizzle warm Nutella over the top and use a knife to create a marbled effect.
- Gluten-Free: Ensure your Rice Krispies are certified gluten-free (like those made by Schär or Nature’s Path), and verify all other ingredients are GF-safe.
- Vegan Option: Use vegan marshmallows (such as Dandies), plant-based butter, and dairy-free chocolate to make a cruelty-free version.
- Protein-Packed: Mix in a scoop of unflavored or chocolate peanut butter protein powder into the melted marshmallow mixture for a boost.
- Cookie Dough Fusion: Fold in edible cookie dough bites or chunks for a fun twist.
- Fruity Pebbles Twist: Replace 2 cups of Rice Krispies with Fruity Pebbles for a colorful, fruity contrast to the chocolate-peanut butter base.
- Salted Caramel Drizzle: Top with homemade or store-bought salted caramel sauce for a sweet-salty finish.
- Holiday Themes: Add red & green sprinkles for Christmas, pastel colors for Easter, or orange & black for Halloween.
Health Considerations and Nutritional Value
While Peanut Butter Chocolate Rice Krispie Treats are undeniably delicious, they should be enjoyed in moderation as part of a balanced diet. Here’s a breakdown of nutritional aspects and ways to make them slightly healthier:
Nutritional Overview (per serving, approx. 1/16 of recipe):
- Calories: ~220–250
- Total Fat: 12–15g (mostly from peanut butter and butter)
- Saturated Fat: 5–7g
- Carbohydrates: 28–32g (primarily from sugar and cereal)
- Sugars: 18–22g
- Protein: 3–4g
- Sodium: 150–200mg
Considerations:
- High Sugar Content: The primary ingredients—marshmallows and chocolate—are high in added sugars. Consider reducing portion size or serving occasionally.
- Healthy Fats: Peanut butter contributes heart-healthy monounsaturated fats and protein, but choose natural varieties without hydrogenated oils or excess sugar.
- Refined Carbs: Rice Krispies are made from refined grains. For a fiber boost, consider substituting part of the cereal with puffed brown rice or quinoa flakes.
- Allergens: Contains peanuts, dairy (butter), and gluten (unless using certified GF cereal). Always label accordingly if sharing.
- Dietary Modifications: Lower-sugar marshmallows (like those sweetened with monk fruit) and reduced-fat peanut butter can slightly lower calorie content, though texture may vary.
Ingredients
- ½ cup (1 stick / 113g) unsalted butter
- 10 oz (about 6 cups) mini marshmallows
- ¼ cup (20g) unsweetened cocoa powder, sifted
- ¾ cup (190g) creamy peanut butter (preferably natural or full-fat)
- 1 teaspoon pure vanilla extract
- ½ teaspoon kosher salt
- 6 cups (150g) Rice Krispies cereal (or gluten-free alternative)
- Optional: melted chocolate, crushed peanuts, Reese’s pieces, sprinkles
Directions
- Line a 9×13-inch baking dish with parchment paper and lightly grease.
- In a large saucepan over medium heat, melt the butter completely.
- Reduce heat to low and add the mini marshmallows. Stir constantly until fully melted and smooth.
- Sift in the cocoa powder and stir until well combined and uniformly colored.
- Add the peanut butter, vanilla extract, and salt. Mix until smooth and creamy.
- Remove from heat and gently fold in the Rice Krispies cereal until evenly coated.
- Pour mixture into the prepared pan and press down firmly with a greased spatula.
- Let cool at room temperature for 1 hour or refrigerate for 20–30 minutes until set.
- Lift out using the parchment overhang and cut into squares with a sharp knife.
- Decorate as desired and serve. Store in an airtight container.
FAQ
Can I use regular marshmallows instead of mini?
Yes, but mini marshmallows melt more evenly. If using large ones, chop them first and expect a slightly longer melting time.
Why are my treats too hard?
Overcooking the marshmallow mixture or over-pressing the cereal can lead to tough treats. Melt gently and press just enough to level.
How long do they last?
Stored in an airtight container at room temperature, they stay fresh for up to 5 days. In the fridge, up to 1 week. They can also be frozen for up to 3 months.
Can I freeze these treats?
Absolutely! Wrap individually or stack with parchment paper between layers. Thaw at room temperature for 30 minutes before serving.
Can I make them without peanut butter?
Yes, but they won’t be “peanut butter” treats! Try almond butter, sunflower seed butter (for allergies), or omit entirely for plain chocolate Rice Krispies.
Why did my treats turn out sticky?
They may not have cooled long enough, or too much marshmallow was used. Always allow full setting time before cutting.
Can I bake them to firm them up?
No—these treats are no-bake and rely on cooling to set. Baking will melt the sugar and ruin the texture.
Are they safe for kids to help make?
Yes! With adult supervision for the stovetop step, this is a great kid-friendly recipe. Let children help with mixing, pressing, and decorating.
Summary
Peanut Butter Chocolate Rice Krispie Treats combine the nostalgic crunch of Rice Krispies with the rich, creamy indulgence of chocolate and peanut butter for a no-bake dessert that’s impossible to resist. Easy to customize, quick to make, and universally loved, these treats are perfect for sharing—or sneaking a few for yourself.