Icebox Cake
Introduction
An Icebox Cake is a no-bake dessert that has charmed generations with its simplicity, elegance, and delightful texture. Combining layers of sweetened cream, crisp cookies, and often fruit or chocolate elements, this chilled treat earns its name from the days when homes used actual iceboxes to keep food cold. Today, it remains a favorite for summer gatherings, potlucks, and quick desserts that require minimal effort but deliver maximum satisfaction. Light, creamy, and endlessly customizable, the icebox cake is more than just a nostalgic throwback—it’s a modern classic reinvented in countless delicious ways.
The History
The origins of the icebox cake trace back to the early 20th century, coinciding with the advent of electric refrigeration and household iceboxes. Before freezers and modern ovens became standard, families relied on insulated boxes cooled with blocks of ice to preserve perishable foods. This innovation opened up new possibilities in dessert-making, allowing recipes that required chilling instead of baking.
The first known versions of the icebox cake used simple ingredients like sweetened whipped cream and graham crackers or vanilla wafers. These were layered and left to chill overnight, allowing the cookies to soften into a cake-like consistency. The concept gained widespread popularity during the Great Depression and World War II due to its low cost, minimal ingredient list, and lack of need for an oven—making it accessible even in times of scarcity.
In the mid-20th century, brands like Nabisco capitalized on the trend by publishing promotional recipes using their cookies, such as the famous “Nilla Wafer Icebox Cake.” Over time, the recipe evolved beyond basic creams and wafers to include flavors like chocolate, coffee, citrus, and fruit. Today, gourmet versions feature mascarpone, flavored liqueurs, and artisanal cookies, showing how this humble dessert has adapted across generations while maintaining its core charm.
Ingredients Breakdown
The beauty of an icebox cake lies in its simplicity and flexibility. While traditional recipes call for just a few key components, each ingredient plays a vital role in creating the final texture and flavor profile:
- Sweetened Whipped Cream: The foundation of most icebox cakes, heavy whipping cream is whipped until fluffy and stabilized with sugar (and sometimes vanilla extract). It provides richness and a cloud-like texture that softens the cookies over time.
- Cookies: Classic choices include graham crackers, vanilla wafers, chocolate wafers, or ladyfingers. These form the structural layers and gradually absorb moisture from the cream, transforming into a tender, cake-like consistency after chilling.
- Sugar: Granulated sugar is typically used to sweeten the whipped cream. Powdered sugar can also be used for smoother incorporation and added stability.
- Vanilla Extract: A touch of pure vanilla enhances the overall flavor and balances the sweetness.
- Milk or Coffee (optional): Some recipes include a light brushing of milk, coffee, or flavored syrup between layers to accelerate softening and add depth.
- Add-ins and Flavorings: Chocolate shavings, cocoa powder, fruit preserves, fresh berries, citrus zest, or liqueurs like Kahlua or Grand Marnier can elevate the flavor complexity.
- Toppings: Common garnishes include shaved chocolate, toasted coconut, crushed nuts, fresh fruit, or edible flowers for visual appeal.
Each ingredient works in harmony to create a dessert that’s greater than the sum of its parts—simple yet sophisticated, cool and refreshing.
Step-by-Step Recipe
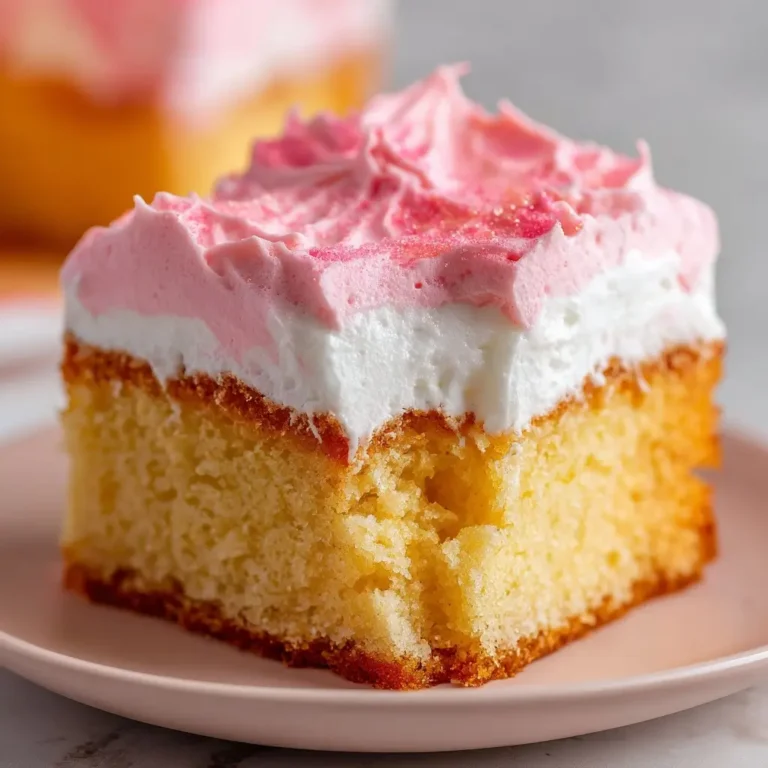
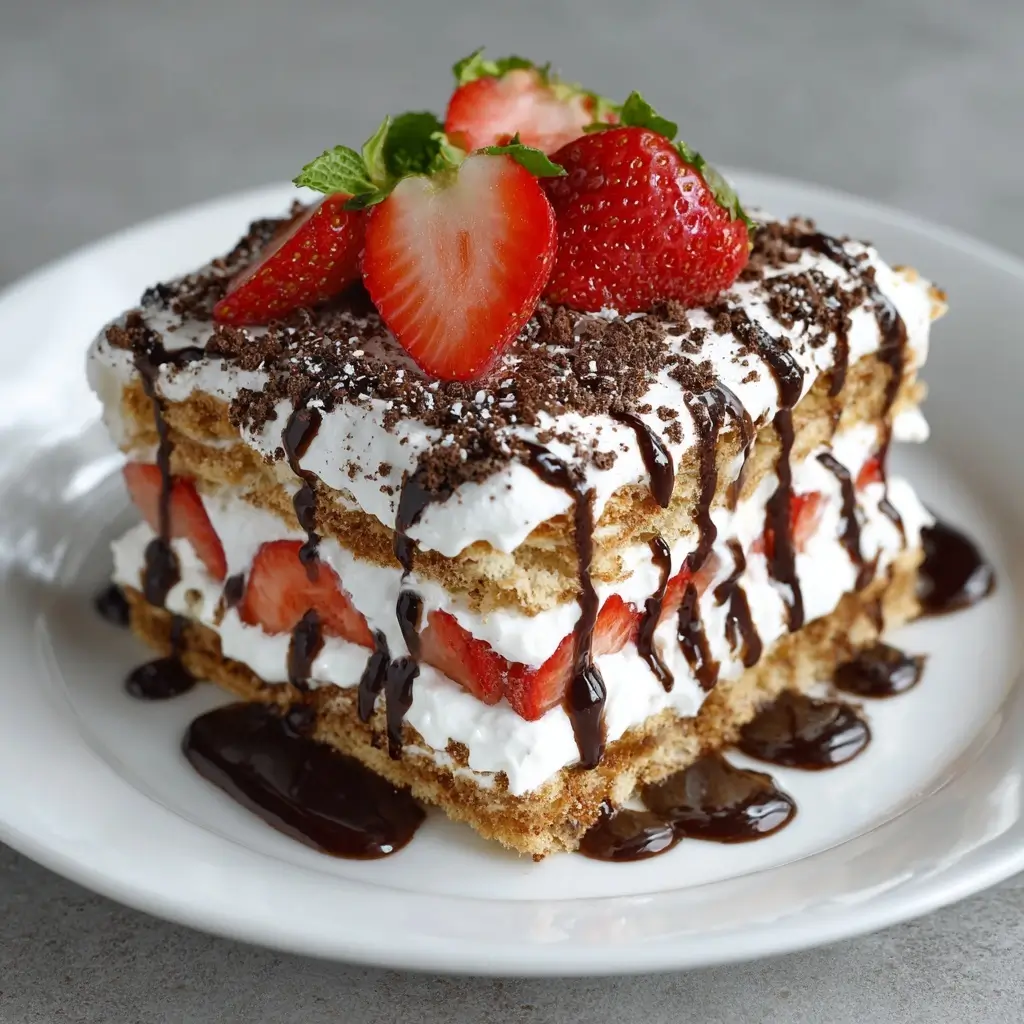
Here’s a detailed guide to making a classic Vanilla Wafer Icebox Cake with fresh strawberries—a timeless version perfect for beginners and seasoned bakers alike.
- Prepare Your Tools: Gather a 9-inch springform pan, mixing bowls, electric hand mixer or stand mixer, spatula, and measuring cups/spoons. Line the bottom of the pan with parchment paper for easy removal.
- Whip the Cream: In a large bowl, combine 3 cups (720 ml) of cold heavy whipping cream, 1/2 cup (100g) granulated sugar, and 1 tablespoon pure vanilla extract. Using a mixer on medium-high speed, whip until stiff peaks form—about 5 to 7 minutes. Be careful not to over-whip, which can lead to butter formation.
- Prepare the Fruit (if using): Wash and hull 2 cups of fresh strawberries. Slice them thinly and set aside. You may reserve a few whole berries for garnish.
- Layer the First Cookie Base: Arrange a single layer of vanilla wafers (about 30–35 cookies) at the bottom of the springform pan, breaking some to fit gaps if necessary. Ensure full coverage to prevent cream leakage.
- Add Cream Layer: Spread one-third of the whipped cream evenly over the cookies using a spatula. Smooth it into a flat, even layer.
- Add Fruit Layer: Scatter a portion of the sliced strawberries over the cream. Gently press them in slightly so they adhere.
- Repeat Layers: Add another layer of vanilla wafers, followed by another third of the whipped cream and more strawberries. Repeat once more to create three full sets of layers.
- Final Top Layer: Finish with a final layer of whipped cream, smoothing the top neatly. Decorate with remaining strawberry slices arranged in a circular pattern or scattered naturally.
- Chill Thoroughly: Cover the pan loosely with plastic wrap and refrigerate for at least 8 hours, preferably overnight. This allows the cookies to absorb moisture and soften into a cohesive, cake-like texture.
- Serve: Remove from the refrigerator 10–15 minutes before serving. Carefully release the springform clamp and lift off the sides. Transfer to a serving platter if desired. Slice with a sharp knife dipped in warm water for clean cuts.
Tips
- Cold Ingredients Are Crucial: Chill your mixing bowl and beaters before whipping cream. Cold cream whips faster and holds its shape better.
- Avoid Over-Whipping: Stop mixing once stiff peaks form. Over-whipped cream can turn grainy or even separate into butter and buttermilk.
- Use Fresh Cookies: Stale cookies may crumble too easily or fail to soften properly. Opt for crisp, fresh packages for best layering results.
- Don’t Skip the Chill Time: Rushing the refrigeration process leads to a loose, messy dessert. The magic happens during the slow absorption period.
- Prevent Soggy Bottoms: If you’re concerned about liquid from fruit seeping through, toss berries with a teaspoon of cornstarch or use a thin layer of jam as a barrier.
- Seal Against Drying: Press plastic wrap directly onto the surface of the cake before covering the entire pan to prevent a skin from forming.
- Slice Cleanly: Use a hot, damp knife and wipe it between cuts for neat, professional-looking slices.
- Customize Wisely: When adding strong flavors like coffee or alcohol, start small and adjust to taste—flavors intensify as the cake chills.
Variations and Customizations
One of the greatest strengths of the icebox cake is its adaptability. With the same basic technique, you can create dozens of unique variations:
- Chocolate Lover’s Dream: Use chocolate wafers or Oreo cookies instead of vanilla wafers. Fold melted and cooled dark chocolate into the whipped cream or add a layer of chocolate ganache between cookie layers.
- Coffee & Cream: Soak espresso-dipped ladyfingers with a shot of strong coffee or coffee liqueur. Alternate with sweetened mascarpone-cream mixture for a tiramisu-inspired icebox cake.
- Lemon Berry Delight: Combine lemon curd with whipped cream and layer with graham crackers and mixed berries like raspberries and blueberries. Top with lemon zest for brightness.
- S’mores Style: Use chocolate sandwich cookies, layer with mini marshmallows or marshmallow fluff, and drizzle with warm chocolate sauce before chilling. Sprinkle crushed graham crackers on top for campfire flair.
- Coconut Dream: Choose coconut-flavored cookies or shredded coconut cookies. Mix toasted coconut into the whipped cream and top with extra toasted flakes.
- Peanut Butter Paradise: Spread a thin layer of peanut butter between each cookie layer or mix powdered peanut butter into the whipped cream. Use chocolate cookies for a Reese’s-inspired twist.
- Oreo Galaxy: Crush Oreos and mix some into the whipped cream for a speckled effect. Alternate whole Oreos with cream layers for dramatic contrast.
- Frozen Version: For a firmer, ice cream-like texture, freeze the assembled cake for 4–6 hours instead of refrigerating. Let sit for 5–10 minutes before slicing.
- Dairy-Free Option: Substitute whipped coconut cream (from chilled canned full-fat coconut milk) for dairy cream. Use vegan cookies to keep it plant-based.
- Kids’ Favorite: Use animal crackers, Teddy Grahams, or fruit snacks with colored whipped cream made from natural food dyes for a fun, playful dessert.
Health Considerations and Nutritional Value
While undeniably delicious, traditional icebox cakes are high in sugar, saturated fat, and calories due to ingredients like heavy cream and cookies. Here’s a general nutritional estimate per serving (based on an 8-slice cake):
- Calories: ~350–450 kcal
- Total Fat: 20–30g (mostly saturated)
- Carbohydrates: 40–50g
- Sugars: 25–35g
- Protein: 3–5g
- Cholesterol: Moderate (from cream and eggs in some cookies)
Healthier Modifications:
- Use reduced-fat whipped topping or Greek yogurt blended with a small amount of cream for lower fat content.
- Opt for low-sugar or whole-grain cookies to reduce refined carbohydrates.
- Sweeten with alternatives like maple syrup, honey, or monk fruit, though these may affect texture and shelf life.
- Incorporate more fruit for natural sweetness and fiber.
- Serve smaller portions and pair with a side of fresh fruit to balance the meal.
Those with lactose intolerance should consider dairy-free substitutes, and individuals watching their sugar intake may enjoy a version sweetened with stevia or erythritol. Always consult dietary needs when serving to guests with specific health concerns.
Ingredients
Makes one 9-inch cake, serving 8–10 people
- 3 cups (720 ml) cold heavy whipping cream
- 1/2 cup (100g) granulated sugar (or powdered sugar for smoother blend)
- 1 tablespoon pure vanilla extract
- 1 package (about 300g) vanilla wafers (e.g., Nilla Wafers)
- 2 cups fresh strawberries, hulled and thinly sliced
- Optional: 1–2 tablespoons strawberry jam or glaze for shine
- Optional garnish: mint leaves, chocolate shavings, or additional berries
Directions
- In a chilled bowl, beat heavy cream, sugar, and vanilla extract with an electric mixer until stiff peaks form. Do not over-beat.
- Line the bottom of a 9-inch springform pan with parchment paper. Begin layering: place a single layer of vanilla wafers on the bottom, breaking pieces as needed to fill gaps.
- Spread one-third of the whipped cream evenly over the wafers.
- Scatter one-third of the sliced strawberries over the cream.
- Repeat the sequence: wafers → cream → strawberries. Do this two more times to build three complete layers.
- Finish with a final layer of whipped cream. Smooth the top with a spatula.
- Arrange remaining strawberry slices on top in a decorative pattern. Brush lightly with warmed jam for a glossy finish (optional).
- Cover the pan with plastic wrap, pressing it gently onto the surface to prevent drying.
- Refrigerate for at least 8 hours, or preferably overnight.
- Before serving, remove from fridge and let sit for 10–15 minutes. Release the springform ring carefully.
- Slice with a warm, clean knife and serve immediately.
FAQ
How long does an icebox cake last?
It keeps well in the refrigerator for up to 4 days. However, the texture is best within the first 48 hours after assembly.
Can I make an icebox cake without a springform pan?
Yes! Use a loaf pan, square baking dish, or even mason jars for individual servings. Just line with plastic wrap for easier removal.
Why didn’t my cookies soften?
Insufficient chill time is the most common reason. Ensure the cake chills for at least 8 hours. Using ultra-thick or stale cookies can also hinder softening.
Can I freeze an icebox cake?
Yes, but texture may change slightly. Freeze uncovered for 2 hours, then wrap tightly in plastic and foil. Thaw in the refrigerator for 4–6 hours before serving.
Is it safe to leave out overnight?
No—due to the dairy content, it must be refrigerated. Never leave an icebox cake at room temperature for more than 2 hours.
Can I use store-bought whipped topping?
Absolutely. Cool Whip or similar products work in a pinch, though homemade whipped cream offers richer flavor and better structure.
What other fruits work well?
Bananas, peaches, raspberries, mangoes, and kiwis all pair beautifully. Avoid overly juicy fruits like watermelon unless drained or thickened.
Can I make it ahead of time?
Yes—it’s actually designed to be made in advance! Assemble it 1–2 days before serving for optimal texture.
Summary
An icebox cake is a timeless, no-bake dessert that combines crisp cookies and sweetened whipped cream, transformed through chilling into a luscious, cake-like confection. Effortless to prepare and endlessly adaptable, it’s the perfect make-ahead treat for any occasion.