No-Bake Strawberry Cheesecake Jars: A Refreshing, Creamy Delight in a Glass
There’s something undeniably magical about the combination of creamy cheesecake and juicy strawberries—especially when you don’t have to turn on your oven. No-Bake Strawberry Cheesecake Jars are the perfect solution for anyone craving a decadent dessert that’s as easy to make as it is to eat. These individual-sized treats are not only visually stunning but also offer a delightful texture contrast between the buttery graham cracker base, smooth cream cheese filling, and fresh strawberry topping. Whether you’re preparing them for a summer picnic, a dinner party, or just a sweet treat at home, these jars are guaranteed to impress.
The History of No-Bake Cheesecake
Cheesecake has a history stretching back thousands of years. The earliest known version dates to ancient Greece, where it was served to athletes during the first Olympic Games in 776 BCE. The Romans later adopted and adapted the recipe, spreading variations throughout their empire. However, the concept of no-bake cheesecake emerged much more recently, with the advent of modern refrigeration and ingredients like cream cheese (invented in the late 19th century by American dairyman William Lawrence). The no-bake method gained popularity in the mid-20th century, especially with the rise of convenience foods and gelatin-based desserts.
The portable, layered dessert-in-a-jar trend began gaining momentum in the 2010s, driven by social media aesthetics and the desire for single-serving, mess-free treats. Mason jar desserts became a staple at weddings, brunches, and food festivals. No-Bake Strawberry Cheesecake Jars perfectly blend this contemporary presentation style with timeless flavor, making them both nostalgic and refreshingly modern.
Ingredients Breakdown: What Goes Into the Perfect Jar
To achieve the ideal balance of sweetness, tang, and texture, each component of these cheesecake jars plays a crucial role. Here’s a detailed look at the ingredients and why they matter:
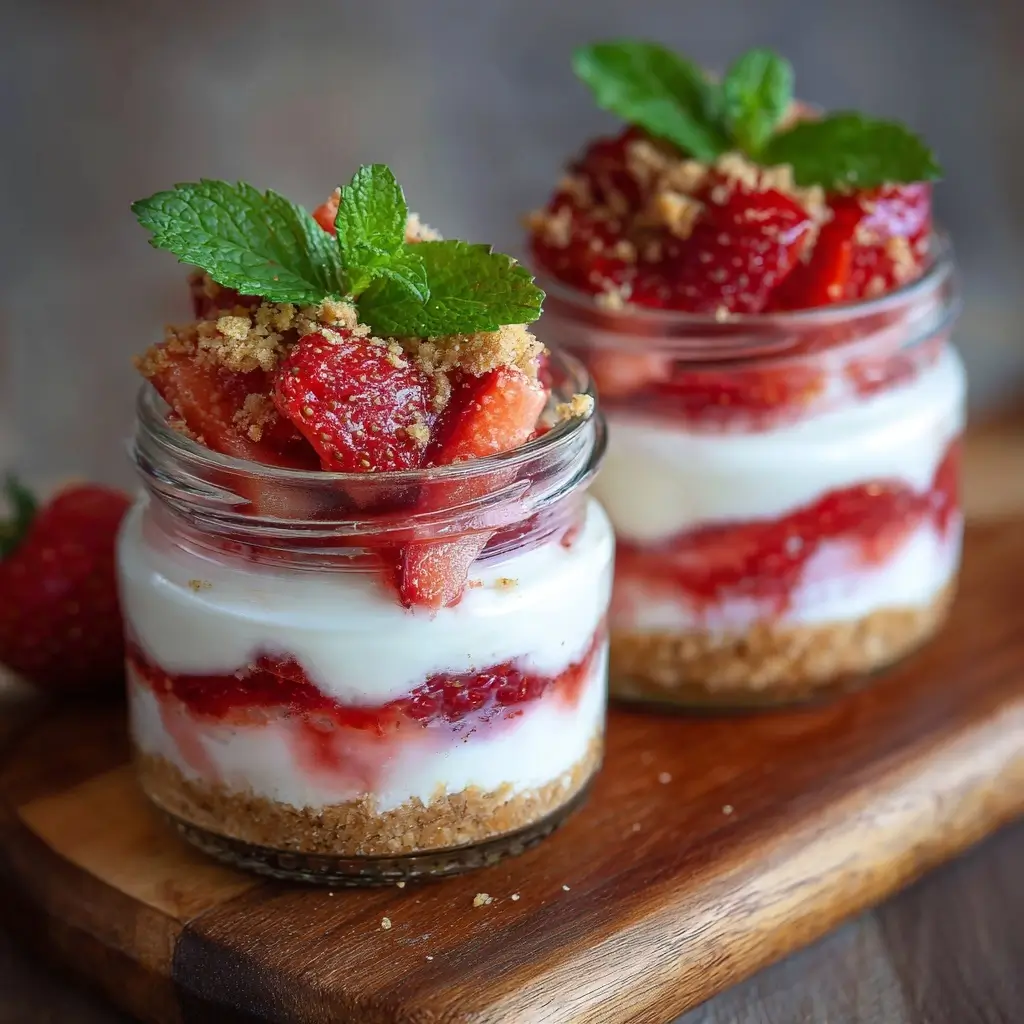
- Graham Crackers: The foundation of the crust, graham crackers provide a slightly sweet, nutty base. Their crisp texture holds up well against the creamy filling when lightly moistened with melted butter.
- Unsalted Butter: Used to bind the graham cracker crumbs, butter adds richness and helps the crust firm up when chilled. Unsalted butter gives you better control over the overall salt content.
- Cream Cheese: Full-fat, brick-style cream cheese is essential for a rich, velvety texture. It should be softened to room temperature to avoid lumps in the filling.
- Heavy Whipping Cream: When whipped to stiff peaks and folded into the cream cheese mixture, it creates a light, airy consistency without sacrificing indulgence.
- Powdered Sugar: This dissolves instantly and adds sweetness without graininess. It also helps stabilize the whipped cream slightly.
- Vanilla Extract: Pure vanilla enhances the overall flavor profile, adding warmth and depth to the creamy layer.
- Fresh Strawberries: The star of the topping, fresh strawberries bring natural sweetness, vibrant color, and a refreshing tartness that cuts through the richness.
- Granulated Sugar (for macerating strawberries): A small amount helps draw out the strawberries’ juices, creating a syrupy compote-like topping.
- Lemon Juice (optional): Brightens the flavor of the strawberries and prevents browning.
Step-by-Step Recipe: How to Make No-Bake Strawberry Cheesecake Jars
Follow this detailed guide to create flawless cheesecake jars every time. This recipe yields 4–6 servings, depending on jar size.
Ingredients
- 1 cup (about 8–10 sheets) graham cracker crumbs (from roughly crushed whole graham crackers)
- 3 tablespoons unsalted butter, melted
- 16 oz (2 packages) full-fat cream cheese, softened to room temperature
- ½ cup powdered sugar, sifted
- 1 teaspoon pure vanilla extract
- 1 cup heavy whipping cream, cold
- 1 lb (450g) fresh strawberries, hulled and sliced
- 2–3 tablespoons granulated sugar (adjust to taste)
- 1 teaspoon lemon juice (optional)
- Fresh mint leaves (optional, for garnish)
Directions
- Prepare the Strawberry Topping: In a medium bowl, combine sliced strawberries, granulated sugar, and lemon juice. Stir gently to coat. Let sit at room temperature for 20–30 minutes, stirring occasionally, until the strawberries release their juices and form a glossy compote. Set aside.
- Make the Crust Layer: In a small mixing bowl, combine graham cracker crumbs and melted butter. Stir until the crumbs are evenly moistened and resemble wet sand. Divide the mixture evenly among 4–6 clear glass jars or mason jars (8–12 oz capacity). Press firmly into the bottom using the back of a spoon or a small flat measuring cup to create a compact, even layer. Place jars in the refrigerator to chill while preparing the filling.
- Whip the Cream: Using a stand mixer or hand mixer, beat the cold heavy whipping cream on high speed until soft peaks form (about 2–3 minutes). Continue beating until stiff peaks form. Be careful not to over-whip into butter. Transfer to a separate bowl and set aside.
- Prepare the Cheesecake Filling: In the same mixing bowl (no need to wash), beat the softened cream cheese on medium speed until smooth and creamy (about 1–2 minutes). Scrape down the sides as needed. Add powdered sugar and vanilla extract. Beat on low initially, then increase to medium until fully combined and smooth. Do not over-mix, as this can incorporate too much air and lead to separation.
- Fold in Whipped Cream: Gently fold one-third of the whipped cream into the cream cheese mixture using a spatula to lighten it. Then, carefully fold in the remaining whipped cream until no white streaks remain. The mixture should be fluffy, smooth, and uniform in texture.
- Assemble the Jars: Remove jars from the refrigerator. Spoon or pipe the cheesecake filling over the graham cracker crust, dividing it evenly. Use the back of a spoon to smooth the tops.
- Add the Strawberry Layer: Spoon the macerated strawberries (including the syrup) over the top of each jar. Distribute evenly, allowing some syrup to drizzle down the sides for visual appeal.
- Chill: Cover the jars with lids or plastic wrap and refrigerate for at least 3–4 hours, or preferably overnight. This allows the layers to set and flavors to meld.
- Serve: Garnish with additional strawberry slices or a sprig of fresh mint before serving. Serve cold, straight from the jar.
Tips for Success: Achieving the Perfect Texture and Flavor
- Use Room Temperature Cream Cheese: Cold cream cheese leads to lumps. Let it sit out for at least 1 hour before beginning.
- Don’t Skip Sifting Powdered Sugar: Sifting ensures a smooth filling and prevents graininess.
- Chill Your Mixing Bowl and Beaters: For best whipped cream results, place the bowl and beaters in the freezer for 10–15 minutes before whipping.
- Fold, Don’t Stir: When combining whipped cream and cream cheese, use a gentle folding motion to maintain airiness.
- Use Fresh, Ripe Strawberries: Underripe berries lack sweetness; overripe ones can become mushy. Look for bright red, fragrant strawberries.
- Press the Crust Firmly: A tightly packed crust prevents crumbling when eating with a spoon.
- Let Them Chill Long Enough: Rushing the chilling process can result in loose layers. Patience pays off in texture.
- Serve in Clear Jars: Transparent containers showcase the beautiful layers and make the dessert extra inviting.
Variations and Customizations: Make It Your Own
One of the greatest advantages of this recipe is its versatility. Feel free to experiment with different flavors, fruits, and textures:
- Fruit Variations: Swap strawberries for raspberries, blueberries, mango, peaches, or a mixed berry medley. Each brings its own unique tartness and color.
- Crust Alternatives: Try crushed digestive biscuits, Oreo cookies (use just the filling-less wafers for chocolate crust), shortbread, or even pretzels for a sweet-and-salty twist.
- Dairy-Free Version: Use vegan cream cheese (e.g., from almonds or soy) and coconut cream (chilled overnight, then whipped) for a plant-based alternative.
- Low-Sugar Option: Replace powdered and granulated sugars with erythritol or monk fruit sweetener. Use unsweetened graham crackers or almond flour crust.
- Protein Boost: Add a scoop of vanilla protein powder to the cheesecake filling (adjust liquid if needed).
- Layered Look: Add multiple fruit layers—strawberry at the bottom, then cheesecake, then blueberry on top—for a rainbow effect.
- Alcoholic Twist: Add a tablespoon of strawberry liqueur or Chambord to the filling, or macerate strawberries in a splash of Grand Marnier.
- Kid-Friendly Fun: Top with sprinkles, mini chocolate chips, or edible glitter for birthdays.
Health Considerations and Nutritional Value
While undeniably indulgent, No-Bake Strawberry Cheesecake Jars can be enjoyed in moderation as part of a balanced diet. Here’s an approximate nutritional breakdown per serving (based on 6 servings):
- Calories: ~380–420 kcal
- Fat: 28–32g (mostly from cream cheese and heavy cream)
- Saturated Fat: 16–18g
- Carbohydrates: 30–35g
- Sugars: 22–25g (natural and added)
- Protein: 5–6g
- Calcium: Provides a moderate amount from dairy ingredients.
- Vitamin C: From fresh strawberries, offering antioxidant benefits.
Considerations:
- High in Saturated Fat: Due to cream cheese and heavy cream, those monitoring heart health may want to enjoy sparingly.
- Lactose Content: Contains dairy; lactose-intolerant individuals should consider substitutes.
- Blood Sugar Impact: The sugar content can cause spikes, so diabetics may opt for sugar-free versions.
- Portion Control: Serving in jars naturally limits portion size, helping prevent overeating.
- Natural Ingredients: Unlike many store-bought desserts, this version uses real fruit and minimal processed components.
FAQ: Frequently Asked Questions
Can I make these ahead of time?
Yes! These jars can be made 1–2 days in advance. Store covered in the refrigerator. Add garnishes just before serving.
Can I freeze No-Bake Strawberry Cheesecake Jars?
Freezing is possible but not ideal. The texture of the whipped cream may become watery upon thawing. If freezing, omit the fresh strawberry topping and add it after thawing.
Why is my filling lumpy?
This usually happens when the cream cheese isn’t softened enough. Always let it sit at room temperature for at least 1 hour before using.
Can I use canned or frozen strawberries?
Fresh is best for texture and flavor. Frozen strawberries release too much water and can make the topping soggy. If using frozen, thaw and drain thoroughly.
How long do they last in the fridge?
Up to 4 days when stored in sealed jars. The crust may soften over time but will still taste delicious.
Can I use Cool Whip instead of whipping cream?
Yes, for a shortcut version. Substitute 16 oz of thawed frozen whipped topping for the whipped cream. However, homemade whipped cream tastes fresher and less artificial.
What size jars should I use?
8–12 oz jars work best. Pint-sized mason jars, dessert glasses, or reusable plastic cups are all suitable.
Can I make a large trifle instead?
Absolutely! Layer all components in a large glass trifle dish for a crowd-pleasing centerpiece dessert.
Summary
No-Bake Strawberry Cheesecake Jars combine a buttery graham cracker crust, luxuriously creamy cheesecake filling, and a vibrant macerated strawberry topping—all layered in portable, picture-perfect jars. Effortless to prepare, endlessly customizable, and always a hit, this dessert brings gourmet charm to any occasion without ever turning on the oven.