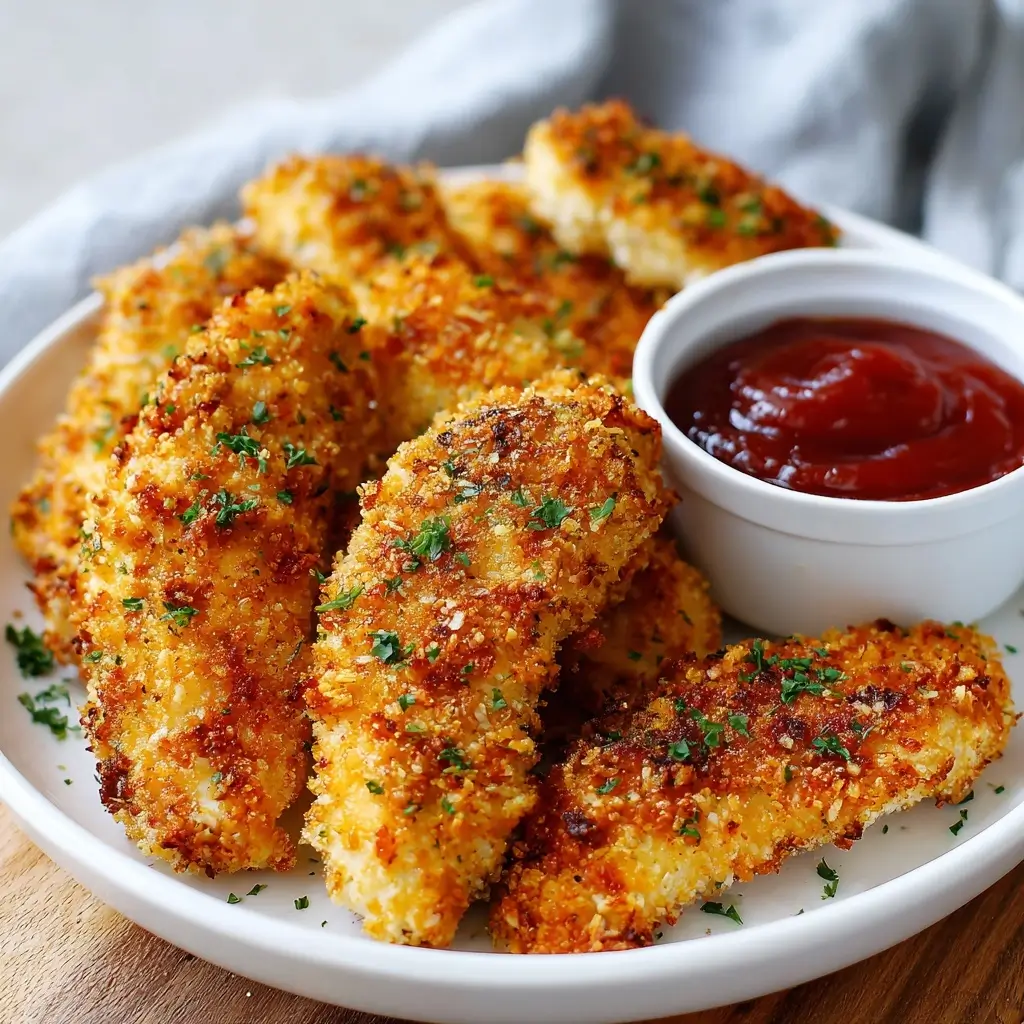
Crispy Baked Chicken Tenders: The Ultimate Healthy Comfort Food
Introduction
If you’re craving the golden, crunchy goodness of fried chicken tenders but want a healthier, guilt-free alternative, look no further than Crispy Baked Chicken Tenders. These tender, juicy strips of chicken are coated in a flavorful, crisp breading and baked to perfection—no deep frying required. With a satisfying crunch on the outside and a soft, moist interior, these baked tenders are perfect for weeknight dinners, meal prep, lunchboxes, or even game-day snacks. Whether you’re feeding kids, entertaining guests, or simply treating yourself, this recipe delivers restaurant-quality flavor with wholesome ingredients and minimal mess.
The History
Chicken tenders, also known as chicken fingers or goujons, have become a staple in American cuisine since their rise in popularity during the 1970s. Originally served in casual dining restaurants and diners, they were typically deep-fried and paired with dipping sauces like honey mustard, ranch, or BBQ. The concept likely evolved from traditional French “suprêmes de volaille,” boneless chicken breasts cut into strips and pan-fried. As fast food culture grew, so did the demand for convenient, kid-friendly proteins, and chicken tenders quickly became a favorite across all age groups.
With increasing awareness around health and nutrition, home cooks and chefs alike began experimenting with baking instead of frying to reduce fat content while maintaining texture and taste. This led to the development of baked chicken tender recipes using whole grain breadcrumbs, panko, and oven-safe coatings that mimic the crunch of frying without the oil. Today, crispy baked chicken tenders represent a modern twist on a classic comfort food—healthier, customizable, and accessible to anyone with an oven and a craving for something savory and satisfying.
Ingredients Breakdown
The magic of perfectly crispy baked chicken tenders lies not just in the method, but in the careful selection and balance of ingredients. Each component plays a vital role in building layers of flavor, texture, and moisture retention.
- Chicken Breast Tenderloins (or sliced chicken breasts): These are the star ingredient—lean, tender, and naturally mild-flavored, making them ideal for absorbing seasonings. Using fresh, high-quality chicken ensures juiciness after baking.
- Eggs: Used as a binder, eggs help the breading adhere to the chicken. They create a sticky surface that allows the crumbs to stick evenly and form a uniform crust.
- Buttermilk (optional but recommended): Marinating the chicken in buttermilk adds tenderness and a subtle tang. It also helps activate leavening agents if used and improves moisture retention during baking.
- All-Purpose Flour (or gluten-free flour blend): Provides a light base layer before the egg wash. It prevents the egg from pooling and creates a better foundation for the breadcrumb coating.
- Panko Breadcrumbs: Japanese-style breadcrumbs known for their airy, flaky texture. Panko browns beautifully and gives superior crunch compared to regular breadcrumbs.
- Grated Parmesan Cheese (optional): Adds umami depth and enhances browning. It also contributes to a richer, more complex flavor profile.
- Seasonings: A blend of garlic powder, onion powder, smoked paprika, salt, black pepper, dried herbs (like oregano or thyme), and cayenne pepper (for heat) builds a well-rounded, aromatic crust.
- Olive Oil or Melted Butter (sprayed or brushed): A light coating before baking promotes browning and crispness. It simulates the effect of frying by helping the exterior caramelize under heat.
- Non-Stick Cooking Spray: Ensures even crisping without over-oiling. Helps prevent sticking to the baking sheet.
Step-by-Step Recipe
- Prep the Chicken: Start with 1.5 pounds (about 680g) of chicken breast tenderloins or slice boneless, skinless chicken breasts into 1-inch wide strips. Trim any visible fat or sinew. Pat dry thoroughly with paper towels—this is crucial for crispiness.
- Optional Buttermilk Soak: In a bowl, combine 1 cup buttermilk with 1 teaspoon each of garlic powder, onion powder, salt, and a pinch of cayenne. Add chicken strips, cover, and refrigerate for at least 30 minutes (up to 4 hours). This step enhances flavor and tenderness.
- Set Up Breading Station: Prepare three shallow bowls:
- Bowl 1: 1/2 cup all-purpose flour mixed with 1 tsp garlic powder, 1 tsp onion powder, 1/2 tsp smoked paprika, 1/2 tsp salt, and 1/4 tsp black pepper.
- Bowl 2: 2 large eggs beaten with 1 tablespoon water or milk to thin slightly.
- Bowl 3: 1.5 cups panko breadcrumbs blended with 1/2 cup grated Parmesan cheese, 1 tsp dried oregano, 1/2 tsp salt, and 1/4 tsp cayenne (adjust to taste).
- Bread the Chicken: Working one piece at a time:
- Dredge each chicken strip in the seasoned flour, shaking off excess.
- Dip into the egg mixture, allowing excess to drip off.
- Press firmly into the panko-Parmesan mix, ensuring full coverage. Place on a wire rack or plate.
- Rest Before Baking: Let the breaded tenders sit for 10–15 minutes. This helps the coating set and reduces shedding during baking.
- Preheat Oven: Set oven to 425°F (220°C). Line a large baking sheet with parchment paper or foil and place a wire rack on top. Lightly spray the rack with non-stick cooking spray.
- Arrange and Oil: Place tenders on the rack in a single layer, not touching. Lightly brush or spray the tops with olive oil or melted butter. For extra crispiness, flip and lightly oil the other side after 10 minutes of baking.
- Bake Until Golden and Cooked Through: Bake for 18–22 minutes, flipping halfway through, until the coating is golden brown and crispy, and the internal temperature reaches 165°F (74°C) when measured with a meat thermometer.
- Rest and Serve: Let rest for 3–5 minutes before serving. This allows juices to redistribute and keeps the coating intact.
Tips for Perfect Crispy Baked Chicken Tenders
- Use a Wire Rack: Elevating the tenders on a rack allows hot air to circulate underneath, preventing sogginess and promoting even browning.
- Don’t Skip the Resting Step: Letting the breaded chicken sit before baking helps the coating adhere and form a stronger bond.
- Double Dip for Extra Crunch: For an ultra-thick, crunchy crust, repeat the egg and breadcrumb steps for a double coating.
- Keep Breading Dry: Ensure your hands are dry when handling the breadcrumbs to avoid clumping.
- Avoid Overcrowding: Space tenders apart on the baking sheet. Crowding causes steaming, which leads to soggy results.
- Broil Briefly (Optional): For deeper golden color, broil for the last 1–2 minutes—but watch closely to prevent burning.
- Batch Cooking? Keep finished batches warm in a 200°F (95°C) oven on a separate rack. Do not stack.
Variations and Customizations
One of the greatest strengths of this recipe is its adaptability. You can tailor it to suit dietary needs, flavor preferences, or global cuisines.
- Gluten-Free: Swap all-purpose flour and panko for certified gluten-free versions. Use GF flour blend and GF panko or crushed cornflakes.
- Keto/Low-Carb: Replace breadcrumbs with crushed pork rinds or almond flour mixed with Parmesan. Use egg wash and skip the flour dredge.
- Spicy Buffalo Style: Toss baked tenders in a mixture of melted butter and hot sauce (like Frank’s RedHot) after baking. Serve with blue cheese dip.
- Honey Garlic Glazed: Brush with a reduction of honey, soy sauce, minced garlic, and ginger during the last 5 minutes of baking.
- Herb & Lemon Zest: Add fresh chopped parsley, dill, and lemon zest to the breadcrumb mix for a bright, Mediterranean flair.
- BBQ Ranch Crunch: Mix BBQ seasoning or ranch powder into the breadcrumbs for bold flavor.
- Nutty Crust: Combine crushed almonds, pecans, or walnuts with breadcrumbs for added richness and texture.
- Vegan Option: Use plant-based chicken strips or tofu, flaxseed egg substitute, and vegan Parmesan. Follow same breading process.
- Sheet Pan Meal: Bake the tenders alongside vegetables (broccoli, carrots, bell peppers) on the same tray for a complete meal.
Health Considerations and Nutritional Value
Compared to traditional fried chicken tenders, baked versions significantly reduce fat and calorie content while preserving protein quality.
Nutritional Highlights (per 4 oz serving, approximately 3–4 tenders):
- Calories: ~220–260 (vs. 350+ in fried)
- Protein: 25–30g (excellent source for muscle repair and satiety)
- Fat: 8–12g (mostly from healthy oils and Parmesan; much lower than deep-fried)
- Saturated Fat: 3–4g
- Carbohydrates: 15–20g (depending on breading choice)
- Fiber: 1–2g (can be increased using whole wheat panko or oats)
- Sodium: ~400–600mg (can be reduced by using low-sodium breadcrumbs and less salt)
Health Benefits:
- High in lean protein, supporting weight management and muscle growth.
- No trans fats or excessive saturated fats associated with deep frying.
- Rich in B-vitamins (especially niacin and B6) from chicken, essential for energy metabolism.
- Can be made nutrient-dense with whole grains, herbs, and healthy fats.
Considerations:
- Monitor sodium levels if using store-bought breadcrumbs or pre-seasoned mixes.
- For heart-healthy diets, use olive oil spray and limit added butter or cheese.
- Ensure chicken is fully cooked to avoid foodborne illness—always check internal temperature.
Ingredients
- 1.5 lbs (680g) chicken breast tenderloins or boneless, skinless chicken breasts, sliced into strips
- 1 cup buttermilk (optional, for marinating)
- 1/2 cup all-purpose flour (or gluten-free alternative)
- 2 large eggs
- 1 tablespoon water or milk
- 1.5 cups panko breadcrumbs (whole wheat or gluten-free as needed)
- 1/2 cup grated Parmesan cheese (omit for dairy-free)
- 1 teaspoon garlic powder
- 1 teaspoon onion powder
- 1 teaspoon smoked paprika
- 1/2 teaspoon dried oregano or thyme
- 1/2 teaspoon salt (plus more to taste)
- 1/4 teaspoon black pepper
- Pinch of cayenne pepper (optional)
- 2 tablespoons olive oil or melted butter (for brushing/spraying)
- Non-stick cooking spray (for baking sheet)
Directions
- Pound chicken strips to an even thickness (about 1/2 inch) for uniform cooking. Pat dry with paper towels.
- (Optional) Soak chicken in buttermilk mixture (buttermilk + 1 tsp garlic powder, 1 tsp onion powder, 1/2 tsp salt, pinch cayenne) for 30 min to 4 hours in the fridge.
- Preheat oven to 425°F (220°C). Line a baking sheet with parchment and place a wire rack on top. Spray rack lightly with cooking spray.
- In Bowl 1, mix flour, 1 tsp garlic powder, 1 tsp onion powder, 1/2 tsp smoked paprika, 1/2 tsp salt, and 1/4 tsp black pepper.
- In Bowl 2, whisk eggs and water until smooth.
- In Bowl 3, combine panko, Parmesan, 1 tsp dried oregano, 1/2 tsp salt, and 1/4 tsp cayenne.
- Dredge each chicken strip: flour → shake off excess → egg wash → panko mix (press firmly). Place on a plate.
- Let breaded tenders rest 10–15 minutes.
- Arrange on prepared wire rack. Lightly brush or spray tops with olive oil.
- Bake 18–22 minutes, flipping halfway through, until golden and internal temp reaches 165°F.
- Rest 3–5 minutes before serving. Serve with dips like honey mustard, ranch, BBQ, or tzatziki.
FAQ
Can I make these ahead of time?
Yes! Bread the chicken and store uncooked tenders on a tray in the fridge for up to 24 hours. Or freeze on a tray, then transfer to a bag for up to 3 months. Bake frozen—add 5–8 minutes to cook time.
Why are my tenders not crispy?
Likely causes: overcrowded pan, skipped wire rack, wet chicken, or insufficient oil. Always pat chicken dry, use a rack, and lightly oil the coating.
Can I air fry instead?
Absolutely! Air fry at 400°F (200°C) for 10–14 minutes, flipping halfway. Spray generously for best crisp.
What can I use instead of eggs?
Try buttermilk, yogurt, mayo, or a flax egg (1 tbsp ground flax + 3 tbsp water per egg).
Are baked chicken tenders kid-friendly?
Extremely! Kids love the shape, crunch, and mild flavor. Serve with ketchup, smiley-face fries, or a fun dip bar.
How do I reheat leftovers?
Reheat in oven or toaster oven at 375°F for 8–10 minutes. Avoid microwave to preserve crispness.
Summary
Crispy Baked Chicken Tenders offer a delicious, healthier alternative to fried favorites—packed with protein, customizable flavors, and perfect for any occasion. Achieve golden, crunchy perfection with simple ingredients and smart techniques, all without a drop of frying oil.