Introduction
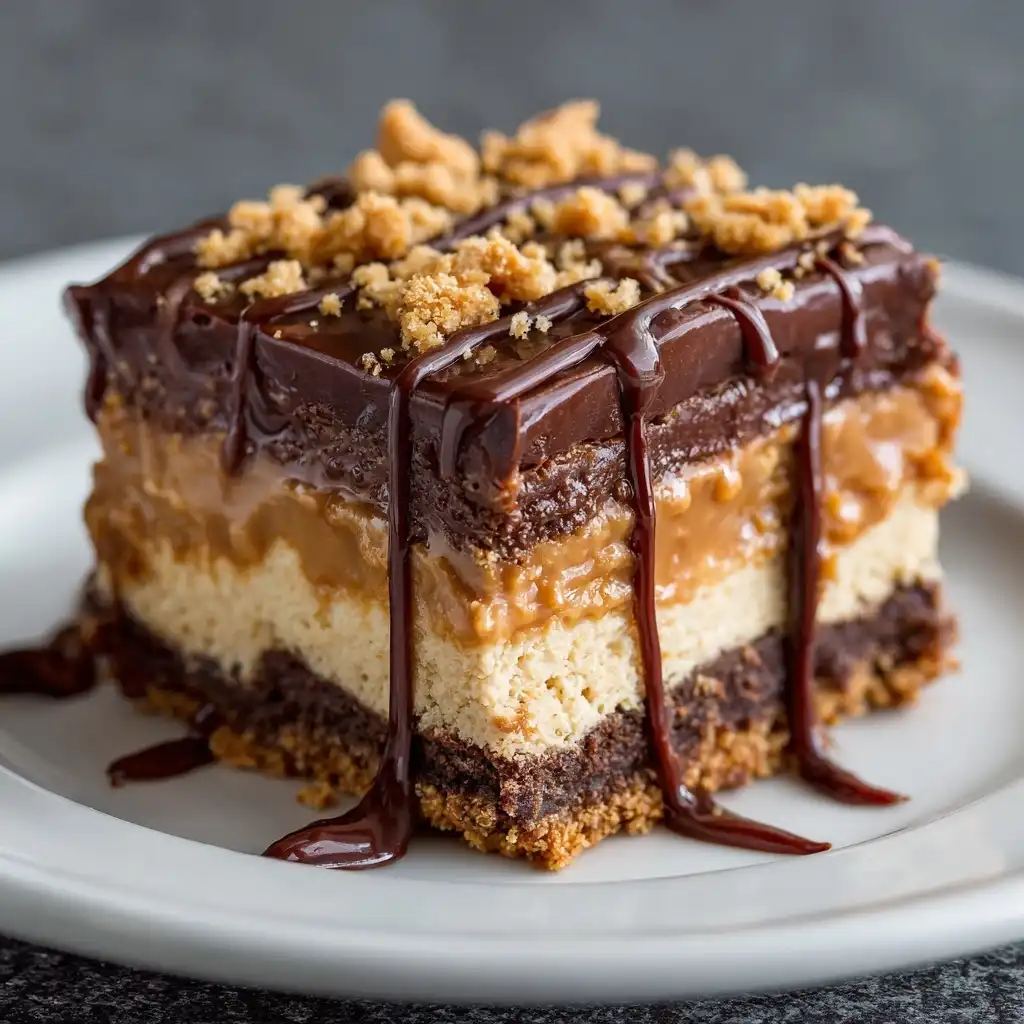
Welcome to the ultimate indulgence—Chocolate Peanut Butter Cheesecake Bars! These decadent, no-bake (or optionally baked) confections are a triple-threat dessert that marries the rich depth of dark chocolate, the creamy-salty allure of peanut butter, and the luxuriously smooth tang of classic New York–style cheesecake—all in one perfectly portioned, sliceable bar. Whether you’re prepping for a potluck, satisfying a late-night craving, celebrating a birthday, or simply treating yourself after a long week, these bars deliver maximum flavor with surprisingly approachable technique. Their layered structure offers textural harmony: a crisp, buttery graham cracker or chocolate cookie crust; a velvety, peanut butter–infused cheesecake filling studded with swirls of melted chocolate; and an elegant, glossy chocolate ganache or drizzle finish. What truly sets them apart is their versatility—they’re freezer-friendly, make-ahead friendly, and endlessly customizable without sacrificing integrity. In this comprehensive guide, we go beyond a simple recipe: we explore their cultural roots, demystify ingredient science, walk you through foolproof techniques step-by-step, offer smart substitutions for dietary needs, analyze nutritional trade-offs transparently, and answer every question you’ve ever had—and likely some you haven’t—about crafting the perfect batch.
The History
The Chocolate Peanut Butter Cheesecake Bar is a brilliant 21st-century fusion dessert born from three iconic American food legacies. Cheesecake itself traces back over 2,000 years to ancient Greece, where it was served to athletes at the first Olympic Games in 776 BCE—but its modern American incarnation emerged in the late 19th century, popularized by New York’s immigrant bakers who adapted European quark- and ricotta-based cakes using domestically abundant cream cheese (first mass-produced by William Lawrence in 1872 in Chester, NY). Peanut butter entered the culinary spotlight in the early 1900s, championed by figures like George Washington Carver (who published over 300 peanut-based recipes) and later cemented in pop culture by Elvis Presley’s infamous “Fool’s Gold Loaf.” Chocolate, of course, has deep Mesoamerican origins but became widely accessible in sweetened, solid form only after the Industrial Revolution—and its pairing with peanut butter exploded post-WWII, fueled by ration-friendly pantry staples and midcentury marketing campaigns.
The bar format gained traction in the 1950s and ’60s with the rise of convenience baking, Jell-O molds, and community cookbooks—think Betty Crocker and church fundraisers—where portion-controlled, transportable desserts were prized for picnics, school bake sales, and ladies’ luncheons. The first documented “peanut butter cheesecake bar” appeared in a 1983 edition of Bon Appétit, though regional variations existed earlier in Southern home kitchens, often using crushed saltine crackers or gingersnaps for crust. The chocolate layer was added gradually as high-cocoa baking chocolate became more affordable and gourmet in the 1990s. Today, the dessert enjoys viral status on Pinterest, TikTok, and Instagram—fueled by ASMR-style preparation videos, “dupe” culture (e.g., “copycat Reese’s Peanut Butter Cup Cheesecake Bars”), and gluten-free/vegan reinterpretations—making it less a passing trend and more a beloved, evolving American classic.
Ingredients Breakdown
Understanding *why* each ingredient matters—not just *what* goes in—is key to mastering these bars. Below is a meticulous, function-forward analysis:
- Graham Cracker Crumbs (1 ½ cups): Provides structure, sweetness, and subtle cinnamon-nutmeg warmth. The fine texture ensures a tight, cohesive crust. Whole-wheat or honey graham variants add fiber and molasses notes; gluten-free graham alternatives work well when certified GF.
- Unsalted Butter (6 tbsp, melted): Acts as the binding agent and flavor carrier. Unsalted allows precise sodium control. Clarified butter (ghee) can be used for higher smoke point and nuttier depth—if baking the crust.
- Granulated Sugar (¼ cup): Enhances browning, balances acidity in cream cheese, and contributes to crust crispness. Coconut sugar may substitute 1:1 but yields a darker, caramelized crust with lower sweetness intensity.
- Cream Cheese (16 oz, full-fat, room temperature): The foundation of the filling. Must be truly softened (65–70°F)—cold cheese causes lumps; overheated or microwaved cheese leads to graininess and water separation. Neufchâtel (⅓-less-fat) is *not recommended* here—it lacks the fat content needed for stability and richness.
- Peanut Butter (¾ cup, smooth & natural, no-stir preferred): Opt for brands with just peanuts + salt (e.g., Smucker’s Natural or Teddie). Avoid “hydrogenated oil” versions—they contain stabilizers that inhibit smooth blending and cause greasy separation. Crunchy PB adds delightful texture but requires extra mixing time to fully incorporate. For nut-free options, sunflower seed butter or soy nut butter yield excellent results with similar fat profile and binding ability.
- Powdered Sugar (1 ¼ cups, sifted): Critical for ultra-smooth texture—granulated sugar won’t dissolve fully and creates grittiness. Sifting prevents lumps and aerates the mixture. Monk fruit– or erythritol-based powdered blends work for keto versions but may impart cooling aftertaste and require xanthan gum (¼ tsp) for viscosity retention.
- Heavy Cream (⅓ cup, cold): Adds luxurious mouthfeel, helps emulsify fats, and improves sliceability when chilled. Half-and-half or whole milk produce a looser, more fragile filling; coconut cream (chilled, solid part only) is a stellar dairy-free alternative.
- Vanilla Extract (2 tsp, pure, not imitation): Deepens aroma and rounds out sharp peanut and tangy cheese notes. Madagascar bourbon vanilla offers floral complexity; Mexican vanilla adds spicier warmth.
- Salt (½ tsp, fine sea salt): A non-negotiable flavor amplifier—it cuts richness, enhances sweetness perception, and balances the saltiness of peanut butter. Flaky Maldon is beautiful for finishing, but fine salt integrates evenly into the filling.
- Dark Chocolate (8 oz, 60–70% cacao, finely chopped or chips): Used both *in* the filling (folded in gently) and *on top* (as ganache or drizzle). High-cocoa chocolate provides bitterness to offset sweetness and prevents cloyingness. Couverture chocolate yields superior shine and snap. Vegan? Use certified dairy-free dark chocolate (e.g., Enjoy Life or Hu Kitchen).
- Optional Add-Ins: ½ cup roasted, salted peanuts (for crunch), 2 tbsp flaky sea salt (for finishing), 1 tsp espresso powder (to intensify chocolate), or 1 tbsp bourbon (adds sophisticated warmth—reduce heavy cream by 1 tsp if using).
Step-by-Step Recipe
This method prioritizes texture integrity, ease of execution, and fail-safes at every stage. Total active time: 45 minutes. Chill time: minimum 6 hours (ideally overnight).
- Prepare the Pan: Line an 8×8-inch metal baking pan with two overlapping sheets of parchment paper, leaving 2-inch overhang on two opposite sides (this is your “lift-out handle”). Lightly grease exposed parchment and pan edges with nonstick spray or softened butter. Do *not* skip parchment—it’s essential for clean removal and slicing.
- Make the Crust: In a medium bowl, whisk together graham crumbs, granulated sugar, and melted butter until evenly moistened and resembling wet sand. Press *firmly* and evenly into the bottom of the prepared pan using the flat bottom of a measuring cup or glass. Apply consistent downward pressure—don’t skimp. Chill uncovered for 15 minutes (or freeze for 10) to set.
- Prep the Filling Base: In the bowl of a stand mixer fitted with the paddle attachment (or large bowl + hand mixer), beat softened cream cheese on medium-low for 1 minute until completely smooth and lump-free. Scrape down bowl and paddle thoroughly. Add peanut butter and beat 1 more minute until homogenous and glossy. Scrape again.
- Incorporate Sweeteners & Liquids: With mixer on low, gradually add sifted powdered sugar in three additions, beating 20 seconds after each until just combined (overmixing incorporates air = cracks later). Add cold heavy cream, vanilla, and salt. Mix on low for 30 seconds—just until incorporated. Batter should be thick, shiny, and free of streaks.
- Fold in Chocolate: Switch to a silicone spatula. Gently fold in 6 oz of chopped dark chocolate (reserve 2 oz for topping) using 10–12 slow, sweeping motions—stop while a few small streaks remain. Over-folding melts chocolate and dulls visual contrast.
- Layer & Swirl: Pour filling over chilled crust. Smooth top with an offset spatula or the back of a spoon. Sprinkle reserved 2 oz chocolate evenly over surface. Using a toothpick or skewer, drag gentle figure-eights or concentric circles to create marbleized ribbons—do *not* over-swirl or you’ll lose definition.
- Chill to Set: Refrigerate uncovered for at least 6 hours—or preferably overnight (12+ hours). This slow, cold setting prevents condensation, ensures clean cuts, and allows flavors to meld. For faster set: Freeze for 3 hours, then refrigerate 1 hour before slicing (but overnight fridge chill yields best texture).
- Finish & Serve: Use parchment overhang to lift entire slab onto a cutting board. With a large, sharp chef’s knife wiped clean between cuts, slice into 16 even bars (4×4 grid). For pristine edges, dip knife in hot water and dry thoroughly before each cut. Optional: Garnish each bar with a pinch of flaky salt, a roasted peanut, or a light dusting of cocoa powder.
Tips
- Room Temperature Is Non-Negotiable: Cream cheese *and* peanut butter must be at true room temperature (65–70°F). Take them out 2–3 hours ahead. If rushed, cut cream cheese into ½-inch cubes and let sit 45 minutes—never microwave.
- Beat Smart, Not Hard: Overbeating the filling introduces excess air → bubbles → cracks and airy, less-dense texture. Mix only until ingredients are just combined and glossy.
- Chill Your Tools: Chill your mixing bowl, spatula, and even parchment-lined pan for 10 minutes before pouring filling—this minimizes melting and promotes faster, more even setting.
- Prevent Sticking Knife: Always use a long, thin, sharp knife (a 10-inch chef’s knife or serrated bread knife works best). Wipe with a hot, damp cloth and dry completely before each slice. For ultra-clean edges, lightly coat blade in neutral oil (like grapeseed) before cutting.
- Freeze for Clean Cuts: If bars feel too soft after chilling, freeze for 20–30 minutes before slicing—this firms the chocolate and filling without freezing solid.
- Storage Wisdom: Store bars tightly wrapped in parchment + plastic wrap (or in an airtight container with parchment layers) in the refrigerator for up to 1 week. Freeze for up to 3 months—wrap individually in parchment and place in a freezer bag. Thaw in fridge 30 minutes before serving.
- No-Bake vs. Baked Crust: While this recipe uses a no-bake crust, you *can* pre-bake it at 350°F for 10 minutes for enhanced crunch and deeper caramelization—cool completely before adding filling.
- Fix a Broken Ganache: If your chocolate topping seizes, whisk in ½ tsp hot heavy cream or corn syrup—slowly—until smooth returns.
Variations and Customizations
These bars are a canvas—not a constraint. Here’s how to adapt them thoughtfully:
- Gluten-Free: Use certified GF graham crackers or GF chocolate wafers (e.g., Schär or Kinnikinnick). Ensure all other ingredients (vanilla, peanut butter) are GF-certified. Add ¼ tsp xanthan gum to crust mixture for cohesion.
- Vegan: Substitute cream cheese with blended silken tofu (12 oz) + 3 tbsp lemon juice + 2 tbsp refined coconut oil + 2 tbsp maple syrup; use natural almond butter or sunflower seed butter; replace heavy cream with full-fat coconut cream; use dairy-free dark chocolate. Chill 8+ hours.
- Low-Sugar/Keto: Replace granulated sugar in crust with 2 tbsp monk fruit–erythritol blend; use keto-friendly powdered sweetener (e.g., Swerve Confectioners) in filling; choose 85%+ dark chocolate (check net carbs); swap peanut butter for unsweetened almond butter. Add ¼ tsp stevia glycerite for extra sweetness without volume.
- Protein-Packed: Stir 2 scoops (⅓ cup) unflavored or chocolate collagen peptides or whey protein isolate into powdered sugar before sifting. Add 2 tbsp chia or flaxseed gel (1 tbsp seeds + 3 tbsp water, rested 10 min) for binding and fiber.
- Flavor Twists: Maple-Bourbon: Replace 1 tbsp heavy cream with bourbon + 1 tbsp pure maple syrup. Espresso Crunch: Add 1 tsp instant espresso powder to filling + top with crushed espresso beans. Salted Caramel Swirl: Drizzle ¼ cup thick homemade or GF caramel sauce over filling before swirling chocolate. White Chocolate Raspberry: Swap dark chocolate for white chocolate + fold in ⅓ cup freeze-dried raspberries.
- Dietary Texture Swaps: Nut-free? Use sunflower seed butter and pumpkin seeds instead of peanuts. Dairy-free? See vegan notes above. Egg-free? Already compliant—no eggs required. Soy-free? Verify chocolate and peanut butter labels (many natural PBs are soy-free; Enjoy Life chocolate is certified soy-free).
- Mini Version: Press crust into lined mini muffin tin cups. Fill with 1 tsp filling + ¼ tsp chocolate. Chill 4 hours. Makes 24 mini bars—perfect for parties or portion control.
Health Considerations and Nutritional Value
A single standard bar (1 of 16, approx. 2×2 inches) contains roughly:
- Calories: 320–360 kcal
- Total Fat: 22–25g (13–15g saturated)
- Carbohydrates: 26–29g (18–21g sugars, 1g fiber)
- Protein: 7–9g
- Sodium: 220–260mg
Nutritional Highlights: These bars offer meaningful protein from peanut butter and cream cheese, heart-healthy monounsaturated fats (from peanuts and cocoa), bone-supportive calcium (cream cheese, graham), and antioxidants (flavonoids in dark chocolate). The natural satiety from fat and protein helps curb cravings better than high-sugar, low-fat alternatives.
Considerations & Mitigations:
- Sugar Content: Primarily from added sugars (powdered + granulated). Reduce by 25% (use 1 cup powdered + 3 tbsp granulated) — texture remains excellent, sweetness is still ample. Or use date paste (¼ cup) in crust + erythritol blend in filling.
- Saturated Fat: From cream cheese, butter, and chocolate. Opt for reduced-fat cream cheese *only* if paired with 1 tbsp additional full-fat coconut oil (to retain structure) — but full-fat delivers superior mouthfeel and satiety.
- Sodium: Moderate—mostly from peanut butter and graham crackers. Choose low-sodium peanut butter (e.g., Crazy Richard’s) and unsalted butter to reduce by ~60mg per bar.
- Allergens: Contains dairy, eggs (in graham crackers), peanuts, and gluten. Always verify labels for cross-contamination warnings if severe allergy exists.
- Balanced Enjoyment: These are intentionally indulgent—not “health food.” Pair with fresh berries or a small green salad to add fiber, vitamins, and balance. One bar satisfies most sweet cravings—portion control is built-in by design.
Ingredients
- 1 ½ cups (150g) graham cracker crumbs (about 10 full sheets)
- 6 tablespoons (85g) unsalted butter, melted
- ¼ cup (50g) granulated sugar
- 16 oz (454g) full-fat brick cream cheese, room temperature
- ¾ cup (200g) smooth natural peanut butter (no-stir preferred)
- 1 ¼ cups (150g) powdered sugar, sifted
- ⅓ cup (80ml) cold heavy cream (≥36% fat)
- 2 teaspoons pure vanilla extract
- ½ teaspoon fine sea salt
- 8 oz (227g) high-quality dark chocolate (60–70% cacao), divided (6 oz chopped, 2 oz reserved)
- Optional garnish: flaky sea salt, roasted salted peanuts, cocoa powder
Directions
- Line an 8×8-inch metal baking pan with parchment paper, allowing overhang on two sides. Lightly grease.
- In a bowl, combine graham crumbs, melted butter, and granulated sugar. Press firmly into pan bottom. Chill 15 minutes.
- Beat cream cheese on medium-low 1 minute until smooth. Add peanut butter; beat 1 minute more. Scrape bowl.
- With mixer on low, add powdered sugar in 3 batches, beating 20 sec after each. Add heavy cream, vanilla, and salt; mix 30 sec until combined.
- Fold in 6 oz chopped chocolate with a spatula—10–12 gentle strokes. Stop while streaks remain.
- Pour filling over crust. Smooth top. Sprinkle reserved 2 oz chocolate evenly. Swirl with toothpick.
- Refrigerate uncovered 6–12 hours (overnight ideal).
- Lift out using parchment. Slice into 16 bars with hot, dry, sharp knife. Garnish as desired.
FAQ
- Can I bake these bars instead of chilling?
- No—this is a no-bake cheesecake bar. Baking would curdle the filling, cause severe cracking, and eliminate the signature creamy texture. The crust *can* be pre-baked for extra crunch, but the filling must always be chilled to set.
- Why did my filling crack or separate?
- Most common causes: cream cheese not fully room temperature (causes lumps that break emulsion), overmixing (incorporates air → cracks), or adding cold heavy cream to warm mixture (temperature shock). Always use cold cream, but ensure all other ingredients are at 65–70°F.
- Can I use low-fat cream cheese?
- Strongly discouraged. Low-fat or Neufchâtel lacks sufficient fat to emulsify with peanut butter and chocolate, resulting in a grainy, watery, or crumbly filling that won’t hold its shape when sliced.
- How do I prevent the chocolate from sinking?
- Use finely chopped chocolate (¼-inch pieces max), fold *gently*, and chill the filling base for 10 minutes before folding in chocolate—this thickens the batter slightly and suspends the pieces.
- Can I make these ahead for a party?
- Absolutely—and recommended! They improve in flavor after 24 hours. Make up to 5 days ahead and keep refrigerated, or freeze for up to 3 months. Thaw in fridge 30 minutes before serving.
- What if I don’t have an 8×8 pan?
- You can use a 9×9 pan for thinner bars (cut into 25 pieces) or a 9×13 for larger yield (double the recipe). Adjust chill time: 9×9 needs 5 hours minimum; 9×13 needs 8+ hours.
- Is there a way to make them firmer for warm climates?
- Yes—add 1 teaspoon unflavored gelatin (bloomed in 1 tbsp cold water, then microwaved 5 seconds to melt) to the filling after heavy cream. Or increase chocolate to 10 oz total—extra cocoa butter adds structure.
- Can I use crunchy peanut butter?
- Yes! Just extend mixing time by 30–45 seconds to fully integrate the bits. You’ll get delightful texture contrast—especially nice with a smooth chocolate drizzle on top.
- Why does my crust crumble when I cut?
- Two fixes: 1) Press crust *more firmly*—use a glass with even downward pressure. 2) Let bars sit at room temperature 5 minutes before slicing—too-cold crust is brittle. Also, ensure butter is fully melted and evenly distributed.
- Can I add fruit?
- Fresh fruit adds moisture and can cause sogginess. Instead, use freeze-dried fruit (raspberries, strawberries, bananas) folded into filling or sprinkled on top before chilling—intact flavor and zero weeping.
Summary
Chocolate Peanut Butter Cheesecake Bars are a masterclass in layered indulgence—featuring a buttery graham crust, a luxuriously smooth and tangy peanut butter–infused cheesecake filling, and rich dark chocolate ribbons—all set to perfection through precise chilling rather than baking.
With adaptable ingredients, clear troubleshooting guidance, thoughtful health-aware modifications, and rich historical context, this recipe empowers bakers of all levels to create stunning, restaurant-quality bars that satisfy deeply while inviting endless creativity and personal expression.