Introduction
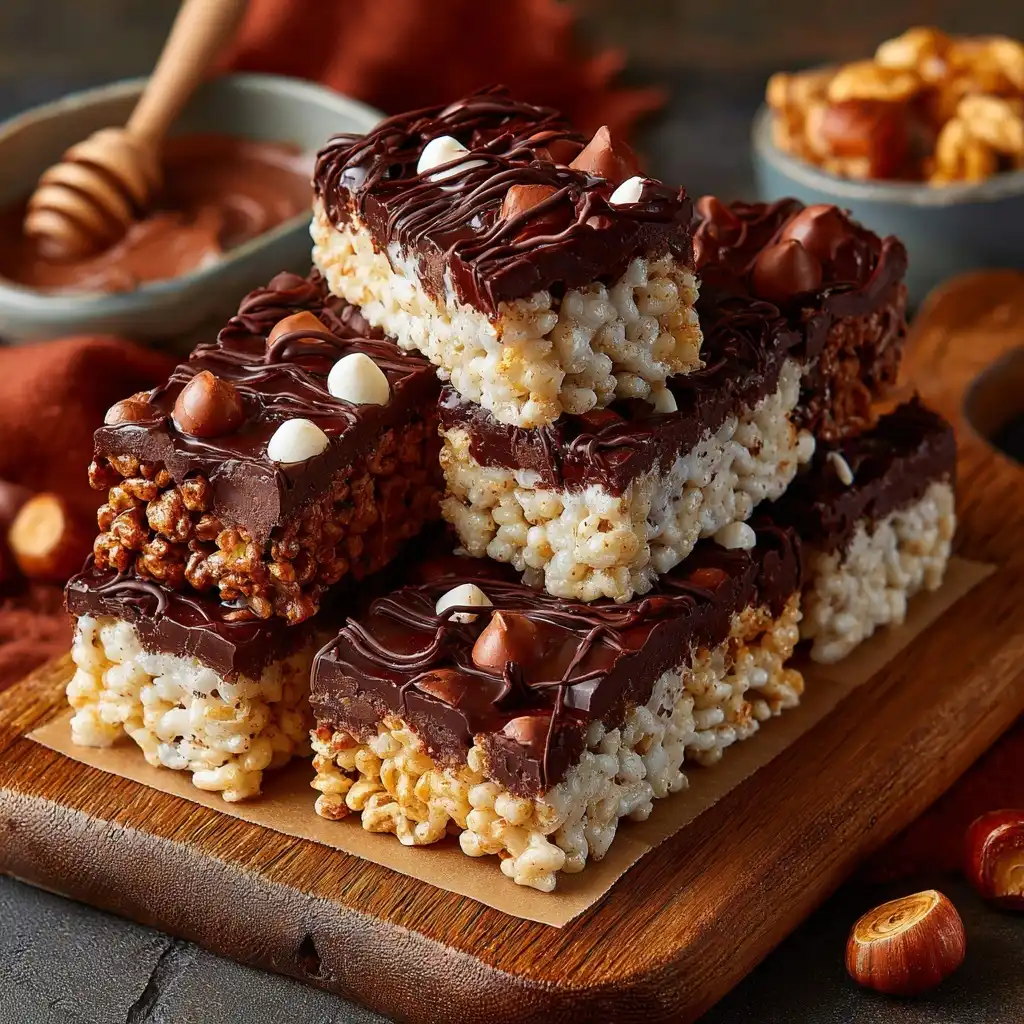
Rice Krispie Chocolate Bars are the ultimate fusion of nostalgic childhood comfort and rich, decadent indulgence. Imagine the light, airy crunch of classic Rice Krispies cereal enveloped in a velvety, deeply chocolatey binding—neither overly sweet nor cloying, but perfectly balanced between chewy, crisp, and melt-in-your-mouth. Unlike traditional Rice Krispie Treats bound with marshmallow, these bars elevate the concept with cocoa-infused syrup, dark or milk chocolate layers, and often a luscious ganache or fudge swirl. They’re ideal for potlucks, holiday platters, after-school snacks, or even elegant dessert tables when finished with flaky sea salt or edible gold dust. Whether you’re a seasoned baker or a kitchen novice, this recipe delivers impressive results with minimal equipment and zero oven time—making it as accessible as it is irresistible.
The History
The origins of Rice Krispie Treats trace back to 1939, when Kellogg’s home economist Mildred Day and advertising executive Vernon D. Hough developed the now-iconic marshmallow-and-cereal confection as a clever way to promote Kellogg’s Rice Krispies cereal during the Great Depression. The original recipe—published on the back of Rice Krispies boxes—was simple, affordable, and required no baking: just melted marshmallows, butter, and cereal. Its instant popularity cemented it as an American pantry staple.
Rice Krispie Chocolate Bars, however, represent a later evolution—a creative reinterpretation born from home cooks’ desire to deepen flavor, add sophistication, and cater to chocolate lovers. In the 1970s and ’80s, regional cookbooks and community fundraising collections began featuring “Chocolate Krispie Squares” using cocoa powder whisked into the marshmallow mixture. By the early 2000s, food bloggers and gourmet dessert shops pushed further—replacing part or all of the marshmallow with chocolate-based binders like fudge sauce, condensed milk–chocolate mixtures, or even tempered chocolate ganache. Today, Rice Krispie Chocolate Bars exist across a broad spectrum: from minimalist two-ingredient versions (melted dark chocolate + cereal) to multi-layered showstoppers with salted caramel ripple, espresso-infused ganache, and toasted coconut crumble. Their rise mirrors broader culinary trends—embracing texture contrast, ingredient integrity (e.g., single-origin chocolate), and customizable nostalgia.
Ingredients Breakdown
Every exceptional Rice Krispie Chocolate Bar begins with intentionality—not just in measurement, but in ingredient selection. Below is a detailed, chef-level breakdown of each component, including functional roles, quality notes, and substitution rationale:
- Rice Krispies Cereal (6–7 cups, unsweetened or lightly sweetened): Provides the foundational crispness and airy structure. Opt for plain, non-GMO, or organic varieties if preferred—the key is low moisture content and uniform puff size. Avoid “honey-flavored” or “frosted” versions unless intentionally seeking added sweetness; they can cause clumping or oil separation. Note: Generic crispy rice cereals work, but Kellogg’s offers optimal expansion and snap.
- Unsweetened Cocoa Powder (½ cup, Dutch-process preferred): Adds deep chocolate intensity without excess sugar. Dutch-process cocoa is alkalized, yielding smoother, less acidic flavor and richer color—ideal for bars meant to taste premium. Natural cocoa works but may lend slight tang; if using, add ¼ tsp baking soda to neutralize acidity and enhance browning.
- Granulated Sugar (1 cup): Not just for sweetness—it aids in syrup formation, contributes to chewiness when combined with corn syrup, and helps stabilize the binding matrix. Reduce by up to ¼ cup for less-sweet versions, but avoid eliminating entirely, as sugar affects texture cohesion.
- Corn Syrup (¾ cup, light or dark): The unsung hero. Corn syrup inhibits sugar crystallization, ensures glossy sheen, adds chewy resilience (especially important in warm climates), and extends shelf life. Dark corn syrup imparts subtle molasses notes; light is more neutral. Honey or golden syrup may substitute 1:1 but may yield stickier, less stable bars.
- Heavy Cream (½ cup): Enriches mouthfeel, tempers bitterness, and emulsifies fat for a silkier set. Ultra-pasteurized cream works fine, but avoid ultra-low-fat or plant-based creams unless specially formulated—they lack sufficient milkfat (≥36%) to properly bind and cool.
- Unsalted Butter (½ cup, 1 stick, cubed): Adds luxurious richness, aids in even melting, and carries fat-soluble cocoa flavors. Salted butter may be used, but reduce added salt accordingly. European-style butter (82–86% fat) yields even more tender, flavorful bars.
- Vanilla Extract (2 tsp, pure, not imitation): Enhances aromatic complexity and rounds out chocolate’s sharp edges. Madagascar bourbon vanilla is recommended for its creamy, woody depth.
- Pinch of Fine Sea Salt (¼ tsp, plus extra for finishing): Critical for flavor balance—suppresses bitterness, amplifies sweetness perception, and creates that addictive sweet-salty contrast. Use finely ground salt for even distribution.
- Optional Add-Ins (see Variations section): Includes toasted nuts (almonds, pecans), freeze-dried berries, crushed pretzels, espresso powder, orange zest, flaky Maldon salt, or high-quality chocolate chunks (70%+ cacao).
Step-by-Step Recipe
- Prepare Your Pan: Line a 9×13-inch metal baking pan with two overlapping sheets of parchment paper, allowing at least 2 inches of overhang on two opposite sides. Lightly grease the parchment with softened butter or neutral oil (like avocado or refined coconut). This ensures clean, effortless removal and clean slicing later.
- Toast the Cereal (Optional but Highly Recommended): Spread 6 cups of Rice Krispies evenly on a large rimmed baking sheet. Bake at 300°F (150°C) for 8–10 minutes, stirring once halfway, until fragrant and slightly golden. Let cool completely. Toasting drives off residual moisture, intensifies nutty aroma, and prevents sogginess—especially vital when using creamy chocolate binders.
- Combine Wet Ingredients: In a heavy-bottomed, light-colored saucepan (for easy temperature monitoring), combine granulated sugar, corn syrup, heavy cream, unsalted butter, and cocoa powder. Whisk thoroughly until no dry streaks remain and cocoa is fully dispersed.
- Cook the Chocolate Syrup: Place saucepan over medium-low heat. Insert a candy thermometer. Bring mixture to a gentle simmer, stirring constantly with a heat-resistant silicone spatula. Once simmering, stop stirring and let cook undisturbed until the syrup reaches the soft-ball stage: 234–240°F (112–115°C). This typically takes 8–12 minutes. Do not rush—undercooking yields sticky, under-set bars; overcooking causes graininess or hard, brittle texture. If sugar crystals form on the side of the pan, brush down with a wet pastry brush.
- Infuse & Finish: Remove from heat. Carefully stir in vanilla extract and fine sea salt (mixture will bubble vigorously). Let rest for 1 minute to slightly cool and thicken—this prevents cereal from disintegrating on contact.
- Combine Cereal & Syrup: Pour hot syrup over cooled, toasted Rice Krispies in a very large heatproof bowl (at least 5-quart capacity). Using a lightly oiled silicone spatula or greased heatproof spoon, gently fold from bottom upward—just until every piece is evenly coated. Avoid overmixing, which compacts cereal and sacrifices airy texture. Work quickly; syrup thickens rapidly as it cools.
- Press Into Pan: Immediately transfer mixture to prepared pan. Use the back of an oiled measuring cup or a parchment-lined flat-bottomed glass to press down *evenly* and *firmly*, applying steady, downward pressure—first around edges, then center. Aim for uniform ¾-inch thickness. For extra polish, smooth surface with an oiled offset spatula.
- Cool & Set: Let bars cool at room temperature for 30 minutes. Then refrigerate—uncovered—for at least 2 hours, or preferably overnight. Chilling allows full setting, improves sliceability, and deepens chocolate flavor. Do not freeze unless storing long-term (see Storage Tips).
- Score & Slice: Using a sharp, thin-bladed knife (dipped in hot water and wiped dry between cuts), score bars into 12–16 rectangles while still chilled. Let sit at room temperature for 5 minutes before lifting out using parchment overhang. Wipe knife clean after every 2–3 slices for pristine edges.
Tips
- Thermometer Is Non-Negotiable: Visual cues (like “thread” or “pearl” stages) are unreliable for chocolate syrup. A digital probe or candy thermometer ensures precise soft-ball stage—critical for perfect chew and clean release.
- Grease Everything: Oil your spatula, spoon, measuring cup, knife, and even your hands if pressing by hand. Chocolate syrup is tenaciously sticky—greasing prevents frustrating waste and uneven coating.
- Toast, Don’t Skip: Raw cereal absorbs moisture from syrup, leading to limp texture within hours. Toasted cereal stays crisp for days—even weeks—when stored properly.
- Work Warm, Not Hot: If syrup cools below 180°F before mixing, gently reheat over low heat for 15–20 seconds—stirring constantly—to restore fluidity without scorching.
- Chill Before Cutting—Always: Slicing warm bars guarantees crumbling and smearing. Cold bars cut cleanly and hold shape impeccably.
- Use Metal Pans: Glass or ceramic retains heat longer and cools unevenly—increasing risk of over-setting edges while center remains soft. Aluminum or stainless steel conducts heat efficiently and cools uniformly.
- Room-Temp Ingredients Only: Cold butter or cream can cause seizing or graininess when added to hot syrup. Always bring dairy to room temperature (65–70°F) first.
- Don’t Rush the Rest: That 1-minute rest post-vanilla isn’t optional—it lets volatile steam escape and prevents dangerous splattering while folding in cereal.
- Scale for Altitude: At elevations above 3,000 ft, reduce target temperature by 2°F per 1,000 ft (e.g., cook to 230–236°F at 5,000 ft) to compensate for lower boiling point.
- Embrace Texture Contrast: For maximum sensory delight, layer textures: press half the mixture, top with chopped toasted almonds and flaky salt, then cover with remaining mixture before final pressing.
Variations and Customizations
These bars are a canvas—endlessly adaptable for holidays, dietary needs, global flavors, or personal whims. Each variation maintains structural integrity while offering distinct personality:
- Double-Chocolate Swirl: Reserve ½ cup of warm syrup. Stir in 4 oz finely chopped semi-sweet chocolate until melted and glossy. Drizzle over pressed bars before chilling; use a toothpick to marble gently.
- Peanut Butter Cup Crunch: Fold 1 cup roasted, salted peanuts and ¾ cup mini peanut butter cups (chilled) into cereal-syrup mixture. Press, then drizzle with melted milk chocolate and sprinkle with crushed pretzel rods.
- Espresso Affogato Bars: Dissolve 2 tsp instant espresso powder into warm cream before adding to saucepan. After pressing, top chilled bars with a layer of cold, whipped mascarpone (1 cup mascarpone + 2 tbsp powdered sugar + 1 tsp vanilla, whipped to soft peaks).
- Orange-Bitters Chocolate: Add 1 tbsp finely grated orange zest and 10 drops of orange blossom water to syrup off-heat. Finish bars with dark chocolate curls and candied orange peel.
- Vegan & Refined-Sugar-Free: Substitute maple syrup or brown rice syrup for corn syrup; use coconut oil + vegan butter blend for dairy fat; swap in certified gluten-free puffed brown rice cereal; sweeten with coconut sugar (reduce by 20%); use carob or vegan chocolate chips.
- Gluten-Free & Allergen-Safe: Ensure cereal is certified GF (many “rice crisp” brands contain barley grass or malt flavoring). Use oat milk or coconut cream instead of dairy cream; verify cocoa and vanilla are GF-certified. For nut-free, omit add-ins or use sunflower seed butter swirl.
- Mini Bite-Sized Bars: Press mixture into a lined 8×8-inch pan. Chill fully, then cut into 1-inch squares. Roll edges in cocoa powder, crushed freeze-dried raspberries, or toasted sesame seeds.
- Holiday Editions: Stir in crushed candy canes (add last, just before pressing), peppermint extract (½ tsp), or white chocolate cranberry clusters. Decorate chilled bars with royal icing snowflakes or edible glitter.
- Boozy Luxe Version: Add 2 tbsp bourbon, Grand Marnier, or Amaretto to syrup off-heat (reduce cream by 1 tbsp to maintain consistency). Top with dark chocolate ganache infused with the same spirit.
- Protein-Packed: Add ⅓ cup unflavored collagen peptides or brown rice protein powder to dry cocoa-sugar mix before cooking. Or fold in ½ cup roasted soy nuts or pumpkin seeds for crunch and nutrition.
Health Considerations and Nutritional Value
While Rice Krispie Chocolate Bars are undeniably indulgent, mindful formulation can enhance nutritional profile without sacrificing pleasure. A standard serving (1 bar, approx. 2×3 inches, ~65g) made with the base recipe contains approximately:
- Calories: 240–270 kcal
- Total Fat: 11–13 g (6–7 g saturated; primarily from cocoa butter and dairy)
- Carbohydrates: 34–38 g (26–29 g sugars; naturally occurring + added)
- Fiber: 1–1.5 g (from cocoa and whole-grain cereal options)
- Protein: 2–3 g (can be increased significantly with add-ins—see Variations)
- Key Micronutrients: Iron (10–15% DV from cocoa), Magnesium (12–18% DV), Copper (20–25% DV), and Polyphenols (antioxidants linked to cardiovascular and cognitive health).
Health Notes & Smart Swaps:
- Sugar Awareness: Traditional recipes rely heavily on refined sugar. To reduce glycemic load: replace up to ⅓ of granulated sugar with erythritol or allulose (heat-stable, non-laxative sweeteners), or use date paste (adjust liquid accordingly). Note: Pure stevia or monk fruit require bulking agents to maintain texture.
- Fat Quality Matters: Choosing grass-fed butter or cocoa butter-rich dark chocolate increases beneficial stearic acid (a neutral saturated fat) and conjugated linoleic acid (CLA)—both associated with anti-inflammatory effects.
- Cocoa Benefits: High-flavanol cocoa (≥70% cacao) supports endothelial function and nitric oxide production—key for healthy blood flow. Opt for minimally processed, stone-ground cocoa for maximal polyphenol retention.
- Dietary Accommodations: Naturally gluten-free (with certified GF cereal), easily adapted for vegan, nut-free, or soy-free diets. Low-FODMAP compliant when made with lactose-free cream and avoiding high-FODMAP add-ins (e.g., apples, honey).
- Portion Mindfulness: These bars are energy-dense. Pair with Greek yogurt, fresh berries, or a handful of almonds to slow digestion and increase satiety.
- Not for Diabetics Unmonitored: Though lower in carbs than many baked desserts, the rapid glucose response from syrup and sugar warrants blood sugar tracking for those with insulin resistance or diabetes.
Ingredients
- 6–7 cups Rice Krispies cereal (plain, unsweetened, or lightly sweetened; ensure gluten-free if needed)
- ½ cup unsweetened Dutch-process cocoa powder (sifted)
- 1 cup granulated sugar
- ¾ cup light corn syrup
- ½ cup heavy cream (36% milkfat minimum)
- ½ cup (1 stick) unsalted butter, cubed
- 2 tsp pure vanilla extract
- ¼ tsp fine sea salt (plus flaky sea salt for garnish)
Directions
- Line a 9×13-inch metal baking pan with parchment paper, leaving overhang on two sides. Lightly grease parchment.
- Preheat oven to 300°F (150°C). Spread cereal on a rimmed baking sheet. Toast 8–10 minutes until fragrant and pale gold. Cool completely.
- In a heavy-bottomed 3-qt saucepan, whisk together cocoa, sugar, corn syrup, cream, butter, and a pinch of salt until smooth.
- Place over medium-low heat. Bring to a gentle simmer, stirring constantly. Once simmering, insert candy thermometer and cook—without stirring—until mixture reaches 234–240°F (112–115°C), about 8–12 minutes.
- Remove from heat. Carefully stir in vanilla and remaining ¼ tsp salt (mixture will bubble). Let stand 1 minute.
- Pour hot syrup over cooled cereal in a large heatproof bowl. Gently fold with oiled spatula until fully coated (~45 seconds).
- Immediately transfer to prepared pan. Press firmly and evenly with oiled cup or glass to ¾-inch thickness.
- Cool at room temperature 30 minutes, then refrigerate uncovered at least 2 hours—or overnight for best texture.
- Using hot, wiped knife, score into 12–16 bars. Lift out using parchment. Serve chilled or at cool room temperature.
FAQ
- Can I make these without a candy thermometer?
- No—this recipe relies on precise sugar syrup science. Substituting “visual tests” (e.g., “sheeting off spoon”) is highly unreliable and risks failure. A $12 digital thermometer is essential equipment for consistent success.
- Why did my bars turn out hard or grainy?
- Most commonly: syrup was cooked past 240°F, causing sugar crystallization; or cold ingredients were added too quickly, shocking the emulsion. Also possible: overmixing cereal or pressing too aggressively while warm.
- Can I use marshmallows instead of syrup?
- You can—but it’s a different recipe (classic Rice Krispie Treats). Marshmallow-based versions lack the deep chocolate intensity, glossy sheen, and chew-resilience of syrup-based bars. For hybrid appeal, replace only ¼ of syrup volume with melted marshmallows.
- How long do they keep? Can I freeze them?
- Stored airtight at cool room temperature: 5 days. Refrigerated: up to 2 weeks. Frozen (wrapped tightly in parchment + foil, then in freezer bag): up to 3 months. Thaw overnight in fridge—do not microwave.
- My bars are sticky or oily on top—what went wrong?
- Sticky surface = undercooked syrup or insufficient chilling. Oily sheen = butter separated due to overheating or cold dairy added too fast. Next time, verify thermometer calibration and warm cream/butter to room temp.
- Can I double the batch?
- Yes—but use a 12×17-inch jelly roll pan and increase cook time by 2–3 minutes. Monitor thermometer closely; larger volume heats/evaporates slower. Do not triple—heat distribution becomes uneven.
- Are these safe for kids with dairy allergies?
- Yes—with substitutions: use full-fat canned coconut milk (not “lite”) instead of cream, vegan butter (e.g., Miyoko’s or Earth Balance), and dairy-free chocolate chips. Ensure cereal is dairy-free (some contain whey).
- Can I add protein powder?
- Yes—if using unflavored, heat-stable collagen or brown rice protein. Whisk into dry cocoa-sugar mixture before adding liquids. Avoid whey or soy isolate—they may clump or impart chalkiness.
- What’s the best chocolate to use for drizzling?
- High-quality couverture chocolate (e.g., Valrhona, Callebaut, Guittard) tempered correctly yields glossy, snappy finish. For simplicity, use chocolate chips + 1 tsp coconut oil per ½ cup—microwave in 15-sec bursts, stirring well.
- Why does my recipe say “no-bake” but I toasted the cereal?
- “No-bake” refers to the final assembly—not prep steps. Toasting is a dry-heat technique that enhances flavor and texture without altering the no-oven binding process. It’s strongly encouraged, not contradictory.
Summary
Rice Krispie Chocolate Bars masterfully reimagine a beloved classic by replacing marshmallow with a rich, velvety cocoa-sugar syrup—delivering deep chocolate flavor, sophisticated texture, and reliable chew without oven dependency.
With meticulous attention to temperature, ingredient quality, and toasting technique—and endless customization potential from vegan adaptations to boozy gourmet twists—these bars offer nostalgic joy elevated to artisanal excellence, perfect for sharing, gifting, or savoring solo.