Introduction
No-Bake Cookie Dough Bars are the ultimate guilt-free (yet indulgent!) dessert solution—creamy, chewy, rich in flavor, and blissfully free of raw eggs or heat processing. Designed for busy bakers, health-conscious snackers, and cookie dough lovers who crave that nostalgic, buttery-sweet, slightly salty, soft-baked-cookie texture without turning on the oven—or worrying about salmonella. These bars deliver all the soul-soothing comfort of classic edible cookie dough, but with structure, portability, and customizable nutrition. Whether you’re meal prepping sweet treats for the week, packing lunchbox surprises, hosting a no-fuss gathering, or simply craving something deeply satisfying yet effortlessly made, these bars rise to the occasion—no whisking over double boilers, no chilling for hours, and no baking sheet cleanup required.
The History
The concept of edible cookie dough traces its modern popularity back to the 1980s and ’90s, when food safety awareness heightened around raw eggs and untreated flour—sparking innovation in “safe-to-eat” formulations. Early versions relied on pasteurized eggs and heat-treated flour, but true evolution came with the no-bake movement of the 2010s: home cooks and food bloggers began experimenting with nut butters, oats, coconut oil, and natural binders to replicate dough’s signature mouthfeel sans any raw risks. The bar format emerged as a brilliant hybrid—combining the convenience of energy bites with the decadence of dessert bars. Influenced by trends like clean eating, vegan baking, gluten-free lifestyles, and functional foods, No-Bake Cookie Dough Bars evolved into a canvas for dietary inclusivity: vegan, paleo, keto, soy-free, nut-free, and low-sugar adaptations now thrive across recipe blogs, Instagram feeds, and even commercial product lines (think RxBar’s cookie dough variant or GoMacro’s protein-packed bars). What began as a pantry hack has become a cultural staple—a testament to how necessity, creativity, and snack-time cravings can reshape dessert history—one press of a spatula at a time.
Ingredients Breakdown
Every ingredient in this recipe serves a precise functional and sensory role—no filler, no afterthoughts:
- Almond Butter (or Sunflower Seed Butter for nut-free): Provides rich fat content, deep roasted flavor, natural binding power, and creamy viscosity. Opt for unsweetened, no-stir, or well-emulsified varieties to ensure smooth texture and prevent oil separation. Its monounsaturated fats also contribute to satiety and shelf-stable richness.
- Packed Light Brown Sugar: Delivers molasses-infused caramel notes, moisture retention, and gentle acidity that balances sweetness. Dark brown sugar may be substituted for deeper flavor—but increases moisture and softness, potentially affecting set.
- Pure Maple Syrup (Grade A Amber): Adds complex earthy-sweetness, natural humectant properties (keeps bars chewy), and trace minerals (zinc, manganese). Avoid pancake syrups—they contain high-fructose corn syrup and artificial flavors that mute nuance and hinder proper binding.
- Vanilla Extract (Pure, Alcohol-Based): Not imitation! Real vanilla enhances aromatic depth, rounds out bitterness, and amplifies perception of sweetness—allowing you to reduce added sugars without sacrificing satisfaction.
- Salt (Fine Sea Salt or Himalayan Pink Salt): Critical for flavor modulation—suppresses metallic notes, brightens sweetness, and intensifies buttery undertones. Even ¼ tsp makes a perceptible difference in balance.
- Heat-Treated All-Purpose Flour (or Certified Heat-Treated Oat Flour for GF): The safest, most authentic “dough” base. Heat-treating (baking at 350°F for 5–7 minutes, then cooling completely) eliminates potential pathogens in raw grain while preserving neutral flavor and ideal absorbency. Never skip this step—it’s non-negotiable for food safety and proper texture.
- Oats (Old-Fashioned Rolled Oats, Gluten-Free if needed): Offer chewy body, fiber-rich structure, and subtle toasted warmth. They absorb excess moisture, prevent gumminess, and lend a wholesome heartiness—distinct from granola’s crunch or flour’s dryness.
- Mini Chocolate Chips (Semi-Sweet or Dairy-Free): Provide melty pockets, textural contrast, and cocoa butter richness. Use chips—not bars chopped small—as they contain stabilizers to hold shape during pressing and resist bloom in cool storage.
- Optional Add-Ins: Toasted walnuts or pecans (for crunch & omega-3s), flaxseed meal (fiber + lignans), collagen peptides (unflavored, for protein boost without grit), freeze-dried strawberries (tart pop), or espresso powder (½ tsp to deepen chocolate notes).
Step-by-Step Recipe
- Prep Your Pan: Line an 8×8-inch metal baking pan with two overlapping sheets of parchment paper—ensure generous overhang on two opposite sides (this is your “lift-out handle”). Lightly mist parchment with neutral oil spray (e.g., avocado) for foolproof release. Chill pan in freezer for 10 minutes—cold surface helps mixture set faster and prevents early smearing.
- Heat-Treat the Flour (Non-Negotiable Step): Spread 1 cup all-purpose flour evenly on a rimmed baking sheet. Bake at 350°F for 5 minutes, stir, then bake 2 more minutes until fragrant and pale golden. Cool completely—*do not skip cooling*, or warm flour will melt butter and cause greasiness.
- Cream Wet Ingredients: In a large, heavy-bottomed saucepan (not nonstick—better heat control), combine almond butter, brown sugar, maple syrup, vanilla, and salt. Warm over *medium-low* heat, stirring constantly with a silicone spatula, for 3–4 minutes until mixture is glossy, smooth, and just beginning to bubble at edges (≈220°F on candy thermometer). Do not boil vigorously—this risks caramelizing sugar too fast and creating graininess.
- Incorporate Dry Base: Remove from heat. Whisk in cooled heat-treated flour and oats *gradually*, ¼ cup at a time, folding gently with spatula until fully absorbed and no dry streaks remain. Mixture will thicken rapidly and turn matte—this is ideal. Let cool 2 minutes (prevents melting chips).
- Fold in Chocolate & Extras: Gently stir in mini chocolate chips and any optional add-ins (nuts, seeds, etc.) until just distributed—overmixing warms chocolate and dulls contrast.
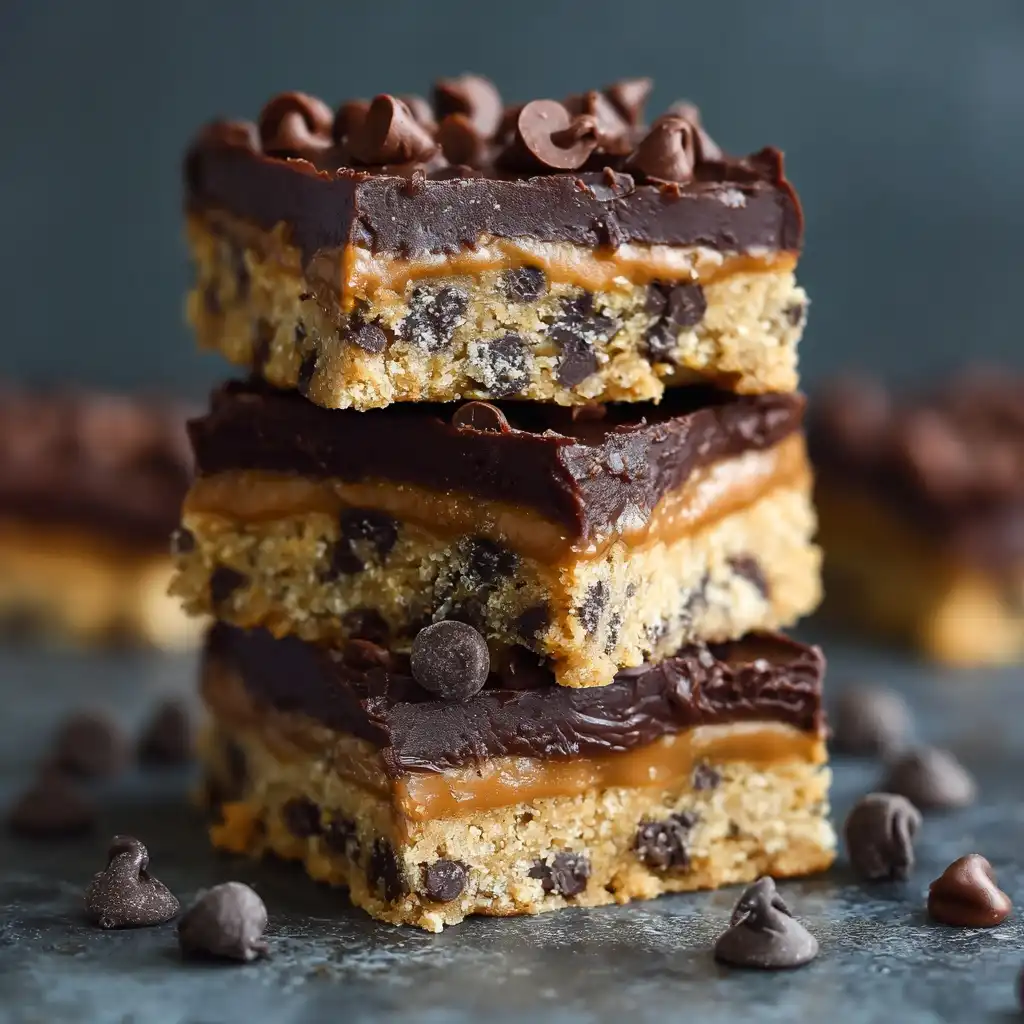
- Press with Precision: Transfer mixture to chilled pan. Use the back of a lightly oiled measuring cup or flat-bottomed glass to press *evenly and firmly* into corners and edges—apply steady downward pressure for 60 seconds. Smooth top with oiled offset spatula. Optional: Sprinkle flaky sea salt or extra chocolate shavings before chilling.
- Chill to Perfection: Refrigerate uncovered for *minimum 3 hours*, preferably 4–6 hours or overnight. This allows starches to fully hydrate, fats to re-solidify, and bars to achieve clean-cut integrity. For ultra-firm slices (ideal for packing), freeze 1 hour before cutting.
- Cut & Store: Using parchment overhang, lift entire slab onto cutting board. With a sharp, hot knife (dip blade in hot water, wipe dry between cuts), slice into 12 even bars (or 16 squares). Store layered with parchment in airtight container.
Tips
- Room-Temperature Nut Butter is Key: Cold almond butter separates and resists emulsifying—let it sit 30 mins at room temp before starting.
- Thermometer Confidence: A digital instant-read thermometer prevents under- or over-cooking the wet base. Target 215–220°F—the “soft-ball” stage where syrup thickens enough to bind without hardening.
- No Microwave Shortcuts: Microwaving nut butter/sugar mix causes uneven heating, scorching, and grainy texture. Stovetop control is essential.
- Press Twice: Press once after pouring, then again after 5 minutes when surface firms slightly—this eliminates air pockets and ensures uniform density.
- Knife Prep Ritual: For pristine edges, chill knife in freezer 10 minutes before cutting. Wipe clean after every slice—not every other.
- Flour Substitution Wisdom: If using oat flour, reduce quantity by 2 tbsp (it’s more absorbent). Coconut flour? Avoid—it’s excessively drying and requires xanthan gum + extra liquid (not recommended for first-timers).
- Humidity Hack: On humid days, add 1 extra tbsp oats to compensate for ambient moisture absorption.
- Texture Troubleshooting: Too crumbly? Next batch add ½ tsp maple syrup. Too sticky? Chill 30 mins longer before cutting—or dust hands lightly with heat-treated flour when handling.
Variations and Customizations
This foundational formula welcomes endless reinvention—each variation maintains structural integrity while transforming flavor, function, and dietary alignment:
- Vegan Protein Power Bars: Swap almond butter for pea protein–infused sunflower seed butter; add 2 scoops unflavored plant protein powder + 1 tbsp chia gel (1 tsp chia + 3 tbsp water, rested 5 mins). Reduce maple syrup to 3 tbsp. Top with cacao nibs.
- Paleo Chocolate Chip Cookie Dough Bars: Replace flour with ¾ cup blanched almond flour + ¼ cup coconut flour; use coconut sugar instead of brown sugar; substitute coconut nectar for maple syrup; choose dairy-free chocolate.
- Keto-Friendly Version: Use erythritol-monk fruit blend (1:1 brown sugar substitute), MCT oil–infused almond butter, ⅓ cup toasted crushed pecans, sugar-free chocolate chips, and increase almond flour to 1 cup (reduce oats entirely). Add ¼ tsp stevia glycerite for sweetness lift.
- Gluten-Free + Grain-Free: Omit oats; use ½ cup golden flaxseed meal + ½ cup cassava flour + 2 tbsp tiger nuts. Toast flax for nuttier depth. Ensure certified GF chocolate.
- Snickerdoodle-Inspired: Add 1½ tsp cream of tartar + 1 tsp ground cinnamon to dry ingredients; roll top in cinnamon-sugar before chilling.
- Double Chocolate Mint: Replace 2 tbsp flour with unsweetened cocoa powder; fold in ¼ cup crushed peppermint candies + 2 tbsp chopped Andes mints.
- Tropical Twist: Use cashew butter; replace maple syrup with coconut nectar; add toasted coconut flakes, dried pineapple bits, and lime zest.
- Protein-Packed Peanut Butter Cup: Substitute peanut butter for almond butter; layer bottom third with melted dark chocolate, top with dough, then drizzle with melted peanut butter and extra chocolate before chilling.
Health Considerations and Nutritional Value
A single 2″x2″ bar (1/12th of batch) delivers approximately:
- Calories: 195 kcal
- Total Fat: 11 g (1.5 g saturated)
- Carbohydrates: 21 g (13 g sugars, 2 g fiber)
- Protein: 5 g
- Sodium: 95 mg
Functional Benefits:
- No Raw Eggs or Untreated Flour: Eliminates risk of Salmonella and E. coli—making it safe for pregnant individuals, young children, and immunocompromised persons.
- Natural Sweeteners Only: Maple syrup offers antioxidants (quebecol) and lower glycemic impact than refined sugar; brown sugar adds trace minerals (calcium, potassium).
- Heart-Healthy Fats: Monounsaturated fats from almond butter support cholesterol balance and sustained energy.
- Dietary Fiber Source: Oats provide beta-glucan—a soluble fiber proven to support gut microbiota diversity and postprandial glucose regulation.
- No Artificial Preservatives, Colors, or Flavors: Shelf life relies on natural antimicrobials (vanilla, salt) and refrigeration—not chemical additives.
Considerations: While nutrient-dense for a treat, these remain energy-concentrated. Those managing insulin resistance may prefer keto or low-glycemic variants. Always verify allergen labels on chocolate chips and nut butters. For nut allergies, sunflower seed butter is an excellent, widely tolerated alternative with comparable fat profile and binding capacity.
Ingredients
- 1 cup (250g) smooth, unsweetened almond butter (or sunflower seed butter for nut-free)
- ¾ cup (150g) packed light brown sugar
- ⅓ cup (80ml) pure maple syrup (Grade A Amber)
- 2 tsp pure vanilla extract
- ½ tsp fine sea salt
- 1 cup (120g) heat-treated all-purpose flour (see instructions above)
- 1 cup (90g) old-fashioned rolled oats (certified gluten-free if needed)
- 1 cup (175g) semi-sweet mini chocolate chips (dairy-free if desired)
- Optional: ¼ cup toasted chopped walnuts, 1 tbsp flaxseed meal, or 2 tbsp freeze-dried strawberry powder
Directions
- Line an 8×8-inch metal baking pan with parchment paper, leaving overhang on two sides. Lightly spray parchment with neutral oil spray. Place pan in freezer for 10 minutes.
- Preheat oven to 350°F. Spread flour evenly on rimmed baking sheet. Bake 5 minutes, stir, then bake 2 more minutes until fragrant and pale golden. Cool completely (≈20 minutes).
- In a medium heavy-bottomed saucepan, combine almond butter, brown sugar, maple syrup, vanilla, and salt. Warm over medium-low heat, stirring constantly, for 3–4 minutes until glossy, smooth, and bubbling gently at edges (215–220°F). Remove from heat.
- Whisk in cooled heat-treated flour and oats, ¼ cup at a time, until fully incorporated and mixture thickens to a matte, dough-like consistency. Let rest 2 minutes.
- Gently fold in chocolate chips and any optional add-ins until just combined.
- Transfer mixture to chilled pan. Press firmly and evenly using the back of an oiled measuring cup. Smooth top with oiled offset spatula. Optional: sprinkle with flaky sea salt.
- Refrigerate uncovered for at least 3 hours—or ideally 4–6 hours or overnight—for clean slicing.
- Lift slab using parchment overhang. Cut into 12 bars using a hot, sharp knife wiped between cuts. Store in airtight container in refrigerator for up to 2 weeks, or freeze for up to 3 months.
FAQ
- Can I make these gluten-free?
- Yes! Use certified gluten-free oats and substitute heat-treated all-purpose flour with ¾ cup heat-treated oat flour + ¼ cup almond flour. Ensure all other ingredients (chocolate, nut butter) are GF-certified.
- Why must I heat-treat the flour?
- Raw flour can harbor harmful bacteria like E. coli. Baking it to 350°F for 7 minutes kills pathogens while preserving functionality. Skipping this step compromises safety—even if you love raw dough, it’s not worth the risk.
- My bars turned out crumbly. What went wrong?
- Most likely causes: flour wasn’t fully cooled before mixing (melted fat), insufficient pressing, or under-chilling. Next time, cool flour completely, press for full 60 seconds, and chill minimum 4 hours.
- Can I use honey instead of maple syrup?
- Not recommended—honey crystallizes when chilled and can make bars gritty or overly firm. Agave is also unstable under heat. Stick with maple syrup for optimal texture and binding.
- How do I store them for travel or lunchboxes?
- Keep refrigerated in insulated lunchbox with ice pack for up to 8 hours. For longer trips, freeze bars solid, pack in vacuum-sealed bag, and thaw 20 minutes before eating.
- Can I double the batch?
- Absolutely—use a 9×13-inch pan and increase chilling time to 6–8 hours. Stirring larger batches requires longer cook time (add 1–2 minutes to stovetop step) to reach target temperature.
- Are these safe for kids?
- Yes—when made with heat-treated flour and no raw eggs, they’re widely considered safe for children. Always supervise young children with small, chewy foods to prevent choking.
- What if I don’t have a stove? Can I make these microwave-only?
- We strongly advise against it. Microwaves create hotspots, scorch sugar, and prevent proper emulsification. A stovetop is essential for texture and safety. If absolutely necessary, use 50% power in 30-second bursts, stirring vigorously between each—monitor closely and stop at 215°F.
Summary
No-Bake Cookie Dough Bars are a masterclass in mindful indulgence—transforming pantry staples into a safe, sliceable, endlessly adaptable dessert that satisfies deep cravings without compromise.
With science-backed steps, chef-level tips, and inclusive variations spanning keto to vegan to allergy-aware, this recipe isn’t just easy—it’s engineered for joy, nourishment, and real-world resilience.