Introduction
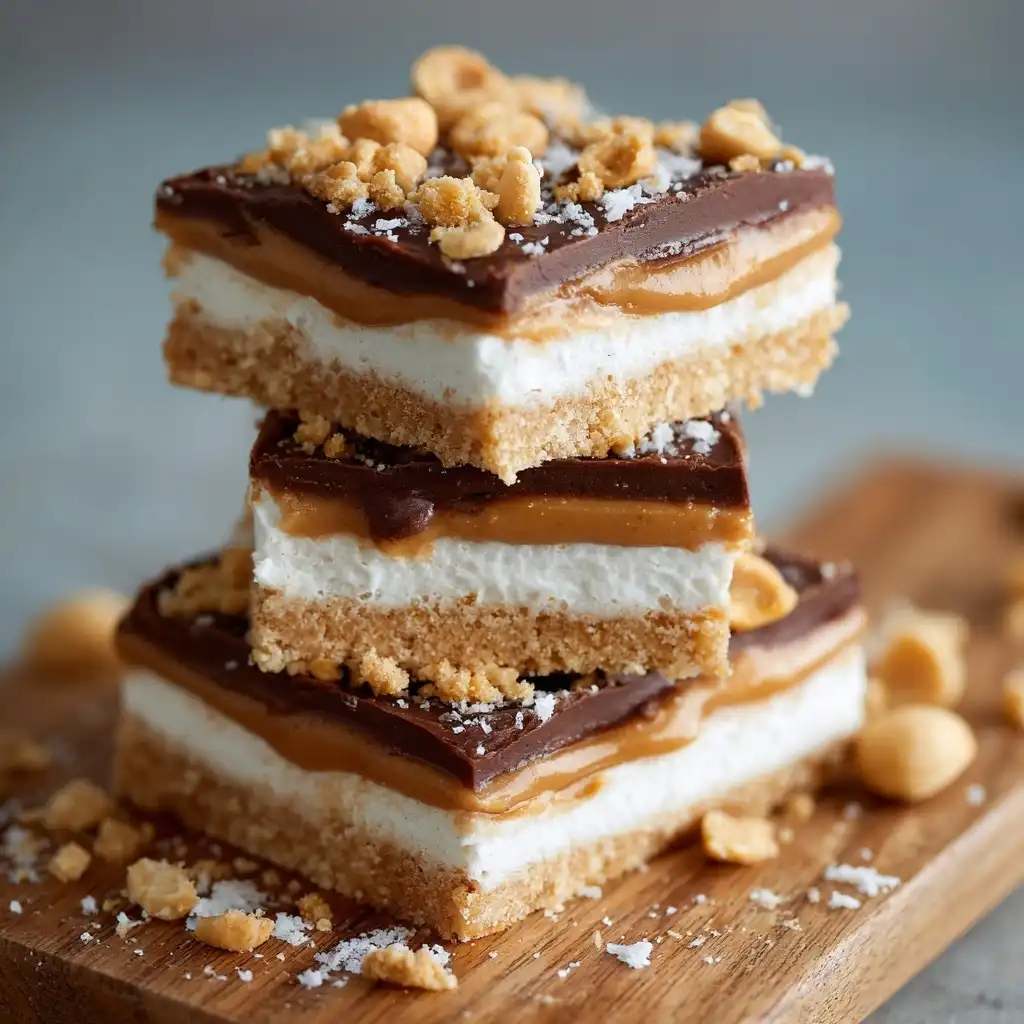
No-Bake Peanut Butter Bars are the quintessential pantry hero—rich, creamy, deeply satisfying, and astonishingly simple to make. With no oven required, no baking time to wait for, and minimal equipment needed (just a saucepan, mixing bowl, and 8×8 pan), these bars are ideal for last-minute gatherings, school lunches, meal prep, or when summer heat makes turning on the oven unthinkable. Their nostalgic flavor profile—nutty, sweet, slightly salty, and luxuriously chewy—evokes childhood lunchboxes and holiday dessert tables alike. Whether you’re a seasoned home baker or a complete beginner, this recipe delivers consistent, crowd-pleasing results every single time—no thermometer, no candy-making expertise, and no stress required.
The History
The origins of no-bake peanut butter bars trace back to mid-20th-century American home cooking, flourishing alongside the rise of convenience foods and iconic pantry staples like creamy peanut butter, graham crackers, and evaporated milk. While exact documentation is scarce, early versions appear in community cookbooks from the 1940s and 1950s—often titled “Peanut Butter Squares,” “No-Cook Fudge Bars,” or “Refrigerator Peanut Butter Delights.” These recipes emerged as practical responses to wartime rationing (where oven use was minimized to conserve fuel) and later evolved into beloved potluck staples during the postwar suburban boom. The foundational technique—melting peanut butter with sugar and butter, then binding with crushed graham crackers or cereal—was adapted endlessly: some versions leaned into fudgy richness using cocoa and powdered sugar; others embraced crunch with Rice Krispies or oats. By the 1970s, variations appeared in national publications like Good Housekeeping and Woman’s Day, cementing their status as an American classic. Today, they remain a viral favorite on food blogs and TikTok, continually reinvented with modern twists—keto-friendly swaps, vegan adaptations, protein-boosted iterations—but always honoring their humble, no-fuss roots.
Ingredients Breakdown
Every ingredient in this No-Bake Peanut Butter Bars recipe serves a precise functional and sensory role—understanding why each one matters helps you troubleshoot, substitute confidently, and elevate your results:
- Creamy Peanut Butter (1 cup): The star and structural backbone. Use a natural-style peanut butter with just peanuts and salt (oil separation is fine—you’ll stir it in)—avoid “no-stir” varieties with added hydrogenated oils or excessive sugar, which can lead to greasiness or graininess. Natural peanut butter provides optimal emulsification, rich flavor, and proper binding power. Crunchy peanut butter may be used for texture contrast, but reduce total mix-ins slightly to maintain bar integrity.
- Unsalted Butter (½ cup / 1 stick): Adds richness, smooth mouthfeel, and helps melt and emulsify the sugar mixture. Unsalted allows full control over sodium levels. Salted butter can be substituted, but reduce added salt by ¼ tsp.
- Granulated Sugar (1 cup): Not just for sweetness—it’s essential for texture development. When heated with butter and peanut butter, sugar dissolves into a thick, glossy syrup that cools into a firm-yet-chewy matrix. Brown sugar may be used for deeper molasses notes and extra chew, but expect softer bars and slightly darker color.
- Evaporated Milk (⅓ cup): A game-changing ingredient. Its concentrated lactose and reduced water content allow it to withstand high heat without curdling, while contributing creaminess, subtle caramel notes, and improved shelf stability. Regular whole milk will cause separation and prevent proper setting—do not substitute. Coconut milk (canned, full-fat, well-shaken) works as a dairy-free alternative but yields a looser set and distinct flavor.
- Vanilla Extract (1 tsp): Enhances aroma and rounds out the nuttiness. Use pure vanilla—not imitation—for best depth. For a warm twist, add ¼ tsp ground cinnamon or a pinch of cayenne.
- Salt (¼ tsp): Critical for balancing sweetness and amplifying peanut flavor. Fine sea salt or kosher salt recommended. Omit only if using salted peanut butter and salted butter together.
- Graham Cracker Crumbs (1½ cups, about 12 full sheets): Provides structure, subtle honeyed sweetness, and tender crumb. Pulse in a food processor until fine—no large shards. Digestive biscuits, vanilla wafers, or even lightly toasted oat flour offer excellent gluten-free or lower-sugar alternatives. For extra crunch, reserve 2 tbsp of coarse crumbs to press on top before chilling.
- Optional Add-Ins (½–¾ cup total): Chocolate chips (semisweet, dark, or white), roasted peanuts, mini marshmallows, dried cherries, flaky sea salt, or shredded coconut. Fold in *after* the hot mixture has cooled slightly (about 2 minutes off heat) to prevent melting or sinking.
Step-by-Step Recipe
- Prepare Your Pan: Line an 8×8-inch metal baking pan with parchment paper, leaving 2-inch overhang on two opposite sides for easy lifting. Lightly grease the parchment with butter or nonstick spray. Set aside.
- Crush the Graham Crackers: Place graham crackers in a zip-top bag and crush with a rolling pin until fine crumbs form (or use a food processor). Measure exactly 1½ cups—do not pack. Transfer to a medium bowl and set aside.
- Combine Wet Ingredients: In a heavy-bottomed, medium saucepan (stainless steel or enameled cast iron preferred), combine peanut butter, butter, granulated sugar, and evaporated milk. Stir well to combine before heating.
- Cook to Soft-Ball Stage: Place saucepan over medium-low heat. Stir constantly with a heat-resistant spatula or wooden spoon—scraping the bottom and corners—to prevent scorching. Bring mixture to a gentle, steady boil. Once boiling, continue stirring for exactly 4 minutes. Do not rush—this timing ensures proper sugar dissolution and syrup development. The mixture will thicken noticeably, turn slightly lighter in color, and bubble more slowly. It should reach ~235°F (soft-ball stage) if using a candy thermometer—but timing is more reliable for home kitchens.
- Remove from Heat & Flavor: Immediately remove saucepan from burner. Stir in vanilla extract and salt until fully incorporated.
- Cool Slightly: Let mixture rest undisturbed for 2 minutes—this slight cooling prevents the graham cracker crumbs from becoming pasty or disintegrating upon mixing.
- Combine & Mix: Pour hot peanut butter mixture over graham cracker crumbs. Using a sturdy spatula, fold gently but thoroughly until all crumbs are evenly coated and no dry pockets remain. If adding mix-ins (chocolate chips, nuts, etc.), fold them in now.
- Press Into Pan: Transfer mixture to prepared pan. Use the back of a greased measuring cup or spatula to press down *firmly* and evenly—this compaction is vital for clean cuts and bar cohesion. Smooth the top meticulously.
- Chill Thoroughly: Refrigerate uncovered for at least 3 hours—or preferably overnight—for optimal firmness and clean slicing. Do not freeze unless storing long-term (see Tips).
- Cut & Serve: Use parchment overhang to lift entire slab from pan. Place on cutting board. With a sharp knife dipped in hot water and wiped dry between cuts, slice into 16 squares (4×4 grid) or 12 rectangles. Wipe knife frequently for pristine edges.
Tips
- Thermometer Tip: While not required, a digital candy thermometer adds precision. Target 234–236°F (soft-ball stage). Below 230°F = sticky, under-set bars. Above 240°F = overly firm, potentially crumbly texture.
- Stirring Is Non-Negotiable: Constant, vigorous stirring prevents hot spots and sugar crystallization. Pause only to check consistency—not to multitask!
- Pan Choice Matters: Use metal (not glass or ceramic) for even, rapid heating and cooling. Dark metal pans may require reducing heat to low after initial boil.
- Chilling Time Is Sacred: Rushing this step leads to crumbling, smearing, or bars that won’t hold shape. Overnight chilling yields the cleanest cuts and most luxurious texture.
- Cutting Technique: For flawless edges: chill knife in freezer 5 minutes before cutting, dip in hot water, wipe dry, cut firmly downward (no sawing), and repeat. A bench scraper also works beautifully.
- Storage Wisdom: Store cut bars in an airtight container with parchment between layers. Refrigerate up to 10 days. For longer storage, freeze layered in freezer-safe container up to 3 months—thaw in fridge 30 minutes before serving.
- Humidity Hack: On humid days, add 1 tbsp powdered sugar to the crumb mixture before folding in hot syrup—absorbs excess moisture and improves set.
- Rescue a Runny Batch: If mixture seems too thin after mixing, return to saucepan and simmer 30–60 seconds longer, stirring constantly—then re-press and re-chill.
- Grease Strategy: Lightly grease parchment—not the pan itself—to avoid slippage while pressing.
- Batch Scaling: This recipe doubles reliably in a 9×13 pan (increase chill time to 4+ hours). Halving is not recommended—smaller volumes heat unevenly.
Variations and Customizations
This base formula is a canvas for endless creativity—each variation maintains structural integrity while offering new dimensions of flavor, texture, and dietary alignment:
- Chocolate Peanut Butter Bars: Stir ½ cup unsweetened cocoa powder into graham cracker crumbs before mixing. Top with melted chocolate ganache (½ cup heavy cream + 1 cup chopped dark chocolate, warmed and stirred until smooth) before chilling.
- Protein-Packed Bars: Replace ¼ cup sugar with unflavored or vanilla whey or plant-based protein powder. Add 2 tbsp chia or flax seeds for binding and omega-3s.
- Vegan Version: Use certified vegan peanut butter (no honey), vegan butter (e.g., Miyoko’s or Earth Balance), full-fat canned coconut milk (well-shaken), and vegan graham crackers. Ensure sugar is beet-derived or certified vegan.
- Keto/Low-Carb Bars: Swap granulated sugar for ¾ cup erythritol + ¼ tsp stevia glycerite blend. Use almond flour or crushed keto graham crackers (almond flour + psyllium husk + cinnamon + monk fruit). Add 2 tbsp MCT oil for satiety.
- Gluten-Free Bars: Use certified GF graham crackers or GF digestive biscuits. Double-check peanut butter and vanilla for hidden gluten.
- Sea Salt & Dark Chocolate: Press flaky sea salt onto bars immediately after spreading. Drizzle with melted 70% dark chocolate and sprinkle with crushed pretzel pieces for sweet-salty-crunchy contrast.
- Flourless Oat-Based Bars: Replace graham crackers with 1½ cups quick oats (toasted 5 min in skillet first for depth). Add 1 tbsp ground flaxseed for binding.
- Maple-Pecan Bars: Substitute ¼ cup pure maple syrup for ¼ cup sugar, reduce granulated sugar to ¾ cup, and fold in ½ cup toasted pecans and 1 tsp maple extract with vanilla.
- Spiced Chai Bars: Infuse evaporated milk with 1 tsp chai spice blend (cinnamon, cardamom, ginger, cloves, black pepper) over low heat for 5 minutes before straining and proceeding. Garnish with candied ginger.
- Mini Energy Bites Variation: Roll chilled mixture into 1-inch balls. Roll in unsweetened coconut, cocoa powder, or crushed freeze-dried strawberries. Refrigerate 1 hour before storing.
Health Considerations and Nutritional Value
Per standard serving (1 bar, 1/16th of recipe), approximate nutritional values are: 225–240 calories, 13–15g fat (3–4g saturated), 24–26g carbohydrates (18–20g sugars), 5–6g protein, 1–1.5g fiber, and 120–150mg sodium. While undeniably indulgent, thoughtful modifications can enhance nutritional merit without sacrificing enjoyment:
- Protein Power: Natural peanut butter contributes heart-healthy monounsaturated fats and ~4g protein per serving. Adding seeds (pumpkin, sunflower) or protein powder boosts satiety and muscle-supporting amino acids.
- Sugar Awareness: The granulated sugar provides necessary texture—but reducing by ¼ cup is feasible for many palates, especially when using naturally sweet add-ins like dried fruit or maple syrup.
- Fat Quality: Prioritize natural peanut butter with zero added oils or sugars. Avoid palm oil or hydrogenated fats common in commercial brands, which contribute to inflammation and less favorable lipid profiles.
- Whole Grain Option: Swapping graham crackers for whole-wheat or oat-based crumbs increases fiber (up to 2.5g per bar) and supports digestive health and glycemic balance.
- Allergen Notes: Contains peanuts, dairy (butter, evaporated milk), and gluten (graham crackers). Always verify labels for cross-contamination if severe allergy exists.
- Mindful Portioning: These bars are calorie-dense. Enjoying one as a balanced snack with fruit or yogurt—or as an occasional dessert—supports sustainable eating patterns.
- Not a “Health Food”—But a Health-Conscious Treat: Framing them as nutrient-enhanced treats rather than “guilt-free” avoids restrictive messaging. Their homemade nature means zero preservatives, artificial flavors, or unrecognizable ingredients—offering transparency and control unmatched by store-bought counterparts.
Ingredients
- 1 cup creamy natural peanut butter (just peanuts + salt)
- ½ cup (1 stick) unsalted butter
- 1 cup granulated sugar
- ⅓ cup canned evaporated milk
- 1 teaspoon pure vanilla extract
- ¼ teaspoon fine sea salt
- 1½ cups graham cracker crumbs (about 12 full 2.5″x2.5″ crackers, finely crushed)
- Optional: ½ cup semisweet chocolate chips, ¼ cup roasted peanuts, or 2 tablespoons flaky sea salt for garnish
Directions
- Line an 8×8-inch metal baking pan with parchment paper, leaving overhang on two sides. Lightly grease parchment.
- In a food processor or zip-top bag, crush graham crackers into fine crumbs. Measure 1½ cups; place in medium bowl.
- In a heavy-bottomed medium saucepan, combine peanut butter, butter, sugar, and evaporated milk. Stir to combine.
- Place over medium-low heat. Stir constantly until mixture reaches a gentle, steady boil.
- Once boiling, continue stirring for exactly 4 minutes—mixture will thicken, lighten slightly, and bubble more slowly.
- Remove from heat. Stir in vanilla and salt.
- Let stand 2 minutes (do not skip).
- Pour hot mixture over graham cracker crumbs. Fold gently but thoroughly until fully combined.
- If using add-ins, fold in now.
- Transfer to prepared pan. Press down *very firmly* with greased measuring cup or spatula until smooth and even.
- Refrigerate uncovered for at least 3 hours—or ideally overnight.
- Using parchment overhang, lift slab from pan. Cut into 16 squares with hot, wiped knife.
- Store refrigerated in airtight container up to 10 days.
FAQ
- Can I use crunchy peanut butter?
- Yes! Expect delightful textural contrast. Reduce optional add-ins (like extra nuts) by 1–2 tbsp to maintain density.
- Why did my bars turn out greasy or oily?
- Most commonly due to using “no-stir” peanut butter with added hydrogenated oils, or overheating the mixture past 240°F. Natural peanut butter + precise 4-minute simmer prevents this.
- Can I make these with almond or sunflower seed butter?
- Absolutely. Almond butter yields richer, slightly drier bars—add 1 extra tbsp evaporated milk. Sunflower seed butter works well for nut-free needs but may impart greenish tint (natural oxidation) and milder flavor.
- My bars crumbled when I cut them—what went wrong?
- Under-chilling is #1 cause. Also check: insufficient pressing, using a glass pan (slower cooling), or substituting regular milk (causes separation).
- Can I double this recipe?
- Yes—in a 9×13 pan. Maintain same cook time, but increase chilling to 4+ hours. Do not triple—heat distribution suffers.
- Are these safe for pregnant people or young children?
- Yes—no raw eggs or unpasteurized dairy. Evaporated milk is heat-treated; natural peanut butter is safe. Always consult your healthcare provider for personalized guidance.
- Can I use honey or maple syrup instead of sugar?
- Not directly—the sugar’s crystalline structure is critical for setting. Liquid sweeteners yield sticky, unset bars. See Maple-Pecan variation for tested substitution method.
- How do I prevent the chocolate topping from cracking?
- Let bars come to cool room temperature (10 min out of fridge) before drizzling. Use tempered chocolate or add 1 tsp coconut oil to melted chocolate for flexibility.
- Can I make these gluten-free?
- Easily—use certified gluten-free graham crackers or GF digestive biscuits. Verify peanut butter and vanilla are GF-certified.
- Why does the recipe specify “evaporated milk” instead of “sweetened condensed milk”?
- Sweetened condensed milk contains added sugar and is much thicker—using it would result in overly sweet, dense, caramelized bars with poor crumb adhesion. Evaporated milk provides ideal moisture balance and dairy richness without extra sugar.
Summary
No-Bake Peanut Butter Bars are a timeless, foolproof confection rooted in mid-century American ingenuity—requiring no oven, minimal tools, and delivering maximum flavor, texture, and nostalgia in every chewy, nutty, golden-brown square. With customizable ingredients, adaptable nutrition profiles, and endless creative variations, they remain as relevant and beloved today as they were in 1952—proving that simplicity, quality ingredients, and mindful technique will always bake (or rather, chill) the best memories.