Introduction
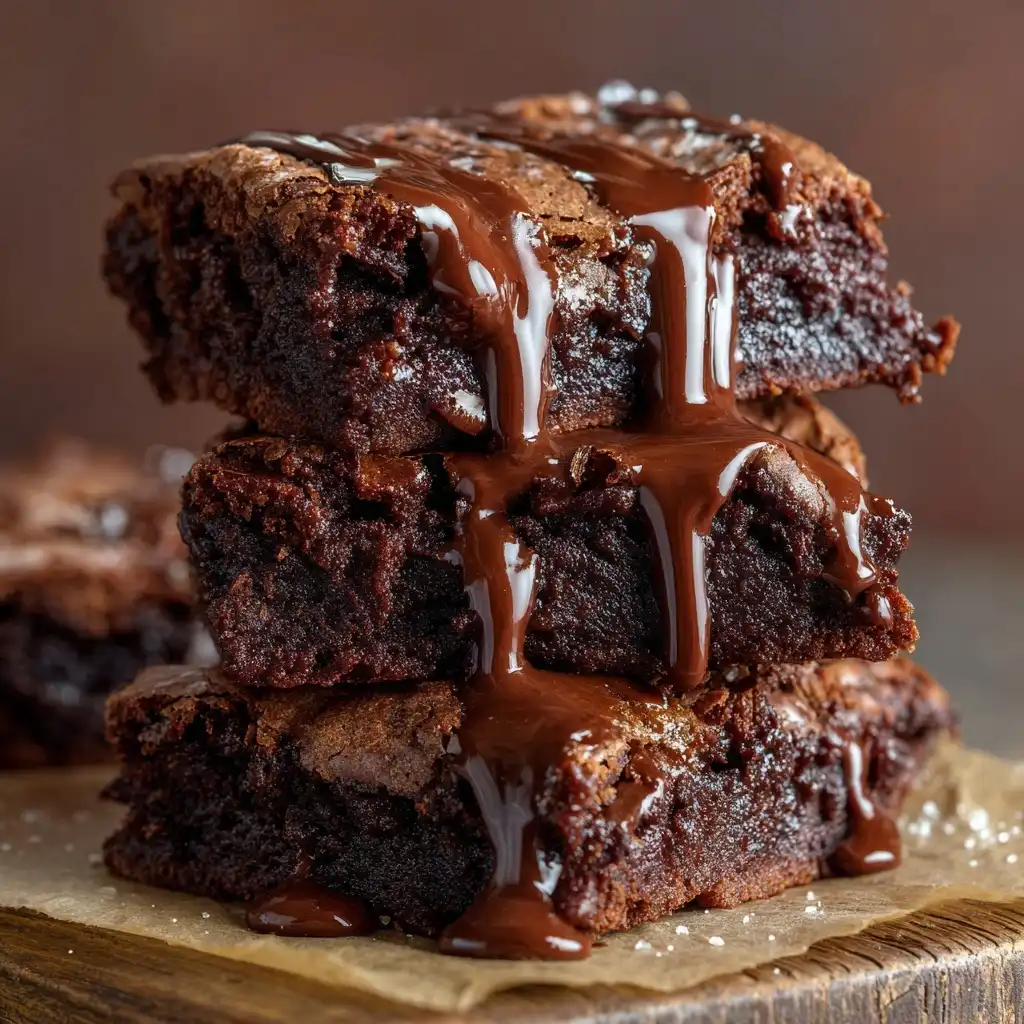
Gluten-free chocolate brownies are a decadent, deeply satisfying dessert that proves dietary restrictions need never compromise on flavor, texture, or indulgence. Whether you’re living with celiac disease, managing non-celiac gluten sensitivity, following a wheat-free lifestyle for digestive wellness, or simply choosing to reduce gluten intake for personal health reasons, these rich, fudgy, crackly-topped brownies deliver all the nostalgic joy of classic brownies—without a trace of gluten. Crafted with thoughtful ingredient substitutions and precise technique, this recipe is not just “safe”—it’s exceptional: intensely chocolatey, luxuriously moist, with a delicate crinkled crust and a melt-in-your-mouth center that rivals any traditional version. Designed for reliability and accessibility, it uses widely available gluten-free flours and avoids common pitfalls like grittiness, dryness, or gummy textures—making it perfect for home bakers, meal preppers, school-safe treats, holiday baking, and even professional gluten-free bakeries seeking a crowd-pleasing staple.
The History
The evolution of the gluten-free brownie mirrors the broader trajectory of gluten-free food culture—from medical necessity to mainstream culinary artistry. Brownies themselves emerged in the United States in the late 19th century, with early versions appearing in cookbooks like the 1896 Boston Cooking-School Cook Book by Fannie Farmer, though the iconic dense, fudgy iteration didn’t gain widespread popularity until the 1930s–1940s, aided by the rise of packaged cocoa and refined sugar. For decades, gluten-containing all-purpose flour was considered non-negotiable for structure and binding—especially in low-moisture, high-fat baked goods like brownies. The gluten-free adaptation lagged behind due to technological limitations: early gluten-free flours (such as rice or potato starch alone) lacked the protein matrix needed to retain moisture and create cohesive crumb, often yielding crumbly, sandy, or rubbery results. The real turning point arrived in the early 2000s with advances in grain science, the proliferation of certified gluten-free oats, and the development of balanced gluten-free flour blends—often combining brown rice flour for neutral flavor, tapioca or potato starch for chew and tenderness, and xanthan or guar gum for elasticity. Pioneering chefs like Shelley Case (author of Gluten-Free Diet: A Comprehensive Resource Guide) and brands like King Arthur Baking and Bob’s Red Mill helped standardize best practices, while social media and food blogs democratized testing, leading to iterative refinements in ratios, mixing methods, and add-ins. Today’s gluten-free brownie is a testament to decades of advocacy, innovation, and passionate home experimentation—transforming what was once an afterthought into a celebrated, scientifically informed, and emotionally resonant dessert experience.
Ingredients Breakdown
Every ingredient in this gluten-free chocolate brownie recipe serves a distinct functional and sensory purpose—no element is arbitrary. Understanding the “why” behind each component empowers bakers to troubleshoot, substitute confidently, and elevate their results:
- Gluten-Free All-Purpose Flour Blend (2 cups / 280g): A *certified* gluten-free 1:1 blend is essential—not just “gluten-free labeled” but third-party tested to <0.5 ppm gluten. We recommend blends containing brown rice flour, white rice flour, tapioca starch, and potato starch (e.g., King Arthur Measure-for-Measure, Bob’s Red Mill 1-to-1, or Pillsbury Gluten-Free). Avoid single-flour substitutes (like almond or coconut flour alone), which lack starch balance and cause dryness or density. Xanthan gum must be included in the blend—or added separately (¼ tsp) if your blend doesn’t contain it—to mimic gluten’s binding and elasticity.
- Unsweetened Natural Cocoa Powder (¾ cup / 75g): Use *natural* (non-alkalized) cocoa—not Dutch-process—for optimal leavening synergy with baking powder and brighter, more acidic chocolate notes that cut through richness. Sifted to prevent lumps and ensure even dispersion. High-fat cocoa (22–24% cocoa butter) adds depth; brands like Hershey’s Natural, Ghirardelli Unsweetened, or Frontier Co-op Organic are reliable.
- Granulated Sugar (1¾ cups / 350g): Provides sweetness, tenderness, and contributes to the signature shiny, crackly top. The large quantity also aids in caramelization during baking. For refined sugar–free options, organic cane sugar or coconut sugar may be used—but expect slightly darker color, molasses notes, and marginally drier texture.
- Brown Sugar (½ cup / 100g, packed): Adds moisture, acidity (from molasses), and complex caramel undertones. Light or dark brown both work; dark yields deeper flavor and slightly chewier texture. Do not omit—its hygroscopic nature is critical for fudginess.
- Large Eggs (3, room temperature): Act as emulsifiers, leaveners (trapping air when beaten), and structural agents. Room temperature ensures uniform batter integration and prevents fat separation. For egg-free: replace each egg with ¼ cup unsweetened applesauce + ½ tsp baking powder OR a commercial egg replacer (e.g., Bob’s Red Mill Egg Replacer); note texture will be denser and less glossy.
- Unsalted Butter (1 cup / 227g, melted and slightly cooled): Delivers unmatched richness, mouthfeel, and flakiness in the crust. Use high-fat (82%+) European-style butter if available. Vegan option: use refined coconut oil (solid at room temp) or high-quality dairy-free butter (e.g., Miyoko’s or Melt Organic)—avoid unrefined coconut oil for its strong flavor.
- Vanilla Extract (2 tsp, pure): Enhances chocolate aroma and rounds out bitterness. Mexican or Tahitian vanilla adds floral nuance; avoid imitation extract.
- Baking Powder (1 tsp, aluminum-free, gluten-free certified): Provides gentle lift without over-drying—critical since gluten-free batters lack natural elasticity. Aluminum-free prevents metallic aftertaste.
- Salt (1 tsp fine sea salt or kosher salt): Not just for seasoning: salt suppresses bitterness, amplifies sweetness, and strengthens protein networks in gluten-free flours for better crumb cohesion.
- Dark Chocolate Chips or Chunks (1 cup / 175g, 60–70% cacao): Folded in for melty pockets and textural contrast. Ensure chips are certified gluten-free (many mainstream brands contain barley grass or shared equipment risks—look for Enjoy Life, Guittard, or Pascha).
- Optional Add-Ins: Toasted walnuts or pecans (1 cup), espresso powder (1 tsp, enhances chocolate), flaky sea salt (sprinkled pre-bake), or orange zest (1 tbsp) for aromatic brightness.
Step-by-Step Recipe
- Preheat & Prep (10 minutes): Position oven rack to center position. Preheat oven to 325°F (163°C)—a lower temperature than traditional brownies prevents doming and promotes even fudgy baking. Grease a 9×13-inch metal baking pan *very thoroughly* with butter or non-stick spray, then line bottom and long sides with parchment paper, leaving 2-inch overhangs on two opposite sides for easy lifting. Dust parchment lightly with GF flour.
- Melt Butter & Chocolate Base (5 minutes): In a heatproof bowl set over a saucepan of barely simmering water (double boiler), melt butter. Remove from heat. Whisk in cocoa powder until smooth and lump-free (about 1 minute). Let cool to lukewarm (~105°F/40°C)—too hot will scramble eggs; too cold causes premature solidification.
- Cream Sugars & Eggs (3 minutes): In a separate large bowl, whisk granulated sugar, brown sugar, and salt until combined. Add eggs one at a time, whisking vigorously for 45–60 seconds after each addition until mixture is thick, pale, and forms a ribbon when drizzled from the whisk. This step incorporates air for lift and creates the glossy top. Stir in vanilla.
- Combine Wet & Dry (2 minutes): Gently fold warm cocoa-butter mixture into egg-sugar mixture using a silicone spatula—do not overmix; stop when no streaks remain. In a small bowl, whisk together GF flour blend, baking powder, and optional espresso powder. Sift this dry mixture over the wet batter. Using the spatula, fold *just until no dry patches remain*—approximately 12–15 strokes. Overmixing develops starch gelation, causing toughness.
- Fold in Mix-Ins (1 minute): Gently fold in chocolate chips and/or nuts until evenly distributed. Batter will be thick, glossy, and pourable—not runny.
- Pan & Bake (35–40 minutes): Pour batter into prepared pan, smoothing top with offset spatula. Tap pan firmly on counter twice to release air bubbles and level surface. Bake 35–40 minutes—start checking at 35 minutes. Brownies are done when edges are set and pull away slightly from pan, top is dry and crackly, and a toothpick inserted 1 inch from edge comes out with *moist crumbs* (not wet batter) and one clean in the center. Do *not* overbake—GF brownies continue cooking in residual heat.
- Cool & Set (2+ hours, non-negotiable): Place pan on a wire rack. Cool completely at room temperature—minimum 2 hours, ideally 3–4. This allows starches to fully hydrate and set; cutting too soon yields crumbly, sticky squares. For cleanest cuts, refrigerate uncovered for 1 hour before slicing with a sharp, hot knife (dip blade in hot water, wipe dry between cuts).
- Store (Up to 5 days): Keep in airtight container at room temperature for up to 3 days, or refrigerate for up to 5 days. Freeze unfrosted squares (wrapped individually in parchment + placed in freezer bag) for up to 3 months. Thaw at room temperature 30 minutes before serving.
Tips
- Measure by Weight: Always use a digital kitchen scale for GF flour—scooping introduces up to 30% excess flour, guaranteeing dryness. 280g = ideal hydration balance.
- Room Temperature is Key: Cold eggs or butter cause fat to seize and create lumpy, separated batter. Take ingredients out 1 hour ahead.
- Sift Everything: Sift cocoa, sugar (if lumpy), and GF flour blend *twice*—this aerates, removes clumps, and ensures uniform distribution of gums/starches.
- Don’t Skip the Cooling Time: This is the #1 reason for failed GF brownies. Cutting warm = mush. Patience yields fudgy integrity.
- Use Metal Pans: Glass or ceramic retains heat longer, increasing risk of overbaked edges. Heavy-gauge aluminum ensures even conduction.
- Check Your Oven Temp: An oven thermometer is indispensable—many ovens run 25°F+ off. Even 10°F variance alters set time dramatically.
- Rotate Pan Midway: If your oven has hot spots, rotate pan 180° at 20 minutes for uniform browning.
- For Extra Glossy Top: After pouring batter, gently tap pan on counter 10 times—this brings air bubbles to surface and encourages crust formation.
- Resist Overmixing: Once dry ingredients hit wet, switch to folding—and stop the *second* flour disappears. Overworked GF batter turns gummy.
- Altitude Adjustments: Above 3,000 ft: reduce sugar by 1 tbsp, increase liquid (add 1 tbsp milk or brewed coffee), and bake at 335°F for 30–35 min.
Variations and Customizations
This foundational recipe is endlessly adaptable—each variation maintains structural integrity while offering exciting new dimensions of flavor and texture:
- Blondie Twist: Omit cocoa powder and chocolate chips. Increase brown sugar to 1¼ cups and add 1 cup toasted pecans + 1 tsp cinnamon. Optional: swirl in ¼ cup dulce de leche before baking.
- Espresso Swirl: Dissolve 2 tsp instant espresso powder in 1 tbsp hot water. After pouring batter, drizzle espresso mixture over top and swirl gently with a knife for marbled effect.
- Peanut Butter Cup: After pouring batter, drop spoonfuls of creamy, certified GF peanut butter (e.g., Justin’s) over surface. Use a skewer to swirl. Top with chopped GF Reese’s Cups before baking.
- Orange-Cocoa: Add 1 tbsp finely grated orange zest + 1 tsp orange extract to batter. Garnish cooled brownies with candied orange peel and dark chocolate drizzle.
- Double Chocolate Mint: Replace ¼ cup cocoa with ¼ cup GF mint chip chocolate chips (e.g., Enjoy Life) + 1 tsp peppermint extract. Top with crushed GF Andes mints.
- Nut-Free School Safe: Omit nuts and chocolate chips. Stir in 1 cup sunflower seed butter + ½ cup mini GF marshmallows for chewy pockets.
- High-Protein Boost: Replace ¼ cup GF flour with ¼ cup unflavored whey or plant-based protein powder (pea/rice blend). Add 2 tbsp unsweetened almond milk to compensate for absorption.
- Vegan Decadence: Use flax eggs (3 tbsp ground flax + 9 tbsp water, rested 10 min), refined coconut oil, GF vegan chocolate, and maple syrup (reduce granulated sugar to 1¼ cups, add ¼ cup syrup).
- Gluten-Free + Grain-Free: Substitute GF flour blend with 1 cup almond flour + ½ cup coconut flour + ¼ cup tapioca starch + ½ tsp xanthan gum. Reduce butter to ¾ cup and add 2 tbsp applesauce for moisture.
- Lava Center: Press 1 tsp molten GF chocolate (melted with ½ tsp coconut oil) into center of each unbaked square before going into oven. Creates molten core when cut.
Health Considerations and Nutritional Value
While brownies are inherently a treat—not a health food—this gluten-free version offers thoughtful nutritional advantages and transparency for conscious consumers:
- Celiac-Safe Assurance: Every ingredient is verified certified gluten-free (<20 ppm), with rigorous attention to cross-contact prevention (e.g., dedicated GF facilities for chocolate, oats, and baking powder). Critical for those with autoimmune celiac disease where even trace exposure triggers intestinal damage.
- No Artificial Additives: Free of artificial colors, flavors, preservatives, or hydrogenated oils commonly found in commercial GF products—relying instead on whole-food sweeteners and natural fats.
- Reduced Refined Carbs (Optional): By using 70% dark chocolate and reducing granulated sugar by ¼ cup (replacing with erythritol or monk fruit blend), net carbs drop ~5g per serving—ideal for low-glycemic or diabetic-friendly adaptations (consult dietitian).
- Antioxidant-Rich Cocoa: Natural cocoa provides flavanols linked to improved endothelial function, reduced oxidative stress, and modest blood pressure support—especially potent when minimally processed and unsweetened.
- Nutrient Density Boosters: Easily enhanced with 2 tbsp ground flaxseed (omega-3s, fiber), ¼ cup unsweetened shredded coconut (MCTs), or ½ tsp spirulina powder (iron, B12) without compromising texture.
- Allergen Transparency: Naturally nut-free (unless add-ins used), soy-free (with soy-free chocolate), and dairy-free adaptable—making it suitable for multiple overlapping restrictions.
- Calorie & Macro Profile (per 2″x2″ square, ~16 servings): Approx. 215 kcal | 12g fat (7g sat) | 26g carbs (1g fiber, 19g sugars) | 2g protein | 115mg sodium. Values vary with substitutions—e.g., almond flour version adds 3g protein/serving; avocado oil swap reduces sat fat by 2g.
- Digestive Notes: GF brownies avoid gluten’s inflammatory effects for sensitive individuals, yet high sugar/fat content may trigger IBS symptoms in some. Pairing with probiotic-rich foods (e.g., yogurt) or digestive enzymes (e.g., alpha-galactosidase) can aid tolerance.
- Not Low-Fat or Low-Cal: Honesty matters—this is a nutrient-dense *indulgence*. Portion control and mindful eating enhance enjoyment without guilt.
Ingredients
- 2 cups (280g) certified gluten-free 1:1 all-purpose flour blend (with xanthan gum)
- ¾ cup (75g) unsweetened natural cocoa powder, sifted
- 1¾ cups (350g) granulated sugar
- ½ cup (100g) packed light or dark brown sugar
- 1 tsp fine sea salt
- 1 cup (227g) unsalted butter, melted and slightly cooled
- 3 large eggs, room temperature
- 2 tsp pure vanilla extract
- 1 tsp aluminum-free gluten-free baking powder
- 1 cup (175g) certified gluten-free dark chocolate chips or chunks (60–70% cacao)
- Optional: 1 cup toasted walnuts or pecans, 1 tsp espresso powder, flaky sea salt for garnish
Directions
- Preheat oven to 325°F (163°C). Grease a 9×13-inch metal baking pan and line with parchment paper, leaving overhangs on two sides.
- In a heatproof bowl over simmering water, melt butter. Remove from heat; whisk in cocoa until smooth. Cool to lukewarm (~105°F/40°C).
- In a large bowl, whisk sugars and salt. Add eggs one at a time, whisking 45–60 seconds after each until thick and pale. Whisk in vanilla.
- Fold warm cocoa-butter mixture into egg mixture until combined. Sift together GF flour, baking powder, and espresso (if using); fold into wet ingredients until *just* incorporated.
- Gently fold in chocolate chips and/or nuts.
- Pour into prepared pan. Tap pan firmly on counter twice. Bake 35–40 minutes, until edges are set and toothpick near edge has moist crumbs.
- Cool completely in pan on wire rack—minimum 2 hours. Lift out using parchment. Slice with hot, clean knife.
- Store airtight at room temperature up to 3 days or refrigerate up to 5 days.
FAQ
- Why did my brownies turn out dry or crumbly?
- Most commonly caused by: (1) Overmeasuring flour (use a scale!), (2) Overbaking (pull them out when edges are set but center still jiggles slightly), (3) Using a GF blend without xanthan gum or adding insufficient binder, or (4) Skipping the brown sugar—which adds vital moisture and acidity.
- Can I use oat flour instead of a GF blend?
- Oat flour alone lacks starch balance and protein structure, resulting in dense, gummy, or crumbly brownies. If using oats, combine 1 cup certified GF oat flour + ½ cup tapioca starch + ¼ tsp xanthan gum—but a tested 1:1 blend remains more reliable.
- Are these safe for severe celiac disease?
- Yes—if *every* ingredient bears certified gluten-free labeling (GFCO, NSF, or CSA logos) and you follow strict prep protocols (clean utensils, dedicated GF toaster/pans, no shared scoops). Cross-contact is the #1 risk—not the recipe itself.
- Can I make these dairy-free?
- Absolutely. Substitute butter with an equal amount of refined coconut oil or high-fat dairy-free butter. Use dairy-free chocolate chips. Ensure vanilla is alcohol-based (not glycerin-based, which sometimes contains gluten).
- My batter looks too thick/thin—what do I do?
- Thickness varies by humidity and flour brand. Ideal batter coats the spatula and drops slowly. If too thick, add 1 tsp warm water or brewed coffee. If too thin, add 1 tbsp GF flour—then recheck. Never add more than 2 tbsp total.
- Can I double the recipe?
- Yes—but bake in two separate 9×13 pans (not one larger pan). Doubling in one pan leads to uneven baking, undercooked centers, or cracked surfaces. Adjust time by +2–3 minutes.
- Why do I need to cool them so long? Can’t I speed it up?
- GF starches (especially rice and tapioca) undergo retrogradation—re-crystallizing and setting—as they cool. Rushing with refrigeration *before* initial cooling causes condensation and sogginess. The full 2-hour ambient cool is irreplaceable for clean cuts and fudgy texture.
- Can I add protein powder?
- Yes—but limit to ¼ cup unflavored whey or plant-based isolate. Add 1–2 tbsp extra liquid (milk or water) and reduce flour by 2 tbsp to prevent chalkiness. Expect slightly denser crumb.
- What’s the best way to store leftovers?
- Room temperature in airtight container with parchment between layers prevents sticking and preserves texture for 3 days. Refrigeration extends freshness to 5 days but firms texture slightly—bring to room temp 20 minutes before serving.
- Can I bake these in muffin tins for brownie bites?
- Yes! Line a 12-cup muffin tin with GF parchment liners. Fill ⅔ full. Bake at 325°F for 18–22 minutes. Cool in pan 10 minutes, then transfer to rack. Yields ~18–20 bite-sized brownies.
Summary
These gluten-free chocolate brownies deliver restaurant-quality fudginess, a glossy crackly top, and deep, nuanced chocolate flavor—all while meeting the strictest celiac safety standards through certified ingredients and meticulous technique. With foolproof steps, customizable variations, and nutritionally mindful options, they redefine what’s possible in gluten-free baking—proving that restriction need never mean compromise.
Whether you’re newly diagnosed, baking for loved ones with sensitivities, or simply seeking a more intentional, flavorful dessert experience, this recipe is your foundation for confidence, creativity, and pure, unapologetic chocolate joy.