Introduction
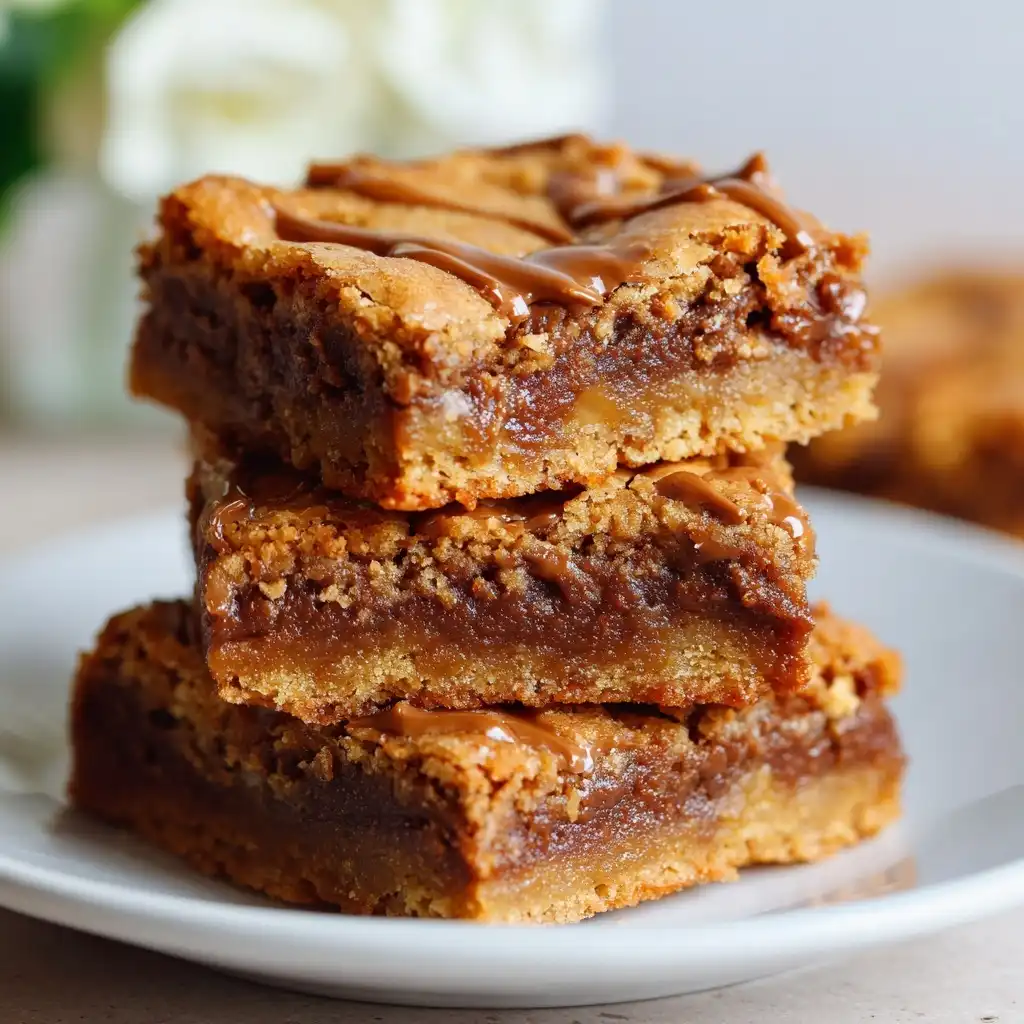
Peanut Butter Blondie Bars are the rich, chewy, nutty cousin of classic brownies—minus the chocolate and bursting with the deep, roasted essence of creamy (or crunchy) peanut butter. Unlike their cocoa-laden counterparts, blondies rely on brown sugar, butter, and vanilla for caramelized depth, while peanut butter adds a luscious, savory-sweet complexity that satisfies both dessert lovers and snack seekers alike. These bars strike the perfect balance between tender crumb and fudgy density—golden-brown at the edges, slightly soft in the center, and studded with optional add-ins like chocolate chips, roasted peanuts, or sea salt flakes. Whether served warm with a scoop of vanilla ice cream or packed into lunchboxes for an energy-boosting treat, Peanut Butter Blondie Bars embody comforting simplicity elevated by bold, nostalgic flavor.
The History
Blondies trace their origins to late 19th- and early 20th-century American home baking—a natural evolution of the brownie, which itself emerged around the 1890s as a dense, cake-like confection bridging cookies and cakes. While the first documented brownie recipe appeared in the 1896 edition of Fannie Farmer’s Boston Cooking-School Cookbook, the “blondie” (originally called “brownie without chocolate” or “butterscotch brownies”) gained traction in the 1920s and 1930s, especially as brown sugar became more widely available and affordable. Early versions often featured butterscotch chips or walnuts, capitalizing on pantry staples and regional preferences. Peanut butter entered the blondie lexicon shortly after its mass commercialization in the 1920s—thanks to brands like Skippy (launched 1932) and Jif (1956)—and quickly became a beloved variation due to its affordability, shelf stability, and crowd-pleasing profile. By the 1950s, community cookbooks, women’s magazines like Good Housekeeping and Ladies’ Home Journal, and corporate recipe pamphlets from peanut butter manufacturers began publishing dedicated “peanut butter blondie” variations—often touting them as “no-fail,” “kid-approved,” and “perfect for potlucks.” Over decades, the recipe has evolved with cultural shifts: the rise of natural food movements spurred whole-grain and reduced-sugar adaptations; gluten-free and vegan iterations exploded in the 2010s; and today’s social media-driven baking culture celebrates visually striking versions—swirled with melted peanut butter and chocolate, topped with caramel drizzle and pretzel crunch, or baked in mini-muffin tins for portion-controlled indulgence. Yet at its core, the Peanut Butter Blondie Bar remains a timeless testament to American ingenuity—transforming humble ingredients into something deeply satisfying, warmly familiar, and endlessly adaptable.
Ingredients Breakdown
Understanding each ingredient’s functional role is key to mastering texture, flavor balance, and structural integrity in Peanut Butter Blondie Bars:
- Unsalted Butter (1 cup / 2 sticks / 227g): Provides richness, moisture, and tenderness. Melted butter encourages denser, fudgier bars; softened butter yields a slightly cakier crumb. Unsalted ensures precise sodium control—especially important when pairing with salty peanut butter or toppings.
- Firmly Packed Light Brown Sugar (1 ½ cups / 300g): The backbone of blondie flavor. Molasses content contributes moisture, acidity (which activates baking soda), and deep caramel notes. Dark brown sugar intensifies molasses flavor and increases chewiness; light brown offers milder sweetness and slightly more lift.
- Granulated Sugar (½ cup / 100g): Adds sweetness and aids in crisp edge formation. Its finer crystals dissolve more readily than brown sugar alone, contributing to even browning and a delicate crust.
- Creamy Peanut Butter (1 cup / 250g): Use a standard shelf-stable brand (e.g., Jif, Skippy, Peter Pan) for consistent emulsification and structure. Natural peanut butter (oil-separated, no added sugar or hydrogenated oils) can cause greasiness, dryness, or separation—unless carefully stabilized with extra flour or cornstarch. The peanut butter contributes fat, protein, and signature nuttiness; it also acts as a partial binder and flavor amplifier.
- Large Eggs (2, room temperature): Provide structure, leavening (via steam and air incorporation), and emulsification. Room temperature eggs blend more smoothly into the batter, preventing curdling and ensuring uniform texture.
- Pure Vanilla Extract (2 tsp): Enhances aromatic complexity and rounds out peanut butter’s earthiness. Imitation vanilla lacks depth and can taste artificial when paired with bold flavors.
- All-Purpose Flour (1 ¼ cups / 160g): The primary structural agent. Too little leads to spread and greasiness; too much yields toughness. Spoon-and-level measuring is critical—never scoop directly from the bag. For gluten-free versions, a 1:1 certified GF blend (with xanthan gum) works best.
- Baking Soda (½ tsp): Reacts with brown sugar’s molasses (an acid) to produce carbon dioxide, providing subtle lift and promoting browning. Omitting it results in overly dense, flat bars with muted color.
- Fine Sea Salt (1 tsp): Balances sweetness and amplifies all other flavors. Coarse salt may not dissolve fully; kosher salt varies in volume—use fine sea salt for consistency.
- Optional Add-Ins: Chocolate chips (semisweet or milk), roasted peanuts (unsalted or lightly salted), peanut butter chips, toffee bits, flaky sea salt for finishing, or a swirl of warmed peanut butter or caramel sauce.
Step-by-Step Recipe
- Preheat & Prep: Position oven rack in the center. Preheat oven to 350°F (177°C). Grease a 9×13-inch metal baking pan *thoroughly* with butter or non-stick spray, then line with parchment paper, leaving 2-inch overhang on two opposite sides for easy lifting. This step is non-negotiable for clean removal and clean slicing.
- Melt Butter & Cool Slightly: In a medium heavy-bottomed saucepan or heatproof bowl set over simmering water (double boiler method), melt butter completely. Remove from heat and let cool just until warm to the touch (about 110–120°F / 43–49°C)—too hot, and it will cook the eggs; too cold, and the peanut butter won’t incorporate smoothly.
- Whisk Wet Ingredients: Into a large heatproof bowl, combine the warm melted butter, brown sugar, granulated sugar, and creamy peanut butter. Whisk vigorously by hand for 2–3 minutes until fully blended, glossy, and slightly thickened. This step aerates the mixture slightly and begins dissolving the sugars—critical for texture and sheen.
- Incorporate Eggs & Vanilla: Add eggs one at a time, whisking thoroughly after each addition until fully emulsified and smooth (about 30 seconds per egg). Whisk in vanilla extract until incorporated. Batter should be cohesive, not broken or separated.
- Dry Ingredients Integration: In a separate medium bowl, whisk together flour, baking soda, and salt until uniformly distributed. Sift if lumps are present. Gradually add the dry mixture to the wet ingredients in three additions, folding gently with a silicone spatula *just until no streaks remain*. Overmixing develops gluten, resulting in tough, rubbery bars. A few small flour pockets are preferable to overworking.
- Fold in Add-Ins (Optional): If using chocolate chips, roasted peanuts, or toffee bits, fold them in gently now—do not overfold. Reserve a small handful of peanuts or chocolate for topping, if desired.
- Pan & Smooth: Pour batter into the prepared pan. Use an offset spatula or the back of a spoon to spread evenly into corners. Tap pan firmly on counter 3–4 times to release air bubbles and encourage even settling.
- Bake with Precision: Bake for 28–34 minutes. Begin checking at 28 minutes: bars are done when the edges are deeply golden and pull slightly away from the pan, the center appears set (no visible jiggle when gently shaken), and a toothpick inserted 1 inch from the edge comes out with *moist crumbs* (not wet batter) — but *clean* when inserted in the very center. Overbaking leads to dry, crumbly bars; underbaking yields greasy, unstructured slabs. Rotating the pan halfway through ensures even baking in most home ovens.
- Cool Completely (Crucial Step): Place pan on a wire rack and cool *undisturbed* for a full 2 hours at room temperature. This allows residual heat to finish cooking the center gently and enables starches and proteins to fully set. Rushing this step guarantees crumbling upon cutting.
- Chill for Clean Cuts (Optional but Recommended): For ultra-sharp, professional-looking squares, refrigerate cooled bars (still in pan) for 1–2 hours before slicing. Cold bars hold their shape better and yield cleaner edges.
- Cut & Serve: Using a sharp chef’s knife wiped clean between cuts, slice into 16 (4×4) or 24 (4×6) bars. Wipe knife with warm water and dry between each cut for pristine edges. Serve at room temperature or slightly warmed.
Tips
- Measure Like a Pro: Use the spoon-and-level method for flour—fluff flour in bag, spoon into measuring cup, level with straight edge. Never scoop! A kitchen scale is ideal: 160g AP flour = perfect accuracy.
- Peanut Butter Consistency Matters: If using natural peanut butter, stir well, then warm gently (10–15 sec in microwave) and mix in 1 tbsp melted coconut oil or neutral oil to restore emulsion. Alternatively, add 1 tsp cornstarch to dry ingredients to absorb excess oil.
- Room Temperature Eggs Are Non-Negotiable: Cold eggs can cause the warm butter–sugar–peanut butter mixture to seize or separate. To warm quickly, place eggs in warm (not hot) water for 5 minutes.
- Don’t Skip the Parchment Overhang: It’s the single biggest factor in stress-free removal. Grease the pan *first*, then line—this prevents sliding.
- Understand Your Oven: Many home ovens run hot or cold. Use an independent oven thermometer. If bars brown too fast on top but stay raw underneath, tent loosely with foil after 20 minutes.
- Rotate for Even Baking: At the 15-minute mark, rotate pan 180° front-to-back for consistent edge development.
- Patience Pays Off: Cutting before full cooling is the #1 cause of crumbling. Set a timer—it’s worth the wait.
- Storage Hack for Freshness: Keep bars airtight at room temperature for up to 3 days. For longer storage, freeze unfrosted bars individually wrapped in plastic + placed in freezer bag for up to 3 months. Thaw at room temperature for 30 minutes.
- Revive Stale Bars: Briefly microwave individual bars (10–15 sec) or warm in a 300°F oven for 5 minutes—they’ll regain chewy softness and aroma.
- Double Batch Smartly: You can easily double the recipe—but bake in two separate pans. Doubling in one pan leads to uneven baking and potential sinking.
Variations and Customizations
The beauty of Peanut Butter Blondie Bars lies in their chameleon-like adaptability. Here are meticulously tested, bakery-worthy variations—each with specific adjustments to maintain structural integrity and flavor harmony:
- Chocolate-Peanut Butter Swirl: After pouring batter into pan, dollop ½ cup melted semisweet chocolate over surface. Use a butter knife to gently swirl in figure-eights—not overmixed. Add flaky salt before baking.
- Crunchy Peanut Power: Replace ¼ cup of the creamy peanut butter with ½ cup finely chopped *roasted, unsalted peanuts*. Fold in an additional ⅓ cup whole roasted peanuts for textural contrast.
- Maple-Peanut Butter Bliss: Substitute ¼ cup of the brown sugar with pure maple syrup (reduce butter by 1 tbsp to compensate for added liquid). Add 1 tsp maple extract with vanilla. Top with candied pecans pre-baking.
- Salted Caramel Peanut Butter: Layer ⅓ cup thick, high-quality salted caramel sauce (cooled) over batter before baking. Drizzle additional caramel and sprinkle flaky salt over warm bars post-bake.
- Oatmeal Peanut Butter Chew: Reduce flour to 1 cup and add ¾ cup old-fashioned rolled oats (not instant). Soak oats in 2 tbsp warm milk for 5 minutes before folding in—adds hearty, chewy texture and fiber.
- Vegan Peanut Butter Blondies: Replace butter with refined coconut oil (1 cup, melted); eggs with flax eggs (2 tbsp ground flax + 6 tbsp water, rested 10 min); use maple syrup or coconut sugar (adjust liquid accordingly); ensure peanut butter is vegan (no honey). Add ½ tsp apple cider vinegar for lift.
- Gluten-Free Peanut Butter Blondies: Use 1:1 gluten-free all-purpose flour blend containing xanthan gum (e.g., King Arthur or Bob’s Red Mill). Add ¼ tsp xanthan gum if blend doesn’t include it. Let batter rest 15 minutes before baking for optimal hydration.
- Protein-Packed Peanut Butter Bars: Add ¼ cup unflavored or vanilla whey or plant-based protein powder. Reduce flour by 2 tbsp to prevent dryness. Increase peanut butter to 1¼ cups for binding and richness.
- Mini Blondie Bites: Line a standard muffin tin with paper liners. Fill ⅔ full. Bake at 350°F for 14–17 minutes. Cool 10 minutes in pan, then transfer to rack. Perfect for parties or portion control.
- Boozy Peanut Butter Delight: Add 2 tbsp bourbon or dark rum with vanilla. Soak ¼ cup chopped dates in the liquor for 10 minutes, then fold in with batter. Deepens complexity and adds subtle fruit notes.
Health Considerations and Nutritional Value
While Peanut Butter Blondie Bars are undeniably indulgent, mindful ingredient choices and portion awareness allow them to fit thoughtfully into balanced eating patterns. Below is a detailed nutritional analysis per standard 2×2-inch bar (based on the base recipe, 16 servings), along with science-informed considerations:
- Calories & Macronutrients: ~245 kcal per bar | 13g fat (3g saturated) | 30g carbohydrates (23g sugars, 1g fiber) | 4g protein. The majority of fat comes from heart-healthy monounsaturated fats in peanut butter and butter, supporting satiety and nutrient absorption.
- Sugar Awareness: Total sugars are moderate for a dessert (~23g), primarily from brown and granulated sugar. To reduce added sugar by 25%, replace ¼ cup brown sugar with mashed ripe banana (add 1 tsp lemon juice to balance pH) and reduce butter by 1 tbsp.
- Protein Boost: Natural peanut butter provides ~4g protein per 2-tbsp serving. Enhancing with roasted peanuts (+2g/bar) or protein powder (+3–4g/bar) improves post-consumption satiety and blood sugar response.
- Fiber Opportunities: Base recipe is low in fiber (1g). Adding 2 tbsp ground flaxseed or 3 tbsp oat bran increases soluble fiber by 2–3g—supporting digestive health and gentle glucose modulation.
- Sodium Context: ~180mg sodium per bar—well within daily limits (<2,300mg). Opt for low-sodium peanut butter and omit optional finishing salt if managing hypertension.
- Gluten Considerations: Naturally gluten-free ingredients make adaptation straightforward—just verify all labels (oats, baking soda, peanut butter) for certified GF status if serving those with celiac disease.
- Allergen Alert: Contains tree nut allergen warnings only if using almond or cashew butter variants. Standard peanut butter bars carry a clear peanut allergen declaration—essential for school or shared environments.
- Glycemic Impact: Medium-high glycemic load due to refined sugars. Pairing with Greek yogurt, berries, or a handful of almonds lowers overall meal glycemic impact and extends energy release.
- Functional Ingredient Upgrades: Swap 2 tbsp butter for avocado oil (rich in vitamin E); use coconut sugar (lower GI); add cinnamon (supports insulin sensitivity); or stir in 1 tsp matcha powder (antioxidants).
- Mindful Indulgence Framework: Enjoy 1 bar mindfully—served alongside a green salad or fresh fruit—to transform it from a standalone treat into part of a nutritionally rounded experience. Frequency matters more than perfection: 1–2x/week fits comfortably within most healthy dietary patterns.
Ingredients
- 1 cup (227g / 2 sticks) unsalted butter
- 1 ½ cups (300g) firmly packed light brown sugar
- ½ cup (100g) granulated sugar
- 1 cup (250g) creamy, shelf-stable peanut butter (e.g., Jif or Skippy)
- 2 large eggs, room temperature
- 2 teaspoons pure vanilla extract
- 1 ¼ cups (160g) all-purpose flour, spooned & leveled
- ½ teaspoon baking soda
- 1 teaspoon fine sea salt
- Optional Add-Ins: ¾ cup semisweet chocolate chips, ½ cup roasted unsalted peanuts, flaky sea salt for finishing
Directions
- Preheat oven to 350°F (177°C). Grease a 9×13-inch metal baking pan, then line with parchment paper, leaving 2-inch overhang on two opposite sides.
- In a medium saucepan over low heat (or double boiler), melt butter. Remove from heat and let cool to warm (110–120°F).
- In a large bowl, whisk warm butter, brown sugar, granulated sugar, and peanut butter until smooth and glossy (~2–3 min).
- Add eggs one at a time, whisking well after each. Whisk in vanilla until combined.
- In a separate bowl, whisk together flour, baking soda, and salt. Gradually fold into wet ingredients in three parts, mixing *just until no dry streaks remain*.
- Gently fold in optional add-ins (if using).
- Spread batter evenly into prepared pan. Tap pan firmly on counter 3–4 times.
- Bake 28–34 minutes, rotating pan halfway, until edges are golden and a toothpick 1 inch from edge has moist crumbs, and center is set.
- Cool completely in pan on wire rack—minimum 2 hours. For cleanest cuts, refrigerate 1–2 hours.
- Using parchment overhang, lift bars from pan. Slice into 16 or 24 bars with sharp, wiped knife.
FAQ
- Can I use natural peanut butter?
- Yes—but with modifications. Stir natural peanut butter thoroughly, then warm gently and mix in 1 tbsp neutral oil or 1 tsp cornstarch (added to dry ingredients) to prevent oil separation and dryness.
- Why did my bars turn out greasy?
- Most commonly due to: 1) Using natural peanut butter without stabilization, 2) Underbaking (center not fully set), 3) Overmixing after adding flour (releasing excess fat), or 4) Using too much peanut butter relative to dry ingredients.
- Can I make these ahead for an event?
- Absolutely. Bake 1–2 days ahead. Cool completely, wrap tightly in plastic, and store at room temperature. They taste even better on Day 2 as flavors meld. Frost or add toppings the morning of serving.
- My bars sank in the center—what went wrong?
- Sinking usually indicates underbaking (structure didn’t fully set), opening oven too early (causing rapid temperature drop), or expired baking soda (no lift). Always test with toothpick in *center*—not just near edges.
- How do I prevent hard, crunchy edges?
- Use light-colored metal pans (dark pans over-brown), avoid overbaking, and consider baking at 325°F for 35–40 minutes for gentler, more even heat. Lining with parchment also insulates edges.
- Can I freeze unbaked batter?
- No—egg-based batters don’t freeze well pre-bake. However, you *can* freeze fully baked, cooled bars for up to 3 months. Thaw unwrapped at room temperature for best texture.
- What’s the best way to add a glaze or frosting?
- Wait until bars are completely cool. Try a simple peanut butter glaze: whisk ½ cup powdered sugar, 2 tbsp creamy peanut butter, 1–2 tsp milk, and ¼ tsp vanilla until smooth. Drizzle over bars and let set 15 minutes before slicing.
- Can I substitute almond butter or sunflower seed butter?
- Yes—with caveats. Almond butter works 1:1 but yields slightly drier bars—add 1 extra tbsp oil or milk. Sunflower seed butter may impart greenish tint (natural reaction) but is safe and delicious; use same amount.
- Why do some recipes use baking powder instead of soda?
- Baking soda reacts with acids (like molasses in brown sugar) for lift and browning. Baking powder contains its own acid and yields lighter, cakier bars. Stick with soda for authentic dense-chewy blondie texture.
- How do I achieve that shiny, crackly top?
- Whisk the butter–sugar–peanut butter mixture vigorously for a full 3 minutes until thickened and glossy. This incorporates just enough air and dissolves sugars fully—creating the signature crust.
Summary
Peanut Butter Blondie Bars are decadently chewy, deeply nutty, and deceptively simple—built on the alchemy of brown sugar, melted butter, and creamy peanut butter, yielding golden-edged, tender-centered squares with nostalgic comfort in every bite.
Master them through precise measuring, patient cooling, and thoughtful customization—from chocolate swirls and salted caramel to vegan, gluten-free, or protein-boosted versions—proving that the humble blondie remains one of baking’s most versatile, joyful, and universally beloved treats.