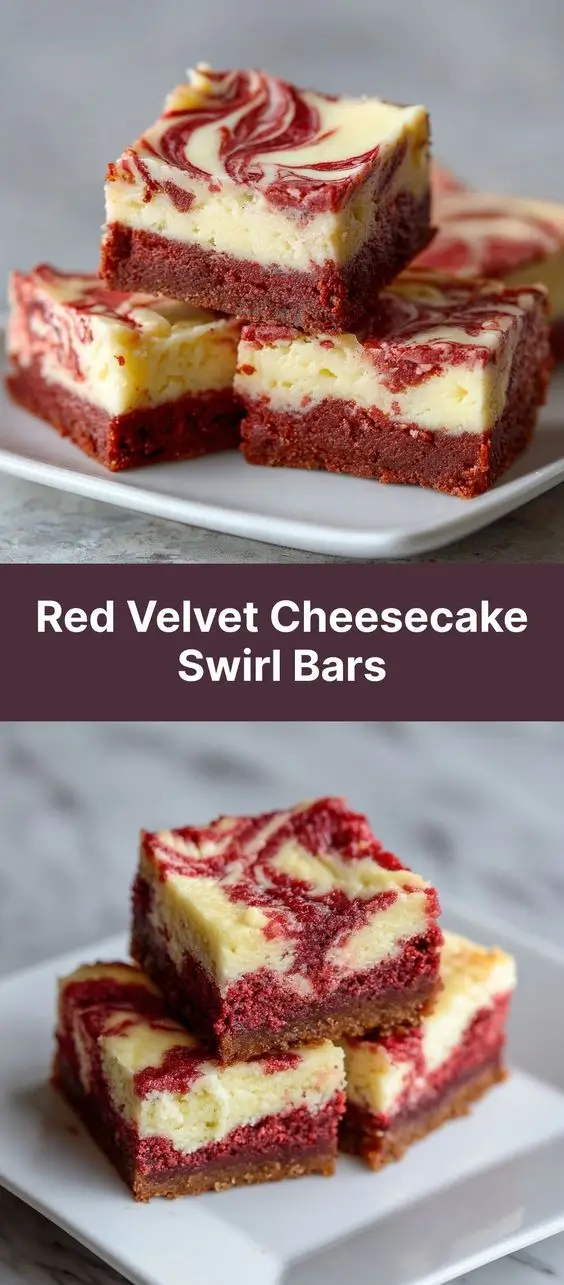
Red Velvet Cheesecake Swirl Bars
Indulge in the decadent fusion of rich red velvet cake and creamy cheesecake with these luscious Red Velvet Cheesecake Swirl Bars. A buttery shortbread crust forms the foundation for a velvety red velvet batter, which is then swirled with a luxurious cream cheese filling to create a marbled masterpiece that’s as stunning as it is delicious. Perfect for holidays, parties, or simply satisfying your sweet tooth, these bars deliver the best of both worlds: the moist, tender crumb of red velvet cake and the tangy richness of New York-style cheesecake—all in convenient bar form.
The History
The origins of Red Velvet Cheesecake Swirl Bars lie at the intersection of two beloved American desserts: red velvet cake and cheesecake. Red velvet cake first gained popularity in the early 20th century, particularly in the Southern United States. Its signature deep red color—originally a result of a chemical reaction between natural cocoa powder and acidic ingredients like buttermilk and vinegar—was later enhanced with food coloring. The cake became iconic after being served at the Waldorf-Astoria Hotel in New York, further popularized through marketing by baking companies like Adams Extract.
Meanwhile, cheesecake has ancient roots, dating back to Greece, but the modern American version evolved in the late 1800s with the invention of cream cheese by William Lawrence in New York. The fusion of red velvet and cheesecake emerged more recently, as bakers sought creative ways to combine flavors and textures. The swirl technique—inspired by marble cakes and cheesecake brownies—allowed home cooks to achieve a visually striking dessert that was both festive and indulgent. Red Velvet Cheesecake Swirl Bars are a modern twist on this tradition, offering portion-controlled servings ideal for gatherings, bake sales, and holiday treats.
Ingredients Breakdown
Understanding each ingredient helps ensure perfect results every time you make these bars. Here’s a detailed look at what goes into Red Velvet Cheesecake Swirl Bars and why it matters:
- All-Purpose Flour: Provides structure to the red velvet layer. It contains gluten-forming proteins that give the bars their soft yet sturdy texture.
- Cocoa Powder (Unsweetened Natural): Adds depth of chocolate flavor without overpowering sweetness. Natural cocoa also reacts with acidic ingredients to enhance the red hue.
- Baking Soda: Acts as a leavening agent, helping the red velvet layer rise slightly and creating a tender crumb.
- Salt: Balances sweetness and enhances overall flavor complexity.
- Butter (Unsalted, Room Temperature): Adds richness, moisture, and tenderness. Room temperature ensures even mixing and proper aeration when creamed with sugar.
- Granulated Sugar: Sweetens the red velvet layer and contributes to browning and texture.
- Large Eggs (Room Temperature): Bind ingredients together, add moisture, and provide structure. Room temperature eggs incorporate more smoothly into batters.
- Buttermilk: Adds acidity, which reacts with baking soda and cocoa powder to boost the red color. Also imparts a subtle tang and keeps the cake layer moist.
- Vanilla Extract: Enhances flavor and adds aromatic warmth.
- White Vinegar: Works with baking soda for lift and further activates the red hue in natural cocoa.
- Red Food Coloring (Liquid or Gel): Gives the signature vibrant red color. Gel coloring offers more intense pigment without thinning the batter.
- Cream Cheese (Full-Fat, Room Temperature): The star of the cheesecake swirl. Full-fat cream cheese delivers the richest, smoothest texture and best flavor.
- Powdered Sugar: Sweetens the cheesecake layer and helps stabilize its texture.
- Sour Cream (or Greek Yogurt): Adds tanginess and moisture to the cheesecake swirl, preventing it from becoming too dense.
- Vanilla Bean Paste (or Extra Vanilla Extract): Elevates the cheesecake flavor with deeper vanilla notes.
- Optional: White Chocolate Chips or Chopped White Chocolate: Can be folded into the red velvet batter for added richness and texture contrast.
Step-by-Step Recipe
Follow these detailed steps to create bakery-quality Red Velvet Cheesecake Swirl Bars at home:
- Preheat Oven & Prepare Pan: Preheat your oven to 350°F (175°C). Line a 9×13-inch baking pan with parchment paper, leaving an overhang on two opposite sides for easy removal. Lightly grease the paper and any exposed pan areas.
- Make the Crust (Optional but Recommended): In a small bowl, mix 1 cup all-purpose flour, ¼ cup granulated sugar, and ½ cup cold unsalted butter (cut into cubes). Use a pastry cutter or fork to blend until crumbly. Press evenly into the bottom of the prepared pan. Bake for 12–15 minutes until lightly golden. Let cool slightly while preparing the batters.
- Prepare Red Velvet Batter: In a medium bowl, whisk together 1¾ cups all-purpose flour, 2 tablespoons unsweetened cocoa powder, ½ teaspoon baking soda, and ¼ teaspoon salt. Set aside.
- Cream Butter and Sugar: In a large mixing bowl, beat ½ cup softened unsalted butter with 1 cup granulated sugar using an electric mixer on medium speed until light and fluffy (about 2–3 minutes).
- Add Eggs: Add 2 large room-temperature eggs one at a time, beating well after each addition. Scrape down the sides of the bowl as needed.
- Mix Wet Ingredients: In a measuring cup, combine ½ cup buttermilk, 1 teaspoon vanilla extract, 1 teaspoon white vinegar, and 1–2 teaspoons red food coloring (adjust for desired intensity). Stir into the butter mixture until just combined.
- Incorporate Dry Ingredients: Gradually add the flour-cocoa mixture to the wet ingredients, mixing on low speed until just incorporated. Do not overmix. Set aside.
- Make Cheesecake Swirl Batter: In another bowl, beat 16 oz (two 8-oz blocks) softened cream cheese until smooth and creamy. Add ½ cup powdered sugar, ¼ cup sour cream, and 1 teaspoon vanilla extract. Beat until smooth and lump-free, about 1–2 minutes.
- Assemble the Layers: Pour the red velvet batter over the cooled crust (or directly into the pan if skipping the crust). Smooth with a spatula. Drop spoonfuls of the cheesecake batter evenly over the surface.
- Create the Swirl: Use a knife or skewer to gently swirl the cheesecake batter into the red velvet layer. Create figure-eight patterns for a marbled effect—do not over-swirl or the layers will lose definition.
- Bake: Place in the preheated oven and bake for 30–38 minutes, or until the edges are set and the center jiggles slightly when nudged. Avoid overbaking to prevent cracking.
- Cool Completely: Transfer the pan to a wire rack and let cool completely at room temperature. Then refrigerate for at least 3 hours (preferably overnight) to allow the cheesecake layer to firm up and make clean slicing easier.
- Cut and Serve: Use the parchment overhang to lift the slab out of the pan. Cut into 12–16 bars using a sharp knife dipped in hot water and wiped clean between cuts for neat edges.
Tips
- Room Temperature Ingredients Are Crucial: Cold cream cheese or eggs can lead to lumpy batter. Allow all refrigerated ingredients to sit out for at least 1 hour before beginning.
- Don’t Overmix the Batter: Once flour is added, mix only until combined. Overmixing develops gluten, resulting in tough bars.
- Use Gel Food Coloring: For a brighter red without altering the consistency, gel food coloring is superior to liquid.
- Swirling Technique Matters: Fewer, gentle swirls yield better visual contrast. Over-swirling blends the batters too much, reducing the marbled effect.
- Chill Before Cutting: Refrigeration firms up the cheesecake layer and prevents crumbling during slicing.
- Line the Pan Properly: Parchment paper with overhang is essential for lifting the bars out cleanly. Alternatively, use aluminum foil sprayed with non-stick spray.
- Avoid Overbaking: The center should still have a slight jiggle when removed from the oven. Residual heat will continue cooking it as it cools.
- Wipe Knife Between Cuts: For picture-perfect slices, dip a sharp knife in hot water, wipe dry, and slice—repeat after each cut.
Variations and Customizations
These bars are highly adaptable to different tastes, dietary needs, and seasonal themes:
- Gluten-Free Version: Substitute all-purpose flour with a 1:1 gluten-free baking blend (like Bob’s Red Mill or King Arthur). Ensure other ingredients (e.g., cocoa powder) are certified gluten-free.
- Dairy-Free Option: Use plant-based butter (e.g., Earth Balance), dairy-free cream cheese (such as Kite Hill or Miyoko’s), and coconut milk yogurt in place of sour cream. Use almond or oat milk mixed with apple cider vinegar as a buttermilk substitute.
- Low-Sugar Variation: Replace granulated sugar with erythritol or monk fruit sweetener, and use powdered erythritol in the cheesecake layer. Note that texture may be slightly less tender.
- Mini Bars: Make these in a muffin tin lined with paper liners for individual servings. Bake for 18–22 minutes.
- Seasonal Twists: Add peppermint extract and crushed candy canes during the holidays. For spring, swirl in pastel-colored batter or top with fresh berries.
- Chocolate Lover’s Upgrade: Fold white chocolate chips into the red velvet batter or drizzle melted dark chocolate on top after chilling.
- Nutty Crunch: Sprinkle chopped pecans or walnuts on top before baking for added texture.
- Lemon Zest Swirl: Add 1 teaspoon lemon zest to the cheesecake batter for a bright, citrusy contrast to the rich chocolate.
- Cake Batter Swaps: Use a boxed red velvet mix for convenience. Follow package instructions, then swirl in homemade or store-bought cheesecake filling.
Health Considerations and Nutritional Value
While undeniably indulgent, understanding the nutritional profile of Red Velvet Cheesecake Swirl Bars can help with mindful enjoyment:
- Calories: One average bar (1/16 of recipe) contains approximately 280–350 calories, depending on size and ingredients used.
- Fat Content: High in fat due to butter, cream cheese, and egg yolks. Each bar has around 18–22g total fat, including 10–12g saturated fat. Using reduced-fat dairy can lower this but may affect texture and flavor.
- Sugar: Contains significant sugar (around 25–30g per bar) from both batters. Ideal for occasional treats rather than daily consumption.
- Protein: Moderate protein content (~4–5g per bar), primarily from eggs and dairy.
- Carbohydrates: Approximately 30–35g per serving, mostly from refined flour and sugars.
- Calcium and Vitamins: Provides some calcium from dairy ingredients, along with small amounts of vitamin A and B12.
- Portion Control: These bars are rich—smaller portions (e.g., 2×2 inch) can satisfy cravings without overindulgence.
- Dietary Modifications: As mentioned, gluten-free, dairy-free, and lower-sugar versions can accommodate allergies, sensitivities, or health goals like keto (with appropriate substitutions).
- Balanced Pairing: Serve with fresh strawberries, a side of Greek yogurt, or a green salad for a more balanced dessert experience.
- Occasional Treat: Best enjoyed as part of a varied diet. Their high-calorie density makes them suitable for special occasions, energy-dense needs (e.g., athletes), or winter comfort eating.
Ingredients
Makes 12–16 bars
- 1 cup all-purpose flour (for crust)
- ¼ cup granulated sugar (for crust)
- ½ cup (1 stick) cold unsalted butter, cubed (for crust)
- 1¾ cups all-purpose flour
- 2 tbsp unsweetened natural cocoa powder
- ½ tsp baking soda
- ¼ tsp salt
- ½ cup (1 stick) unsalted butter, softened
- 1 cup granulated sugar
- 2 large eggs, room temperature
- ½ cup buttermilk
- 1 tsp vanilla extract
- 1 tsp white vinegar
- 1–2 tsp red food coloring (gel preferred)
- 16 oz (2 x 8-oz blocks) full-fat cream cheese, softened
- ½ cup powdered sugar
- ¼ cup sour cream (or plain Greek yogurt)
- 1 tsp vanilla extract (or ½ tsp vanilla bean paste)
- Optional: ½ cup white chocolate chips
Directions
- Preheat oven to 350°F (175°C). Line a 9×13-inch baking pan with parchment paper, greasing lightly.
- To make the crust, combine 1 cup flour, ¼ cup sugar, and ½ cup cold butter. Cut in until crumbly. Press into the bottom of the pan. Bake for 12–15 minutes until golden. Cool slightly.
- In a bowl, whisk together 1¾ cups flour, cocoa powder, baking soda, and salt.
- In a large bowl, cream ½ cup softened butter and 1 cup sugar until fluffy. Add eggs one at a time, beating well.
- In a separate container, mix buttermilk, vanilla, vinegar, and food coloring. Add to butter mixture and blend.
- Gradually mix in the dry ingredients until just combined. Stir in white chocolate chips if using.
- In another bowl, beat cream cheese until smooth. Add powdered sugar, sour cream, and vanilla. Mix until creamy.
- Pour red velvet batter over the cooled crust. Drop spoonfuls of cheesecake mixture on top.
- Use a knife to gently swirl the batters together in a figure-eight motion.
- Bake for 30–38 minutes until edges are set and center jiggles slightly.
- Cool completely on a wire rack, then chill in the refrigerator for at least 3 hours.
- Lift out using parchment overhang. Cut into bars with a hot, clean knife.
- Serve chilled. Store leftovers covered in the fridge for up to 5 days, or freeze for up to 3 months.
FAQ
Can I make these bars ahead of time?
Yes! These bars actually taste better the next day after chilling. Prepare up to 2 days in advance and store covered in the refrigerator.
Why did my cheesecake layer crack?
Cracking usually results from overbaking or rapid cooling. Bake just until set with a slight jiggle, and avoid opening the oven door during baking.
Can I freeze Red Velvet Cheesecake Swirl Bars?
Absolutely. Wrap tightly in plastic wrap and place in an airtight container. Freeze for up to 3 months. Thaw overnight in the refrigerator before serving.
What can I use instead of buttermilk?
Mix ½ cup milk with ½ tablespoon vinegar or lemon juice. Let sit for 5–10 minutes until slightly curdled.
Can I use a boxed red velvet cake mix?
Yes. Prepare according to package directions for a 9×13 pan, then swirl in the cheesecake mixture as directed.
Why is my red velvet layer not very red?
Natural cocoa produces a rust-red hue. For brighter color, use more food coloring or switch to Dutch-process cocoa with added acid (though note: Dutch-process doesn’t react the same way chemically).
How do I store leftover bars?
Keep refrigerated in an airtight container for up to 5 days. Place parchment between layers to prevent sticking.
Can I make these without a crust?
Yes—the bars will still be delicious. Simply pour the red velvet batter directly into the prepared pan.
Summary
Red Velvet Cheesecake Swirl Bars combine a tender red velvet cake base with a creamy, tangy cheesecake swirl, all atop a buttery shortbread crust, baked to perfection and chilled for clean slicing. A show-stopping dessert that’s rich, festive, and perfect for celebrations year-round.